On Windows 10, you can print a document to PDF from any application, thanks to the built-in Print to PDF feature. You no longer have to use the old XPS Printer or install a third-party application.
在Windows 10上,借助内置的“打印为PDF”功能,您可以从任何应用程序将文档打印为PDF。 您不再需要使用旧的XPS打印机或安装第三方应用程序。
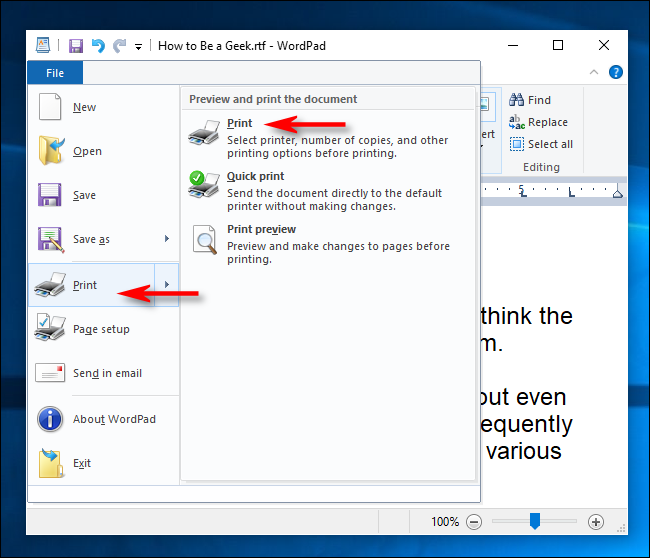
To get started, open the document you want to print to a PDF file. Find and open the Print dialog box in the application. Where this is located will vary by program, but you can usually go to File > Print, or just click a printer icon.
首先,将您要打印的文档打开为PDF文件。 在应用程序中查找并打开“打印”对话框。 该文件所在的位置会因程序而异,但是通常可以转到“文件”>“打印”,或者单击打印机图标。

When the “Print” window opens, click “Microsoft Print to PDF” in the “Select Printer” section. Then, click “Print” at the bottom of the window.
当“打印”窗口打开时,在“选择打印机”部分中单击“ Microsoft打印为PDF”。 然后,单击窗口底部的“打印”。

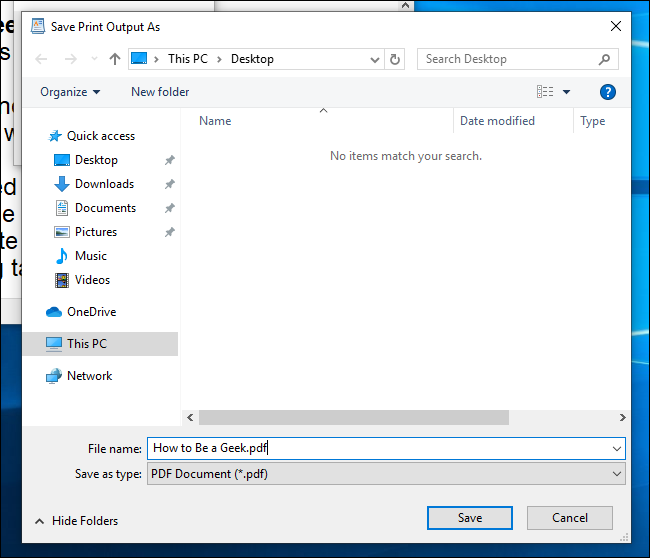
When the “Save Print Output As” window appears, type a filename, and then select the location in which you want to save the file (such as Documents or Desktop). When you’re done, click “Save.”
当出现“将打印输出另存为”窗口时,键入文件名,然后选择要保存文件的位置(例如“文档”或“桌面”)。 完成后,点击“保存”。

The printed document will be saved as a PDF file in the location you chose. If you double-click the file you just created, you should see it the way it would appear if you printed a hard copy.
打印的文档将保存为PDF文件,位于您选择的位置。 如果双击刚刚创建的文件,则应该以打印硬拷贝时出现的样子看到它。

From there, you can copy your file, back it up, or save it for later reference.
从那里,您可以复制,备份或保存文件以供以后参考。
翻译自: https://www.howtogeek.com/666835/how-to-print-to-pdf-on-windows-10/


 在Windows10中,您可以利用内置的“打印为PDF”功能轻松地将文档转换为PDF格式,无需安装额外软件。只需打开文档,选择‘打印’选项,然后选择‘Microsoft打印为PDF’作为打印机,最后保存文件即可。


 1778
1778

 被折叠的 条评论
为什么被折叠?


