


硬盘未分配空间变为可用空间

Windows 10 has a new, easy-to-use tool for freeing up disk space on your computer. It removes temporary files, system logs, previous Windows installations, and other files you probably don’t need.
Windows 10具有易于使用的新工具,可以释放计算机上的磁盘空间。 它会删除临时文件,系统日志,以前的Windows安装以及您可能不需要的其他文件。
This tool is new in the April 2018 Update. It works similarly to the old Disk Cleanup utility, but it’s part of the modern Settings app and is a bit faster to use.
该工具是2018年4月更新中的新增功能。 它的工作方式与旧的“ 磁盘清理”实用程序相似,但它是现代“设置”应用程序的一部分,使用起来速度更快。
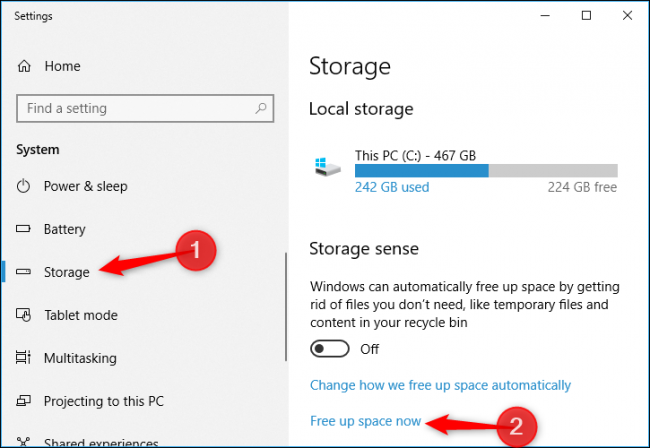
To find this new tool, head to Settings > System > Storage. Click the “Free Up Space Now” link under Storage Sense. If you don’t see that option here, the April 2018 Update hasn’t been installed on your PC yet.
要找到此新工具,请转到设置>系统>存储。 单击Storage Sense下的“立即释放空间”链接。 如果您在此处看不到该选项,则说明您的PC尚未安装2018年4月更新。
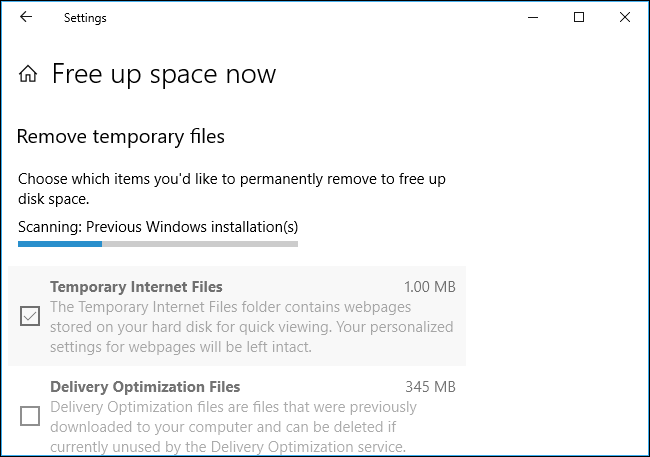
Windows automatically scans your PC for unnecessary data that it can removed to free up space. Unlike the old Disk Cleanup tool, this screen only shows data you can actually remove, and it scans both user files like your Recycle Bin and system data like old Windows installations at the same time.
Windows会自动扫描您的PC中是否有多余的数据,可以删除这些数据以释放空间。 与旧的磁盘清理工具不同,此屏幕仅显示您实际上可以删除的数据,并且它同时扫描用户文件(例如回收站)和系统数据(例如旧的Windows安装)。
Scroll through the list and check the different types of data you want to remove. Windows shows exactly how much space you’ll free up by removing each type of data. You can delete everything here as long as your computer is functioning properly. For example, “Windows upgrade log files” and “System created Windows Error Reporting Files” are both only helpful if your PC is experiencing problems. If everything is working fine, feel free to delete them.
滚动列表,然后检查要删除的不同类型的数据。 Windows会确切显示您将通过删除每种类型的数据释放多少空间。 只要您的计算机运行正常,您就可以删除此处的所有内容 。 例如,“ Windows升级日志文件”和“系统创建的Windows错误报告文件”都仅在PC出现问题时才有用。 如果一切正常,请随时删除它们。
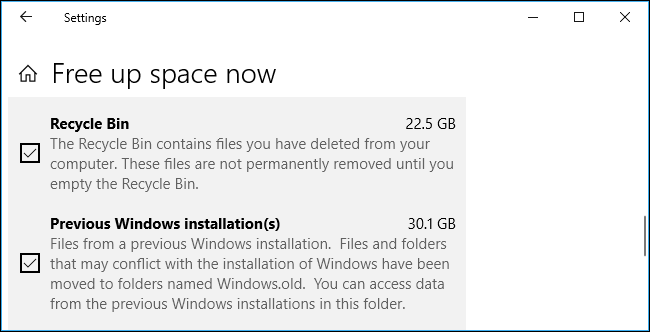
Be careful when checking the “Recycle Bin” option here. This will erase any deleted files in your Recycle Bin. Be sure you don’t want to recover any files from the Recycle Bin before checking this option.
在此处检查“回收站”选项时要小心。 这将清除回收站中所有已删除的文件。 在选中此选项之前,请确保您不想从回收站中恢复任何文件。
After a big update like the April 2018 Update itself, you’ll also see a “Previous Windows installation(s)” entry here. Feel free to remove these files if your computer is working properly. You won’t be able to downgrade to the previous Windows 10 update after removing these files, but Windows automatically removes these files after 10 days anyway. If your computer isn’t working properly, you’ll need these files to roll back to your previous build of Windows.
在进行了重大更新(如April 2018 Update本身)之后,您还将在此处看到“ 以前的Windows安装 ”条目。 如果您的计算机运行正常,请随时删除这些文件。 删除这些文件后,您将无法降级到以前的Windows 10更新,但是Windows仍会在10天后自动删除这些文件。 如果您的计算机无法正常运行,则需要这些文件才能回滚到以前的Windows版本 。
Windows shows how much total space will be freed up at the top of the screen. Click “Remove Files” to remove the data you’ve selected.
Windows在屏幕顶部显示将释放多少总空间。 点击“删除文件”以删除您选择的数据。
Depending on how much data there is to remove, Windows may take a few minutes to finish the process.
Windows可能需要几分钟才能完成删除过程,具体取决于要删除的数据量。

While you can enable the “Storage Sense” option at Settings > System > Storage to automatically remove some types of data, including old temporary files and files that have been in your Recycle Bin for a while, it won’t remove as many types of data as the “Free Up Space Now” tool. These are two different tools.
虽然您可以在“设置”>“系统”> “存储”中启用“存储感知”选项 ,以自动删除某些类型的数据,包括旧的临时文件和回收站中已有一段时间的文件,但不会删除那么多类型的数据。数据作为“立即释放空间”工具。 这是两个不同的工具。
Click the “Change how we free up space automatically” option under Settings > System > Storage to configure how the Storage Sense feature automatically frees up space.
单击设置>系统>存储下的“更改我们如何自动释放空间”选项,以配置Storage Sense功能如何自动释放空间。
翻译自: https://www.howtogeek.com/348635/use-windows-10s-new-free-up-space-tool-to-clean-up-your-hard-drive/
硬盘未分配空间变为可用空间


 2万+
2万+

 被折叠的 条评论
为什么被折叠?
被折叠的 条评论
为什么被折叠?
 到【灌水乐园】发言


