


开机自动启动特定程序
Windows–especially Windows 10–has a bad habit of installing new updates for hardware drivers whether you want them or not. You could go big and simply prevent Windows from downloading updates altogether, or you might have luck blocking or hiding updates. But if you’ve got the Pro or Enterprise version of Windows, you can tailor your actions a little better by using Group Policy Editor to prevent the installation or updating of specific devices.
Windows(尤其是Windows 10)有一个坏习惯,即无论是否要为硬件驱动程序安装新更新。 您可能会大手笔,只是阻止Windows完全下载更新 ,或者运气阻止或隐藏更新 。 但是,如果您拥有Windows的Pro或Enterprise版本,则可以使用组策略编辑器阻止特定设备的安装或更新,从而更好地调整操作。
And of course, we have a caveat for you right off the bat: setting a policy to disable updates for a device prevents both automatic and manual updates of drivers for that device. So, if you want to update the driver yourself, you’ll have to disable the policy you’re about to configure, update the device, and then set the policy up again. That said, with a little preparation to minimize the hassle, we think you’ll find it worth the effort.
当然,我们马上就为您提供了警告:设置策略以禁用设备更新会同时阻止该设备驱动程序的自动和手动更新。 因此,如果您想自己更新驱动程序,则必须禁用将要配置的策略,更新设备,然后再次设置策略。 话虽如此,但做些准备以最大程度地减少麻烦,我们认为您会发现值得付出努力的。
There are actually two steps to this process. First, we’re going to use Device Manager to find the hardware IDs for the device in question, and then we’re going to use Group Policy Editor to block installation or updating of the device that matches those IDs. Before you get started, though, you should make sure that the device has the driver version you want installed and that everything’s working properly.
实际上,此过程有两个步骤。 首先,我们将使用设备管理器查找相关设备的硬件ID,然后使用组策略编辑器阻止与这些ID匹配的设备的安装或更新。 但是,在开始之前,您应确保设备具有要安装的驱动程序版本,并且一切正常。
第一步:在设备管理器中找到设备的硬件ID (Step One: Find the Hardware IDs for the Device in Device Manager)
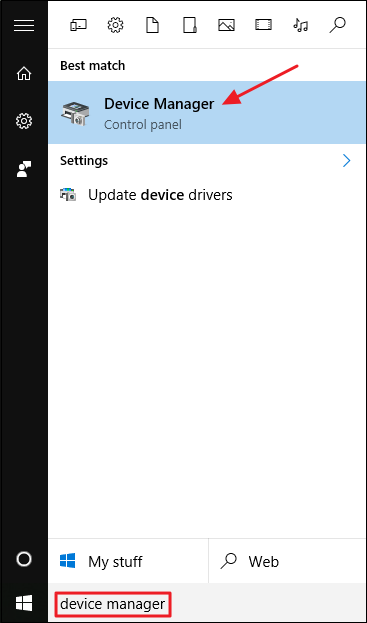
Your first step is finding the hardware IDs of the device for which you want to block updates. And for that, we’ll use Device Manager. Hit Start, type “device manager,” and then press Enter or click the “Device Manager” entry.
第一步是找到要阻止其更新的设备的硬件ID。 为此,我们将使用设备管理器。 单击开始,键入“设备管理器”,然后按Enter或单击“设备管理器”条目。
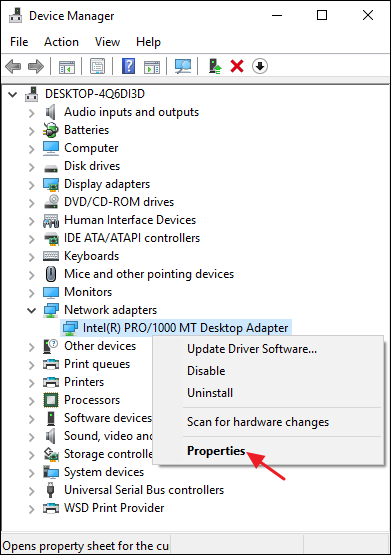
In Device Manager, find the device you want to block updates for. Right-click the device and choose “Properties” from the context menu.
在设备管理器中,找到要阻止更新的设备。 右键单击设备,然后从上下文菜单中选择“属性”。
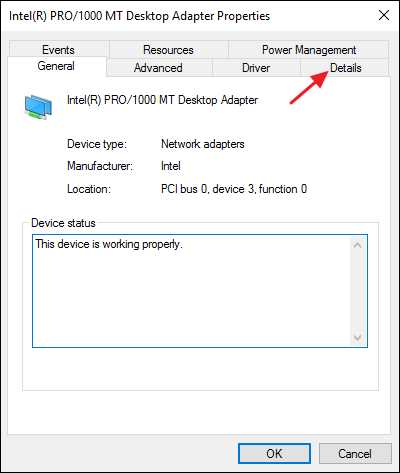
On the device’s properties window, click the “Details” tab.
在设备的属性窗口上,单击“详细信息”选项卡。
From the “Property” drop-down menu, choose “Hardware Ids” to display the IDs associated with the device.
从“属性”下拉菜单中,选择“硬件ID”以显示与设备关联的ID。
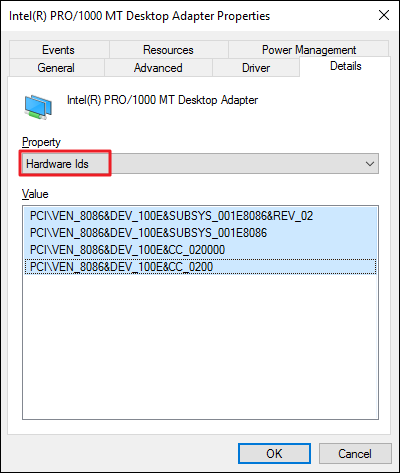
Now, all you have to to is grab those IDs so you can access them when you configure the policy in the next step. The easiest way is to copy them to a text file. Just click the top ID, shift-click the bottom ID to select them all, and hit Ctrl+C to copy the text. Fire up Notepad (or whatever you use to store text) and press Ctrl+V to paste the values. And if you’re collecting IDs for multiple devices, put them in different sections and label them so you can tell which IDs go with which device. Save the text file so you can call it up in the future.
现在,您所需要做的就是获取这些ID,以便在下一步配置策略时可以访问它们。 最简单的方法是将它们复制到文本文件。 只需单击顶部的ID,然后按住Shift并单击底部的ID以将其全部选中,然后按Ctrl + C即可复制文本。 启动记事本(或用于存储文本的任何内容),然后按Ctrl + V粘贴值。 并且,如果您要收集多个设备的ID,请将它们放在不同的部分并贴上标签,这样您就可以知道哪个ID与哪个设备一起使用。 保存文本文件,以便将来调用。
第二步:防止在组策略编辑器中安装和更新设备 (Step Two: Prevent Installation and Updating of the Device in Group Policy Editor)
Now that you have the right hardware IDs in hand, you’ll be using Group Policy Editor to make the changes. Note again that you’ll need to be using a Windows Pro or Enterprise edition. The Windows Home edition does not have Group Policy Editor.
现在您掌握了正确的硬件ID,您将使用组策略编辑器进行更改。 再次注意,您将需要使用Windows Pro或Enterprise版本。 Windows Home Edition没有组策略编辑器。
Be warned that Group Policy is a pretty powerful tool, so if you’ve never used it before, it’s worth taking some time to learn what it can do. Also, if you’re on a company network, do everyone a favor and check with your admin first. If your work computer is part of a domain, it’s also likely that it’s part of a domain group policy that will supersede the local group policy, anyway.
请注意,组策略是一个非常强大的工具,因此,如果您以前从未使用过它,那么值得花一些时间来学习它可以做什么 。 另外,如果您在公司网络中,请给所有人一个帮助,并首先与您的管理员联系。 如果您的工作计算机是域的一部分,则它也很可能是域组策略的一部分,无论如何,该组策略将取代本地组策略。
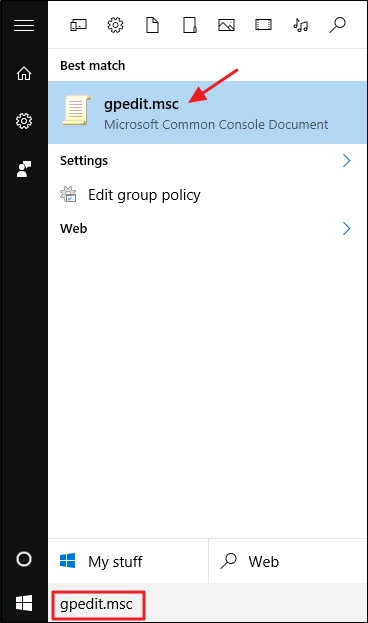
First, sign in with an administrative account and open the Group Policy Editor by hitting Start, typing “gpedit.msc”, and then pressing Enter.
首先,使用管理帐户登录并通过单击开始,键入“ gpedit.msc”,然后按Enter打开组策略编辑器。
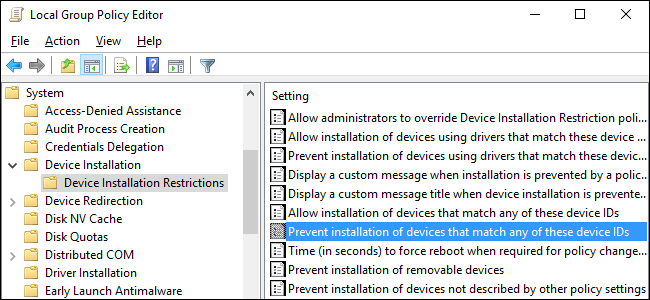
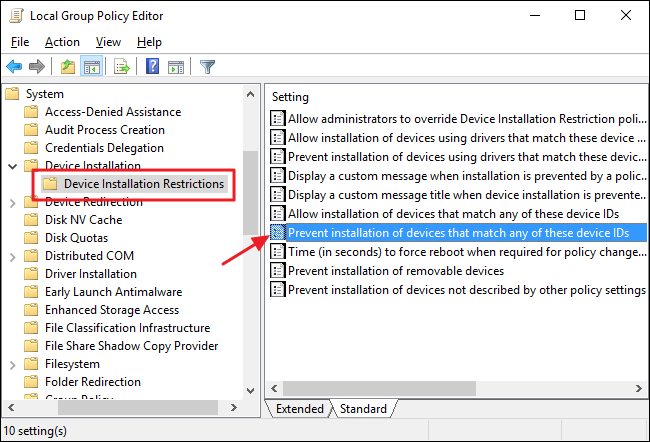
In the Group Policy window, in the left-hand pane, drill down to Computer Configuration > Administrative Templates > System > Device Installation > Device Installation Restrictions. On the right, find the “Prevent installation of devices that match any of these devices IDs” item and double-click it.
在“组策略”窗口的左侧窗格中,深入到“计算机配置”>“管理模板”>“系统”>“设备安装”>“设备安装限制”。 在右侧,找到“防止安装与这些设备ID匹配的设备”项,然后双击它。
In the policy window, select the “Enabled” option and then click the “Show” button.
在策略窗口中,选择“已启用”选项,然后单击“显示”按钮。

In the Show Contents window, you’ll add the hardware IDs for the device. You’ll need to add them one at a time, so just copy each ID from that text file you created earlier and paste it into the next available line in the “Value” column. When you’re done adding all the hardware IDs, click OK. Note that if you’re blocking updates for more than one device, you can just keep adding hardware IDs for all the devices to this window until you’re done.
在“显示目录”窗口中,您将添加设备的硬件ID。 您需要一次添加一个,因此只需复制您先前创建的文本文件中的每个ID,然后将其粘贴到“值”列中的下一个可用行中即可。 添加完所有硬件ID后,单击“确定”。 请注意,如果您阻止多个设备的更新,则可以继续向该窗口添加所有设备的硬件ID,直到完成操作为止。

Back on the policy page, click OK to apply the policy change and then you can exit the Group Policy Editor. The only way to really test the new settings is by trying to install an updated driver or waiting for Windows Update to try. You should get an error message when any new driver installation is attempted.
返回策略页面,单击“确定”以应用策略更改,然后您可以退出组策略编辑器。 真正测试新设置的唯一方法是尝试安装更新的驱动程序或等待Windows Update尝试。 尝试安装任何新的驱动程序时,您应该收到一条错误消息。
Also, since the device is still registered, Windows Update may download new driver updates for the device. It just won’t be able to install them, instead reporting an installation error in the Windows Update window. This won’t get in the way of other updates being successfully installed and you can always hide that particular update if you’d rather not see it in Windows Update at all.
另外,由于设备仍处于注册状态,因此Windows Update可能会下载该设备的新驱动程序更新。 它只是无法安装它们,而是在Windows Update窗口中报告安装错误。 这不会妨碍成功安装其他更新,并且如果您根本不想在Windows Update中看到该特定更新,则可以始终隐藏该特定更新 。
If you change your mind and want to allow updates to that device again, you can go back into Group Policy Editor and disable the policy. You’ll have to do this even if you just want to allow a one-time manual update of the drivers.
如果您改变主意并希望再次允许对该设备进行更新,则可以返回组策略编辑器并禁用该策略。 即使您只想允许一次手动更新驱动程序,也必须这样做。
There is a big caveat here, though. If you disable the policy (or set it to “Not Configured”), all the hardware IDs you added to the policy will be deleted. If you want to re-enable the policy again, you’ll have to re-enter all the hardware IDs. This is especially important to note if you’ve got hardware IDs for multiple devices entered. If you want to re-enable updates for just one device, it’s better to leave the policy on and remove those specific hardware IDs. That’s why it’s important to save that text file.
不过,这里有一个很大的警告。 如果禁用该策略(或将其设置为“未配置”),则添加到该策略的所有硬件ID将被删除。 如果要再次重新启用该策略,则必须重新输入所有硬件ID。 如果要输入多个设备的硬件ID,这一点尤其重要。 如果您只想为一台设备重新启用更新,则最好保留该策略并删除这些特定的硬件ID。 这就是为什么保存该文本文件很重要的原因。
And that’s it. It’s not a perfect solution, but using Group Policy to disable updating specific devices at least gives you a little more control than having to disable updates altogether.
就是这样。 这不是一个完美的解决方案,但是使用组策略禁用更新特定设备至少比完全禁用更新给您更多的控制权。
开机自动启动特定程序


 1万+
1万+

 被折叠的 条评论
为什么被折叠?
被折叠的 条评论
为什么被折叠?
 到【灌水乐园】发言


