


Getting pictures from your Android phone to your PC can be a daunting task if you don’t know where to start. Fortunately, it’s pretty straightforward once you know where to look.
如果您不知道从哪里开始,将图片从Android手机获取到PC可能是一项艰巨的任务。 幸运的是,一旦您知道要看哪里,就非常简单。
They say the best camera is the one you have with you, and more often than not that camera is the one built into your smartphone. If you end up shooting a lot of pictures or videos with your phone, you’ll undoubtedly want to get those pictures onto your PC at some point.
他们说,最好的相机是随身携带的相机,而且多数情况下,相机是智能手机内置的相机。 如果最终用手机拍摄了许多图片或视频,那么毫无疑问,您希望将这些图片上传到PC上。
There’s no shortage of ways to automatically back up your images to the cloud (and then move them from the cloud to your PC), but that’s not what we’re talking about here. Instead, we’re going to look at how to get pictures from your phone to your computer via a simple, old school USB transfer.
没有很多方法可以自动将图像备份到云(然后将它们从云移动到PC),但这不是我们在这里谈论的。 取而代之的是,我们将研究如何通过简单的老式USB传输将手机中的图片传输到计算机。
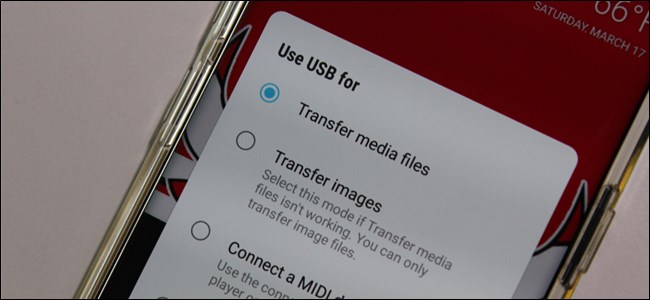
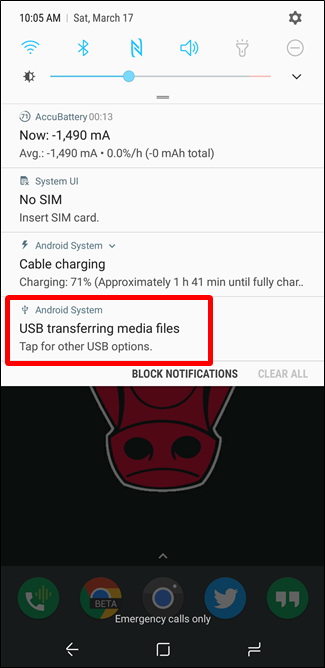
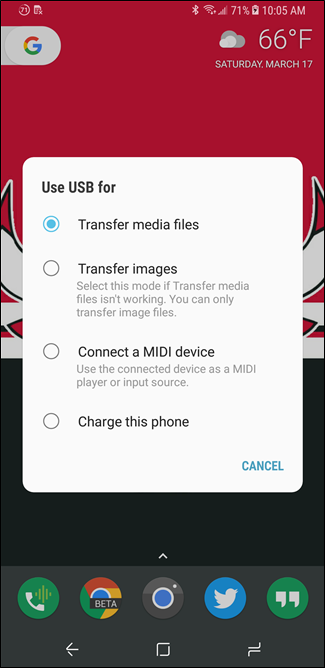
Regardless of which method you choose below, you’ll need to make sure your phone is ready to transfer pictures. Go ahead and connect your phone to your computer with a USB cable. Then, pull down the notification shade and make sure the option to transfer images is selected. The option may actually be named “Transfer images,” but it could also be named “MTP,” “PTP,” or even just “File transfer.” They all basically do the same thing.
无论您在下面选择哪种方法,都需要确保手机已准备好传输图片。 继续,然后使用USB电缆将手机连接到计算机。 然后,拉下通知栏,并确保选择了传输图像的选项。 该选项实际上可以命名为“传输图像”,但也可以命名为“ MTP”,“ PTP”,甚至仅仅是“文件传输”。 他们基本上都做同样的事情。
方法1:使用Microsoft照片 (Method One: Use Microsoft Photos)
If you’re into letting software do the majority of the work for you, Microsoft Photos is probably the easiest way to go about getting pictures from your phone to your computer. Photos is probably already installed on your PC and is super easy to use. And if it’s not on your PC, you can get it for free from the Microsoft Store (the one on your computer, not to be confused with the other Microsoft Store).
如果您想让软件为您完成大部分工作,则Microsoft Photos可能是从手机到计算机获取图片的最简单方法。 照片可能已经安装在您的PC上,并且非常易于使用。 而且,如果它不在您的PC上,则可以从Microsoft Store免费获得它(一个在计算机上,不要与另一个 Microsoft Store混淆)。
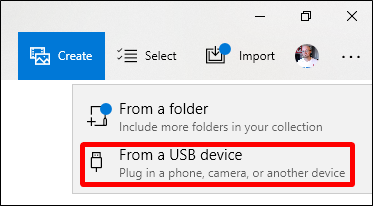
With your phone plugged into your computer and in the correct mode (as highlighted above), click the “Import” button in the upper right corner of Photos.
将手机插入计算机并以正确的模式(如上突出显示),单击“照片”右上角的“导入”按钮。

On the menu that pops up, select the “From a USB device” option.
在弹出的菜单上,选择“来自USB设备”选项。
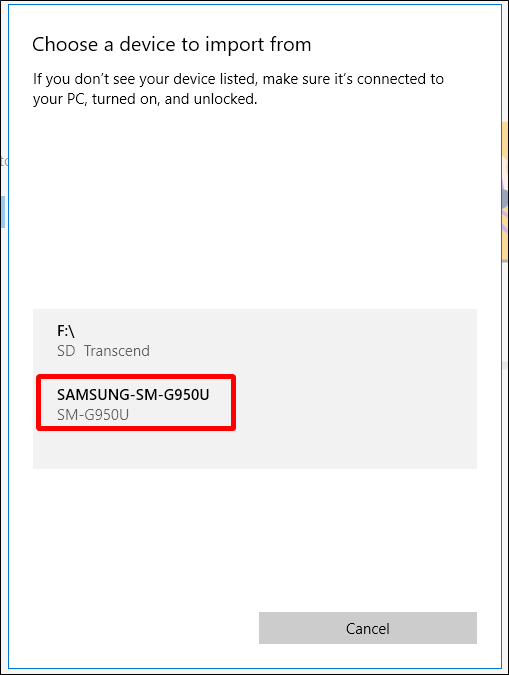
Photos should scan for USB devices, and then load a list. Select your phone.
照片应扫描USB设备,然后加载列表。 选择您的手机。
After you select a device, Photos immediately starts looking for images stored on the phone. This could take a bit of time, so just let it do its thing.
选择设备后,“照片”将立即开始查找手机中存储的图像。 这可能需要一些时间,所以就让它来做吧。
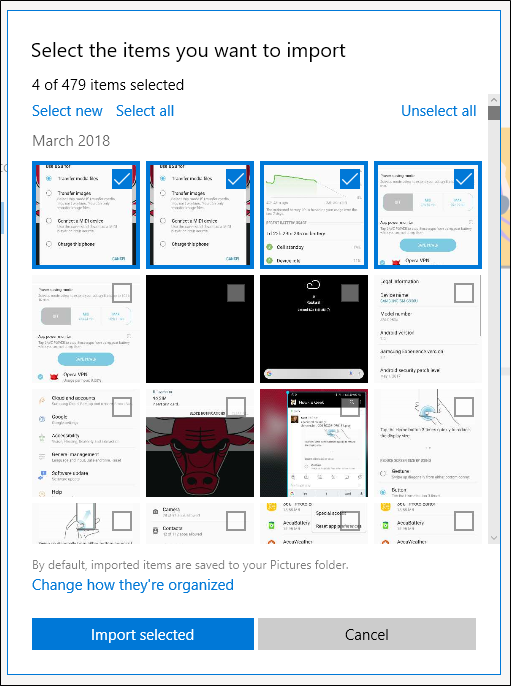
When the photos list loads up, go through and click on all the photos you’d like to import. If you know you want them all, just use the “Select All” link at the top. You can also hit the “Select New” link to select only images that are new since your last import session (i.e., those that Photos has not transferred before). Obviously, if you’ve never used this feature before, all your photos will be new and those two options will do the same thing.
照片列表加载完毕后,浏览并单击所有要导入的照片。 如果您知道自己想要全部,只需使用顶部的“全选”链接。 您也可以点击“选择新”链接,以仅选择自上次导入会话以来的新图像(即,照片之前从未传输过的图像)。 显然,如果您以前从未使用过此功能,则所有照片都是新照片,并且这两个选项将执行相同的操作。
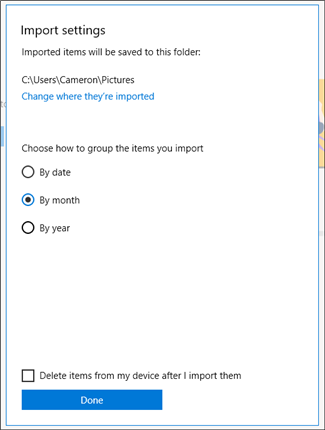
By default, Photos creates a new folder named according to the year and month when the pictures were taken, and places that new folder in the Pictures folder on your PC. So, if this is the first time you’ve used Photos to import pictures, be ready for it to create several new folders. It’s not an ideal organization, but it beats having everything dumped into a single folder.
默认情况下,“照片”会根据拍摄照片的年份和月份创建一个新文件夹,并将该新文件夹放置在PC的“图片”文件夹中。 因此,如果这是您首次使用“照片”导入图片,请准备好创建几个新文件夹。 这不是一个理想的组织,但是它比将所有内容都转储到单个文件夹中要好得多。
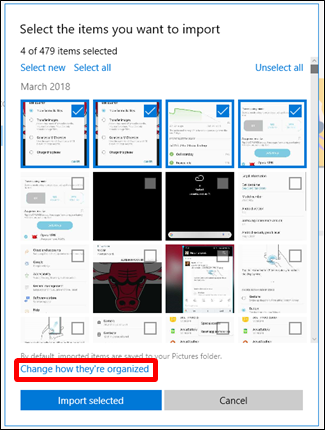
You can, however, change this organization. Just click the “Change how they’re organized” link at the bottom. From here, you can choose a new folder if you’d like, as well as a different sorting option. For more granular organization, you can choose date (which will end up creating a lot of different folders), or you organize them by year to minimize the number of new folders.
但是,您可以更改此组织。 只需单击底部的“更改其组织方式”链接。 在这里,您可以根据需要选择一个新文件夹以及其他排序选项。 对于更精细的组织,您可以选择日期(最终将创建许多不同的文件夹),或者按年份组织它们以最大程度地减少新文件夹的数量。
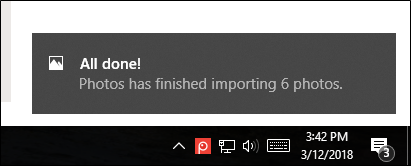
With your images and organization options selected, tap the “Import Selected” button at the bottom. Poof—like magic, the photos are imported to your computer.
选择图像和组织选项后,点击底部的“导入所选”按钮。 of-照片就像魔术一样,被导入到您的计算机中。
Couldn’t be easier.
再简单不过了。
方法二:在资源管理器中手动复制/粘贴图像 (Method Two: Manually Copy/Paste Images in Explorer)
If you prefer to have as much control as possible over how your photos are organized, you’ll want to import everything manually.
如果您希望对照片的组织方式拥有尽可能多的控制权,则需要手动导入所有内容。
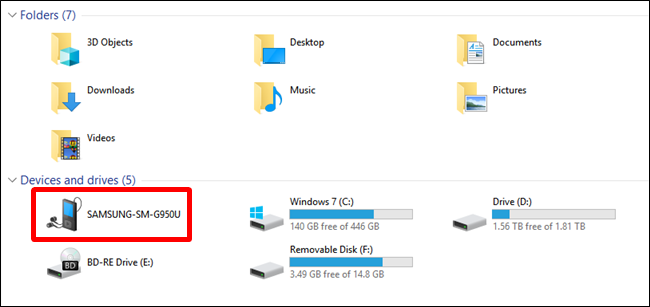
To do this, once again make sure your phone is in the correct mode and ready to transfer images. From there, open Windows Explorer and head to “This PC.”
为此,请再次确保手机处于正确的模式并准备传输图像。 从那里打开Windows资源管理器,然后转到“此PC”。
Your phone should be listed as a device. Depending on how the USB transfer option is set, the icon may look like a camera, a portable media player, or maybe even another drive. The icon isn’t that important, though—just pay attention to the name.
您的手机应列为设备。 根据USB传输选项的设置方式,图标可能看起来像照相机,便携式媒体播放器,甚至可能是另一个驱动器。 不过,图标并不是那么重要,只要注意名称即可。
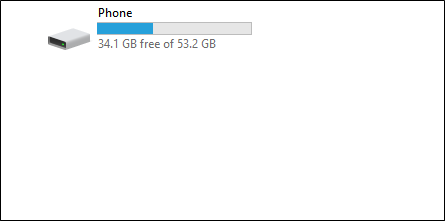
Once you open the device, you’ll see a drive named “Phone.” Open that.
打开设备后,您将看到一个名为“ Phone”的驱动器。 打开那个
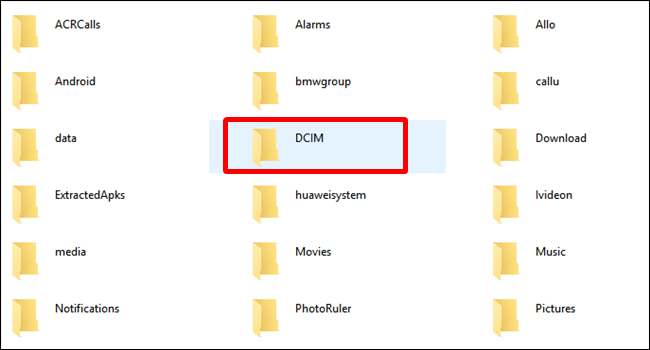
To find the images, look for the DCIM folder.
要查找图像,请查找DCIM文件夹。
In the DCIM folder, open the “Camera” folder.
在DCIM文件夹中,打开“ Camera”文件夹。

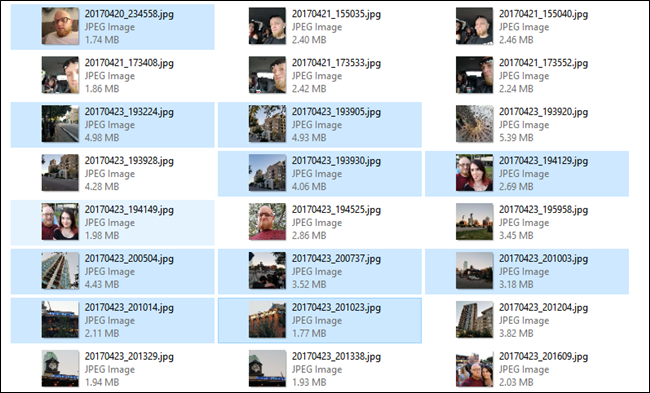
Select all the images you’d like to transfer. Just as in other Windows folders, you can select a range of photos by clicking the first photo you want, and then Shift+clicking the last photo in the range. Or, you can select multiple photos one at a time by Ctrl+clicking them.
选择您要传输的所有图像。 与在其他Windows文件夹中一样,您可以通过单击所需的第一张照片,然后按住Shift键并单击该范围中的最后一张照片来选择照片范围。 或者,您可以通过按住Ctrl键并单击的方式一次选择多张照片。
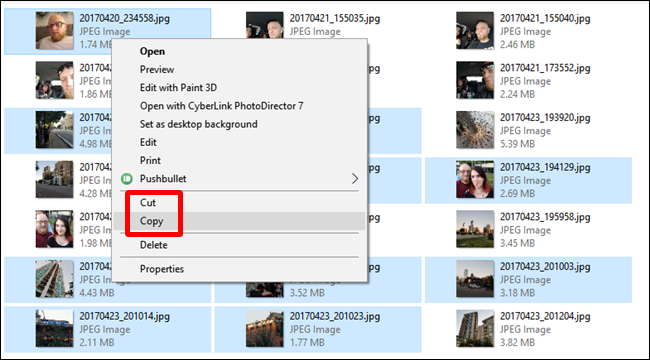
After selecting your photos, right click on one of the selected images, and then select the “Copy” command (you can also just hit Ctrl+C). If you’d like to move photos instead of copying them (which removes them from the phone), use the “Cut” command instead.
选择照片后,右键单击所选图像之一,然后选择“复制”命令(也可以按Ctrl + C)。 如果您想移动照片而不是复制照片(将照片从手机中删除),请改用“剪切”命令。
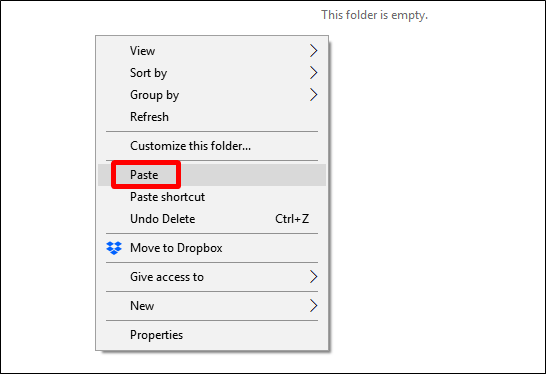
Navigate to the folder where you’d like the pictures to go, right click any empty space in the folder, and then choose the “Paste” command (or hit Ctrl+V).
导航到您要放置图片的文件夹,右键单击该文件夹中的任何空白区域,然后选择“粘贴”命令(或按Ctrl + V)。
After a few seconds (or minutes, depending on how many images you’re transferring) all the pictures should be in their new home. And of course, if you prefer dragging and dropping rather than copying and pasting, you could can also open a couple of File Explorer windows and just drag the photos the way you would any other files.
几秒钟(或几分钟,取决于要传送的图像数量)后,所有图片都应放在新的家中。 当然,如果您更喜欢拖放而不是复制和粘贴,则还可以打开几个“文件资源管理器”窗口,以与其他任何文件一样的方式拖动照片。
翻译自: https://www.howtogeek.com/346317/how-to-transfer-photos-from-android-to-your-windows-pc/


 被折叠的 条评论
为什么被折叠?
被折叠的 条评论
为什么被折叠?
 到【灌水乐园】发言


