


动画 gif
If you’ve ever wondered how to record your computer screen and then turn it into an animated GIF, then wonder no more. Here’s everything you need to know about creating GIF screencasts on Windows and Mac.
如果您曾经想过如何记录计算机屏幕,然后将其转换为GIF动画,那就别无所求了。 这是您需要在Windows和Mac上创建GIF屏幕录像的所有信息。
GIFs go back about as long as the Internet has been popular. The format itself isn’t necessarily the best for sharing moving images, with more efficient formats on the horizon like GIFV, but the renaissance of animated images has led to dozens of GIF sites and a whole crop of specialized apps that let you create and share all sorts of animated GIFs.
GIF可以追溯到互联网流行的时候。 格式本身并不一定是共享运动图像的最佳方式, GIFV等更有效的格式已经出现 ,但是动画图像的复兴已导致数十个GIF网站和大量专用应用程序可供您创建和共享各种动画GIF。
One of the more practical uses of animated GIFs is making screen recordings, which can then be inserted into instructional articles and so forth, to better illustrate a point or process. Truly, a [animated] picture is worth a thousand words.
动画GIF的更实际用途之一是制作屏幕录像,然后可以将其插入教学文章等中,以更好地说明要点或过程。 诚然,一个[动画]图片胜过千言万语。
如何在Windows上创建屏幕的GIF (How to Create a GIF of Your Screen on Windows)
For Windows, you’ll find a bevy of free screen-to-GIF programs out there. After testing quite a few, we think the easiest one to use is GIF Screen Recorder. GIF Screen Recorder lets you record all or part of your screen and then edit the output afterward, so you can make the perfect GIF.
对于Windows,您可以在其中找到许多免费的屏幕到GIF程序。 经过大量测试之后,我们认为最容易使用的是GIF屏幕录像机 。 GIF屏幕录像机可让您录制全部或部分屏幕,然后再编辑输出,因此您可以制作出完美的GIF。
GIF Screen Recorder will work on Windows XP through Windows 10, but requires .NET Framework 4.0, which GIF Screen Recorder will automatically install if it is missing.
GIF Screen Recorder可以在Windows XP到Windows 10上运行,但是需要.NET Framework 4.0 ,如果缺少GIF Screen Recorder,它将自动安装。
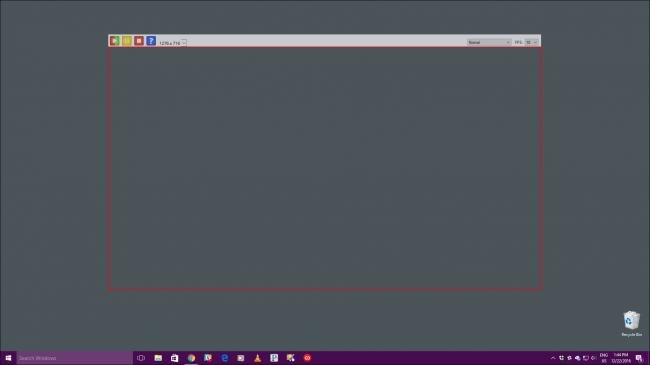
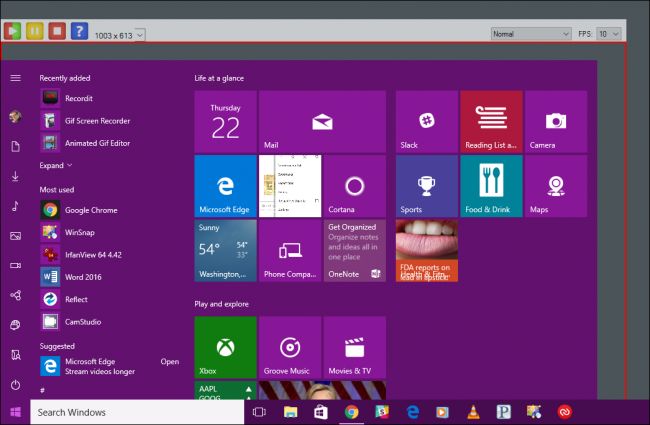
Once you have GIF Screen Recorder installed, go ahead and start it up. The application is very simple to use. The red outline denotes the area you will be recording.
一旦安装了GIF屏幕录像机,请继续并启动它。 该应用程序非常易于使用。 红色轮廓线表示您将要录制的区域。
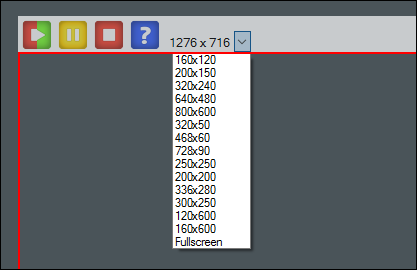
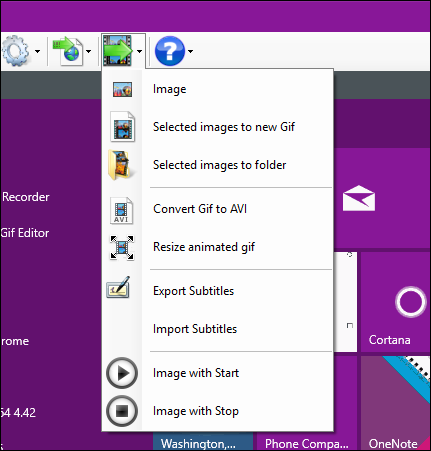
In the upper-left corner, there are controls, which let you Start/Restart, Pause, and Stop your recording. There’s also a Help button, and a dropdown menu from which you can select one of over a dozen preset sizes, including full screen.
在左上角,有一些控件,可让您开始/重新启动,暂停和停止录制。 还有一个“帮助”按钮和一个下拉菜单,您可以从中选择十几种预设尺寸之一,包括全屏。
If none of the preset sizes work for you, you can grab the red borders and drag them to resize the area manually.
如果没有适合您的预设大小,则可以抓住红色边框并将其拖动以手动调整区域大小。
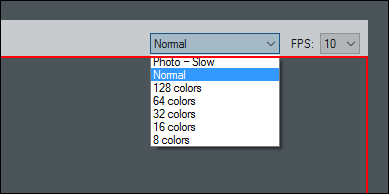
In the upper-right corner, you can change the color depth and framerate of your GIFs. Both these options will affect the appearance and file size of the finished product.
在右上角,您可以更改GIF的颜色深度和帧速率。 这两个选项都会影响成品的外观和文件大小。
Lowering the color depth will make the GIF appear more washed out, and lowering the framerate will cause them to play less smoothly. However, lowering these settings can also save a lot in terms of file size, which is useful given how large GIFs can get. You might need to play around until you get just the right combination.
降低色彩深度将使GIF看起来更褪色,而降低帧速率将使它们播放不流畅。 但是,降低这些设置也可以在文件大小方面节省很多,鉴于可以得到大的GIF,这很有用。 您可能需要尝试一下,直到获得正确的组合。
For this demonstration, we’re going to do a simple recording of opening and closing the Start menu on Windows, so we’ll resize the GIF Recorder window so it frames just the Start menu.
对于此演示,我们将对在Windows上打开和关闭“开始”菜单进行简单记录,因此我们将调整“ GIF记录器”窗口的大小,使其仅构成“开始”菜单。
When you have your area framed just right, click GIF Recorder’s Start button and record the action. When you’re finished, click the Stop button. If you need to pause the recording click the Pause button, and if you think you messed up and want a do-over, click the Start button again (it doubles as the Restart button).
当您的区域恰好位于右侧时,单击GIF记录器的“开始”按钮并记录操作。 完成后,单击“停止”按钮。 如果需要暂停录制,请单击“暂停”按钮,如果您认为自己搞砸了并想要重做,请再次单击“开始”按钮(它兼作“重新开始”按钮)。
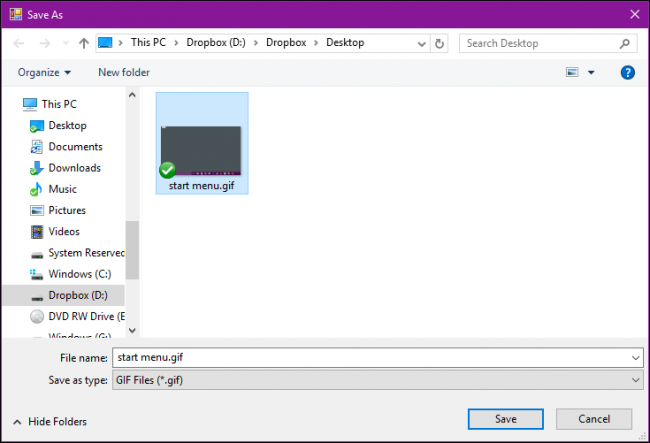
When you click the Stop button, you will be asked to save your new creation. Make sure you choose a destination that is easily accessible, give it a name, and then “Save” it.
当您单击停止按钮时,将要求您保存新创建的内容。 确保选择一个易于访问的目的地,为其命名,然后“保存”。
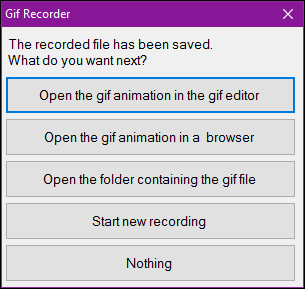
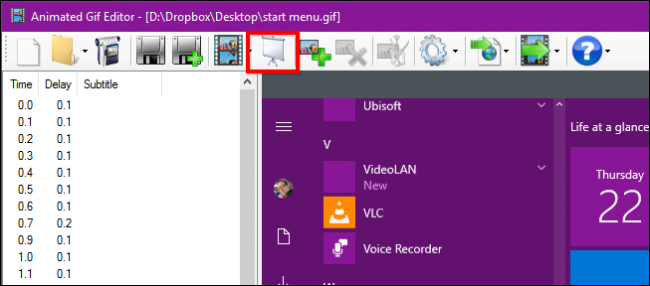
At this point, you’re essentially done. You could go ahead and share you new GIF if you want, but our GIF has some unnecessary frames at the beginning and end that we want to trim off to give us a tighter animation, so at the next dialog, we’ll click “Open the gif animation in the gif editor”.
至此,您基本上完成了。 您可以根据需要继续分享新的GIF,但是我们的GIF的开头和结尾都有一些不必要的帧,我们希望对其进行剪裁以使其更加紧凑,因此在下一个对话框中,我们将点击“打开gif编辑器中的gif动画”。
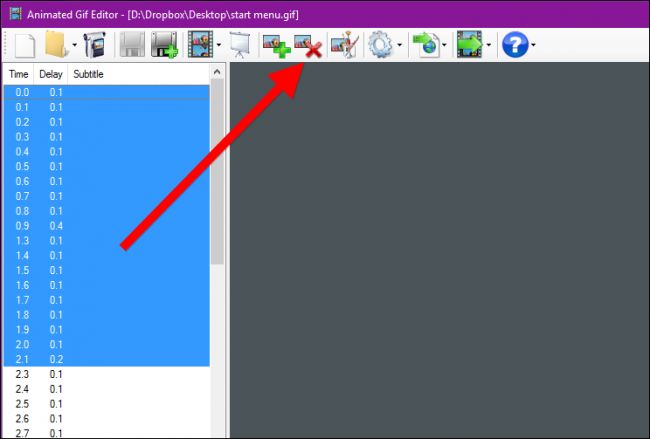
The GIF Editor application will let you trim off excess frames be they at the beginning, middle or end. To do this, first find the frame where you want your GIF to begin. Here, we want our GIF to start when the mouse pointer is on the Start button. So we’ll select the frame just before that, hold the “Shift” button, then select the very first frame in the sequence, so we select the frames from 0.0 seconds to 2.1 seconds.
GIF编辑器应用程序可让您修剪多余的帧,无论它们是在开头,中间还是结尾。 为此,首先找到您希望GIF开始的帧。 在这里,我们希望GIF在鼠标指针位于“开始”按钮上时开始。 因此,我们将选择之前的帧,按住“ Shift”按钮,然后选择序列中的第一帧,以便从0.0秒到2.1秒之间选择帧。
Next, click the “Delete Image” button in the toolbar or use the “Delete” button on the keyboard.
接下来,单击工具栏中的“删除图像”按钮,或使用键盘上的“删除”按钮。
Do the same for the end of your GIF, if necessary, and then click the “Show Animation” button in the toolbar to preview the result.
如有必要,请对GIF末尾执行相同的操作,然后单击工具栏中的“显示动画”按钮以预览结果。
Make sure you’re satisfied with your trim job, otherwise you will need to reopen the GIF and trim it again (there’s no undo button).
确保对修剪工作感到满意,否则,您将需要重新打开GIF并再次修剪(没有撤消按钮)。

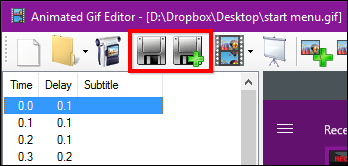
If you’re happy with the result, you can Save the edited GIF by overwriting the old one (left), or create a new one with the Save As button (right).
如果您对结果感到满意,则可以通过覆盖旧的GIF(左)来保存编辑的GIF,或者使用“另存为”按钮(右)来创建新的GIF。
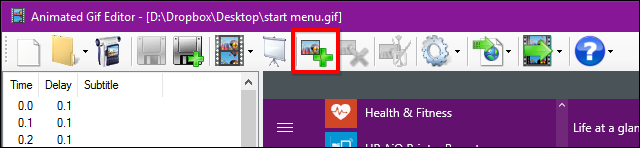
While you’re at it, there are some other options available to you with the GIF editor. For one, you can add supplemental images to your animation.
使用它时,GIF编辑器还为您提供了其他一些选项。 首先,您可以在动画中添加补充图像。
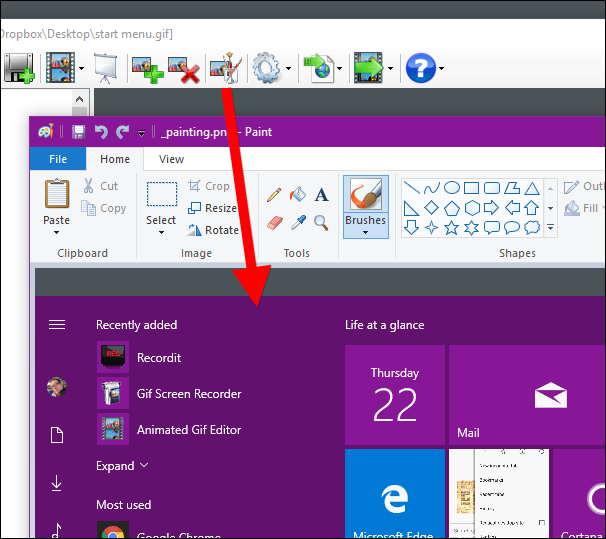
Also, clicking the “Edit Image” button will open it in Microsoft Paint, where you can make adjustments like adding visual aids or text.
另外,单击“编辑图像”按钮将在Microsoft Paint中将其打开,您可以在其中进行调整,例如添加视觉辅助工具或文本。
Finally, the Export button will give you various options, such as resizing it (if the file is just too large) and converting it to an AVI file.
最后,“导出”按钮将为您提供各种选项,例如调整大小(如果文件太大)并将其转换为AVI文件。
Here is our finished product, a simple recording of opening and closing the Start menu.
这是我们的成品,它是打开和关闭“开始”菜单的简单记录。

Once you’ve got the process of recording your screen mastered, you can take some time to browse the GIF editor further.
掌握了录制屏幕的过程之后,您就可以花一些时间进一步浏览GIF编辑器。
GIF Screen Recorder will let you create a fairly nice finished product without much further adjustments, but you can also really dress things up nicely if you need something even more polished.
GIF Screen Recorder可以让您创建一个相当不错的成品,而无需进行进一步的调整,但是如果您需要更精致的东西,也可以很好地打扮自己。
如何在macOS上创建屏幕的GIF (How to Create a GIF of Your Screen on macOS)
To create GIFs on a Mac, we are going to use GIPHY Capture, which can be downloaded from the App Store.
要在Mac上创建GIF,我们将使用GIPHY Capture ,可以从App Store下载 。
GIPHY Capture lets you record, edit, and save your screen captures to animated GIFs, which you can then share as you wish.
GIPHY Capture可让您记录,编辑屏幕截图并将其保存到动画GIF中,然后您可以根据需要进行共享。
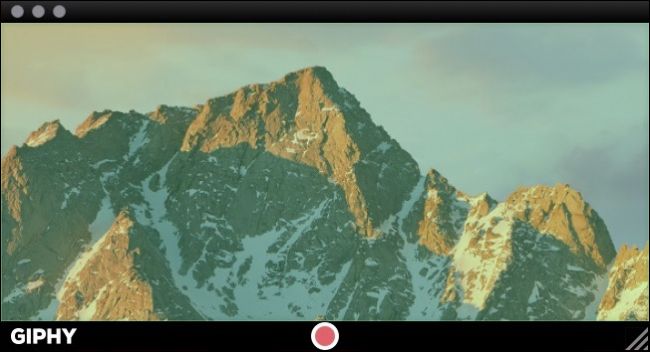
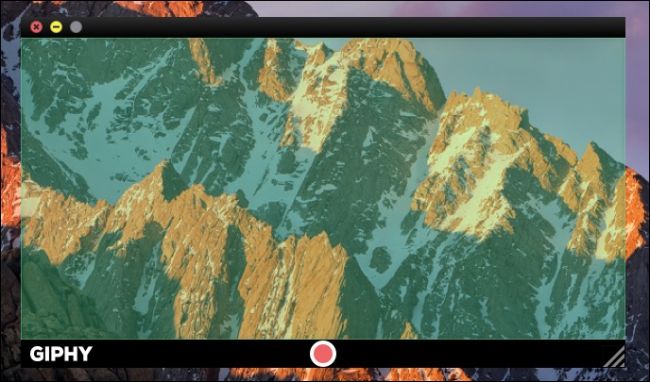
GIPHY Capture is extremely simple to use, consisting of really nothing more than a window with a red record button.
GIPHY Capture的使用非常简单,实际上只不过是带有红色记录按钮的窗口而已。
You can resize this window to nearly the full size of the screen, though you will need to move the recorder window off-screen a bit if you want to capture stuff like the Dock and menu bar as the following screenshot demonstrates (the record control is actually below the Dock).
您可以将该窗口的大小调整为几乎整个屏幕的大小,但是如果要捕获Dock和菜单栏之类的内容,则需要将记录器窗口移出屏幕一点,如以下屏幕快照所示(记录控件为实际上在Dock下方)。
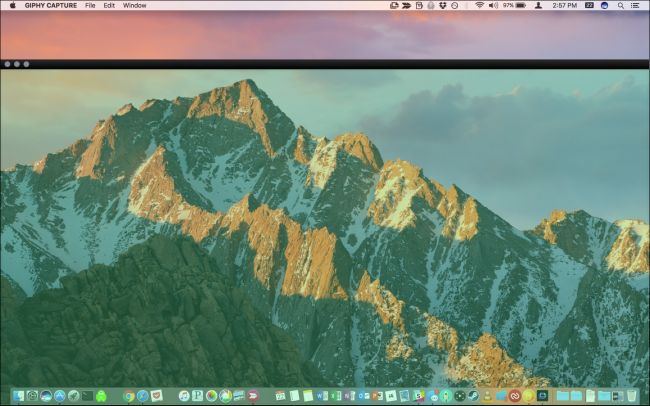
In this demonstration, we want to record the mouse pointer as it moves across the Dock, but the record button is hidden.
在此演示中,我们要记录鼠标指针在Dock上移动时的记录,但是记录按钮是隐藏的。
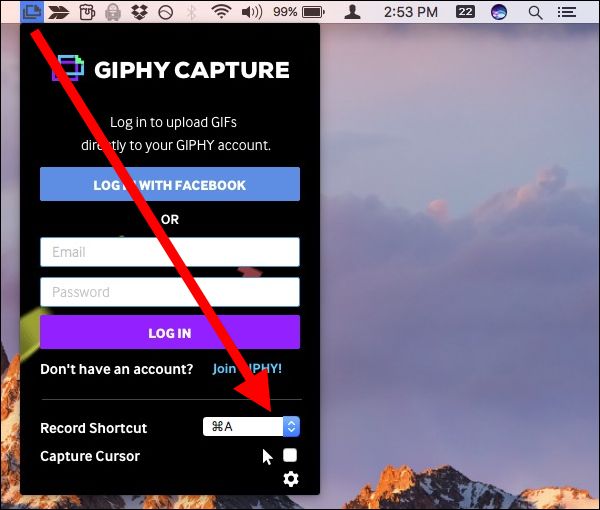
To fix this problem, click the GIPHY Capture icon in the menu bar, and set a keyboard shortcut to record. In this case, we’ve selected Command+A. You can also check the box to capture the mouse pointer if desired.
要解决此问题,请单击菜单栏中的GIPHY Capture图标,然后设置键盘快捷键进行录制。 在这种情况下,我们选择了Command + A。 如果需要,您也可以选中该框以捕获鼠标指针。
Once your area is framed the way you want, you’re ready to begin. Either click the record button if it is visible or use the keyboard shortcut. To stop recording, click the record button or use the keyboard shortcut again.
一旦按照您想要的方式框住了区域,就可以开始了。 单击“记录”按钮(如果可见)或使用键盘快捷键。 要停止录制,请单击录制按钮或再次使用键盘快捷键。
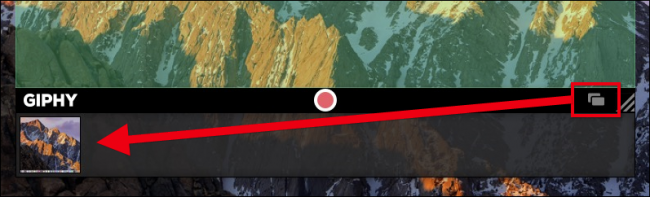
With your recording finished, click on the thumbnail at the bottom of the GIPHY Capture window. If the thumbnail or thumbnails aren’t visible, click the button in the lower-right corner.
录制完成后,单击GIPHY Capture窗口底部的缩略图。 如果看不到缩略图,请单击右下角的按钮。
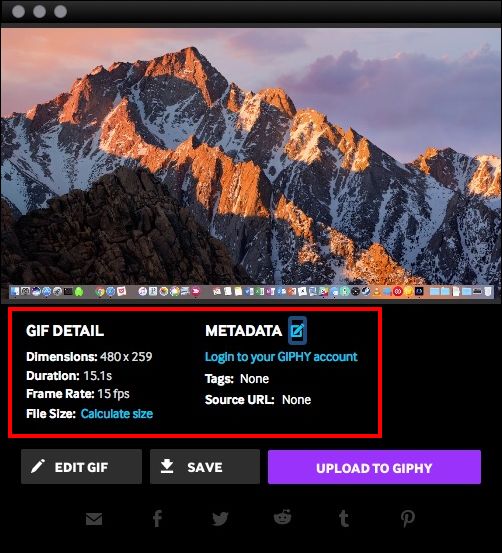
To get an idea of your GIF’s duration and size, check out the details below the preview.
要了解您GIF的持续时间和大小,请查看预览下方的详细信息。
Clicking “Calculate size” will give you an idea of how big the file will be. At this point, if you’re happy with the result, you can save it or even share it via email, Facebook, Twitter, and so on.
单击“计算大小”将使您了解文件的大小。 此时,如果您对结果感到满意,则可以保存它,甚至可以通过电子邮件,Facebook,Twitter等共享它。
If you need to make adjustments to the GIF however, such as to its quality or duration, click “Edit GIF”.
但是,如果您需要调整GIF,例如质量或持续时间,请单击“编辑GIF”。
When you edit your GIF, you can trim it by grabbing the left handle and dragging it right, which will remove frames from the beginning, and conversely, drag the right handle to the left to remove frames from the end. Make sure to check the preview area as you’re doing this so you get it just right.
编辑GIF时,可以通过抓住左手柄并向右拖动来修剪它,这将从开头删除帧,相反,向右拖动左手柄从结尾删除帧。 确保在执行此操作时检查预览区域,以确保正确进行预览。
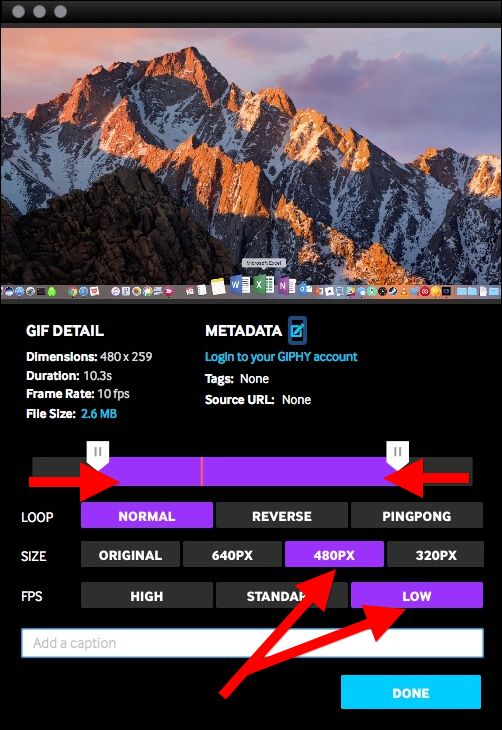
Take time also to adjust the size and frame rate, if needed. You can change how your GIF loops as well as add a caption if desired. Again, click “Calculate size”. As you can see, by reducing the frame rate and duration, we’re able to bring our GIF’s file size down below 3 MB.
如果需要,还需要花费一些时间来调整大小和帧速率。 您可以更改GIF循环的方式,并根据需要添加标题。 再次单击“计算尺寸”。 如您所见,通过降低帧频和持续时间,我们能够将GIF的文件大小减小到3 MB以下。
Click “Done” on the edit screen when you’re happy with the result, and then “Save” to save it to your Mac.
对结果满意后,在编辑屏幕上单击“完成”,然后单击“保存”以将其保存到Mac。

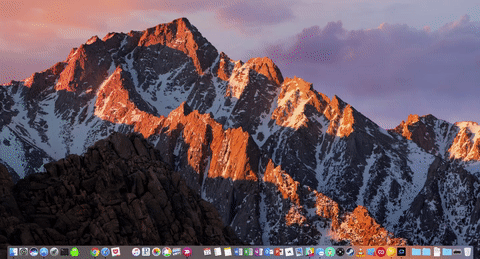
Here we see our new animated GIF of a simple swipe across our Dock using our mouse pointer.
在这里,我们看到了使用鼠标指针在Dock上滑动的新动画GIF。
That is all there is to it. Screen captures to animated GIFs on Windows and macOS in three easy steps: record, trim, and save.
这就是全部。 屏幕截图可通过三个简单的步骤捕获到Windows和macOS上的GIF动画:记录,修剪和保存。
It will take some practice at first until you become proficient with the process. Once you do however, you’ll be creating GIFs of your computer tasks and easily sharing them with friends, family, and co-workers.
在您精通该过程之前,首先需要进行一些练习。 但是,一旦完成,您将创建计算机任务的GIF,并轻松与朋友,家人和同事共享。
The time you save describing a process or task alone makes this a skill a worth mastering, so get to it and don’t forget to have fun!
您节省的时间仅用于描述流程或任务,因此使该技能成为值得掌握的技能,因此请紧紧抓住它,别忘了获得乐趣!
翻译自: https://www.howtogeek.com/286210/how-to-turn-your-computer-screen-into-an-animated-gif/
动画 gif


 被折叠的 条评论
为什么被折叠?
被折叠的 条评论
为什么被折叠?
 到【灌水乐园】发言


