


Ubuntu and many other Linux distributions use the GRUB2 boot loader. If GRUB2 breaks—for example, if you install Windows after installing Ubuntu, or overwrite your MBR—you won’t be able to boot into Ubuntu.
Ubuntu和许多其他Linux发行版都使用GRUB2引导加载程序。 如果GRUB2中断了(例如,如果您在安装Ubuntu之后安装Windows,或者覆盖了MBR),您将无法启动到Ubuntu。
You can easily restore GRUB2 from a Ubuntu live CD or USB drive. This process is different from restoring the legacy GRUB boot loader on older Linux distributions.
您可以轻松地从Ubuntu Live CD或USB驱动器还原GRUB2。 此过程与在较旧的Linux发行版上还原旧版GRUB引导加载程序不同。
This process should work on all versions of Ubuntu. It’s been tested on Ubuntu 16.04 and Ubuntu 14.04.
此过程应适用于所有版本的Ubuntu。 它已经在Ubuntu 16.04和Ubuntu 14.04上进行了测试。
图形方法:引导修复 (The Graphical Method: Boot Repair)
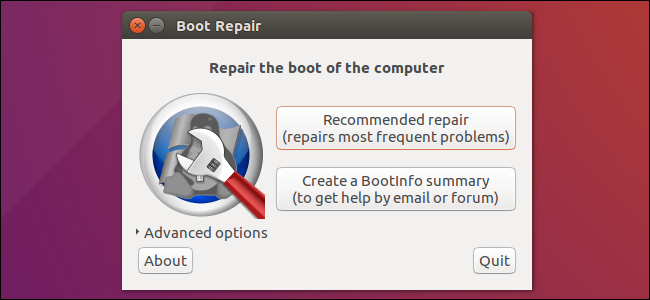
Boot Repair is a graphical tool that can repair GRUB2 with a single click. This is the ideal solution to boot problems for most users.
引导修复是一种图形工具,可以单击以修复GRUB2。 对于大多数用户来说,这是解决启动问题的理想解决方案。
If you have the media you installed Ubuntu from, insert it into your computer, restart, and boot from the removable drive. If you don’t, download a Ubuntu live CD and burn it to a disc or create a bootable USB flash drive.
如果您有安装Ubuntu的介质,请将其插入计算机,重新启动并从可移动驱动器引导 。 如果没有,请下载Ubuntu live CD并将其刻录到光盘或创建可引导的USB闪存驱动器 。
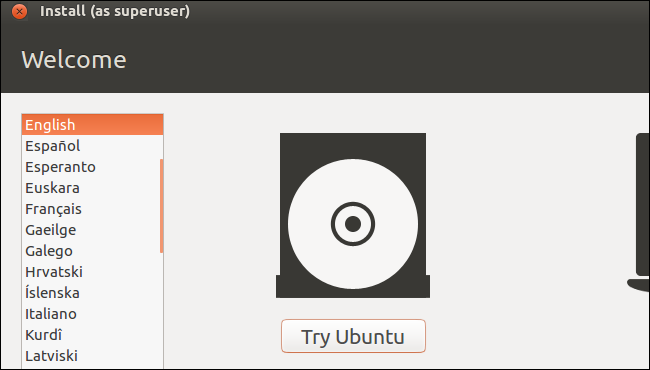
When Ubuntu boots, click “Try Ubuntu” to get a usable desktop environment.
Ubuntu启动时,单击“尝试Ubuntu”以获取可用的桌面环境。
Ensure you have an Internet connection before continuing. You may need to choose a Wi-Fi network and enter its passphrase.
在继续之前,请确保您具有Internet连接。 您可能需要选择一个Wi-Fi网络并输入其密码。
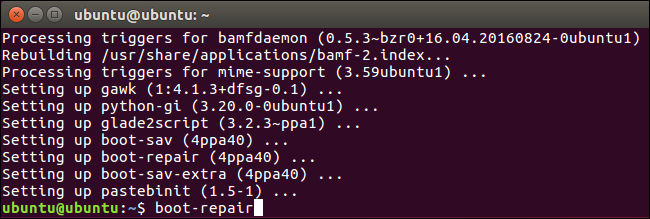
Open a Terminal window from the Dash and run the following commands to install and launch Boot Repair:
从仪表板打开“终端”窗口,然后运行以下命令来安装和启动“引导修复”:
sudo apt-add-repository ppa:yannubuntu/boot-repair

sudo apt-get update

sudo apt-get install -y boot-repair

boot-repair
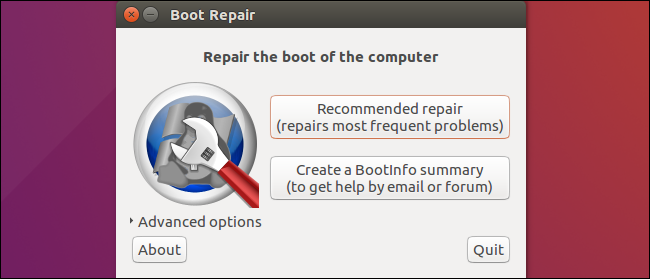
The Boot Repair window will automatically scan your system after you run the boot-repair command. After it scans your system, click the “Recommended repair” button to repair GRUB2 with a single click.
运行boot-repair命令后,“ Boot Repair”窗口将自动扫描系统。 扫描完系统后,单击“推荐修复”按钮,只需单击一下即可修复GRUB2。
You can choose to use the advanced options here, but Ubuntu’s wiki recommends you not use the advanced options unless you know what you’re doing. The recommended repair option can fix most problems automatically, and you could mess up your system even more by selecting the wrong advanced options.
您可以在此处选择使用高级选项,但是Ubuntu的Wiki建议您不要使用高级选项,除非您知道自己在做什么。 推荐的修复选项可以自动修复大多数问题,并且通过选择错误的高级选项,您甚至可能使系统更加混乱。
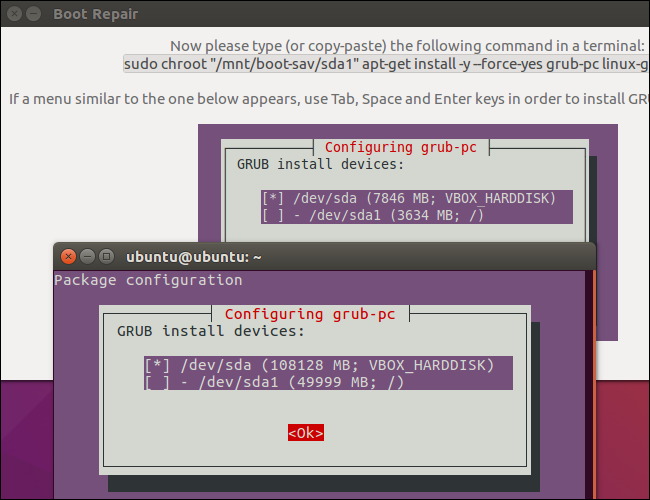
Boot Repair will begin working. It may ask you to open a Terminal and copy/paste a few commands into it.
引导修复将开始工作。 它可能会要求您打开一个终端并将一些命令复制/粘贴到其中。
Just follow the instructions that appear on your screen. Perform the instructions Boot Repair wants you to and click “Forward” to continue through the wizard. The tool will walk you through everything you need to do.
只需按照屏幕上显示的说明进行操作即可。 执行引导修复所需的说明,然后单击“转发”以继续执行向导。 该工具将引导您完成所有需要做的事情。
Restart your computer after the Boot Repair tool finishes applying its changes. Ubuntu should boot up normally.
引导修复工具完成更改后,重新启动计算机。 Ubuntu应该正常启动。
终端法 (The Terminal Method)
If you’d rather get your hands dirty, you can do this yourself from a terminal. You’ll need to boot from a live CD or USB drive, as in the graphical method above. Ensure the version of Ubuntu on the CD is the same as the version of Ubuntu installed on your computer. For example, if you have Ubuntu 14.04 installed, ensure you use a Ubuntu 14.04 live CD.
如果您想弄脏双手,可以在终端机上自己进行操作。 您需要从活动CD或USB驱动器启动,如上面的图形方法所示。 确保CD上的Ubuntu版本与计算机上安装的Ubuntu版本相同。 例如,如果您已安装Ubuntu 14.04,请确保使用Ubuntu 14.04 Live CD。
Open a terminal after booting into the live environment. Identify the partition Ubuntu is installed on using one of the following commands:
进入实时环境后,打开终端。 使用以下命令之一标识安装了Ubuntu的分区:
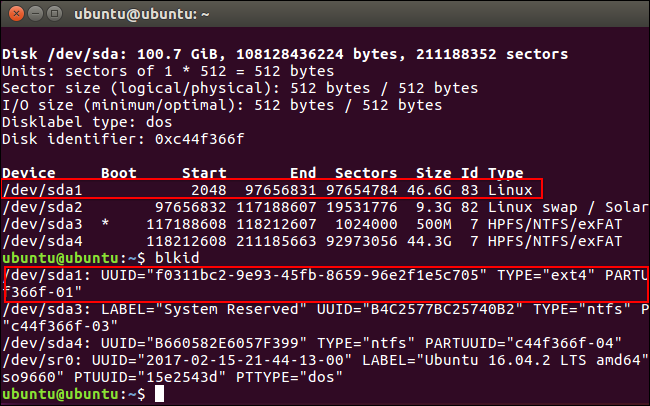
sudo fdisk -l

sudo blkid
Here’s the output of both commands. In the fdisk -l command, the Ubuntu partition is identified by the word Linux in the System column. In the blkid command, the partition is identified by its ext4 file system.
这是两个命令的输出。 在fdisk -l命令中,Ubuntu分区由“系统”列中的单词Linux标识。 在blkid命令中,该分区由其ext4文件系统标识。
If you have multiple Linux ext4 partitions, you can get an idea of which is which by viewing the size of the partitions and their order on the disk here.
如果您有多个Linux ext4分区,则可以通过在此处查看分区的大小及其在磁盘上的顺序来了解哪个分区。
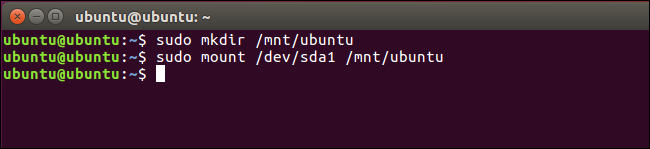
Run the following commands to mount the Ubuntu partition at /mnt/ubuntu, replacing /dev/sdX# with the device name of your Ubuntu partition from the above commands:
运行以下命令以在/ mnt / ubuntu上安装Ubuntu分区,并通过上述命令将/dev/sdX#替换为Ubuntu分区的设备名称:
sudo mkdir /mnt/ubuntu

sudo mount /dev/sdX# /mnt/ubuntu
In the screenshot above, our Ubuntu partition is /dev/sda1. This means the first partition on the first hard disk device.
在上面的屏幕截图中,我们的Ubuntu分区是/ dev / sda1。 这意味着第一个硬盘设备上的第一个分区。
Important: If you have a separate boot partition, skip the above command and mount the boot partition at /mnt/ubuntu/boot instead. If you don’t know whether you have a separate boot partition, you probably don’t.
重要提示 :如果您有单独的引导分区,请跳过上述命令,然后将引导分区挂载到/ mnt / ubuntu / boot。 如果您不知道是否有单独的启动分区,则可能没有。
Run the following command to reinstall grub from the live CD, replacing /dev/sdX with the device name of the hard disk above. Omit the number. For example, if you used /dev/sda1 above, use /dev/sda here.
运行以下命令以从实时CD重新安装grub,将/ dev / sdX替换为上面硬盘的设备名称。 省略数字。 例如,如果您在上面使用了/dev/sda1 ,请在此处使用/dev/sda 。
sudo grub-install --boot-directory=/mnt/ubuntu/boot /dev/sdX

Restart your computer and Ubuntu should boot properly.
重新启动计算机,Ubuntu应该可以正常启动。
For more detailed technical information, including how to use the chroot command to gain access to a broken Ubuntu system’s files and restore GRUB2, consult the Ubuntu wiki.
有关更多详细的技术信息,包括如何使用chroot命令访问已损坏的Ubuntu系统文件并还原GRUB2,请参阅Ubuntu Wiki 。
翻译自: https://www.howtogeek.com/114884/how-to-repair-grub2-when-ubuntu-wont-boot/


 485
485

 被折叠的 条评论
为什么被折叠?
被折叠的 条评论
为什么被折叠?
 到【灌水乐园】发言


