


The tilt-shift effect is a weird optical illusion where a regular photo looks like a photo of a toy model. By creatively blurring different parts of the image, you trick people’s eyes into interpreting everything in it as really tiny.
倾斜移动效果是一种奇怪的光学错觉,其中常规照片看起来像玩具模型的照片。 通过创造性地模糊图像的不同部分,您可以欺骗人们的眼睛,将图像中的所有内容都解释为很小的东西。
A tilt-shift lens is the simplest way to do this, but they cost several thousand dollars. Instead, we’re going to mimic the effect using Photoshop.
倾斜移位透镜是最简单的方法,但它们要花费数千美元。 相反,我们将使用Photoshop模仿效果。
第一步:选择一张照片 (Step One: Pick a Photo)
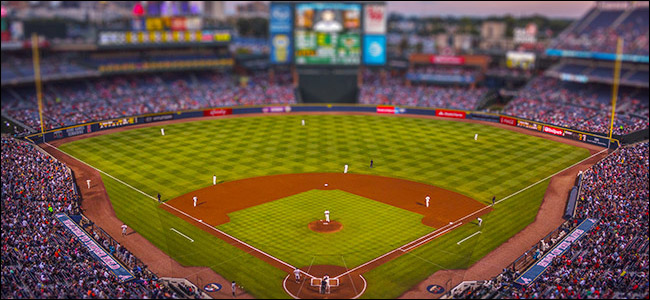
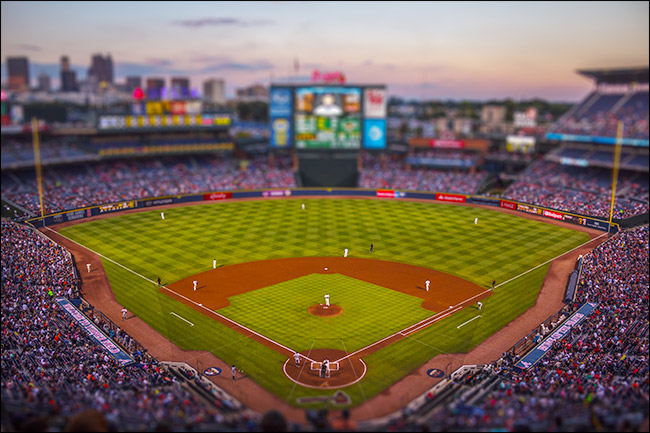
This effect will only work with certain kinds of photos. You want something that could conceivably be a miniature model. Wide angle shots of buildings or crowds from above tend to work best. I’m using this photo of Turner Field by Joshua Peacock.
此效果仅适用于某些类型的照片。 您想要的东西可能是微型模型。 从上方对建筑物或人群进行广角拍摄通常效果最佳。 我正在使用Joshua Peacock的Turner Field这张照片。

Once you’ve got an image you’re happy with, open it up in Photoshop.
获得满意的图像后,在Photoshop中将其打开。
第二步:应用效果 (Step Two: Apply the Effect)
Duplicate the Background layer by going to Layer > Duplicate Layer or pressing Control+J on your keyboard (Command+J if you’re on a Mac).
通过转到“图层”>“复制图层”或在键盘上按Control + J(如果是Mac,则为Command + J)来复制“背景”图层。
Next, go to Filter > Blur Gallery > Tilt-Shift. Your cursor will change to a Drawing Pin.
接下来,转到“滤镜”>“模糊库”>“倾斜移位”。 您的光标将变为图钉。
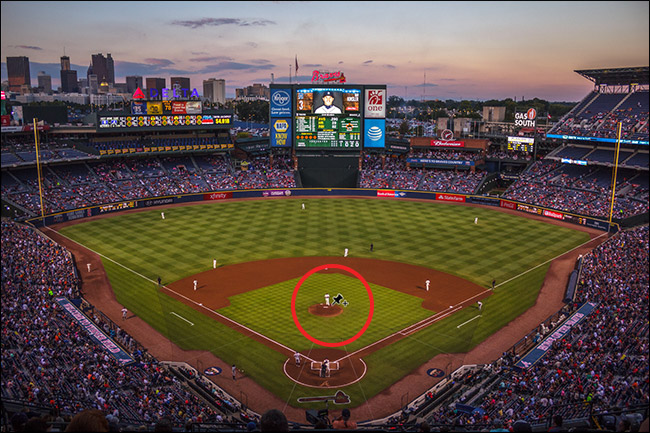
Click on where you want the centre of the in-focus area to be and you’ll get an overlay that looks something like this.
单击您希望焦点对准区域的中心所在的位置,您将获得一个看起来像这样的叠加层。

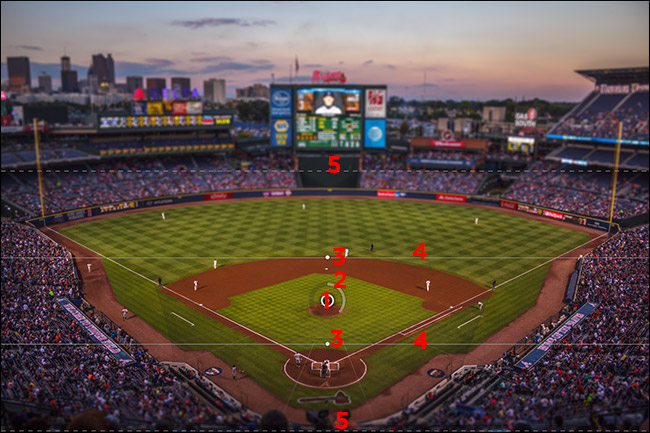
This looks a little complicated so lets break down what everything is:
这看起来有点复杂,所以让我们分解一下所有内容:
- Click and drag on the inner circle to move the center of the blur around. 单击并拖动内圆,以移动模糊的中心。
- Click and drag on the outer ring to change the amount of blur that’s being applied. 单击并拖动外圈以更改要应用的模糊量。
- Click and drag on the control handles on the solid lines to change the angle of the in-focus area. 单击并拖动实线上的控制手柄以更改对焦区域的角度。
- Click and drag anywhere else on the solid lines to change the size of the in-focus area. 单击并拖动实线上的其他任意位置以更改对焦区域的大小。
- Click and drag on the dashed lines to change the size of the transition between the in-focus and blurred areas. 单击并拖动虚线以更改对焦区域和模糊区域之间的过渡大小。
Play around with the settings until you get something that looks right. I’ve increased the Blur to 25, reduced the size of the in-focus area in the foreground, reduced the size of the transition in the foreground and increased the size of the transition in the background.
试着进行设置,直到得到看起来合适的东西。 我将“模糊”增加到25,减小了前景中对焦区域的大小,减小了前景中过渡的大小,并增加了背景中过渡的大小。

When you’re happy with your settings, press Enter. Here’s what mine looks like now:
对设置满意后,请按Enter。 这是我现在的样子:

第三步:添加画龙点睛 (Step Three: Add Your Finishing Touches)
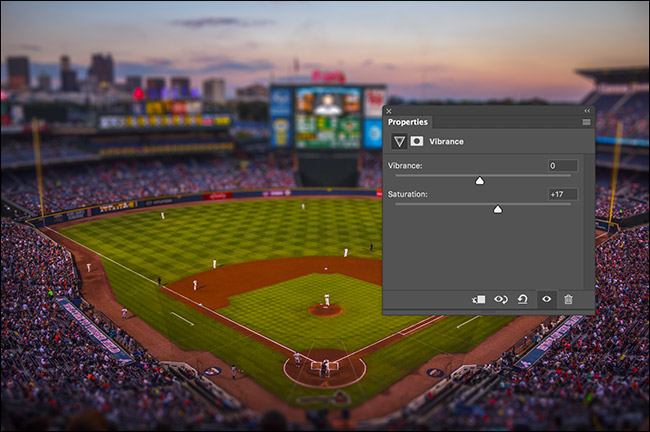
With the tilt-shift effect applied, your image should be well on its way to looking like a miniature model. Now it’s time to apply any finishing touches you want. I’m going to brighten my image up and add some saturation to make it look a bit more toy-like.
应用了倾斜移位效果后,您的图像应该看起来像一个微型模型。 现在是时候应用您想要的所有修饰。 我将使图像变亮并增加一些饱和度,使其看起来更像玩具。
Go to Layer > New Adjustment Layer > Vibrance and drag the Saturation slider to the right. Around 17 looks good for the image I’m using, but go with whatever works for yours.
转到“图层”>“新调整图层”>“鲜艳度”,然后将“饱和度”滑块拖到右侧。 大约17看起来很适合我正在使用的图像,但是请选择适合您的图像。
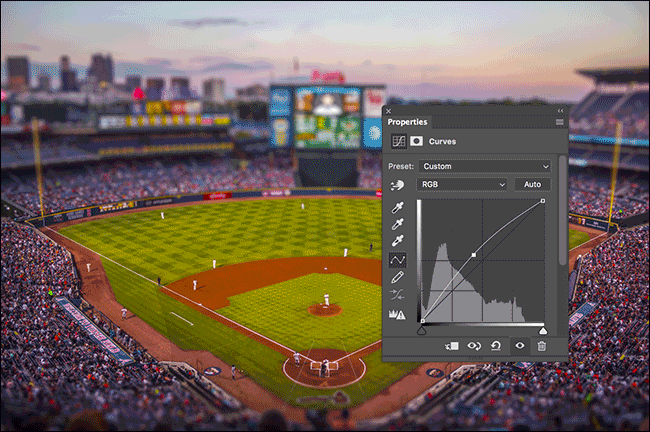
Next, go to Layer > New Adjustment Layer > Curves and click a point somewhere in the middle of the line. Drag it up to brighten the image. For more on using curves, check out our detailed guide.
接下来,转到“图层”>“新调整图层”>“曲线”,然后单击线中间某点。 向上拖动以使图像变亮。 有关使用曲线的更多信息, 请查看我们的详细指南 。
And with that, it’s done. We’ve taken a regular photo and turned it into this cool, model-esque effect.
这样就完成了。 我们拍摄了一张常规照片,并将其变成了这种酷炫的,类似模型的效果。


 被折叠的 条评论
为什么被折叠?
被折叠的 条评论
为什么被折叠?
 到【灌水乐园】发言


