


The Amazon Echo is a fantastic tool for using your voice to manage everything from shopping lists to music play lists, but what if you have other people in your household? Read on as we show you how to link multiple Amazon accounts to the Echo for shared music, lists, and more.
Amazon Echo是一款出色的工具,可以使用您的声音来管理从购物清单到音乐播放清单的所有内容,但是如果您家中有其他人怎么办? 请继续阅读,我们将向您展示如何将多个Amazon帐户链接到Echo以获得共享音乐,列表等。
我为什么要这样做? (Why Do I Want To Do This?)
If you’re the only one in your household and/or the only person who does any purchasing through Amazon, then this tutorial probably isn’t for you (but you may still find that multiple profiles are useful for your family or roommates, so we’d encourage you to keep reading).
如果您是家庭中唯一的人和/或唯一通过亚马逊购物的人,那么本教程可能不适合您(但是您可能仍然会发现多个配置文件对您的家人或室友有用,因此我们鼓励您继续阅读)。
For people with multi-person households, especially where members of that household all have purchased various content on Amazon like music and audio books, it makes sense to enable shared profiles so that you can, for example, play songs and albums through the Echo system that your spouse or roommate have purchased.
对于拥有多人家庭的人,尤其是那些家庭成员都已在亚马逊上购买了音乐和有声读物等各种内容的人,启用共享配置文件很有意义,例如,您可以通过Echo系统播放歌曲和专辑您的配偶或室友已经购买的。
In addition to sharing music you also can share shopping lists, to-dos, calendar entries, and other useful features available on the Echo/Alexa system, perfect for ensuring that whoever does the shopping has full access to everything added to the collective shopping list and other shared household tasks.
除了共享音乐,您还可以共享购物清单,待办事项,日历条目以及Echo / Alexa系统上可用的其他有用功能,非常适合确保购物者可以完全访问添加到集体购物清单中的所有内容和其他共同的家庭任务。
Note: There is one minor caveat worth noting: giving someone access via shared profiles also gives them access to the purchasing capacity of your Amazon Echo. You may with to turn off voice-based purchasing (or enable a PIN code) in the Settings section of the Amazon Alexa app.
注意:有一点值得注意的注意事项:通过共享的个人资料授予某人访问权限也使他们可以访问您的Amazon Echo购买能力。 您可以在Amazon Alexa应用程序的“设置”部分中关闭基于语音的购买(或启用PIN码)。
将配置文件添加到您的Amazon Echo (Adding A Profile To Your Amazon Echo)
Let’s take a look at how to add a profile to your Amazon Echo. You can perform all these actions either by using the Amazon Alexa app on your smart device or by visiting echo.amazon.com while logged into the Amazon account of the primary Echo user. For easier to read and larger screenshots we opted to use echo.amazon.com for the tutorial but the menu layout and function is identical.
让我们看一下如何向您的Amazon Echo添加配置文件。 您可以通过在智能设备上使用Amazon Alexa应用程序来执行所有这些操作,也可以在登录到主要Echo用户的Amazon帐户后访问echo.amazon.com。 为了便于阅读和截取更大的屏幕截图,我们选择在本教程中使用echo.amazon.com,但菜单布局和功能相同。
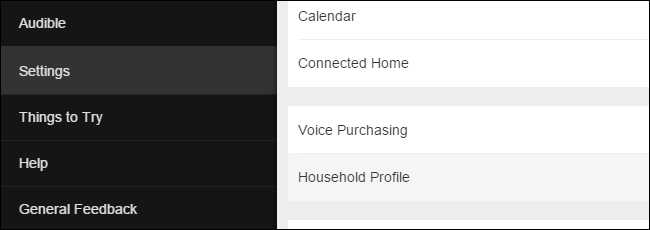
To get started navigate to the menu by tapping the menu button on the Amazon Alexa app or simply loading the echo.amazon.com portal. Select “Settings” from the side menu and then select “Household Profile”.
首先,通过点击Amazon Alexa应用程序上的菜单按钮或直接加载echo.amazon.com门户导航到菜单。 从侧面菜单中选择“设置”,然后选择“家庭资料”。
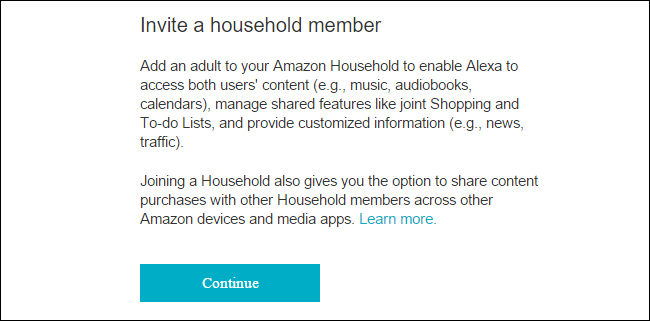
You’ll be prompted with a summary of the Amazon Household system and asked if you want to continue. Select “Continue” once you’ve read over the summary.
系统将提示您提供Amazon Household系统的摘要,并询问您是否要继续。 阅读摘要后,选择“继续”。
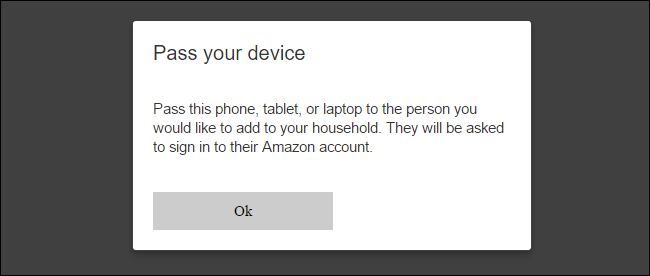
Next you’ll be prompted to pass the device or computer to the other person, as seen above. Once you click “OK” they’ll need to input their Amazon login credentials to authorize their addition to your Amazon Echo.
接下来,系统将提示您将设备或计算机传递给其他人,如上所示。 单击“确定”后,他们将需要输入自己的Amazon登录凭据以授权将其添加到Amazon Echo。
After their credentials are verified they’ll be presented with a summary of the Amazon Echo/Alexa sharing experience that runs through everything that will be shared (music, audio books, calendars as well as joint-managed to-do and shopping lists). After reading over the summary and the information about Alexa voice processing and data collection, select “Join Household” to complete the process. You’ll see a confirmation process welcoming you to the household of the primary account holder.
验证其凭据后,将为他们提供Amazon Echo / Alexa共享经验的摘要,该经验贯穿将要共享的所有内容(音乐,有声读物,日历以及联合管理的待办事项和购物清单)。 阅读完摘要和有关Alexa语音处理和数据收集的信息后,选择“加入家庭”以完成该过程。 您会看到一个确认过程,欢迎您来到主要帐户持有人的家中。
Although it looks like you’re all done here, there’s one final step before the process is officially over. The user you just added to your Echo needs to either download and install the Amazon Alexa app on their smart device (a recommended step, regardless) or visit echo.amazon.com while logged into their Amazon account so that they may accept the terms and agreements of the Alexa voice assistant program. Until they agree to the user agreement their profile will not be accessible on the Echo and all profile-related commands will be met with a prompt for the user to go accept the terms of service.
尽管看起来您已经完成了所有工作,但是在此过程正式结束之前还有最后一步。 您刚刚添加到您的Echo中的用户需要在其智能设备上下载并安装Amazon Alexa应用程序(无论如何,建议执行此步骤),或者在登录其Amazon帐户后访问echo.amazon.com,以便他们可以接受以下条款和条件: Alexa语音助手程序的协议。 在他们同意用户协议之前,将无法在Echo上访问其个人资料,并且所有与个人资料相关的命令都将得到提示,提示用户接受服务条款。
Now that we’ve invited the user, set up the profile sharing, and accepted the terms of service, it’s time to take a look at how to actually use multiple profiles on the Echo.
既然我们已经邀请了用户,设置了配置文件共享并接受了服务条款,现在该看看如何在Echo上实际使用多个配置文件了。
在配置文件之间切换 (Switching Between Profiles)
Once you’ve completed all the steps in the previous section it’s easy to jump between profiles. When using commands related to the profile system you can use the word “account” or “profile” interchangeable as Alexa responds to both terms. We prefer using “profile” as it most naturally fits with the function of the profile system on the Echo.
一旦完成了上一部分中的所有步骤,就可以在配置文件之间轻松切换。 当使用与配置文件系统相关的命令时,您可以使用单词“ account”或“ profile”,因为Alexa会同时对这两个术语做出响应。 我们更喜欢使用“配置文件”,因为它最自然地适合Echo上的配置文件系统的功能。
First, if you’re not sure which profile you’re currently on you can say:
首先,如果不确定当前使用的个人资料,可以说:
Alexa, whose profile is this?
Alexa,这是谁的个人资料?
In turn, you’ll get a response like “In Jason’s profile”. You can then switch between profiles one of two ways by saying:
反过来,您会收到诸如“在Jason的个人资料中”的回复。 然后,您可以通过以下两种方式之一在配置文件之间切换:
Alexa, switch profiles.
Alexa,切换配置文件。
Alexa, switch to [Name]’s profile.
Alexa,切换到[名称]的个人资料。
If there are only two Amazon accounts links to the Echo then you can stick to “switch profiles”. If you have more than one account linked to the Echo then it is much faster to switch profiles by name like “switch to Steve’s profile”.
如果只有两个Amazon账户链接到Echo,则可以坚持使用“切换配置文件”。 如果您有多个帐户与Echo关联,则按名称切换配置文件(例如“切换至Steve的配置文件”)的速度要快得多。
Once you’ve switched profiles you can use all the commands you would normally use when speaking with Alexa but the commands will have access to the content of the currently active profile. (Thus, if your spouse or roommate is the huge music fan who does all the music purchasing, you’d want to switch to their profile when using the Echo as a jukebox).
切换配置文件后,您可以使用与Alexa通话时通常使用的所有命令,但是这些命令将可以访问当前活动配置文件的内容。 (因此,如果您的配偶或室友是负责所有音乐购买的超级音乐迷,那么在将Echo用作自动点唱机时,您希望切换到他们的个人资料)。
从您的Amazon Echo移除配置文件 (Removing A Profile From Your Amazon Echo)
If a member leaves your household or you simply decide to remove them from the device for other reasons, doing so is easy. To remove a household member from your Amazon Echo simply open up the Amazon Alexa app or visit echo.amazon.com as we did in the first step.
如果有成员离开您的家庭,或者您只是出于其他原因决定将其从设备中删除,这样做很容易。 要从您的Amazon Echo中删除家庭成员,只需打开Amazon Alexa应用或按照第一步中的操作访问echo.amazon.com。
There is one element to this process we want to emphasize: once you remove someone from your Amazon Household you cannot re-add them for 180 days. If you remove someone in error you’ll need to contact Amazon’s support center to get them put back onto the account as you will no longer be able to manually add them in.
我们要强调此过程的一个要素:一旦您从亚马逊之家中删除某人,您将无法在180天内重新添加他们。 如果您删除错误的人,您将需要联系亚马逊支持中心以将他们放回到帐户中,因为您将无法再手动添加他们。
With that in mind let’s take a look at removing someone (if you’re certain you wish to remove them).
考虑到这一点,让我们看一下删除某人(如果您确定要删除他们)。
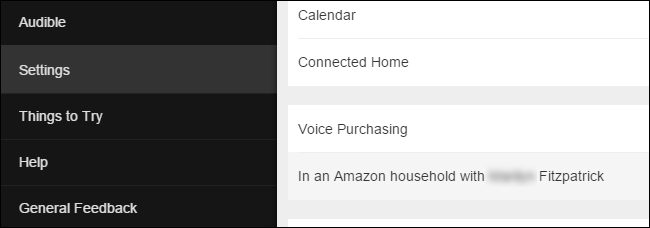
When you return to the Settings section and scroll down to the location where we originally found “Household Profile” you’ll now find an entry that reads “In an Amazon household with [Name]”. Select that entry.
当您返回到“设置”部分并向下滚动到我们最初找到“家庭资料”的位置时,您现在会看到一个条目,内容为“在一个带[名称]的亚马逊家庭中”。 选择该条目。
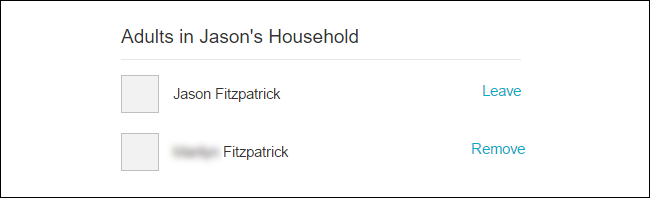
You’ll be prompted to reauthorize your Amazon credentials and then you’ll be presented with the screen above that allows you to select and then remove the other user.
系统将提示您重新授权您的Amazon凭证,然后会出现上方的屏幕,允许您选择然后删除其他用户。
In addition to removing users yourself the users you’ve added can also remove themselves by repeating the above steps. (So if you found this tutorial because you’re trying to remove yourself from your roommate’s Alexa-enabled device you can repeat the above steps an instead select “Leave” beside your name to initiate the removal process yourself.)
除了自己删除用户外,您添加的用户还可以通过重复上述步骤来删除自己。 (因此,如果您由于试图从室友的启用了Alexa的设备中删除自己而找到本教程,则可以重复上述步骤,而只需在名称旁边选择“离开”即可自己启动删除过程。)
Have a pressing question about the Amazon Echo or the Alexa voice-assistant? Shoot us an email at ask@howtogeek.com and we’ll do our best to answer it.
对Amazon Echo或Alexa语音助手有一个紧迫的问题吗? 向我们发送电子邮件至ask@howtogeek.com,我们将尽力答复。
翻译自: https://www.howtogeek.com/237073/how-to-invite-a-household-member-to-share-your-amazon-echo/


 1321
1321

 被折叠的 条评论
为什么被折叠?
被折叠的 条评论
为什么被折叠?
 到【灌水乐园】发言


