


iphone数据存放位置
Just because you want to share a photo with someone doesn’t necessarily mean you want to share the exact location you took it with them. Fortunately, it’s easy to send a photo without sending sensitive data along with it.
仅仅因为您想与某人共享照片并不一定意味着您想与他人共享拍摄的确切位置。 幸运的是,无需发送敏感数据即可轻松发送照片。
The iPhone, like other smartphones, embeds tons of metadata into each photograph you take with the onboard camera. This data, known as EXIF data, includes a lot of benign information from the general (the time the photo was taken) to the very technical (the ISO speed the camera used and the color space profile the photo was recorded in, for example). It also includes, if your phone is configured to allow it, embedded GPS data (known as “geotagging”) which pinpoints the location the photo was taken down to a few square meters.
与其他智能手机一样,iPhone将大量元数据嵌入车载相机拍摄的每张照片中。 该数据称为EXIF数据,包括从一般(拍摄照片的时间)到技术性(例如,所用相机的ISO感光度和照片所记录的色彩空间配置文件)的许多良性信息。 。 它还包括(如果您的手机已配置为允许)嵌入的GPS数据(称为“地理定位”),该数据可精确定位照片的拍摄位置,直至几平方米。
While it hardly matters if your mom knows that the photo of your kid was taken in your backyard (as she likely already has the address and knows where you live) it’s a different story if you’re sending a photo to a potential Craigslist buyer that you would prefer not know exactly where the photo was taken. Thankfully, there are more than a few apps that make it dead simple to send a photo with the EXIF metadata removed.
虽然妈妈知道您孩子的照片是在后院拍摄的(因为她可能已经有地址并且知道您的住所)并不重要,但如果您将照片发送给潜在的Craigslist买家却是另一回事。您可能不希望确切知道照片的拍摄地点。 值得庆幸的是,有许多应用程序使发送删除了EXIF元数据的照片变得非常简单。
Note: Our focus today is on sending photos from your iPhone or iPad with GPS location (and other metadata) removed; if you want to remove all the location metadata from your existing photos, stop your iPhone from recording GPS metadata in the future, check out our tutorial on the subject here.
注意:我们今天的重点是从iPhone或iPad发送删除了GPS位置(和其他元数据)的照片; 如果您想从现有照片中删除所有位置元数据,请日后停止iPhone记录GPS元数据, 请在此处查看有关该主题的教程 。
如何使用ViewExif发送GPS剥离的照片 (How to Send GPS-Stripped Photos with ViewExif)
If you search in the App Store, there are dozens upon dozens of iOS apps for viewing, manipulating, and removing EXIF meta data. While you’re free to explore through them all, including the free options, we’re strongly recommend ViewExif ($0.99), which is more than worth the buck price tag.
如果您在App Store中进行搜索,则有数十个iOS应用程序可用于查看,操作和删除EXIF元数据。 尽管您可以自由浏览所有内容,包括免费选项,但我们强烈建议您使用ViewExif (0.99美元),这绝对物有所值。
Not only is ViewExif very simple to use, but it integrates so well with the iOS share sheet system that it comes off feeling like a feature integrated into iOS to begin with. To get started, grab your iOS device and download ViewExif from the App Store. Once you’ve downloaded the app, resist the urge to tap the “Open” link right in the App Store app. ViewExif is totally designed to integrate into iOS and be called from other apps—if you run the app by itself it just gives you information about the app and the user manual.
ViewExif不仅非常易于使用,而且与iOS共享表系统集成得非常好,以至于感觉就像是集成到iOS的功能一样。 首先,请抓住您的iOS设备并从App Store下载ViewExif。 下载完应用程序后,不要再点击App Store应用程序中的“打开”链接。 ViewExif完全旨在集成到iOS中,并可以从其他应用程序调用-如果您自己运行该应用程序,它只会为您提供有关该应用程序和用户手册的信息。
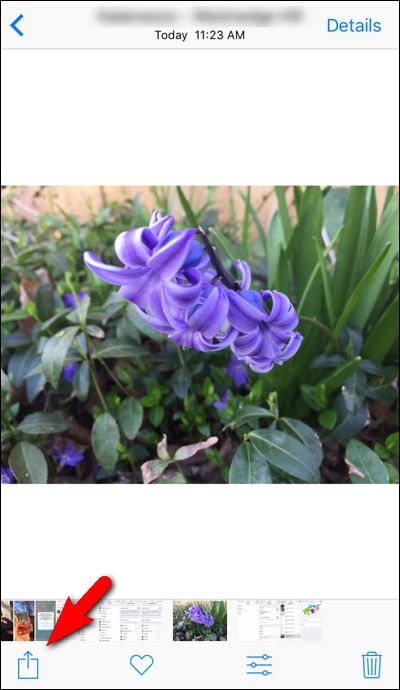
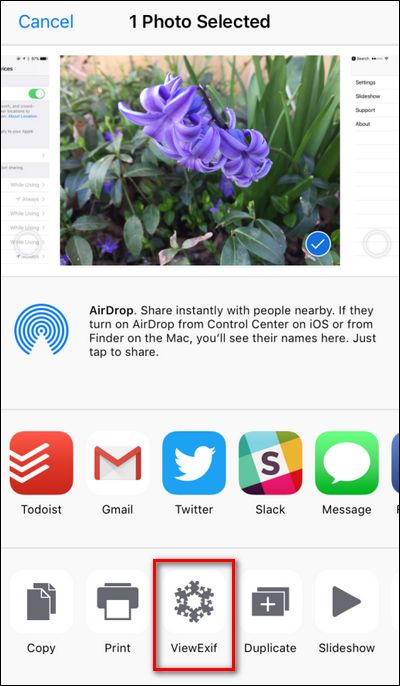
Instead, open up the Photos app (or whatever other app you regularly use to manage and send your photos). Select a photo. You’ll note, in our screenshot below, that we have the location blurred out—the test photo we took of an early spring flower blooming in our backyard was, quite accurately, tagged with the exact location of our backyard. Tap on the Share icon in the lower left corner.
而是打开“照片”应用程序(或您经常用来管理和发送照片的其他任何应用程序)。 选择一张照片。 您会注意到,在下面的屏幕截图中,我们的位置被模糊了-我们拍摄的在后院开花的早春花朵的测试照片准确地标记了我们后院的确切位置。 点击左下角的共享图标。
Within the Share menu, swipe left on the lower menu, where the system functions like Copy and Paste are located.
在[共享]菜单中,向左滑动,即复制和粘贴之类的系统功能所在的下部菜单。
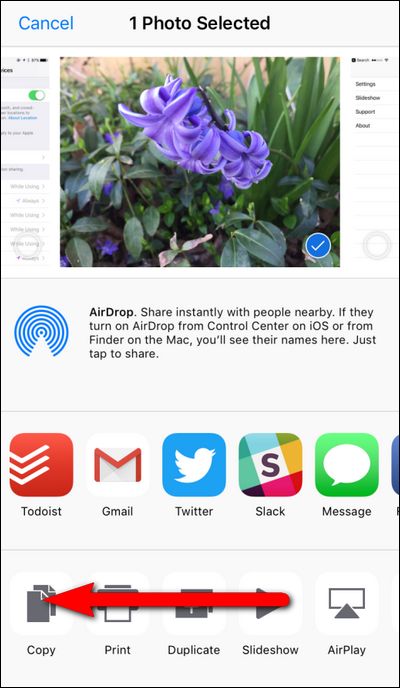
At the end of the function row, tap on the “More” icon.
在功能行的末尾,点击“更多”图标。

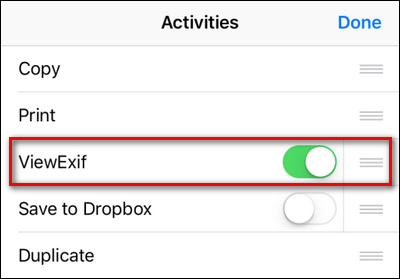
Locate the entry in the “Activity” list for “ViewExif” and toggle it on. In the screenshot below, we have not only turned it on but also dragged it further up the list for easy access by grabbing the the little three-bar icon. Tap “Done”.
在“活动”列表中找到“ ViewExif”的条目,然后将其打开。 在下面的屏幕截图中,我们不仅将其打开,而且还通过抓住小三栏图标将其拖动到列表的上方,以方便访问。 点击“完成”。
Now, in the photo selection screen, you’ll see “ViewExif” as an option in function bar at the bottom. Tap on it now.
现在,在照片选择屏幕中,您将在底部的功能栏中看到“ ViewExif”作为选项。 现在点击。
You’ll be immediately prompted to allow “ViewExif” to access your photos. Click OK.
系统将立即提示您允许“ ViewExif”访问您的照片。 单击确定。
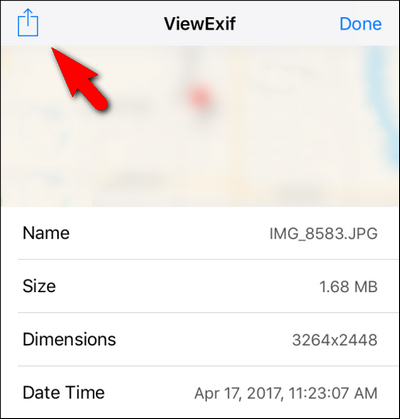
Here, you can see all the metadata attached to the photo, including those aforementioned technical stats about it as well as the location data. While ViewExif is, as the name implies, perfect for reviewing that information, we’re here to send the photo with that information removed. To do so tap the Share icon in the upper left corner of the screen.
在这里,您可以查看照片所附的所有元数据,包括上述有关照片的技术统计数据以及位置数据。 顾名思义,虽然ViewExif非常适合查看该信息,但我们还是发送删除了该信息的照片。 为此,请点击屏幕左上角的共享图标。
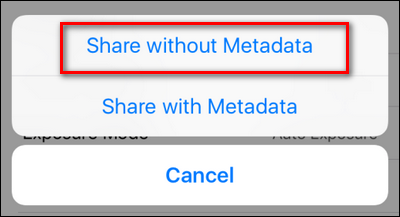
Select “Share without Metadata” from the popup menu.
从弹出菜单中选择“无元数据共享”。
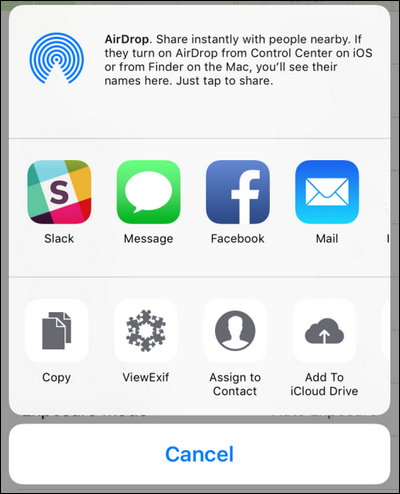
After selecting “Share without Metadata”, you’ll be prompted to select how you wish to share it. You can select from any of the usual suspects in your share sheet gallery including AirDrop, Message, Mail, or any other option available to you including uploading the photo to your iCloud Drive, Dropbox, or other cloud services.
选择“不使用元数据共享”后,系统将提示您选择共享方式。 您可以从共享库中的任何常见嫌疑犯中进行选择,包括AirDrop,Message,Mail或任何其他可用选项,包括将照片上传到iCloud Drive,Dropbox或其他云服务。
That’s all there is to it! ViewExif strips the metadata away and the photo, wherever you send it, will only reveal what the photo itself displays and not the hidden data (including the GPS coordinates where it was taken).
这里的所有都是它的! ViewExif会将元数据剥离掉,无论您将其发送到哪里,照片都只会显示照片本身显示的内容,而不显示隐藏的数据(包括拍摄位置的GPS坐标)。
Image Credit: sterankofrank.
图片来源: sterankofrank 。
翻译自: https://www.howtogeek.com/303443/how-to-send-photos-from-ios-with-the-location-data-removed/
iphone数据存放位置


 8130
8130

 被折叠的 条评论
为什么被折叠?
被折叠的 条评论
为什么被折叠?
 到【灌水乐园】发言


