


What’s with that weird graph with all the peaks and valleys? You’ve seen it when you open Photoshop or go to edit a camera raw file. But what is that weird thing called a histogram, and what does it mean?
带有所有峰谷的怪异图形又是怎么回事? 打开Photoshop或编辑相机原始文件时,您已经看到了它。 但是,所谓的直方图是什么奇怪的东西,它是什么意思?
The histogram is one of the most important and powerful tools for the digital imagemaker. And with a few moments reading, you’ll understand a few simple rules can make you a much more powerful image editor, as well as helping you shoot better photographs in the first place. So what are you waiting for? Read on!
直方图是数字图像制作者最重要,功能最强大的工具之一。 通过阅读一会儿,您将了解一些简单的规则,这些规则可以使您成为功能更强大的图像编辑器,并首先帮助您拍摄出更好的照片。 你还在等什么? 继续阅读!
关于直方图,我需要了解什么? (What Do I Need to Know About Histograms?)
 ()
()
While it may be intimidating looking, histograms are nothing really all that complex. What they represent are the distribution of tones throughout the image—a simple algebraic graph, when it all comes down to it.
尽管看起来可能令人生畏,但直方图实际上并没有那么复杂。 它们代表的是色调在整个图像中的分布-简单的代数图,当一切都归结到它时。
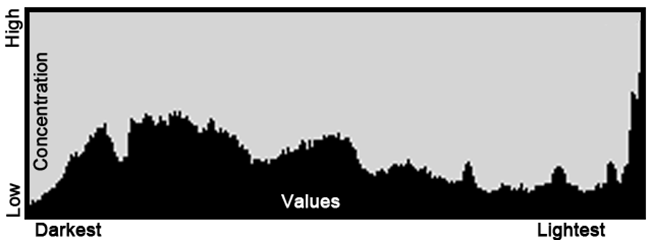
The horizontal line represents the various values in your image. The leftmost side stands for pure blacks and dark shadows. The right side are your highlights, and pure whites. The values between the two fall much the way you might imagine them, with dark tones transitioning to midtones, then on unto brighter and brighter highlights.
水平线代表图像中的各种值。 最左侧代表纯黑色和深色阴影。 右侧是您的亮点和纯白色。 两者之间的值下降的方式与您想象的差不多,暗色调过渡为中间色调,然后变为越来越亮的高光。
The vertical axis represents how much of any corresponding value, whether light or dark, appears in the image. Higher peaks represent high concentrations of that particular value. In our example, we can see that the image this histogram came from has a high concentration of brightest highlights, with the concentration falling sharply, as we look to the slightly dimmer highlights.
垂直轴表示在图像中出现多少相应值(无论是亮还是暗)。 较高的峰表示该特定值的高浓度。 在我们的示例中,我们可以看到该直方图所来自的图像具有高浓度的最亮高光,并且随着我们对稍暗的高光的观察,该浓度急剧下降。
Digital images don’t have unlimited tones. They only have 256 (that’s 8-bits of information). On a Histogram, black is 0 and white is 255. The dark tones all have low values and the bright tones have high values.
数码图像没有无限的色调。 它们只有256个(即8位信息)。 在直方图上,黑色为0,白色为255。深色调均具有较低的值,而明亮色调均具有较高的值。
好的,但是我要用它做什么呢? (Okay, But What Do I Use It For?)

Histograms are great tools for photography because they allow you to do two key things. First of all, a histogram tool on a DSLR will allow you to see how balanced the composition you’re shooting is before you shoot it. Is it too heavy on the darks, or are the darks lost in the composition? Are the whites too bright—all the detail washed out of them? An in-camera histogram can give you a rough idea of how your image will take or has taken.
直方图是摄影的绝佳工具,因为它们可以让您完成两项关键任务。 首先,使用DSLR上的直方图工具,您可以在拍摄之前查看所拍摄构图的平衡程度 。 在黑暗中是否太沉重,还是在合成中失去了黑暗? 白人太明亮了吗?所有细节都被淘汰了吗? 相机内的直方图可以让您大致了解图像的拍摄方式。
In addition to this, histograms can tell you what’s wrong with an image, as well. Sometimes, a potentially great shot gets exposed wrong, and you don’t have the time to bracket or recreate the moment. By looking at your photo’s histogram in an image editor after the fact, you can find out how to best bring your ruined exposures back from the brink, and get a decent, or possibly even a great image out what might have originally been a poor one.
除此之外,直方图还可以告诉您图像出了什么问题。 有时,潜在的好镜头会暴露在错误的位置上,而您没有时间进行包围或重新创建时刻。 事后,通过在图像编辑器中查看照片的直方图,您可以找到如何最好地将毁损的曝光从边缘带回来,并获得原本可怜的图像甚至是精美的图像。

Let’s take a minute to see a few of these badly exposed images, and how we can read a histogram to make them into better photographs. All of these images were shot in RAW by the author, and are processed and improved in Adobe Camera Raw. If you prefer not to use Adobe, there are usually free Raw Editing tools with DSLR cameras, as well as very good freeware programs like Raw Therapee. Adobe Lightroom is another program Adobe offers, this one a stand alone from Photoshop, often considered the new standard for Raw file editing and digital image developing.
让我们花一点时间看一下其中一些曝光不良的图像,以及如何读取直方图以使它们成为更好的照片。 所有这些图像都是作者在RAW中拍摄的,并在Adobe Camera Raw中进行了处理和改进。 如果您不喜欢使用Adobe,通常会提供带有DSLR相机的免费Raw Raw编辑工具,以及非常好的免费软件程序,例如Raw Therapee 。 Adobe Lightroom是Adobe提供的另一种程序,它是Photoshop的独立程序,通常被认为是Raw文件编辑和数字图像开发的新标准。
For those of you shooting your images in JPG, and not Raw, you can definitely learn about histograms from this article, and pick up a few tips on how to improve your images, but you may learn more by learning how to adjust contrast like a pro specifically for non-Camera Raw files. All other readers, keep on going to pick up some simple tips on how to improve your photos.
对于那些使用JPG而非Raw拍摄图像的人 ,您绝对可以从本文中学习直方图,并获得一些有关如何改善图像的技巧,但是您可以通过学习如何像这样调整对比度来学习更多信息。 专业版适用于非Camera Raw文件。 所有其他读者,都将继续学习如何改善照片的一些简单技巧。
不良直方图的形状以及如何对其进行改进 (The Shape Of Bad Histograms, and How to Improve Them)
 ()
()
This shot is a complete disappointment. Obviously this was exposed to get detail in the sky, which it does, but it has ruined the shadows in nearly all of the image. Let’s take a look at the histogram to see what we should change to improve the image.
这张照片完全让人失望。 显然,这样做是为了获得天空中的细节而进行的,但是它几乎破坏了所有图像的阴影。 让我们看一下直方图,看看我们应该改变些什么以改善图像。

In this case, we see that our biggest spikes are in our leftmost (darkest) areas. These biggest spikes represent the majority of the tone in the image. There are some spikes in the midtone to highlight range, but they pale in comparison.
在这种情况下,我们看到最大的峰值出现在最左侧(最暗)的区域。 这些最大的尖峰代表图像中大多数的色调。 在中间调中有一些尖峰以突出显示范围,但相比之下它们显得苍白。

Some serious RAW file editing later, and our photograph has changed from unusable, to reasonably nice. Let’s see how our histogram has changed.
后来进行了一些认真的RAW文件编辑,我们的照片从无法使用变为了不错的状态。 让我们看看直方图如何变化。

Because the exposure was bungled, our histogram is not quite a textbook perfect example, but it’s pretty decent for a completely botched shot. You can only push one image so far. There aren’t any incredibly obvious problems with the image at this point, anyway. We have succeeded in that we have a full tonal range from dark to light, and have managed to keep detail and color throughout most of the image. In case you were curious, we have achieved the majority of this dramatic change by adjusting the “Fill Light” slider to a dramatic, and extremely high setting. While many adjustments have been made to the image, that was the key to bringing out out detail in the shadows.
由于曝光不佳,我们的直方图并不是教科书上的完美示例,但对于完全不合格的镜头而言,它还是不错的。 到目前为止,您只能推送一张图像。 无论如何,目前图像还没有任何明显的问题。 我们成功地实现了从暗到亮的完整色调范围,并且设法在整个图像的大部分区域中保持了细节和色彩。 如果您感到好奇,我们可以通过将“填充光”滑块调整到一个戏剧性的极高设置来实现大部分的戏剧性变化。 尽管对图像进行了许多调整,但这是在阴影中展现出细节的关键。

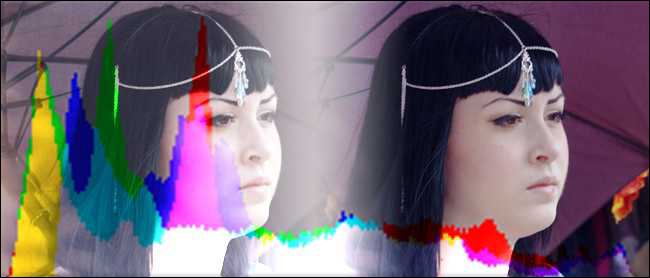
A second image, this one apparently exposed to grab the shadows has bleached this girl’s skin, ruining detail in highlights, and taking all the dark details down nearly to mid-tone range. Let’s look closer at the histogram.
第二张图像,显然是为了抓住阴影而暴露的,漂白了该女孩的皮肤,破坏了高光部分的细节,并将所有黑暗细节都降低到了中间色调范围。 让我们仔细看看直方图。

Yikes. There are absolutely no darks (left side) and there are a large concentration of highlights (right side). The image also seems mostly flat. We should try and add a better range of value, and see if we can’t bring out the some beauty of this pic.
kes 绝对没有暗处(左侧),并且有很多高光(右侧)。 图像似乎也大部分是平坦的。 我们应该尝试增加一个更好的价值范围,看看是否无法带出这张照片的某些美感。

With some work on our RAW file, we’re able to bring out full, rich darks while keeping good detail in our highlights. The shadow from the umbrella feels more cool, and the light from the sun is still creating great highlights on her pale skin. The only difference is now she isn’t glowing!
通过对RAW文件进行一些处理,我们可以在保持高光细节的同时,呈现出饱满丰富的暗度。 雨伞上的阴影感觉更凉爽,太阳的光仍在她苍白的皮肤上创造出高光。 唯一的区别是现在她不发光了!

A good first step with a camera raw file that is overexposed like this, lacking detail in highlights, is to first adjust the exposure slider. In this example, we first reduced by a whole stop (typing –1.0 into the exposure box). This begins shifting our entire value range toward the darker end of our histogram (toward the left side). From there, we can tool around with contrast (we’ve removed quite a bit of it here) and added lots and lots of black to the image to get a rich, dark color out of her hair without completely losing details.
对于这样曝光过度,缺少高光细节的相机原始文件,一个好的第一步是首先调整曝光滑块。 在此示例中,我们首先减少了一个完整的光圈(在曝光框中键入–1.0)。 这开始将整个值范围移向直方图的较暗端(向左侧)。 从那里,我们可以进行对比处理(我们在这里已经去除了很多),并为图像添加了很多黑色,以使头发染上浓密的深色,而不会完全丢失细节。
We are, in this case, concentrating our tones in the darker areas for a reason. These darks really make the white highlights pop, and create great focal points along the face and neck. There’s a lot of room for personal choice with and artful decisions to be made.
在这种情况下,由于某种原因,我们将色调集中在较暗的区域。 这些暗色确实使白色高光变得流行,并在脸部和脖子上形成了很好的焦点。 个人选择的余地很大,需要做出明智的决定。
进一步做好曝光 (Taking a Good Exposure One Step Further)

While it may not have a perfect histogram with a wonderful range of light, dark, and midtones, this image is reasonably well exposed. But with a glance, we can improve the harsh qualities of the shadows and add detail quite simply, even though the image is more or less alright.
尽管它可能没有完美的直方图,并且具有良好的亮,暗和中间色调范围,但此图像的曝光度相当好。 乍一看,即使图像或多或少都可以,我们可以改善阴影的苛刻质量并添加细节。

Adding a half stop to the exposure improves the somewhat underexposed shadows, and adds great highlights to the skin, providing the look of bright daylight. Adjustment to the “blacks” slider allows us to bring our shadows to the point of just barely touching the black on the left side of the histogram, while keeping the detail intact in all of our various shadow areas. With some minor artistic changes to “contrast” and “clarity,” our image is improved over what was already a reasonable, decent image.
将曝光量增加一半,可以改善有些曝光不足的阴影,并为皮肤添加高光,从而提供明亮的日光外观。 调整到“黑人”滑块使我们能够把我们的影子来的刚好触及柱状图左侧的黑点,同时保持完整的细节在我们所有的各种阴影区域。 通过对“对比度”和“清晰度”进行一些细微的艺术更改,我们的图像已比原本合理,体面的图像得到了改善。
Readers have asked me “how do I know what to change, when I’m editing a photo?” The short answer is almost always the histogram. Learning these techniques will show you the way to not only rescue horrible images, but also to make your good shots even better. Correctly reading a histogram will give you the tools you need to create a dynamic range of tones, with rich darks and bright whites, without losing detail in either. So, take some great shots, and keep your graphics questions coming to ericgoodnight@howtogeek.com!
读者问我:“编辑照片时我怎么知道要更改什么 ?” 简短的答案几乎总是直方图。 学习这些技术将为您展示不仅挽救可怕图像的方法,而且还使您获得更好的照片。 正确读取直方图将为您提供创建动态色调范围(丰富的深色和明亮的白色)而不会丢失任何细节所需的工具。 因此,拍摄一些精彩的照片,并将有关图形的问题发送到ericgoodnight@howtogeek.com !
Image Credit: Canon EOS by 아우크소(Auxo.co.kr), available under Creative Commons.
图片提供: 아우크소(Auxo.co.kr)的佳能EOS,可在“ 创用CC”下找到 。
翻译自: https://www.howtogeek.com/66546/what-is-a-histogram-and-how-can-i-use-it-to-improve-my-photos/


 714
714


 被折叠的 条评论
为什么被折叠?
被折叠的 条评论
为什么被折叠?
 到【灌水乐园】发言


