


php实现链表
A linked list is a linear data structure, which contains node structure and each node contains two elements. A data part that stores the value at that node and next part that stores the link to the next node as shown in the below image:
链表是一个线性数据结构,其中包含节点结构,每个节点包含两个元素。 数据部分存储该节点上的值,下一部分存储到下一个节点的链接,如下图所示:

The first node also known as HEAD is usually used to traverse through the linked list. The last node (next part of the last node) points to NULL. The list can be visualized as a chain of nodes, where every node points to the next node.
通常将第一个节点(也称为HEAD)用于遍历链表。 最后一个节点(最后一个节点的下一部分)指向NULL。 该列表可以可视化为一系列节点,其中每个节点都指向下一个节点。

单链表的实现 (Implementation of Singly Linked List)
表示: (Representation:)
In PHP, singly linked list can be represented as a class and a Node as a separate class. The LinkedList class contains a reference of Node class type.
在PHP中,单链表可以表示为一个类,而Node可以表示为单独的类。 LinkedList类包含Node类类型的引用。
//node structure
class Node {
  public $data;
  public $next;
}

class LinkedList {
  public $head;

  //constructor to create an empty LinkedList
  public function __construct(){
    $this->head = null;
  }
};
创建链接列表 (Create a Linked List)
Let us create a simple linked list which contains three data nodes.
让我们创建一个包含三个数据节点的简单链表。
<?php
//node structure
class Node {
  public $data;
  public $next;
}

class LinkedList {
  public $head;

  //constructor to create an empty LinkedList
  public function __construct(){
    $this->head = null;
  }
};

// test the code
//create an empty LinkedList
$MyList = new LinkedList();

//Add first node.
$first = new Node();
$first->data = 10;
$first->next = null;
//linking with head node
$MyList->head = $first;

//Add second node.
$second = new Node();
$second->data = 20;
$second->next = null;
//linking with first node
$first->next = $second;

//Add third node.
$third = new Node();
$third->data = 30;
$third->next = null;
//linking with second node
$second->next = $third;
?>
遍历链接列表 (Traverse a Linked List)
Traversing through a linked list is very easy. It requires creating a temp node pointing to the head of the list. If the temp node is not null, display its content and move to the next node using temp next. Repeat the process till the temp node becomes null. If the temp node is empty at the start, then the list contains no item.
遍历链表非常容易。 它需要创建一个指向列表头的临时节点。 如果temp节点不为null,则显示其内容并使用temp next移至下一个节点。 重复该过程,直到temp节点变为空。 如果临时节点在开始时为空,则该列表不包含任何项目。
The function PrintList is created for this purpose. It is a
为此创建功能PrintList 。 它是一个
3步程序 (3-step process)
.
。
public function PrintList() {
//1. create a temp node pointing to head
$temp = new Node();
$temp = $this->head;
//2. if the temp node is not null continue
// displaying the content and move to the
// next node till the temp becomes null
if($temp != null) {
echo "\nThe list contains: ";
while($temp != null) {
echo $temp->data." ";
$temp = $temp->next;
}
} else {
//3. If the temp node is null at the start,
// the list is empty
echo "\nThe list is empty.";
}
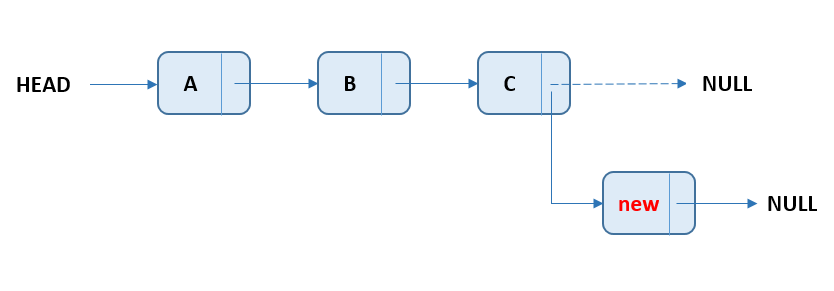
}在链接列表的末尾添加一个新节点 (Add a new node at the end of the Linked List)
In this method, a new node is inserted at the end of the linked list. For example — if the given List is 10->20->30 and a new element 100 is added at the end, the Linked List becomes 10->20->30->100.
在这种方法中,新节点将插入到链表的末尾。 例如,如果给定的列表为10-> 20-> 30,并在末尾添加了新元素100,则链接列表将变为10-> 20-> 30-> 100。
Inserting a new node at the end of the Linked List is very easy. First, a new node with given element is created. It is then added at the end of the list by linking the last node to the new node.
在链接列表的末尾插入新节点非常容易。 首先,创建具有给定元素的新节点。 然后通过将最后一个节点链接到新节点,将其添加到列表的末尾。
The function push_back is created for this purpose. It is a
为此创建了函数push_back 。 它是一个
六步法 (6-step process)
.
。
public function push_back($newElement) {

  //1. allocate node
  $newNode = new Node();

  //2. assign data element
  $newNode->data = $newElement;

  //3. assign null to the next of new node
  $newNode->next = null;

  //4. Check the Linked List is empty or not,
  //   if empty make the new node as head
  if($this->head == null) {
    $this->head = $newNode;
  } else {

    //5. Else, traverse to the last node
    $temp = new Node();
    $temp = $this->head;
    while($temp->next != null) {
      $temp = $temp->next;
    }

    //6. Change the next of last node to new node
    $temp->next = $newNode;
  }
}
The below is a complete program that uses above discussed all concepts of the linked list.
下面是一个完整的程序,使用上面讨论的链表的所有概念。
<?php
//node structure
class Node {
  public $data;
  public $next;
}

class LinkedList {
  public $head;

  public function __construct(){
    $this->head = null;
  }

  //Add new element at the end of the list
  public function push_back($newElement) {
    $newNode = new Node();
    $newNode->data = $newElement;
    $newNode->next = null;
    if($this->head == null) {
      $this->head = $newNode;
    } else {
      $temp = new Node();
      $temp = $this->head;
      while($temp->next != null) {
        $temp = $temp->next;
      }
      $temp->next = $newNode;
    }
  }

  //display the content of the list
  public function PrintList() {
    $temp = new Node();
    $temp = $this->head;
    if($temp != null) {
      echo "\nThe list contains: ";
      while($temp != null) {
        echo $temp->data." ";
        $temp = $temp->next;
      }
    } else {
      echo "\nThe list is empty.";
    }
  }
};

// test the code
$MyList = new LinkedList();

//Add three elements at the end of the list.
$MyList->push_back(10);
$MyList->push_back(20);
$MyList->push_back(30);
$MyList->PrintList();
?>
The output of the above code will be:
上面代码的输出将是:
The list contains: 10 20 30php实现链表


 527
527

 被折叠的 条评论
为什么被折叠?
被折叠的 条评论
为什么被折叠?
 到【灌水乐园】发言


