


 本文介绍了如何在Linux系统中将ext2或ext3文件系统升级为ext4,无需重新安装操作系统。升级前需要确认内核版本至少为2.6.28,然后使用Live CD启动,转换文件系统,检查文件系统,挂载并编辑fstab,升级grub,最后重新启动。这种方法适用于硬件限制不能升级Linux发行版的情况。

如何在hdfs上将文件下载
Know you should upgrade your Linux filesystem but can’t face the aggravation? Here’s how to convert ext2 and ext3 to ext4 without the upheaval of a complete re-install.
知道您应该升级Linux文件系统,但不能面对麻烦吗? 这是将ext2和ext3转换为ext4的方法,而无需彻底重新安装。
Linux文件系统 (Linux Filesystems)
If you were polite, you’d call the ext3 file system venerable, launching as it did way back in 2001. As for poor old ext2, that filesystem hails from 1993, and there’s no word for it other than ancient. In computer terms, ext3 is an antique. And ext2 is an archaeological find.
如果您彬彬有礼,则可以将ext3文件系统称为值得尊敬的系统 ,该系统可追溯到2001年启动。至于较旧的ext2 ,该文件系统可追溯到1993年,除了古老以外,别无他法。 用计算机术语来说,ext3是古董。 ext2是考古发现。
The modern filesystem in the Linux world is ext4 which was released in 2008. It is faster, less prone to fragmentation, capable of handling larger filesystems—and larger files—it has more accurate file date stamps and did we mention it’s faster? A lot faster.
Linux世界中的现代文件系统是ext4,它于2008年发布 。 它速度更快,不易碎片化,能够处理更大的文件系统和更大的文件,并且文件日期戳更准确,我们是否提到它更快? 快很多。
好,我被卖了,让我们这样做 (OK, I’m Sold—Let’s Do This)
Let’s think this through. Actually, you probably don’t want to upgrade your filesystem.
让我们仔细考虑一下。 实际上,您可能不想升级文件系统。
It makes more sense to upgrade your entire Linux system instead. By upgrade we mean take a couple of data backups, wipe your system, re-install a modern distribution, and restore your data. Go for the complete refresh. Get the benefits of a modern Linux distribution with updated software, as well as a clean, current, and newly installed filesystem.
相反,升级整个Linux系统更有意义。 升级意味着我们要进行几次数据备份,擦除系统,重新安装最新的发行版并还原数据。 进行完全刷新。 通过更新的软件以及全新,最新安装的干净文件系统,获得现代Linux发行版的好处。
If you cannot run a modern Linux on your hardware, even one of the lightweight distributions like Lubuntu, LinuxLite or CrunchBang++, and you absolutely have to stick with the Linux you’ve got, there are still caveats.
如果您不能在硬件上运行现代Linux,即使是Lubuntu , LinuxLite或CrunchBang ++之类的轻量级发行版,也绝对必须坚持使用已有Linux,仍然有一些警告。
To upgrade your filesystem to ext4, you have to be using kernel version 2.6.28 or later. So if you don’t have that version of the kernel or a later version, you must upgrade your kernel first.
要升级到ext4,你必须要使用内核版本2.6.28或更高版本。 因此,如果您没有该版本的内核或更高版本,则必须先升级您的内核。
Warning: Don’t even think about trying this without satisfying that kernel version requirement. You’ll end up with an unbootable computer. Check which kernel version you’re using before continuing.
警告 :甚至不要考虑不满足该内核版本要求就尝试这样做。 您最终将无法启动计算机。 在继续之前, 请检查您使用的内核版本 。
Make sure you have an install disk for the version of Linux you’re currently using and keep it on stand by. Upgrading your filesystem is not without dangers.
确保您拥有当前正在使用Linux版本的安装盘,并保持备用状态。 升级文件系统并非没有危险。
Backups are your safety net. Before you do anything, make a couple of data backups to different backup media, and make sure you have that old Linux install disk handy. If something goes badly wrong, you can then re-install your old Linux and restore your data.
备份是您的安全网。 在执行任何操作之前,请先将几个数据备份到不同的备份介质上,并确保可以随身携带旧Linux安装磁盘。 如果出现严重错误,则可以重新安装旧Linux并还原数据。
You’re also going to need a current Live CD/DVD of a modern Linux distribution to perform the filesystem upgrade with. So make sure you have one of those to hand too.
您还需要现代Linux发行版的当前Live CD / DVD来执行文件系统升级。 因此,请确保您也拥有其中之一。
Incidentally, this article was researched using an install of Ubuntu Jaunty Jackalope, which was released in April of 2009. It used ext3 as the file system.
顺便说一下,本文是使用2009年4月发布的Ubuntu Jaunty Jackalope的安装进行研究的。它使用ext3作为文件系统。
还和我们在一起吗? (Still With Us?)
John Wayne said courage was being terrified but still saddling up anyway. I admire your guts.
约翰·韦恩(John Wayne)说,勇气虽然吓坏了,但无论如何仍会背负起来。 我很佩服你的胆量。
The first thing we’re going to do is check the kernel version with uname. The uname command can display different types of system information.
我们要做的第一件事是用uname检查内核版本。 uname命令可以显示不同类型的系统信息。
On your old Linux computer open a terminal window and type the following command. Type uname , a space, -r, then hit Enter.
在旧Linux计算机上,打开一个终端窗口,然后键入以下命令。 输入uname ,一个空格-r ,然后按Enter。
uname -r
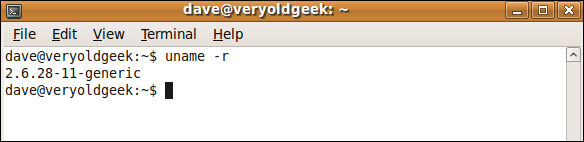
The version of Linux on this computer is using kernel version 2.6.28-11, so we’ve met the kernel version requirement.
这台计算机上Linux版本使用的是内核版本2.6.28-11,因此我们满足了内核版本要求。
Seriously, If you haven’t met this requirement, stop now. Close enough just isn’t enough. You must meet or exceed this kernel version number.
严重的是,如果您没有达到此要求,请立即停止。 足够接近只是不够。 您必须达到或超过此内核版本号。
Now we’ll check the disk identifiers with blkid, which identifies the block devices on the system.
现在,我们将使用blkid检查磁盘标识符,该标识符标识系统上的块设备。
blkid
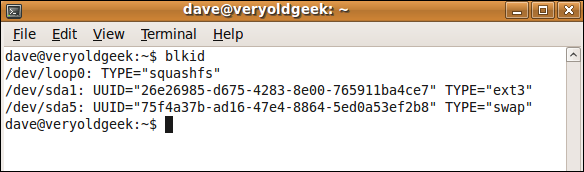
This system has a single hard drive (sda) which has a file system on it (sda1) which is mounted at /dev/sda1. This is an ext3 filesystem. This is the filesystem we are going to convert.
该系统只有一个硬盘驱动器(sda),其上有一个文件系统(sda1),该文件系统安装在/ dev / sda1上。 这是一个ext3文件系统。 这是我们要转换的文件系统。
There is also a filesystem called swap, but that doesn’t interest us.
还有一个名为swap的文件系统,但这对我们不感兴趣。
用Live CD重新启动 (Reboot with the Live CD)
Insert the Live CD and reboot your computer. You may need to press a key during the reboot to make the computer boot from the CD. The key to press will be displayed during the early stages of the boot-up process. Be quick – the window of opportunity doesn’t last long. If you miss it, reboot and try again.
插入Live CD并重新启动计算机。 在重新引导过程中,可能需要按一个键才能使计算机从CD引导 。 在启动过程的早期,将显示要按下的键。 快点–机会之窗不会持续太久。 如果错过了,请重新启动并重试。
When you have booted into the Live CD environment, make sure you don’t accidentally start an installation. Take time to read the options you are provided with, and if there is one that says something similar to “Try DistributionName,” select that option.
启动到Live CD环境后,请确保不要意外启动安装。 请花一些时间阅读所提供的选项,如果有类似“ Try DistributionName ”的内容,请选择该选项。
成为根 (Become Root)
Open a terminal window and type the following command. This effectively makes you root and means you don’t need to type sudo in front of every command.
打开一个终端窗口,然后键入以下命令。 这有效地使您成为root用户,这意味着您无需在每个命令前都键入sudo 。
sudo bash

Note that the command prompt has changed. You are root. Tread carefully.
请注意,命令提示符已更改。 你是根。 小心踩一下。
识别文件系统 (Identify the Filesystems)
We need to identify the filesystems once more to see how they show up in this instance of Linux.
我们需要再次标识文件系统,以查看它们在Linux实例中如何显示。
fdisk -l

You’ll see some output similar to the following.
您将看到一些类似于以下内容的输出。
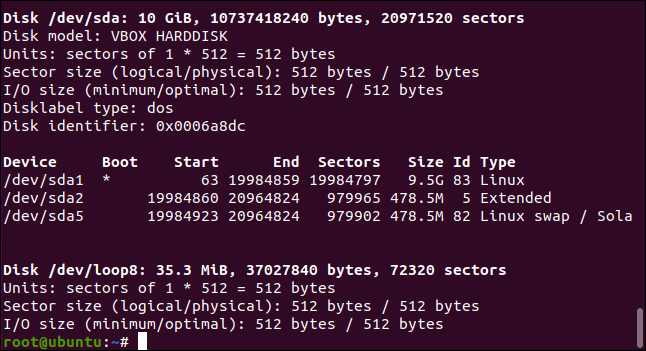
The filesystem we previously identified as sda1 has been found and recognized by the Live CD Linux. That’s the first mini-milestone.
Live CD Linux已找到并识别了我们先前标识为sda1的文件系统。 那是第一个迷你里程碑。
The second is converting the filesystem.
第二个是转换文件系统。
转换文件系统 (Converting the Filesystem)
There are two commands listed here, one for converting from ext2 to ext4 and one for converting from ext3 to ext4. Make sure you use the right one for you!
这里列出了两个命令,一个用于将ext2转换为ext4,另一个用于将ext3转换为ext4。 确保使用适合您的产品!
To convert from ext2 to ext4 use this:
要将ext2转换为ext4,请使用以下命令:
tune2fs -O extents,uninit_bg,dir_index,has_journal /dev/sda1
To convert from ext3 to ext4 use this:
要将ext3转换为ext4,请使用以下命令:
tune2fs -O extents,uninit_bg,dir_index /dev/sda1

It’s slightly underwhelming as not a lot appears to happen. You are returned to the command prompt. If you do see some output, it is probably going to be error messages. So no news is good news here.
由于似乎没有发生太多事情,所以它有点让人不知所措。 您将返回到命令提示符。 如果确实看到一些输出,则可能是错误消息。 因此,这里没有新闻是好消息。
检查文件系统 (Check the Filesystem)
Even though no errors were flagged, let’s be thorough and check the whole filesystem for problems. We will use a command called e2fsck. This is a tool used to check the integrity of filesystems. It can also attempt to repair any issues it finds. The e2fsck tool works with ext2, ext3, and also ext4 filesystems.
即使未标记任何错误,我们也要彻底检查整个文件系统是否存在问题。 我们将使用一个名为e2fsck的命令。 这是用于检查文件系统完整性的工具。 它还可以尝试修复发现的任何问题。 e2fsck工具可与ext2,ext3和ext4文件系统一起使用。
The -p (preen) option causes e2fsck to attempt to repair errors and the -f (force) option causes e2fsck to check the filesystem even if the filesystem seems clean.
-p (preen)选项使e2fsck尝试修复错误,而-f (force)选项使e2fsck检查文件系统,即使文件系统看起来很干净。
e2fsck -pf /dev/sda1

No errors were reported. We can now try to mount the filesystem.
没有错误报告。 现在我们可以尝试挂载文件系统。
安装文件系统 (Mounting the FIlesystem)
We need to adjust the file system table (fstab) and the grub bootloader to work with the converted filesystem. To do this, we must mount the filesystem. We shall mount it on /mnt. We identified the filesystem as sda1 earlier, so our command is:
我们需要调整文件系统表(fstab)和grub引导加载程序以使用转换后的文件系统。 为此,我们必须挂载文件系统。 我们将其安装在/ mnt上。 我们之前将文件系统标识为sda1,因此我们的命令是:
mount -t ext4 /dev/sda1 /mnt

Now that it is mounted we should be able to list the filesystem. Let’s check that. The root of the filesystem is going to be at the mount point, /mnt.
现在已经安装了它,我们应该能够列出文件系统了。 让我们检查一下。 文件系统的根目录将位于挂载点/ mnt。
ls /mnt
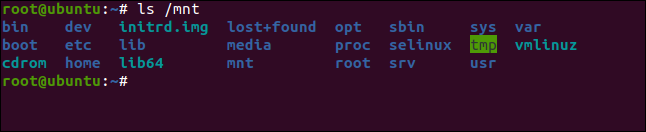
That’s encouraging. It looks like we’d expect it to.
令人鼓舞。 看起来像我们期望的那样。
编辑fstab (Editing fstab)
We need to edit the fstab file and change any references of ext3 (or ext2, if that’s the file system you’ve converted from) to ext4.
我们需要编辑fstab文件,并将ext3(或ext2,如果这是您转换的文件系统)的任何引用更改为ext4。
The Live CD used in this example has the nano editor on it. It’s a simple little editor, so we’ll use that. If nano is not available on your Live CD there will be another editor that will have been bundled by the Linux distribution on the CD.
本示例中使用的Live CD带有nano编辑器。 这是一个简单的小编辑器,因此我们将使用它。 如果Live CD上没有nano ,则Linux发行版中将捆绑有另一个编辑器。
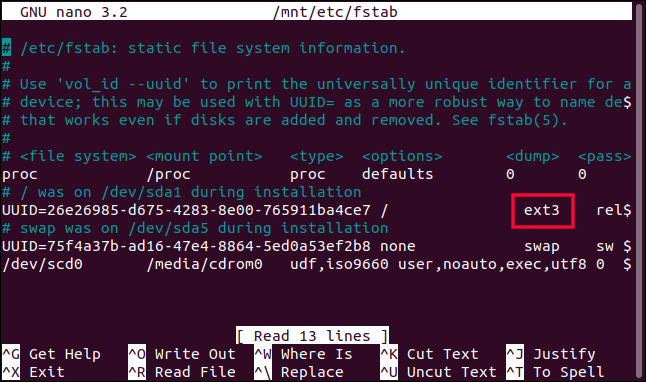
nano /mnt/etc/fstab

The nano editor window will appear. You need to look for occurrences of the string “ext3” or “ext2” and change them to “ext4”. In this example, there was one occurrence of ext3, which is highlighted.
nano编辑器窗口将会出现。 您需要查找字符串“ ext3”或“ ext2”的出现,并将其更改为“ ext4”。 在此示例中,出现了ext3,这是突出显示的。
The ext3 was replaced by ext4.
ext3被ext4代替。
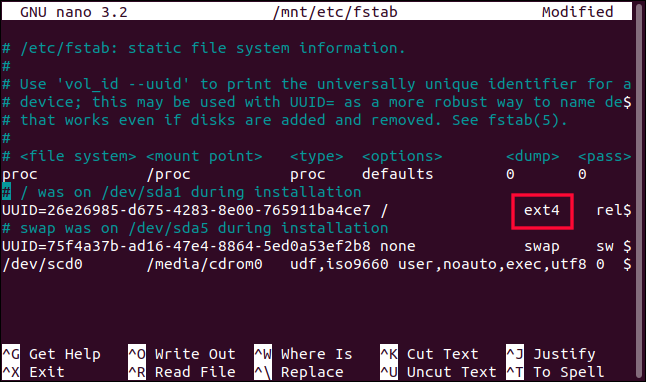
You need to save the file and exit from the editor. In nano Ctrl+O will save the file, and Ctrl+X will close the editor.
您需要保存文件并退出编辑器。 在nano Ctrl + O将保存文件,而Ctrl + X将关闭编辑器。
升级g (Upgrading grub)
Because we have mounted the sda1 filesystem on /mnt, the pathways to the directories in the filesystem have effectively all been moved one level deeper than usual. That’s why the path we provided to nano was /mnt/etc/fstab instead of the usual /etc/fstab.
因为我们已经在/ mnt上安装了sda1文件系统,所以文件系统中目录的路径实际上都比平时移了一层。 这就是为什么我们提供给nano的路径是/ mnt / etc / fstab而不是通常的/ etc / fstab。
Because grub expects to find things in certain places, we need to make the filesystem appear as though it were mounted normally. We need the root of the filesystem to be at / and not at /mnt. The chroot command allows us to run a command shell and to specify the root point we wish to use.
因为grub希望在某些地方找到东西,所以我们需要使文件系统看起来像是正常安装的。 我们需要文件系统的根目录位于/而不是/ mnt。 chroot命令允许我们运行命令外壳并指定我们要使用的根点 。
The command we use is:
我们使用的命令是:
chroot /mnt

Note that the command prompt has changed.
请注意,命令提示符已更改。
We can now issue the update-grub command to have grub read the fstab file and reconfigure itself.
现在,我们可以发出update-grub命令,以使grub读取fstab文件并重新配置自身。
update-grub

.
。
Once grub has reconfigured itself, we need to install a new instance of grub on the hard drive. Note this is the hard drive sda, not the filesystem sda1. Don’t include the “1”, just type “sda”.
grub重新配置后,我们需要在硬盘驱动器上安装新的grub实例。 请注意,这是硬盘驱动器sda,而不是文件系统sda1。 不包括“ 1”,只需键入“ sda”。
grub-install /dev/sda

重新启动Linux (Rebooting Your Linux)
Reboot your system and remove the Live CD. When your system has rebooted, open a terminal window, and enter the following command:
重新启动系统并删除Live CD。 系统重新引导后,打开终端窗口,然后输入以下命令:
blkid
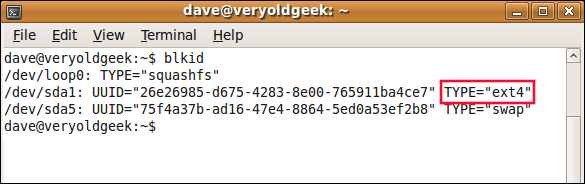
As we can see, the filesystem is now an ext4 filesystem.
如我们所见,文件系统现在是ext4文件系统。
The machine that this article was researched on took so long to reboot (over ten minutes) it was assumed something had gone wrong and that it would never come back up.
本文所研究的机器花了很长时间重新启动(十分钟以上),因此认为出了点问题,并且永远不会恢复正常。
Perhaps it was because it was a virtual machine, or perhaps some of the filesystem conversion takes place during that first boot up. Either way, patience won out, and it eventually did resurface. If your machine does something similar, wait it out. All might not be lost.
可能是因为它是一台虚拟机,或者可能是某些文件系统转换是在第一次启动时发生的。 无论哪种方式,耐心都会胜出,并且最终的确浮出水面。 如果您的计算机执行类似的操作,请等待它。 一切可能不会丢失。
Subsequent reboots were as quick as normal.
随后的重新启动与正常情况一样快。
升级您Linux (Upgrade Your Linux Instead)
Well, we got there. But you’re still left with a non-standard hybrid using an old Linux release on a modern filesystem.
好吧,我们到了那里。 但是,您仍然剩下在现代文件系统上使用旧Linux发行版的非标准混合文件。
If moving to a new filesystem is important to you, and your hardware can take it, moving to a current Linux distribution is the best route to take. You will enjoy all of the other security and software advantages that come from doing so.
如果迁移到新文件系统对您很重要,并且您的硬件可以使用它,那么迁移到当前Linux发行版是最好的选择。 您将享受到的所有其他安全性和软件优势。
Still, if there’s nothing else for it—and sometimes we don’t have the options we wish we did—these steps will allow you to upgrade your filesystem.
但是,如果没有其他用途(有时我们没有希望做的选择),这些步骤将使您可以升级文件系统。
翻译自: https://www.howtogeek.com/424868/how-to-migrate-ext2-or-ext3-file-systems-to-ext4-on-linux/
如何在hdfs上将文件下载


 1万+
1万+

 被折叠的 条评论
为什么被折叠?
被折叠的 条评论
为什么被折叠?
 到【灌水乐园】发言


