


 在Linux及其类Unix系统中,文件系统以统一的目录树形式存在,挂载设备使其成为整体的一部分。`mount`、`df`等命令提供对文件系统的控制,包括挂载、卸载和重新挂载。本文介绍了如何使用这些命令,包括挂载ISO映像、Samba共享,以及创建和管理挂载点。此外,还探讨了如何处理文件系统的错误和故障诊断。
File systems in Linux and Unix-like operating systems like macOS can be mounted, unmounted, and remounted using the terminal. This is a powerful and versatile tool—here’s everything you need to know.
可以使用终端安装,卸载和重新安装Linux和类似macOS的类Unix操作系统中的文件系统。 这是一个功能强大且用途广泛的工具,这是您需要了解的所有内容。
Linux文件系统 (The Linux File System)
The file systems in Linux, macOS, and other Unix-like operating systems don’t use separate volume identifiers for storage devices in the way that, say, Windows does. Windows assigns each volume a drive letter such as C: or D: and the file system for each volume is a tree of directories sitting below that drive letter.
Linux,macOS和其他类似Unix的操作系统中的文件系统不像 Windows那样使用单独的卷标识符来存储设备。 Windows为每个卷分配一个驱动器号,例如C:或D :,每个卷的文件系统是位于该驱动器号下方的目录树。
In Linux, the file system is an all-in-one directory tree. A mounted storage device has its file system grafted onto that tree so that it appears to be an integral part of one cohesive file system. The newly mounted file system will be accessible via the directory to which it is mounted. That directory is called the mount point for that file system.
在Linux中,文件系统是多合一目录树。 挂载的存储设备将其文件系统移植到该树上,因此它似乎是一个内聚文件系统的组成部分。 新安装的文件系统可通过其安装目录访问。 该目录称为该文件系统的安装点。
Many file systems are auto-mounted at boot time or on-the-fly as storage volumes connected to the computer during runtime. Cautious system admins can turn off the runtime auto-mount features so that they can control connections to the system.
许多文件系统会在启动时自动挂载,或在运行时动态存储为连接到计算机的存储卷。 谨慎的系统管理员可以关闭运行时自动安装功能,以便他们可以控制与系统的连接。
This means storage devices connected during runtime might not auto-mount and will require mounting manually. Mounting a file system manually lets you make decisions about that file system, such as where the mount point will be and whether the file system is going to be read-only or read-write.
这意味着在运行时连接的存储设备可能不会自动挂载,需要手动挂载。 手动挂载文件系统使您可以决定该文件系统,例如挂载点将在何处以及文件系统是只读还是读写。
Whether it is out of necessity or through choice, the mount, umount and remount commands give you the ability to take control of this important aspect of your Linux system.
无论是出于必要还是通过选择, mount , umount和remount命令使您能够控制Linux系统的这一重要方面。
使用mount询问您的文件系统 (Interrogate Your File System With mount)
Mount has a great many options, but to list all of the mounted file systems on your computer requires no options at all. Simply type mount and hit Enter:
挂载有很多选项 ,但是要列出计算机上所有已挂载的文件系统,根本不需要任何选项。 只需键入mount并按Enter:

mount will list all of the connected file systems in the terminal window.
mount将在终端窗口中列出所有连接的文件系统。
It can be difficult to pick through that dump of data to find what you are looking for.
很难通过数据转储找到您要寻找的内容。
You can refine the output by asking mount to list only the file systems of interest to you. The -t (type) option tells mount what type of file system to report on.
您可以通过要求mount仅列出您感兴趣的文件系统来优化输出。 -t (类型)选项告诉mount要报告的文件系统类型。
mount -t tmpfs
mount -t ext4
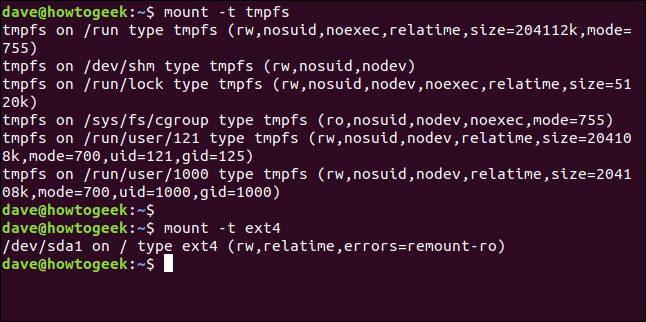
As an example, we have asked mount to list only tmpfs file systems. We get a much more manageable output.
例如,我们要求mount仅列出tmpfs文件系统。 我们得到了更易于管理的输出。
A tmpfs file system appears as though it were a regular, mounted file system but it is actually stored in volatile memory—the tmp stands for temporary—instead of on a persistent storage device.
tmpfs文件系统看起来好像是一个常规的已挂载文件系统,但实际上存储在易失性内存中( tmp代表临时的),而不是存储在持久性存储设备上。
You’ll want to substitute the tmpfs parameter for the file type in which you are interested.
您需要用tmpfs参数代替您感兴趣的文件类型。
We’ve also issued a command to list ext4 file systems. On this test computer, there is a single ext4 file system, it is on device sda—the first storage device mounted, usually the main hard drive—and mounted on /, which is the root of the file system tree.
我们还发布了列出ext4文件系统的命令。 在此测试计算机上,有一个ext4文件系统,它位于设备sda第一个已安装的存储设备,通常是主硬盘驱动器),并位于文件系统树的根目录/上。
The other indicators mean:
其他指标表示:
rw: The file system is readable and writable.
rw :文件系统是可读写的。
relatime: The kernel is using an optimized scheme to record file access and modification meta-data.
relatime :内核正在使用一种优化的方案来记录文件访问和修改元数据。
errors=remount -o: If a sufficiently serious error is detected, the file system will be remounted in read-only mode to allow diagnosis.
errors = remount -o :如果检测到足够严重的错误,将以只读模式重新安装文件系统以进行诊断。
使用df询问您的文件系统 (Interrogate Your File System With df)
The df command can also be used to display which file systems are mounted and where their mount points are.
df命令还可以用于显示安装了哪些文件系统以及它们的安装点在哪里。
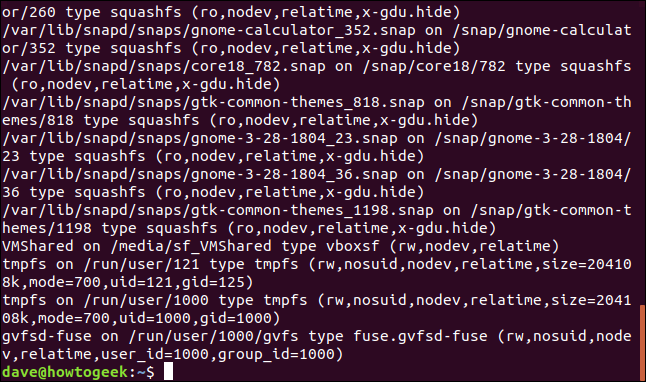
df used with no parameters gives you the same information overload problem as mount. As an example, in Ubuntu Linux, there is a squashfs pseudo-file system created for each and every application that has been installed using the snap command. Who wants to see all of those?
不带参数的df给您带来与mount相同的信息过载问题。 例如,在Ubuntu Linux中,为使用snap命令安装的每个应用程序创建了一个squashfs伪文件系统。 谁想看到所有这些?
To force df to ignore them—or any other file system type— use the -x (exclude) option:
要强制df忽略它们-或任何其他文件系统类型-请使用-x (排除)选项:
df -x squashfs
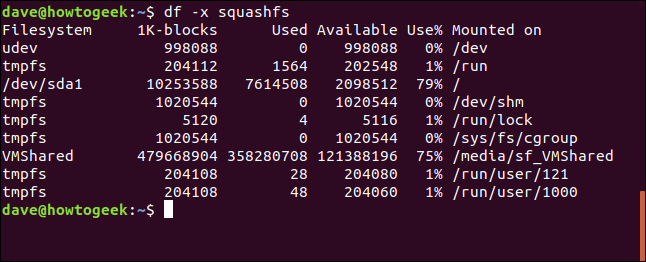
You can easily see the names of the file systems, their capacities, used and free space, and their mount points.
您可以轻松地查看文件系统的名称,它们的容量,已用和可用空间以及它们的安装点。
在fstab中重新挂载所有文件系统 (Remounting All File Systems in fstab)
All of the file systems mounted at boot time have entries in a file called fstab, which is the file system table located within /etc.
引导时挂载的所有文件系统在名为fstab的文件中都有条目, fstab是位于/etc的文件系统表。
You can use mount to force a “refresh” and remount all the file systems listed in fstab. Under normal operating conditions this is not required. It really comes into its own if you have issues with multiple file systems.
您可以使用mount强制“刷新”并重新装入fstab列出的所有文件系统。 在正常操作条件下,这不是必需的。 如果您对多个文件系统有疑问,它确实会发挥作用。
You’ll need to use sudo, so you’ll be prompted for your password.
您需要使用sudo ,因此系统会提示您输入密码。
sudo mount -a

Admittedly, on a correctly operating computer, it is a little underwhelming.
诚然,在正确运行的计算机上,它有点让人难以理解。
On a computer with file system issues, however, the remount might clear the problems. If that doesn’t happen, then at least you will get diagnostic messages on the screen and in the system logs that will guide you to seek out the cause of the problem.
但是,在出现文件系统问题的计算机上,重新安装可能会解决问题。 如果这没有发生,那么至少您会在屏幕上和系统日志中获得诊断消息,这些消息将指导您查找问题的原因。
挂载ISO映像 (Mounting an ISO Image)
It is easy to mount an ISO image so that you can access its contents as part of the file system.
挂载ISO映像很容易,因此您可以将其内容作为文件系统的一部分进行访问。
This will work with any ISO image. In this example, we happen to be using a Tiny Core Linux ISO because it is conveniently small and quick to download. (A tiny Linux distribution with a GUI, in 18 MB! You probably have .mp3 files bigger than that.)
这将适用于任何ISO映像。 在此示例中,我们碰巧正在使用Tiny Core Linux ISO,因为它体积小且下载速度快。 (一个带有GUI的小型Linux发行版,大小为18 MB!您可能有大于此大小的.mp3文件。)
In the same directory as the ISO image, issue this command. Substitute the name of the ISO file that you are mounting.
在与ISO映像相同的目录中,发出此命令。 替换要安装的ISO文件的名称。
sudo mount -t iso9660 -o loop TinyCore-current.iso /mnt
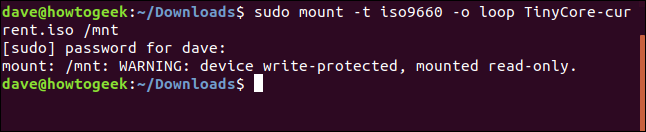
Because we need to use sudo you’ll need to enter your password.
因为我们需要使用sudo ,所以需要输入密码。
The -t (type) option tells mount what type of file system we are mounting. It is an ISO file, so we provide the iso9660 type specifier.
-t (类型)选项告诉mount我们正在挂载的文件系统类型。 这是一个ISO文件,因此我们提供了iso9660类型说明符。
The -o (options) flag is used to pass extra parameters to mount. Our parameter is loop.
-o (选项)标志用于将额外的参数传递给mount 。 我们的参数是loop 。
We’re using loop to force mount to use a loop device file to connect to our ISO image. A loop device file allows a file (like the ISO image) to be mounted and treated as though it were a storage device.
我们正在使用loop来强制mount以使用循环设备文件来连接到我们的ISO映像。 循环设备文件允许挂载和处理文件(如ISO映像),就好像它是存储设备一样。
Device files are special files used as an interface so that connected devices appear as though they were a normal file system file. This is part of the everything in Linux is a file design philosophy.
设备文件是用作接口的特殊文件,因此连接的设备看起来就像是普通的文件系统文件。 这是Linux中所有内容的一部分, 是文件设计理念。
There are many different types of device files. We saw one earlier when we noted that the only ext4 file system on this test machine was mounted on / and was called sda.
有许多不同类型的设备文件。 当我们注意到该测试机上唯一的ext4文件系统安装在/并称为sda时,我们看到了一个。
To be more accurate, that ext4 file system is on a storage device connected to the file system through the /dev/sda device file and the file system on that storage device mounted at /.
更准确地说,该ext4文件系统位于通过/dev/sda设备文件连接到该文件系统的存储设备上,并且该存储设备上的文件系统位于/ 。
We have to provide the name of the ISO image of course, and we need to let mount know where we’d like the file system to be mounted. We have chosen /mnt.
当然,我们必须提供ISO映像的名称,并且需要让mount知道我们希望将文件系统挂载的位置。 我们选择了/mnt 。
The ISO image is mounted. A reminder that ISO images are always mounted in read-only mode appears in the terminal window.
已安装ISO映像。 在终端窗口中会出现一个提示,即ISO映像始终以只读模式安装。
探索ISO映像 (Exploring the ISO Image)
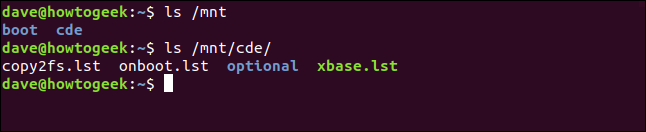
Now that it is mounted we can navigate the directories in the ISO image in the same way as any other part of the file system. Let’s list the files in the ISO image. It is mounted at /mnt remember.
现在已经安装了它,我们可以以与文件系统其他任何部分相同的方式浏览ISO映像中的目录。 让我们在ISO映像中列出文件。 它挂在/mnt记住。
ls /mnt
ls /mnt/cde/
卸载ISO映像 (Unmounting the ISO Image)
To unmount a mounted file system, use the umount command. Note that there is no “n” between the “u” and the “m”—the command is umount and not “unmount.”
要卸载已挂载的文件系统,请使用umount命令。 请注意,“ u”和“ m”之间没有“ n”,该命令是umount而不是“ unmount”。
You must tell umount which file system you are unmounting. Do so by providing the file system’s mount point.
您必须告诉umount哪个文件系统。 通过提供文件系统的挂载点来实现。
sudo umount /mnt

No news is good news. If there’s nothing to report, then all went well.
没有消息就是好消息。 如果没有什么要报告的,那么一切都进行得很好。
创建挂载点 (Creating a Mount Point)
You can create and use your own mount points. We’re going to create one called isomnt and mount our ISO image on that. A mount point is just a directory. So we can use mkdir to create our new mount point.
您可以创建和使用自己的挂载点。 我们将创建一个称为isomnt并在其上挂载我们的ISO映像。 挂载点只是一个目录。 因此,我们可以使用mkdir创建新的挂载点。
sudo mkdir /media/dave/isomnt

Now we can use the same command format as before to mount our ISO image. This time we won’t mount it on /mnt, we’ll mount it on /media/dave/isomnt/:
现在,我们可以使用与以前相同的命令格式来挂载我们的ISO映像。 这次我们不会将其安装在/mnt ,而是将其安装在/media/dave/isomnt/ :
sudo mount -r -t iso9660 -o loop TinyCore-current.iso /media/dave/isomnt/

We can now access the mounted file system from our new mount point.
现在,我们可以从新的挂载点访问挂载的文件系统。
ls /media/dave/isomnt/cde/optional

But those pathways are getting very long. That’s quickly going to become tiresome. Let’s do something about that.
但是这些途径变得很长。 这很快就会变得令人厌烦。 让我们为此做些事情。
绑定安装点 (Binding a Mount Point)
You can bind a mount point to another directory. The mounted file system can then be accessed either through the original mount point or through the directory that is bound to it.
您可以将安装点绑定到另一个目录。 然后,可以通过原始安装点或绑定到该文件系统的目录来访问已安装的文件系统。
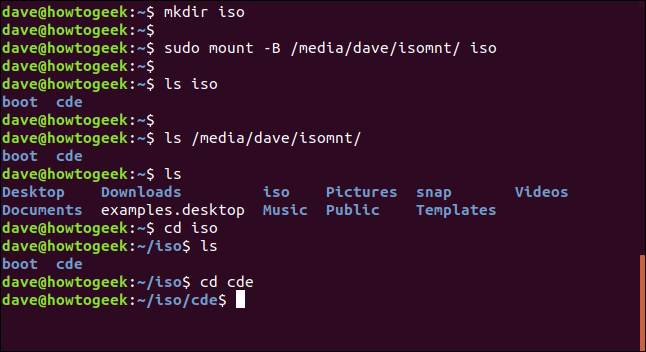
Here’s a worked example. We’ll create a directory in our home directory called iso. Then we’ll bind the mount point of the ISO image /media/dave/isomnt to the new iso directory in our home directory.
这是一个可行的示例。 我们将在主目录中创建一个名为iso目录。 然后,我们将ISO映像/media/dave/isomnt的安装点绑定到主目录中的新iso目录。
We’ll be able to access the ISO image through the original mount point /media/dave/isomnt and through the new iso directory. The -B (bind) option requires the name of the mount point and the name of the directory to bind it to.
我们将能够通过原始挂载点/media/dave/isomnt以及新的iso目录访问ISO映像。 -B (绑定)选项需要安装点的名称以及将其绑定到的目录的名称。
mkdir iso
sudo mount -B /media/dave/isomnt/ iso
ls iso
ls /media/dave/isomnt
cd iso
ls
cd cde
对绑定使用umount (Using umount With Binds)
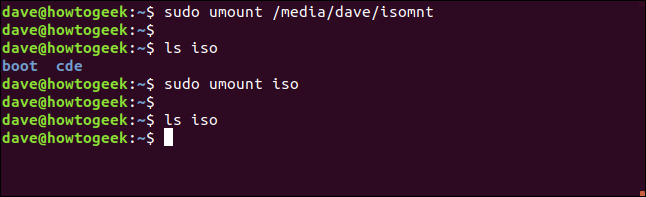
A file system that has had its mount point bound to another directory requires unmounting from its mount point and the bind point.
已经将安装点绑定到另一个目录的文件系统需要从其安装点和绑定点卸载。
Even if we unmount the file system from its original mount point, you can still access the file system from its bound directory. The file system must be unmounted from that directory also.
即使我们从原始安装点卸载文件系统,您仍然可以从其绑定目录访问文件系统。 还必须从该目录卸载文件系统。
sudo umount /media/dave/isomnt
ls iso
sudo umount iso
ls iso
挂载软盘 (Mounting a Floppy Disk)
A floppy drive (with a floppy disk in it) is a storage device. That means an sd (for storage device) device file will be used to connect to the physical device. We must establish which is the next free sd device file. We can do this by piping the output of df through grep and looking for entries with “sd” in them.
软盘驱动器(其中装有软盘)是一种存储设备。 这意味着sd(用于存储设备)设备文件将用于连接到物理设备。 我们必须确定哪个是下一个免费的sd设备文件。 为此,我们可以通过grep将df的输出传递给管道,然后查找其中包含“ sd”的条目。
df | grep /dev/sd

On this computer, there is a single sd device file in use. This is /dev/sda. The next sd device file issued will be /dev/sdb. That means when we connect the floppy drive to the computer, Linux will use /dev/sdb to connect to the floppy drive.
在这台计算机上,有一个正在使用的sd设备文件。 这是/dev/sda 。 下一个发布的sd设备文件将是/dev/sdb 。 这意味着当我们将软盘驱动器连接到计算机时,Linux将使用/dev/sdb连接到软盘驱动器。
We will tell mount to mount the file system on the floppy disk in the floppy drive that is connected to /dev/sdb to the /mnt mount point.
我们将告诉mount将文件系统mount到连接到/dev/sdb到/mnt挂载点的软盘驱动器中。
Insert the floppy disk into the floppy drive and connect the floppy drive to a USB port on the computer. Issue the following command:
将软盘插入软盘驱动器中,然后将软盘驱动器连接到计算机上的USB端口。 发出以下命令:
sudo mount /dev/sdb /mnt

文件系统标签 (File System Labels)
We can use the -l (label) option with mount to find out what, if any, label is attached to a file system. Labels are no more than arbitrary names. They have no functional purpose.
我们可以将-l (标签)选项与mount一起使用,以找出标签附加到文件系统的内容(如果有)。 标签只不过是任意名称。 它们没有功能目的。
We’re using the -t (type) option to ask mount to report on vfat file systems only.
我们正在使用-t (类型)选项,要求mount仅在vfat文件系统上报告。
mount -l -t vfat

You’ll find the label in square brackets at the end of the listing. The label for this floppy drive is NORTUN.
您会在列表末尾的方括号中找到该标签。 该软盘驱动器的标签为NORTUN。
We can access the floppy drive through the /mnt mount point.
我们可以通过/mnt挂载点访问软盘驱动器。
cd /mnt
ls
ls -l AMATCH.C
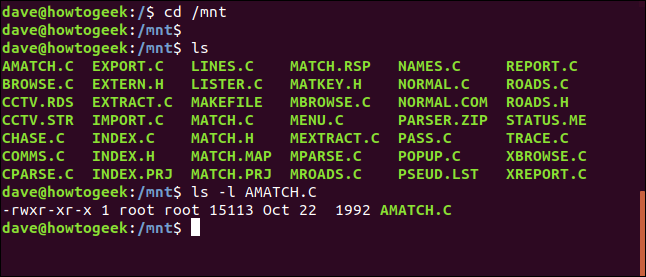
The floppy contains C language source code files. The date stamp of one file shows it was last modified on October 1992. It is probably older than a lot of our readers. (Needless to say the meaning of NORTUN as a label is lost in the mists of time.)
软盘包含C语言源代码文件。 一个文件的日期戳显示该文件的最新修改时间为1992年10月。它可能比我们的很多读者还老。 (不用说NORTUN作为标签的含义在时间的迷雾中迷失了。)
If we repeat our df piped through grep command to list sd device files, we’ll see that there are now two of them.
如果我们重复通过grep命令传递的df以列出sd设备文件,我们将看到现在有两个。
df | grep /dev/sd

Our floppy drive is showing as mounted on /dev/sdb as we expected. The file system on the floppy disk in the drive is mounted at /mnt .
我们的软盘驱动器显示为按预期挂载在/dev/sdb 。 驱动器中软盘上的文件系统安装在/mnt 。
To unmount the floppy we use umount and pass it the device file as a parameter.
要卸载软盘,我们使用umount并将设备文件作为参数传递给它。
sudo umount /dev/sdb

umount懒惰选项 (The umount Lazy Option)
What happens if you (or another user) are using the file system when you try to unmount it? The unmount will fail.
如果您(或另一个用户)在尝试卸载文件系统时正在使用它,会发生什么? 卸载将失败。
sudo umount /dev/sdb

It failed because the current working directory of the user is within the file system he is trying to unmount. Linux is smart enough not to let you saw off the branch you’re sitting on.
失败是因为用户的当前工作目录在他要卸载的文件系统中。 Linux足够聪明,不会让您看不到所坐的分支。
To overcome this use the -l (lazy) option. This causes umount to wait until the file system is able to be safely unmounted.
要解决此问题,请使用-l (惰性)选项。 这将导致umount等待,直到能够安全地卸载文件系统为止。
sudo umount -l /dev/sdb
ls
cd ~
ls /mnt
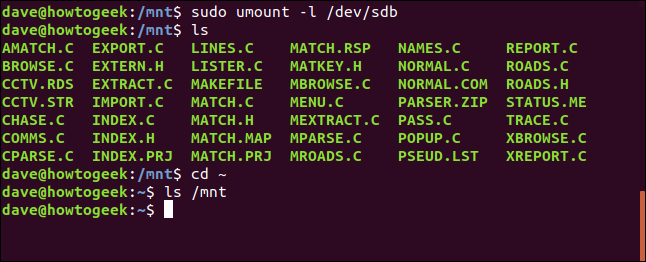
Even though the umount command is issued, the file system is still mounted, and the user can list the files as normal.
即使发出umount命令,文件系统仍会挂载,并且用户可以正常列出文件。
As soon as the user changes directory to their home directory, the floppy file system is released and is unmounted. Trying to list the files in /mnt produces no results.
用户将目录更改到其主目录后,便会释放并卸载软盘文件系统。 尝试列出/mnt中的文件不会产生任何结果。
挂载Samba共享 (Mounting a Samba Share)
Samba is a set of software services that allow network shares to be accessed interchangeably between Linux and Unix-like operating systems, and Windows operating systems.
Samba是一组软件服务 ,允许在Linux和类Unix操作系统以及Windows操作系统之间互换访问网络共享。
Setting up Samba is beyond the scope of this article. But, if you have authorized access to a Samba share that has been made available to you, this is how you can mount it in Linux.
设置Samba超出了本文的范围。 但是,如果您有权访问已提供给您的Samba共享,则可以通过这种方式将其安装在Linux中。
A Raspberry Pi connected to the same network as the test machine has a Samba share on it. It is a directory called Backup that has given the Samba name of “share.” Let’s make an SSH connection to it and look at the contents of the shared directory. The shared directory is on a USB stick mounted on the Pi.
连接到与测试计算机相同网络的Raspberry Pi带有Samba共享。 这是一个名为Backup的目录,该目录的Samba名称为“ share”。 让我们对其建立SSH连接,并查看共享目录的内容。 共享目录位于Pi上安装的USB记忆棒上。
The username is pi and the network name of the Raspberry Pi is marineville.local.
用户名是pi ,Raspberry Pi的网络名称是marineville.local 。
ssh pi@marineville.local
ls /media/pi/USB64/Backup
exit
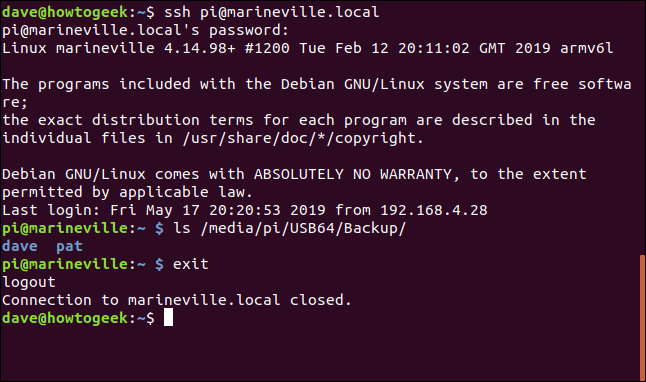
The user issues the SSH command and is prompted for their Raspberry Pi password.
用户发出SSH命令,并被提示输入其Raspberry Pi密码。
They provide their password and are authenticated. The terminal window prompt changes to pi@marineville because it’s connected to the Raspberry Pi.
他们提供密码并通过身份验证。 终端窗口提示更改为pi@marineville因为它已连接到Raspberry Pi。
They list the contents of the shared directory at /media/pi/USB64/Backup . The contents are two directories, one called dave and one called pat. So now we know what to expect when we mount the Samba share.
它们列出了共享目录/media/pi/USB64/Backup 。 内容是两个目录,一个称为dave ,一个称为pat 。 因此,现在我们知道挂载Samba共享时的期望了。
They type exit to disconnect from the Raspberry Pi and the prompt changes back to dave@howtogeek.
他们键入exit断开与Raspberry Pi的连接,提示更改回dave@howtogeek 。
To use Samba, you must install the cifs-utils package.
要使用Samba,您必须安装cifs-utils软件包。
Use apt-get to install this package onto your system if you’re using Ubuntu or another Debian-based distribution. On other Linux distributions, use your Linux distribution’s package management tool instead.
如果您使用的是Ubuntu或其他基于Debian的发行版,请使用apt-get将此软件包安装到系统上。 在其他Linux发行版上,请改用Linux发行版的程序包管理工具。
sudo apt-get install cifs-utils

When the installation has completed, mount the share with a command like the following, changing the IP address, share name and mount point (which must already exist) to suit your circumstances.
安装完成后,使用如下命令安装共享,更改IP地址,共享名称和安装点(必须已经存在)以适合您的情况。
sudo mount -t cifs -o credentials=/etc/samba/creds,uid=1000,gid=1000 //192.168.4.13/share /media/dave/NAS

Let’s break down the parts of that command.
让我们分解该命令的各个部分。
-t cifs: The file system type is cifs.
-t cifs :文件系统类型为cifs。
-o credentials=/etc/samba/creds,uid=1000,gid=1000: The options parameters are the path to a file called
credsthat is secured and contains the user name and password for the Raspberry Pi user; the User ID (UID) and Group ID (GID) that are used to set the owner and group of the root of the file system.-o凭据= / etc / samba / creds,uid = 1000,gid = 1000 :选项参数是一个名为
creds的文件的路径,该文件受保护并包含Raspberry Pi用户的用户名和密码; 用户ID(UID)和组ID(GID),用于设置文件系统根目录的所有者和组。//192.168.4.13/share: The network location of the device with the Samba share on it, and the Samba name of the shared directory. The root of the share is a directory called
Backup, but its Samba share name is set toshare.//192.168.4.13/share :具有Samba共享的设备的网络位置,以及共享目录的Samba名称。 共享的根目录是一个名为
Backup的目录,但其Samba共享名称设置为share。/media/dave/NAS: The name of the mount point. You must create your mount point in advance.
/ media / dave / NAS :挂载点的名称。 您必须提前创建安装点。
By accessing our mount point at /media/dave/NAS we are accessing the shared directory on the Raspberry Pi across the network. We can see the two folders on the Raspberry Pi called dave and pat.
通过访问/media/dave/NAS挂载点,我们可以跨网络访问Raspberry Pi上的共享目录。 我们可以在Raspberry Pi上看到两个名为dave和pat文件夹。
cd /media/dave/NAS

创建和挂载文件系统 (Creating and Mounting a File System)
You can use the dd command to create an image file, then use mkfs to create a file system inside it. That file system can then be mounted. This is a good way to practice and experiment with mount.
您可以使用dd命令创建映像文件,然后使用mkfs在其中创建文件系统。 然后可以挂载该文件系统。 这是练习和尝试mount的好方法。
We use the if (input file) option to tell dd to use the stream of zero values from /dev/zero as the input file.
我们使用if (输入文件)选项告诉dd将/dev/zero的零值流用作输入文件。
The of (output file) is a new file called geek_fs.
在of (输出文件)是一个所谓的新文件geek_fs 。
We’re using the bs (block size) option to request a block size of 1 MB.
我们正在使用bs (块大小)选项来请求1 MB的块大小。
We use the count option to tell dd to include 20 blocks in the output file.
我们使用count选项告诉dd在输出文件中包括20个块。
dd if=/dev/zero of./geek_fs bs=1M count=20
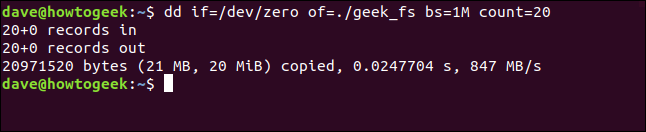
That creates our image file for us. It contains nothing but zero values.
这样就为我们创建了图像文件。 它只包含零值。
We can create a working file system inside the geek_fs file using the mkfs command. The -t (type) option allows us to select the file system type. We’re creating an ext4 system.
我们可以使用mkfs命令在geek_fs文件中创建一个工作文件系统。 -t (类型)选项允许我们选择文件系统类型 。 我们正在创建一个ext4系统。
mkfs -t ext4 ./geek_fs
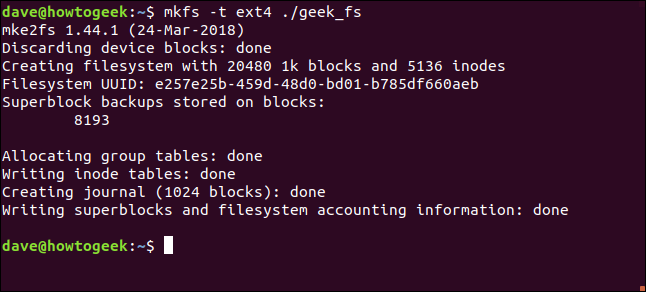
That’s all it takes to have a working file system.
这就是拥有一个正常工作的文件系统所需要的。
Let’s mount it on /media/dave/geek and then use chown to set the owner and group ownerships to allow access to it.
让我们将其安装在/media/dave/geek ,然后使用chown设置所有者和组所有权以允许对其进行访问。
sudo mount ./geek_fs /media/dave/geek
sudo chown dave:users /media/dave/geek

Does it work? Let’s change into the new file system and copy in a file to see.
它行得通吗? 让我们切换到新的文件系统并复制文件以进行查看。
cd /media/dave/geek
cp /etc/fstab .
ls -l
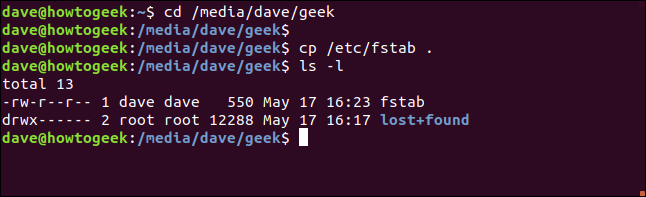
We were able to change directory into the new file system, and we successfully made a copy of the /etc/fstab file. It’s working!
我们能够将目录更改为新文件系统,并且成功复制了/etc/fstab文件。 工作正常!
If we use mount to list the mounted file systems but restrict its output to ext4 file systems using the -t (type) option, we’ll see that there are now two mounted ext4 file systems.
如果我们使用mount列出已挂载的文件系统,但使用-t (type)选项将其输出限制为ext4文件系统,我们将看到现在有两个已挂载的ext4文件系统。
mount -t ext4

重新挂载文件系统 (Remounting a File System)
Remounting a file system uses the -o remount option. It is typically done to change a file system from a read-only (testing) state to a read-write (production) state.
重新-o remount文件系统使用-o remount选项。 通常可以完成将文件系统从只读(测试)状态更改为读写(生产)状态的操作。
Let’s mount our floppy drive again. This time we’ll use the -r (read-only) flag. Then we’ll pipe mount through grep and look at the details of the floppy file system.
让我们再次安装软盘驱动器。 这次,我们将使用-r (只读)标志。 然后,我们将通过grep管道mount ,并查看软盘文件系统的详细信息。
sudo mount -r /dev/sdb /mnt
mount | grep /mnt
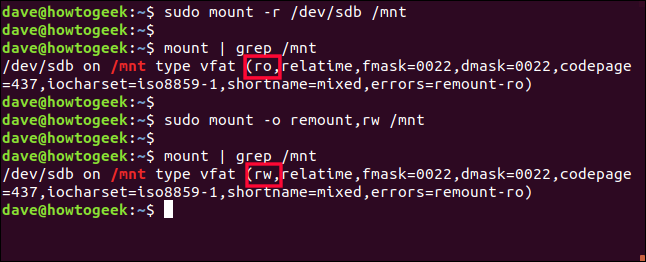
As you can see the highlighted ro indicates the file system is mounted read-only.
如您所见,突出显示的ro表示文件系统是只读安装的。
Using the -o remount option with the rw (read-write) flag we can unmount and remount the file system with the new settings, all in one command.
通过将-o remount选项与rw (读写)标志一起使用,我们可以在一个命令中使用新设置卸载和重新挂载文件系统。
sudo mount -o remount,rw /mnt
Repeating the piping of mount through grep shows us that the ro has been replaced by rw (highlighted). The file system is now in read-write mode.
重复通过grep进行mount ,向我们显示ro已被rw代替(突出显示)。 文件系统现在处于读写模式。
mount | grep /mnt
(不)移动文件系统 ((Not) Moving a File System)
You used to be able to unmount a file system and remount it on another mount point with a single command.
您曾经能够卸载文件系统,然后使用单个命令将其重新安装到另一个安装点。
The -M (move) option in mount exists specifically to allow you to do that. But it no longer works in Linux distributions that have moved over to systemd. And that’s most of the big names.
mount的-M (移动)选项专门用于允许您执行此操作。 但是它不再适用于已经转移到systemd Linux发行systemd 。 那就是大多数大牌。
If we try to move a file system from /mnt to ./geek, it fails and gives the error message shown below. Trying to list the files in the files ystem through ./geek returns no results.
如果我们尝试将文件系统从/mnt移至./geek ,它将失败并显示以下错误消息。 尝试通过./geek列出文件系统中的文件./geek返回任何结果。
sudo mount -M /mnt ./geek
ls ./geek
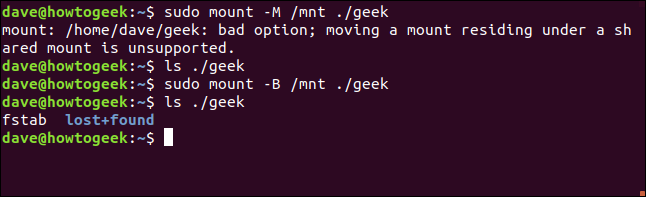
The workaround is to use the -B (bind) option that we used earlier to bind the original mount point to the new mount point.
解决方法是使用我们先前使用的-B (绑定)选项将原始安装点绑定到新的安装点。
sudo mount -B /mnt ./geek
ls ./geek
Apart from not freeing up the original mount point, this will have the same practical outcome.
除了不释放原始安装点之外,这将具有相同的实际结果。
最终观察 (Final Observations)
Using the --make-private option it was possible to force the move to take place on systemd versions of Linux. That technique is not presented here for two reasons.
使用--make-private选项它可能迫使移动采取地方systemdLinux版本。 由于两个原因,此处未介绍该技术。
- It may have unpredictable behavior. 它可能具有不可预测的行为。
- It was not persistent and would need to repeat at each reboot. 它不是持久性的,需要在每次重新启动时重复。
Devuan Linux uses SysV init not systemd. A computer was loaded with the latest version of Devuan and tested. The -M (move) option worked as expected on that system.
DevuanLinux使用SysV init已不systemd 。 装有最新版本的Devuan的计算机已经过测试。 -M (移动)选项在该系统上按预期工作。
Apart from the systemd issues with the -M (move) option, you should find the use of mount and umount straightforward. These are great commands to have up your sleeve when faced with a damaged system, and you have to start piecing the file system back together by hand.
除了-M (移动)选项的systemd问题之外,您还应该直接使用mount和umount 。 当遇到损坏的系统时,这些命令非常有用,您必须手动将文件系统拼凑在一起。
翻译自: https://www.howtogeek.com/414634/how-to-mount-and-unmount-storage-devices-from-the-linux-terminal/


 1153
1153

 被折叠的 条评论
为什么被折叠?
被折叠的 条评论
为什么被折叠?
 到【灌水乐园】发言


