


关闭防火墙ping请求超时
When Windows Firewall is enabled with default settings, you can’t use the ping command from another device to see if your PC is alive. Here’s how to change that.
当使用默认设置启用Windows防火墙后,您将无法使用其他设备上的ping命令来查看您的PC是否处于活动状态。 更改方法如下。
The ping command works by sending special packets known as Internet Control Message Protocol (ICMP) Echo Requests to a target device, and then waiting for that device to send back an ICMP Echo Reply packet. This not only lets you test whether a network-connected device is active, but it also measures the response time and displays that for you, as well. By default, Windows Firewall with Advanced Security blocks ICMP Echo Requests from the network. Sure, you could take the drastic step of disabling the firewall for testing purposes, but a simpler solution is just to create an exception that allows ICMP requests through the firewall. We’re going to show you how to do that both from the Command Prompt and the Windows Firewall with Advanced Security interface. (Note that, if you have an antivirus with a firewall or another type of third-party firewall program installed, you’ll need to open ports in that firewall instead of the built-in Windows Firewall.)
ping命令通过向目标设备发送称为Internet控制消息协议(ICMP)回显请求的特殊数据包,然后等待该设备发回ICMP Echo Reply数据包来工作。 这不仅使您能够测试联网设备是否处于活动状态,而且还可以测量响应时间并为您显示响应时间。 默认情况下, 具有高级安全性的Windows防火墙会阻止来自网络的ICMP回显请求。 当然,您可以采取激进的步骤来禁用防火墙以进行测试 ,但是更简单的解决方案是创建一个允许ICMP请求通过防火墙的异常。 我们将向您展示如何从命令提示符和具有高级安全性的Windows防火墙界面执行此操作。 (请注意,如果您的防病毒软件安装了防火墙或其他类型的第三方防火墙程序,则需要在该防火墙中打开端口,而不是内置Windows防火墙。)
The instructions in this article should work for Windows 7, 8, and 10. We’ll point out where there are any major differences.
本文中的说明应适用于Windows 7、8和10。我们将指出存在主要差异的地方。
Warning: Creating exceptions and opening ports through your firewall does open up security risks. Allowing ping requests isn’t too big a deal, but it’s usually best to block anything you don’t need.
警告 :创建例外并通过防火墙打开端口会增加安全风险。 允许ping请求没什么大不了的,但是通常最好阻止不需要的任何东西。
使用命令提示符允许ping请求 (Allow Ping Requests by Using the Command Prompt)
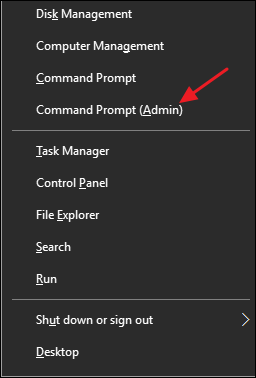
The fastest way to create an exception for ping requests is with the Command Prompt. You’ll need to open it with admin privileges. To do so in Windows 8 and 10, press Windows+X and then select “Command Prompt (Admin).” In Windows 7, hit Start and type “command prompt.” Right-click the resulting entry and choose “Run as Administrator.”
创建ping请求异常的最快方法是使用命令提示符。 您需要使用管理员权限打开它。 为此,请在Windows 8和10中按Windows + X,然后选择“命令提示符(管理员)”。 在Windows 7中,点击“开始”,然后键入“命令提示符”。 右键单击结果条目,然后选择“以管理员身份运行”。
To enable ping requests, you’re going to create two exceptions to allow traffic through the firewall—one for ICMPv4 requests and one for ICMPv6 requests. To create the ICMPv4 exception, type (or copy and paste) the following command at the prompt and then hit Enter:
要启用ping请求,您将创建两个例外以允许通过防火墙的流量-一个例外用于ICMPv4请求,另一个例外用于ICMPv6请求。 要创建ICMPv4异常,请在提示符下键入(或复制并粘贴)以下命令,然后按Enter键:
netsh advfirewall firewall add rule name="ICMP Allow incoming V4 echo request" protocol=icmpv4:8,any dir=in action=allow

And to create the ICMPv6 exception, use this command:
要创建ICMPv6异常,请使用以下命令:
netsh advfirewall firewall add rule name="ICMP Allow incoming V6 echo request" protocol=icmpv6:8,any dir=in action=allow
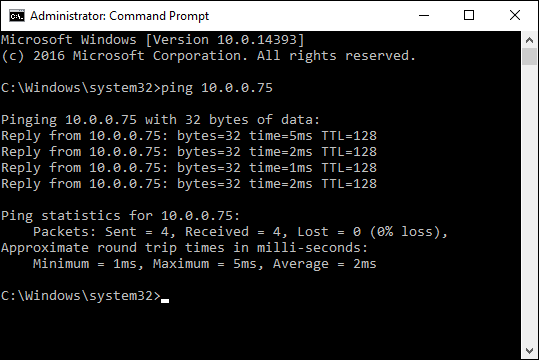
The changes will take place immediately—no need to restart your PC or anything. Now, if you ping your PC from a remote device, you should get an actual result.
更改将立即进行-无需重新启动PC或任何其他操作。 现在,如果您从远程设备ping PC,您应该会得到实际的结果。
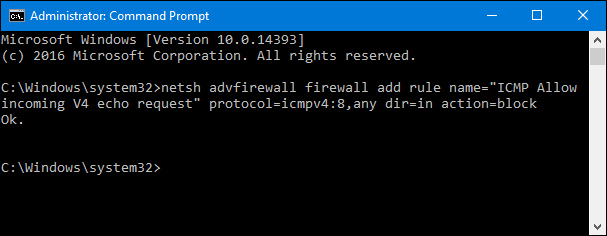
To disable ping requests again, you’ll need to disable both exceptions you created. For the ICMPv4 exception, type (or copy and paste) this command at the prompt and hit Enter:
要再次禁用ping请求,您需要禁用创建的两个异常。 对于ICMPv4异常,请在提示符下键入(或复制并粘贴)此命令,然后按Enter:
netsh advfirewall firewall add rule name="ICMP Allow incoming V4 echo request" protocol=icmpv4:8,any dir=in action=block
And to disable ICMPv6 requests, use this command:
要禁用ICMPv6请求,请使用以下命令:
netsh advfirewall firewall add rule name="ICMP Allow incoming V6 echo request" protocol=icmpv6:8,any dir=in action=block
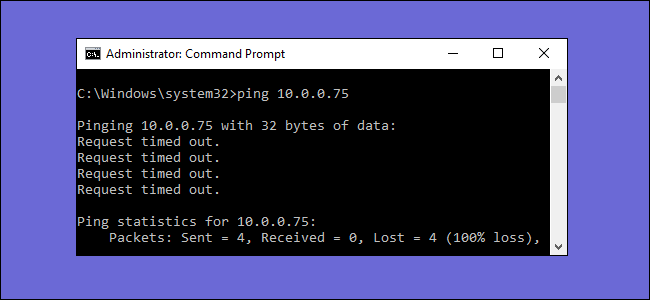
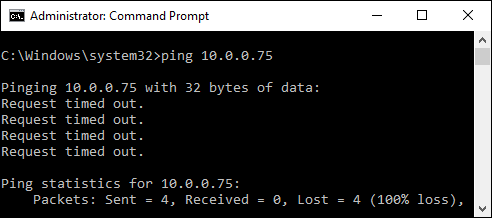
When requests are blocked, ping requests to your PC will be met with a “Request timed out” error.
当请求被阻止时,对PC的ping请求将遇到“请求超时”错误。
Note that when using the commands we just covered, you can use any name for the rule you want. However, when you go to disable a rule, you’ll want to use the same rule name as when you created it. If you forget the name of the rule, you can use the Command Prompt to see a list of all rules. Just type the following command and hit Enter:
请注意,在使用我们刚刚介绍的命令时,您可以为所需的规则使用任何名称。 但是,当您禁用规则时,您将要使用与创建规则时相同的规则名称。 如果忘记了规则名称,则可以使用命令提示符查看所有规则的列表。 只需键入以下命令,然后按Enter:
netsh advfirewall firewall show rule name=all
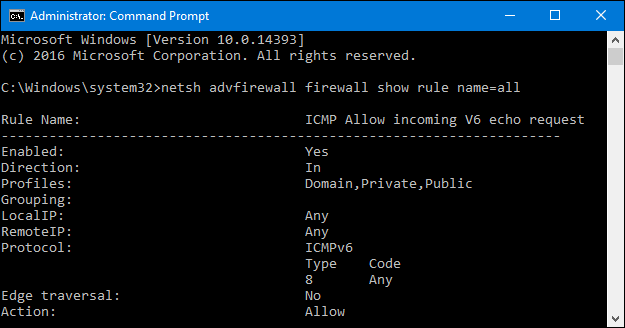
You’ll see lots of rules listed, but scroll back up to the top of the list and you should see any rules you’ve created right at the top.
您会看到列出了许多规则,但是向上滚动到列表的顶部,您应该在顶部看到自己创建的任何规则。
通过使用具有高级安全性的Windows防火墙来允许Ping请求 (Allow Ping Requests by Using Windows Firewall With Advanced Security)
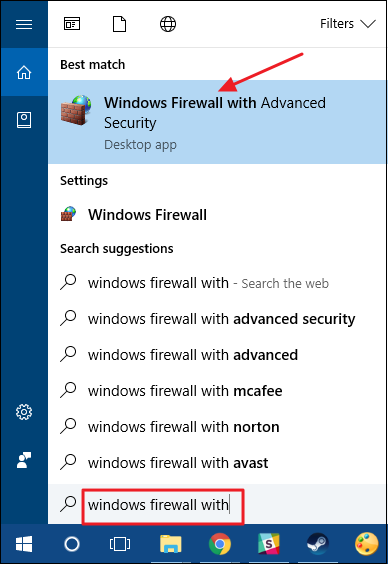
While the Command Prompt is the quickest way to add an exception to your firewall for ping requests, you can also do this in the graphic interface using the “Windows Firewall with Advanced Security” app. Hit Start, type “windows firewall with,” and then launch “Windows Firewall with Advanced Security.”
虽然命令提示符是向防火墙添加ping请求例外的最快方法,但是您也可以使用“具有高级安全性的Windows防火墙”应用程序在图形界面中执行此操作。 单击开始,键入“ Windows防火墙使用”,然后启动“具有高级安全性的Windows防火墙”。
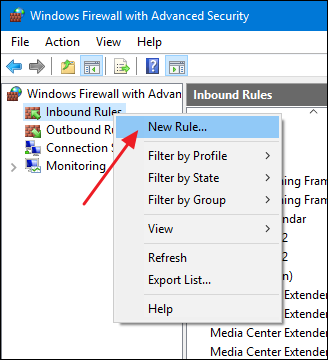
You’re going to create two new rules—one for allowing ICMPv4 requests and one for allowing ICMPv6 requests. In the left pane, right-click “Inbound Rules” and choose “New Rule.”
您将创建两个新规则-一个用于允许ICMPv4请求的规则,另一个用于允许ICMPv6请求的规则。 在左窗格中,右键单击“入站规则”,然后选择“新规则”。
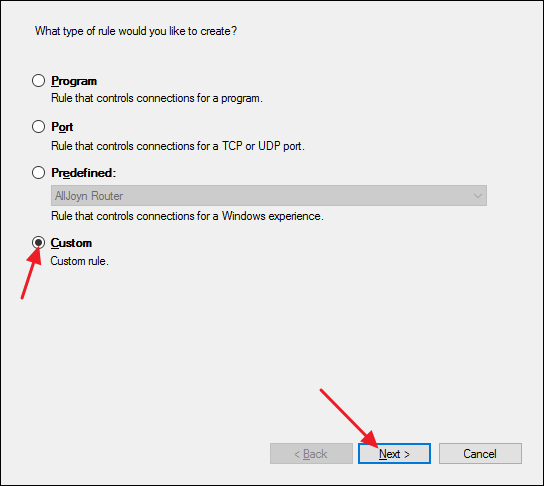
In the “New Inbound Rule Wizard” window, select “Custom” and then click “Next.”
在“新建入站规则向导”窗口中,选择“自定义”,然后单击“下一步”。
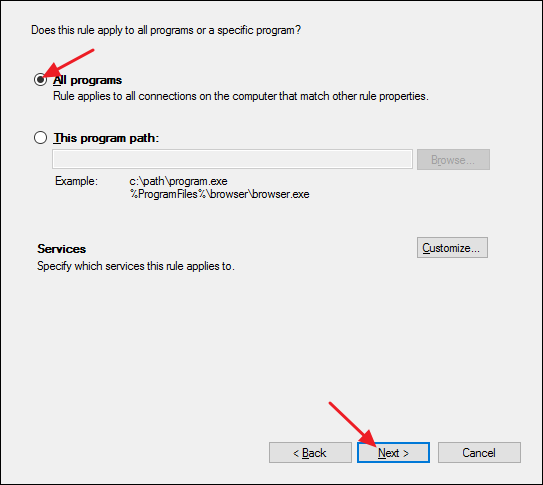
On the next page, make sure “All programs” is selected and then click “Next.”
在下一页上,确保选中“所有程序”,然后单击“下一步”。
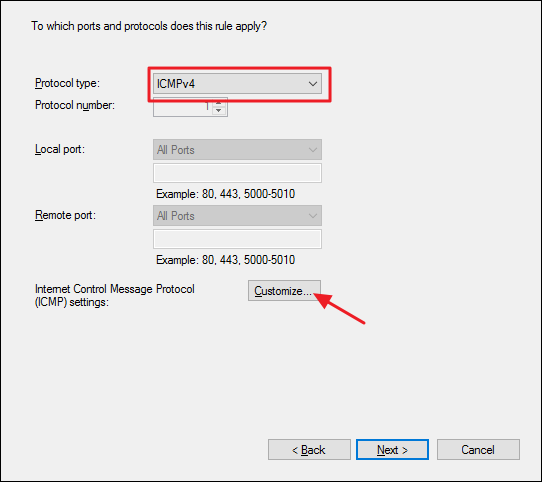
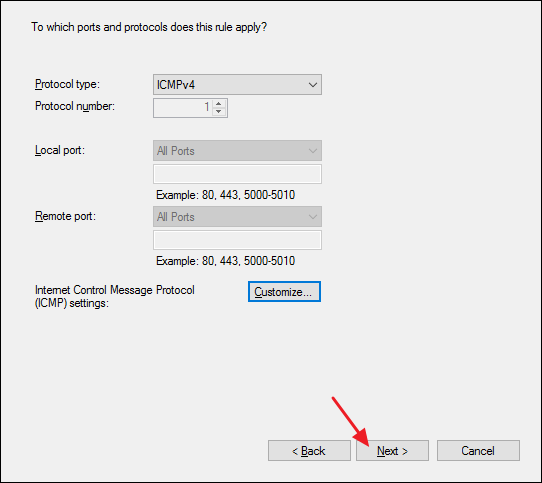
On the next page, choose “ICMPv4” from the “Protocol type” dropdown and then click the “Customize” button.
在下一页上,从“协议类型”下拉列表中选择“ ICMPv4”,然后单击“自定义”按钮。
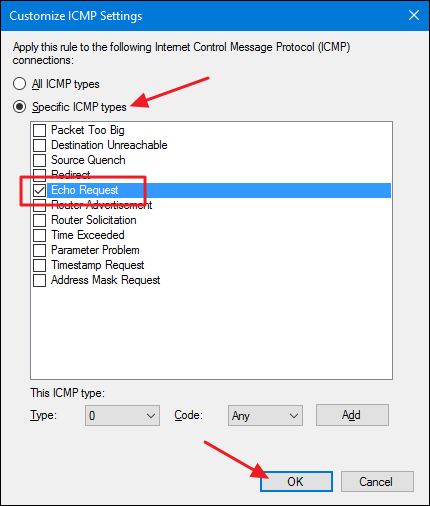
In the “Customize ICMP Settings” window, select the “Specific ICMP types” option. In the list of ICMP types, enable “Echo Request” and then click “OK.”
在“自定义ICMP设置”窗口中,选择“特定ICMP类型”选项。 在ICMP类型列表中,启用“回显请求”,然后单击“确定”。
Back in the “New Inbound Rule Wizard” window, you’re ready to click “Next.”
返回“新建入站规则向导”窗口,您可以单击“下一步”。
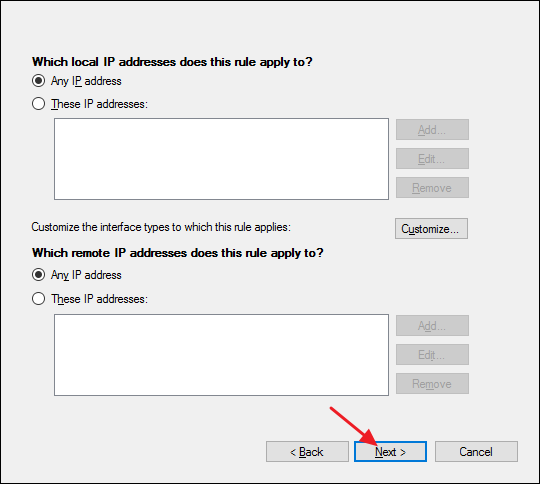
On the next page, it’s easiest to just make sure that the “Any IP address” options are selected for both local and remote IP addresses. If you want, you can configure specific IP addresses to which your PC will respond to a ping request. Other ping requests are ignored. This lets you narrow things down a bit so that only certain devices will be able to ping your PC. You can also configure separate lists of approved IP addresses for your local and remote (Internet) networks. However you set it up, click “Next” when you’re done.
在下一页上,最简单的方法是确保为本地和远程IP地址都选择了“任何IP地址”选项。 如果需要,您可以配置PC响应ping请求的特定IP地址。 其他ping请求将被忽略。 这使您可以缩小范围,以便仅某些设备能够ping您的PC。 您也可以为本地和远程(Internet)网络配置单独的认可IP地址列表。 但是,设置完成后,请单击“下一步”。
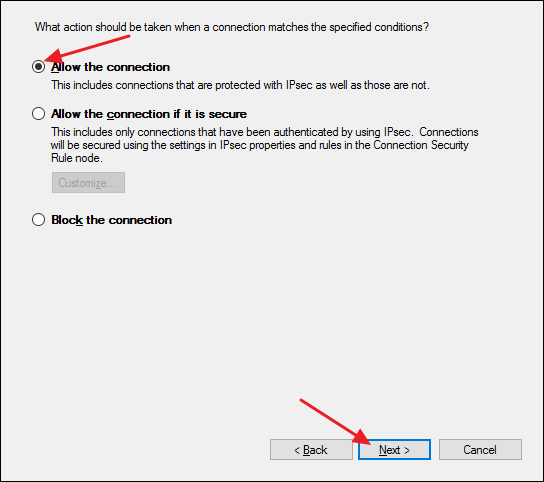
On the next page, make sure that the “Allow the connection” option is enabled and then click “Next.”
在下一页上,确保启用“允许连接”选项,然后单击“下一步”。
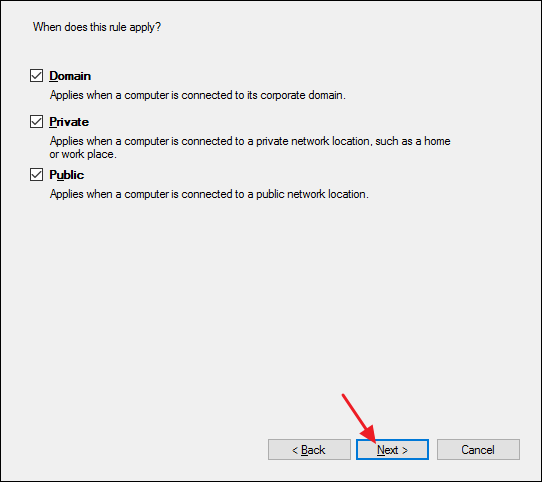
The next page allows you some control over when the rule is active. If you want the rule to apply no matter what type of network it’s connected to, leave the options at their default and just click “Next.” However, if your PC is not part of a business (and doesn’t connect to a domain), or if you prefer it not respond to ping requests when it’s connected to a public network, feel free to disable those options.
下一页允许您控制何时激活规则。 如果您希望该规则无论连接到哪种类型的网络都适用,请将这些选项保留为默认值,然后单击“下一步”。 但是,如果您的PC不属于企业(并且未连接到域),或者如果您希望PC在连接到公共网络时不响应ping请求,请随时禁用这些选项。
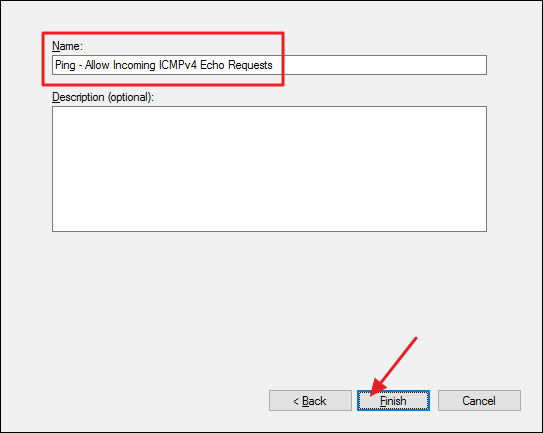
Finally, you need to give your new rule a name, and optionally a description. However, we do recommend that you at least get the text “ICMPv4” in there because you’ll also be creating a second rule for allowing ICMPv6 requests. Choose whatever makes sense to you and then click “Finish.”
最后,您需要给新规则起一个名字,以及一个可选的描述。 但是,我们建议您至少在其中输入文本“ ICMPv4”,因为您还将创建第二条规则来允许ICMPv6请求。 选择对您有意义的任何内容,然后单击“完成”。
Unfortunately, you’re not quite done yet. It’s a good idea to go ahead and create a second rule that allows incoming ICMPv6 requests. Mostly, it’s a good just-in-case measure. People tend to use IPv4 addresses when issuing ping commands, but some networking apps use IPv6. Might as well have your bases covered.
不幸的是,您还没有完成。 继续创建允许传入ICMPv6请求的第二条规则是一个好主意。 通常,这是一个很好的案例。 人们在发出ping命令时倾向于使用IPv4地址,但是某些网络应用程序使用IPv6。 可能还包括您的基地。
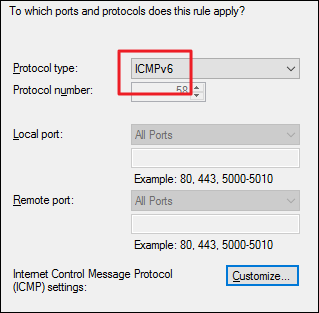
Follow the same steps we just went over and set all the options exactly the same as we did for the ICMPv4 rule. However, when you get to the ports and protocols page, select “ICMPv6” from the dropdown instead of “ICMPv4.” That—and creating a different name for the rule—are the only two things that change.
遵循我们刚刚经过的相同步骤,并将所有选项设置为与对ICMPv4规则完全相同的设置。 但是,当您进入端口和协议页面时,请从下拉列表中选择“ ICMPv6”,而不是“ ICMPv4”。 唯一的两件事就是更改,并为规则创建一个不同的名称。
When you have the two new rules in place, you can close the “Windows Firewall with Advanced Security” app. No need to restart your PC or anything. Your PC should immediately begin responding to pings.
有了两个新规则后,您可以关闭“具有高级安全性的Windows防火墙”应用程序。 无需重启PC或其他任何操作。 您的PC应该立即开始响应ping。
If you ever want to disable all this, you could go back and delete those two rules. However, you might be better off just disabling the rules instead. That way, you can re-enable them without recreating them. In the “Windows Firewall with Advanced Security” app, select “Inbound Rules” on the left, and locate the rules you made in the middle pane. Right-click a rule and choose “Disable” to prevent ping requests from passing through the firewall.
如果您想禁用所有这些功能,则可以返回并删除这两个规则。 但是,最好禁用这些规则。 这样,您可以重新启用它们而无需重新创建它们。 在“具有高级安全性的Windows防火墙”应用中,选择左侧的“入站规则”,然后在中间窗格中找到您制定的规则。 右键单击规则,然后选择“禁用”,以防止ping请求通过防火墙。

Allowing ping requests to reach your PC is not something everyone will need to do. But, if you’re doing any kind of network troubleshooting, ping can be a valuable tool. It’s also pretty easy to turn on and off once you have things set up.
每个人都不需要允许ping请求到达您的PC。 但是,如果您要进行任何类型的网络故障排除,则ping可能是一个有价值的工具。 设置完所有东西后,打开和关闭它也很容易。
关闭防火墙ping请求超时


 7474
7474

 被折叠的 条评论
为什么被折叠?
被折叠的 条评论
为什么被折叠?
 到【灌水乐园】发言


