


禁用window安全
By default, using the Windows+L key combination locks Windows, so you have to re-type your password to use the computer. If you find yourself occasionally hitting that combination by accident—and you don’t really have a need to lock Windows—here’s how to disable it.
默认情况下,使用Windows + L组合键可锁定Windows,因此您必须重新输入密码才能使用计算机。 如果您发现自己偶尔偶然碰到该组合,并且您实际上并不需要锁定Windows,请按以下步骤禁用它。
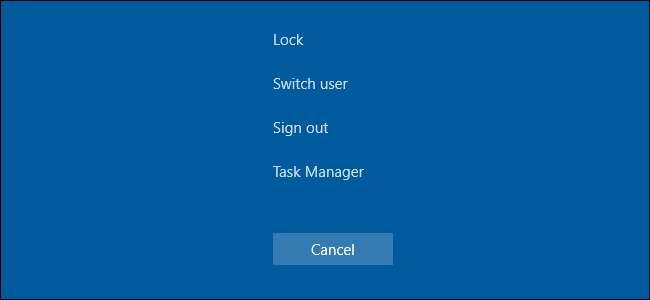
Versions of Windows going back to at least Windows 2000 have given you the ability to lock your workstation. Since the Windows XP days, the easiest way to do the locking is by pressing Windows+L, though you can also press Ctrl+Alt+Delete and lock your PC from the page that comes up or choose the “Lock” command on the Start menu. You can even create a shortcut for locking Windows. When you lock your PC, it immediately returns you to the sign in screen, but unlike signing out, all your open apps and windows remain intact. It’s much like when your PC goes to sleep, assuming you have it set to ask for a password when you return. To disable locking your PC in Windows 7, 8, or 10, you just need to perform a quick hack in the Registry or Local Group Policy Editor.
至少可以追溯到Windows 2000的Windows版本使您能够锁定工作站。 从Windows XP开始,最简单的锁定方法是按Windows + L,尽管您也可以按Ctrl + Alt + Delete并从出现的页面中锁定PC或在“开始”菜单中选择“锁定”命令。菜单。 您甚至可以创建用于锁定Windows的快捷方式 。 锁定PC时,它将立即使您返回登录屏幕,但与注销不同,所有打开的应用程序和窗口均保持不变。 就像您的PC进入睡眠状态一样,假设您已将其设置为在返回时要求输入密码 。 要禁用将您的PC锁定在Windows 7、8或10中,您只需要在注册表或本地组策略编辑器中进行快速修改即可。
家庭用户:通过编辑注册表禁用Windows Lock (Home Users: Disable Windows Lock by Editing the Registry)
If you have a Windows Home edition, you will have to edit the Windows Registry to make these changes. You can also do it this way if you have Windows Pro or Enterprise, but feel more comfortable working in the Registry than Group Policy Editor. (If you have Pro or Enterprise, though, we recommend using the easier Group Policy Editor, as described in the next section.)
如果您使用的是Windows Home版本,则必须编辑Windows注册表才能进行这些更改。 如果您拥有Windows Pro或Enterprise,也可以通过这种方式进行操作,但是与组策略编辑器相比,在注册表中进行操作会更自在。 (但是,如果您具有Pro或Enterprise,我们建议使用更简单的组策略编辑器,如下一节所述。)
Standard warning: Registry Editor is a powerful tool and misusing it can render your system unstable or even inoperable. This is a pretty simple hack and as long as you stick to the instructions, you shouldn’t have any problems. That said, if you’ve never worked with it before, consider reading about how to use the Registry Editor before you get started. And definitely back up the Registry (and your computer!) before making changes.
标准警告:注册表编辑器是一个功能强大的工具,滥用它会使您的系统不稳定甚至无法运行。 这是一个非常简单的技巧,只要您按照说明进行操作,就不会有任何问题。 也就是说,如果您以前从未使用过它,请在开始之前考虑阅读有关如何使用注册表编辑器的信息 。 并在进行更改之前一定要备份注册表 (和您的计算机 !)。
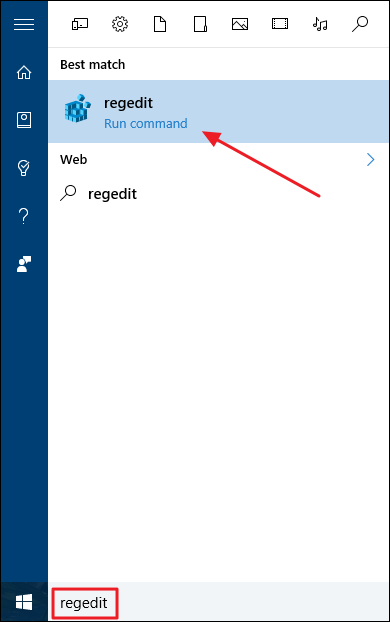
To get started, open the Registry Editor by hitting Start and typing “regedit.” Press Enter to open Registry Editor and give it permission to make changes to your PC.
首先,点击开始并键入“ regedit”,打开注册表编辑器。 按Enter键打开注册表编辑器,并授予其对PC进行更改的权限。
In the Registry Editor, use the left sidebar to navigate to the following key:
在注册表编辑器中,使用左侧边栏导航至以下键:
HKEY_CURRENT_USER\SOFTWARE\Microsoft\Windows\CurrentVersion\Policies\
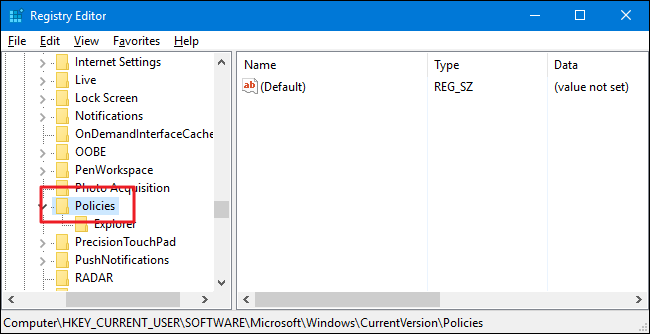
Next, you’re going to create a new key inside the Policies key. Right-click the Policies key and choose New > Key. Name the new key “System.” Note that if you already have a System key there, you can just skip this step.
接下来,您将在“ Policies键中创建一个新键。 右键单击“ Policies密钥,然后选择“新建”>“密钥”。 将新密钥命名为“ System”。 请注意,如果那里已经有System密钥,则可以跳过此步骤。

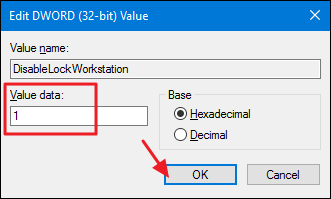
Now, you need to create a new value inside the System key you just created. Right-click the System key and choose New > DWORD (32-bit) Value. Name the new value “DisableLockWorkstation.”
现在,您需要在刚创建的System键内创建一个新值。 右键单击“ System键,然后选择“新建”>“ DWORD(32位)值”。 将新值命名为“ DisableLockWorkstation”。
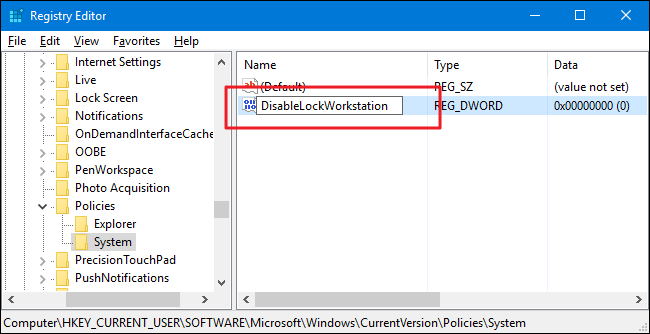
Next, double-click the new DisableLockWorkstation value to open its properties window. Change the value from 0 to 1 in the “Value data” box to enable the new key, which in turn disables the lock workstation functionality.
接下来,双击新的DisableLockWorkstation值以打开其属性窗口。 在“数值数据”框中将值从0更改为1以启用新密钥,从而禁用锁定工作站功能。
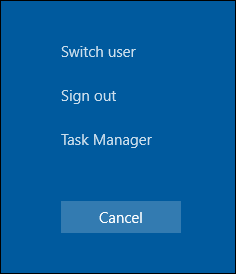
You can now close Registry Editor. The changes take place immediately, so no need to restart your computer or anything. Now, if you press Windows+L, nothing at all should happen. And if you press Ctrl+Alt+Delete—or click the User button on the Start menu, you’ll see that the “Lock” command has been removed.
现在,您可以关闭注册表编辑器。 更改会立即进行,因此无需重新启动计算机或任何其他操作。 现在,如果按Windows + L,则什么也不会发生。 并且,如果您按Ctrl + Alt + Delete或单击“开始”菜单上的“用户”按钮,您将看到“锁定”命令已被删除。
If you want reverse the change, just follow the same steps and set the DisableLockWorkstation value back to 0.
如果要撤消更改,只需遵循相同的步骤,并将DisableLockWorkstation值设置回0。
下载我们的一键式注册表黑客 (Download Our One-Click Registry Hack)
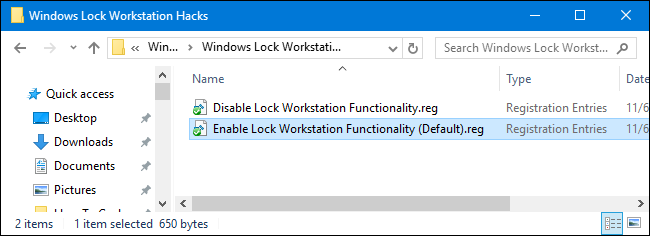
If you don’t feel like diving into the Registry yourself, we’ve created two downloadable registry hacks you can use. One hack disables the Lock Workstation functionality and the other enables it, restoring the default setting. Both are included in the following ZIP file. Double-click the one you want to use, click through the prompts, and then restart your computer.
如果您不想自己进入注册表,我们创建了两个可供下载的注册表黑客。 一种hack会禁用Lock Workstation功能,而另一种hack会恢复默认设置。 两者都包含在以下ZIP文件中。 双击要使用的计算机,单击提示,然后重新启动计算机。
Windows Lock Workstation Hacks
These hacks are really just the System key, stripped down to the DisableLockWorkstation value we described above, and then exported to a .REG file. Running the “Disable Lock Workstation Functionality” hack creates the System key and the DisableLockWorkstation value and also sets that value to 1. Running the “Enable Lock Workstation (Default)” hack sets the value back to 0. And if you enjoy fiddling with the Registry, it’s worth taking the time to learn how to make your own Registry hacks.
这些黑客实际上只是System密钥,被简化为我们上面描述的DisableLockWorkstation值,然后导出到.REG文件。 运行“禁用锁工作站功能” hack创建System密钥和DisableLockWorkstation值,并将该值设置为1。运行“启用锁工作站(默认)” hack将值设置回0。如果您喜欢摆弄Registry,值得花时间学习如何制作自己的Registry hack 。
专业版和企业版用户:使用本地组策略编辑器禁用工作站锁定 (Pro and Enterprise Users: Disable Workstation Lock with the Local Group Policy Editor)
If you’re using Windows 10 Pro or Enterprise, the easiest way to disable the Workstation Lock functionality is by using the Local Group Policy Editor. It’s a pretty powerful tool, so if you’ve never used it before, it’s worth taking some time to learn what it can do. Also, if you’re on a company network, do everyone a favor and check with your admin first. If your work computer is part of a domain, it’s also likely that it’s part of a domain group policy that will supersede the local group policy, anyway.
如果您使用的是Windows 10 Pro或Enterprise,禁用工作站锁定功能的最简单方法是使用本地组策略编辑器。 这是一个非常强大的工具,因此,如果您以前从未使用过它,那么值得花一些时间来学习它可以做什么 。 另外,如果您在公司网络中,请给所有人一个帮助,并首先与您的管理员联系。 如果您的工作计算机是域的一部分,则它也很可能是域组策略的一部分,无论如何,该组策略将取代本地组策略。
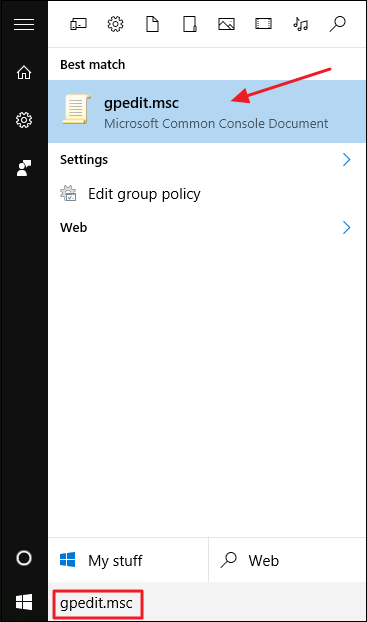
In Windows 10 Pro or Enterprise, hit Start, type “gpedit.msc,” and then press Enter.
在Windows 10 Pro或Enterprise中,单击“开始”,键入“ gpedit.msc”,然后按Enter。
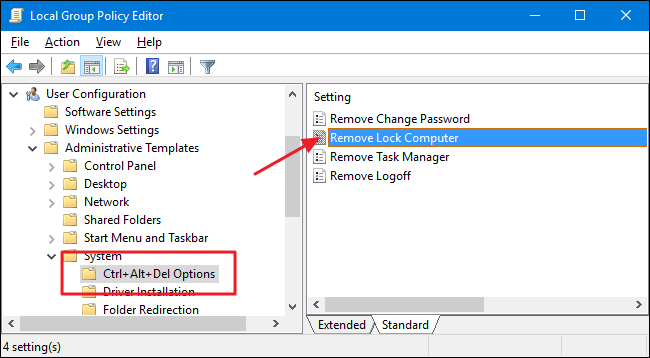
In the Local Group Policy Editor, in the left-hand pane, drill down to User Configuration > Administrative Templates > System > Ctrl+Alt+Del Options. On the right, find the “Remove Lock Computer” setting and double-click it.
在本地组策略编辑器的左侧窗格中,向下钻取到“用户配置”>“管理模板”>“系统”>“ Ctrl + Alt + Del选项”。 在右侧,找到“删除锁定计算机”设置,然后双击它。
In the properties window that opens, select the Enabled option and then click OK.
在打开的属性窗口中,选择“启用”选项,然后单击“确定”。
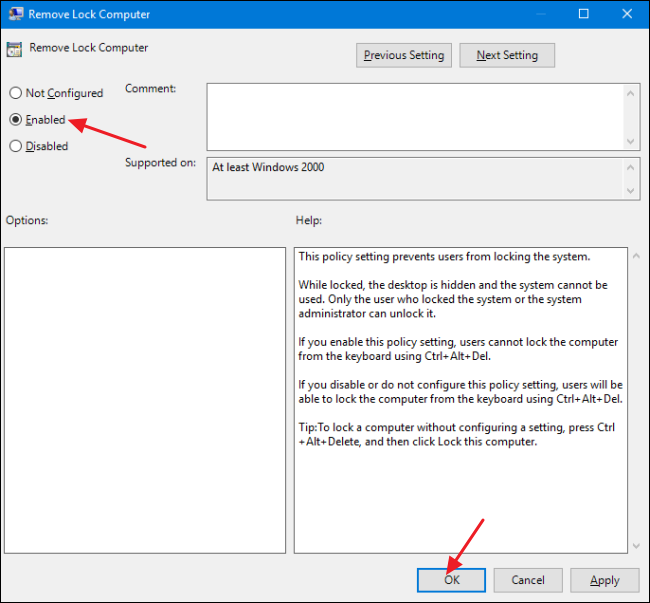
You can now exit the Local Group Policy Editor. Changes are immediate and pressing Windows+L should do nothing. The “Lock” command should also be removed from the Start menu and from the Ctrl+Alt+Delete security screen. If at any time you want to enable workstation locking again, just follow the same procedure and set that option back to Disabled or Not Configured.
现在,您可以退出本地组策略编辑器。 更改是立即的,按Windows + L不会执行任何操作。 还应该从“开始”菜单和Ctrl + Alt + Delete安全屏幕中删除“锁定”命令。 如果您想在任何时候再次启用工作站锁定,只需遵循相同的步骤,然后将该选项设置回“已禁用”或“未配置”即可。
禁用window安全


 4350
4350


 被折叠的 条评论
为什么被折叠?
被折叠的 条评论
为什么被折叠?
 到【灌水乐园】发言


