


启用页面脚本
Are you wanting to improve the search results view at Google and make better use of the webpage space? With a little user script magic you can make those search results look and fit better in your favorite browser.
您是否要改善Google的搜索结果视图并更好地利用网页空间? 借助一点点用户脚本魔术,您可以使这些搜索结果看起来更适合您喜欢的浏览器。
Note: This user script may conflict with the AutoPager extension if you have it installed in your favorite browser.
注意:如果您在喜欢的浏览器中安装了此用户脚本,则该脚本可能与AutoPager扩展名冲突。
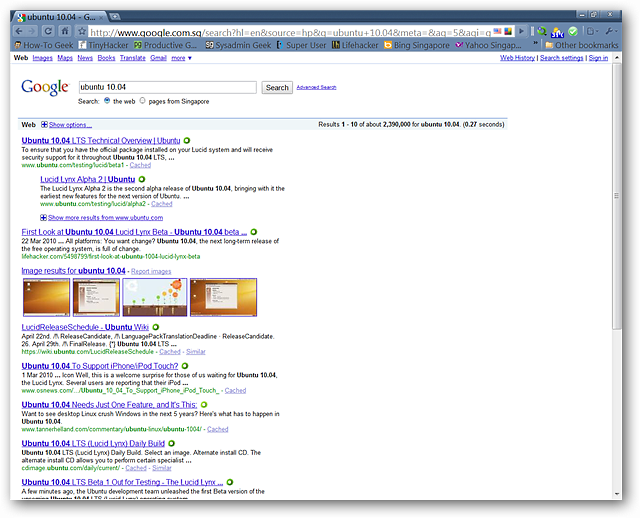
Before
之前
Here is the standard single column view of search results at Google. Not too bad but the available space could certainly be better utilized.
这是Google搜索结果的标准单列视图。 还不错,但是可用空间肯定可以更好地利用。
Note: For the purposes of our example we are using Google Chrome but this user script can be easily added to other browsers.
注意:在本示例中,我们使用的是Google Chrome浏览器,但是可以将该用户脚本轻松添加到其他浏览器中。
After
后
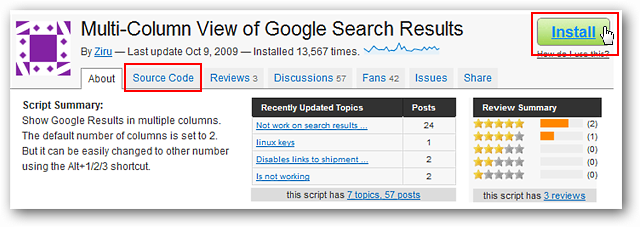
If you have never installed a user script in Chrome before it is just as simple as the regular extensions at the official Google website. Here you can see the details for the user script we are installing. Notice that you can view the source code if desired. To add the user script to Chrome click on “Install”.
如果您从未在Chrome中安装过用户脚本,那么它就像Google官方网站上的常规扩展程序一样简单。 在这里,您可以看到我们正在安装的用户脚本的详细信息。 请注意,您可以根据需要查看源代码。 要将用户脚本添加到Chrome,请单击“安装”。
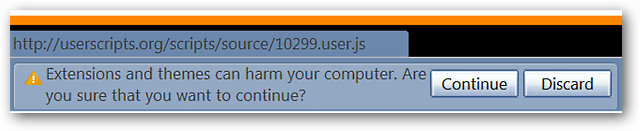
Once you start the install process you will see an intermediary message asking if you wish to continue in the lower left corner of your browser. Click “Continue” to move to the next step in the install process.
一旦开始安装过程,您将在浏览器的左下角看到一条中间消息,询问您是否要继续。 单击“继续”以转到安装过程的下一步。
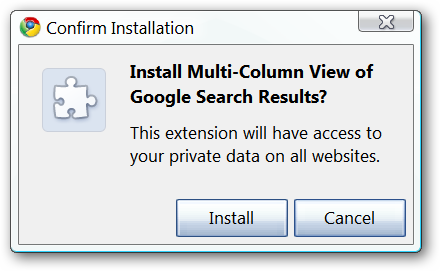
From this point on the install process is practically identical to the official extensions. You can see the final confirmation window here…click “Install” to finish adding the user script to Chrome.
从这一点来看,安装过程实际上与官方扩展相同。 您可以在此处看到最终的确认窗口…单击“安装”以完成将用户脚本添加到Chrome。
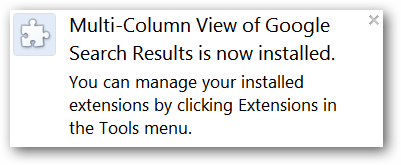
As with regular extensions you will see a post-install message in the upper right corner.
与常规扩展程序一样,您将在右上角看到安装后消息。
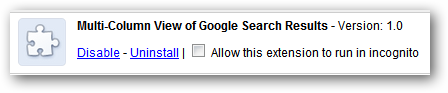
So, what does a user script look like in the “Extensions Page”? You can see the user script entry here…outside of an icon it looks rather identical to a normal extension.
那么,用户脚本在“扩展页面”中是什么样的? 您可以在此处看到用户脚本条目…在图标之外,它看上去与普通扩展名完全相同。
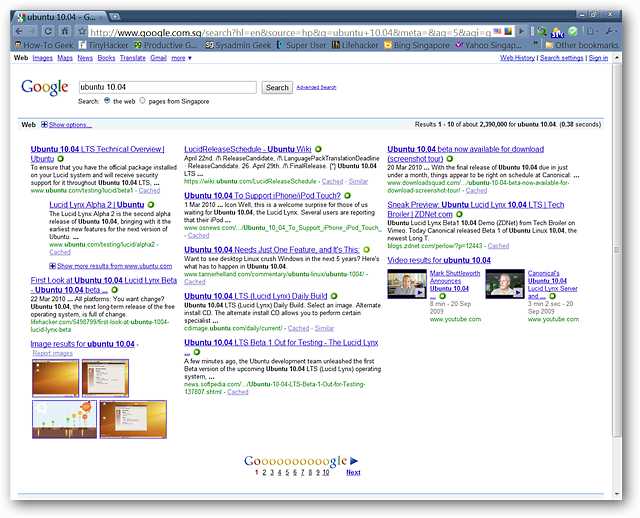
After refreshing the search page shown above we now have two columns of search results (default setting). This looks much much better than a single column view and there is little to no page scrolling required now.
刷新上面显示的搜索页面后,我们现在有两列搜索结果(默认设置)。 这看起来比单列视图好得多,并且现在几乎不需要页面滚动。

To switch to a three column view simply use the keyboard shortcut “Alt + 3”. To return to a single column view use “Alt + 1” and for the default two column view use “Alt + 2”. Three keyboard shortcuts for three different views…definitely a good thing.
要切换到三列视图,只需使用键盘快捷键“ Alt + 3”。 要返回单列视图,请使用“ Alt + 1”,对于默认的两列视图,请使用“ Alt + 2”。 三个键盘快捷键可用于三个不同的视图……绝对是一件好事。
Note: On our test system we needed to use the number keys at the top of our keyboard to switch views…this is most likely the result of unique settings on our test system.
注意:在测试系统上,我们需要使用键盘顶部的数字键来切换视图…这很可能是测试系统上唯一设置的结果。
Conclusion
结论
If you are wanting a better viewing experience when conducting searches at Google then this user script will make a very nice addition to your favorite browser.
如果您希望在Google上进行搜索时获得更好的观看体验,那么此用户脚本将为您最喜欢的浏览器增添一抹亮丽的色彩。
For those using Firefox you can add user scripts with the Greasemonkey & Stylish extensions. Using Opera Browser? See our how-to for adding user scripts to Opera here.
对于使用Firefox的用户,您可以添加带有Greasemonkey & Fashion扩展名的用户脚本。 使用Opera浏览器? 请在此处查看将用户脚本添加到Opera的方法。
Links
链接
Install the Multi-Column View of Google Search Results User Script
翻译自: https://www.howtogeek.com/howto/14266/enable-multi-column-google-searches-with-a-user-script/
启用页面脚本


 3621
3621

 被折叠的 条评论
为什么被折叠?
被折叠的 条评论
为什么被折叠?
 到【灌水乐园】发言


