


azure云数据库
The below screenshots and code samples are valid at the time of writing (May 2018) but as things in Azure can change so quickly, please check the latest documentation if a code sample doesn’t work as expected!
以下屏幕快照和代码示例在编写本文时(2018年5月)有效,但由于Azure的变化可能会如此Swift,因此,如果代码示例无法正常工作,请查看最新文档!
工具包 (Toolkit)
Essentially you have 3 choices to perform operations in Azure:
本质上,您有3种选择可以在Azure中执行操作:
- Install Azure CLI 2.0安装Azure CLI 2.0
- PowerShell (PS) PowerShell(PS)
- Azure Portal user interface (GUI) Azure门户用户界面(GUI)
This above is in the order of how things become available in Azure. Almost always CLI and PS get new things first (in some very rare cases CLI gets it even earlier) and sometime later it becomes part of the GUI.
上面是按事物在Azure中变得可用的顺序排列的。 几乎总是CLI和PS首先获得新功能( 在极少数情况下,CLI甚至更早地获得新功能),有时它又成为GUI的一部分。
Use a terminal of your choice. I started with the built-in PowerShell ISE environment, but sometimes it behaves inconsistently: a pop-up window appeared for a second then it disappeared. The PS window was hanging and didn’t give the prompt back to me even for CTRL-C or CTRL-break…, so I decided to go for VS Code as an environment to use (Download Visual Studio Code). It is a very neat tool and provides you a lot of add-ons and customization options. I love keyboard shortcuts, so this page was a very interesting read for me
使用您选择的终端。 我从内置的PowerShell ISE环境开始,但是有时它的行为不一致:弹出窗口出现一秒钟然后消失。 PS窗口正在挂起,即使是CTRL-C或CTRL-break…也没有给我提示,所以我决定将VS Code作为要使用的环境( 下载Visual Studio Code )。 这是一个非常简洁的工具,可为您提供许多附加组件和自定义选项。 我喜欢键盘快捷键,因此该页面对我来说非常有趣
Key Bindings for Visual Studio Code
There are pros and cons to both tools. According to my opinion the major advantage of CLI over PS is that it’s cross-platform, but on the other hand on a Windows machine, PS has a wider set of functionalities, as it’s a very versatile scripting environment from which you can manage everything in Windows.
两种工具都有优点和缺点。 根据我的观点,CLI相对于PS的主要优势在于它是跨平台的,但是另一方面,在Windows计算机上,PS具有更广泛的功能集,因为它是一种非常通用的脚本环境,您可以从中管理所有内容。视窗。
Instead of using VS Code or PowerShell ISE (or another tool of your choice), there are two ways for an in-browser experience:
除了使用VS Code或PowerShell ISE( 或您选择的其他工具 )之外,还可以通过两种方法来获得浏览器内体验:
- If you can’t use any installed development tools, Cloud Shell is available in the Azure Portal using the browser and you can still pick CLI or PS as your preferred scripting language: 如果您不能使用任何已安装的开发工具,则可以使用浏览器在Azure门户中使用Cloud Shell,并且仍可以选择CLI或PS作为首选脚本语言:
-
- Azure Cloud Shell (Azure Cloud Shell ( for this a storage needs to be mounted that you have to already have or create as part of the process)为此,必须安装您已经拥有或在过程中创建的存储 )
Azure CLI (Azure CLI)
To install it, download the .msi installer from the URL specified at the top and make sure you have admin rights. Then it’s best to go through the three options below that you can configure using the command
要安装它,请从顶部指定的URL下载.msi安装程序,并确保您具有管理员权限。 然后最好浏览以下三个选项,您可以使用以下命令进行配置
az configure
-

My approach is that I use colored JSON when I experimenting as it returns more information that can potentially be used to understand how this or that feature works. For day-to-day operations, the table output is easier to use.
我的方法是在进行实验时使用彩色JSON,因为它会返回更多信息,可用于了解此功能的工作方式。 对于日常操作,表输出更易于使用。
- your_username\.azure\logs\az.log)your_username \ .azure \ logs \ az.log)
- Enable anonymous CLI usage data collection. Up to you, I’m a privacy freak so I chose not to. 启用匿名CLI使用情况数据收集。 由您决定,我是个隐私狂,所以我选择不这样做。
在登录 (Logging in)
CLI – The simplest “az login”
CLI –最简单的“ az登录”
This is the simplest command to start with and can be further parameterized. If you don’t mind messing around with the browser as well, it works fine. The below process got very tedious very quickly to me:
这是最简单的命令,可以进一步进行参数化。 如果您也不介意浏览器,那么它可以正常工作。 以下过程对我来说非常繁琐:
az login
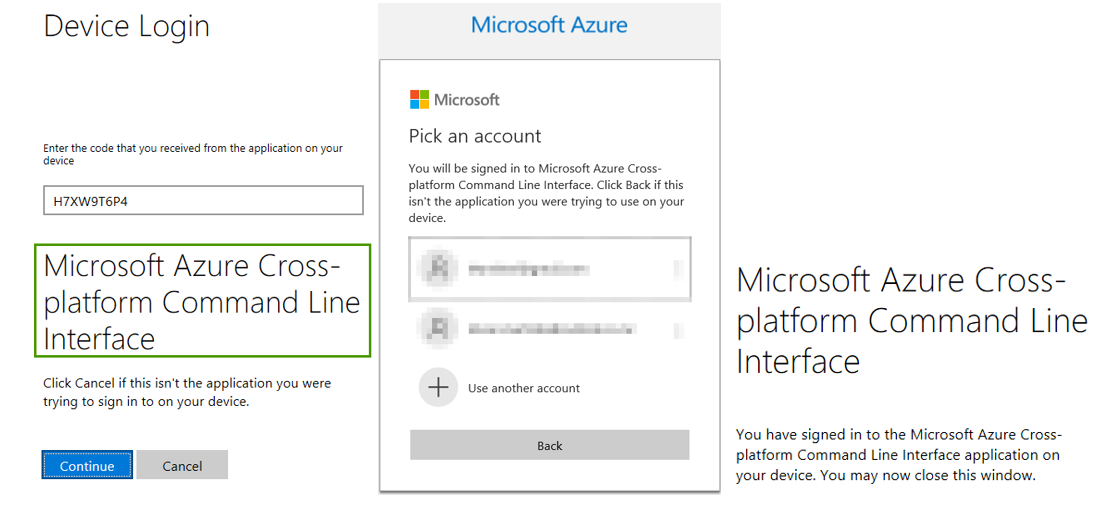
The https://microsoft.com/devicelogin URL is always the same but the one-off code is different.
https://microsoft.com/devicelogin URL始终相同,但一次性代码不同。
When you navigate to that page, simply enter the given code, click continue and then choose the account you would like to log on to. You should be logged on at the end of the click sequence
导航到该页面时,只需输入给定的代码,单击“继续”,然后选择您要登录的帐户。 您应该在点击序列结束时登录
In the meantime, your console should return something like this (list of the subscriptions your account has) based on the output settings of az
同时,您的控制台应根据az的输出设置返回类似以下内容(您帐户具有的订阅列表)
To be a tidy developer: type az logout when you’re finished.
成为一个整洁的开发人员:完成后输入az注销 。
PS – Connect-AzureRmAccount
PS – Connect-AzureRmAccount
Running Connect-AzureRmAccount is very similar to az login as you don’t specify any parameters, so the rest is happening interactively. The difference is that PowerShell pops up a standard login window instead of asking the user to go to https://microsoft.com/devicelogin with a one-off code to authenticate.
由于您未指定任何参数,因此运行Connect-AzureRmAccount与az登录非常相似,因此其余操作都是交互式进行的。 区别在于,PowerShell会弹出一个标准的登录窗口,而不是要求用户使用一次性代码转到https://microsoft.com/devicelogin进行身份验证。
Connect-AzureRmAccount
Connect-AzureRmAccount -TenantId <your tenant id>
使用参数登录 (Login with parameters)
CLI
命令行界面
Using CLI to find out the possible parameters that can be used, simply run the below command:
使用CLI查找可能使用的参数,只需运行以下命令:
az login -h
As you could see from the previous example, the less you specify in the actual command, the more you need to click and choose on the screen in the browser. If the user account has only one tenant and one subscription, those are used by default. However, you can use parameters to set a value to them when writing the az command. The most common ones are:
从上一个示例中可以看到,在实际命令中指定的内容越少,在浏览器屏幕上单击和选择的内容就越多。 如果用户帐户只有一个租户和一个订阅,则默认情况下使用这些租户和一个订阅。 但是,在编写az命令时,可以使用参数为它们设置一个值。 最常见的是:
- username or u – that is straightforward, together with 用户名或u –简单明了,以及
- password or p – you can skip that switch in which case you’ll be prompted to enter but in that case it won’t be visible on the screen as you enter it 密码或p –您可以跳过该开关,在这种情况下,系统会提示您输入该密码,但在您输入该密码时,它在屏幕上将不可见
-
-
Of course, the most automated way is to specify all three:
当然,最自动化的方法是指定所有三个:
az login --tenant <tenant id / name> --user <username@domain> --password <YourPassword>
But it does give me the goosebumps entering my password in clear text! If you don’t feel the same… well, you should! To avoid that use the below code to get prompted for the password, but of course, it is not fully automated then:
但这确实让我鸡皮clear以明文形式输入密码! 如果您有不同的感觉……那就应该了! 为了避免这种情况,请使用下面的代码提示输入密码,但是当然,它不是完全自动化的:
az login --tenant <tenant id / tenant name> --user <username@domain>
PowerShell
电源外壳
Below follows the same process of logging in, as we did it above, this time using PowerShell.
以下是使用PowerShell进行与上述相同的登录过程。
If you want to see all the possible parameters, the PS help is useful as usual:
如果要查看所有可能的参数,PS帮助将照常使用:
Connect-AzureRmAccount -?
Get-Help Connect-AzureRmAccount -full
Get-Help Connect-AzureRmAccount -Examples
To use credential parameters for a user account (to find the required id values, please refer to the az login section)
要为用户帐户使用凭据参数( 要查找所需的id值,请参阅az登录部分 )
$Credential = Get-Credential -UserName <username> -Message "Enter Password: "
Connect-AzureRmAccount -Credential $Credential
If you really need to specify the password so it’s not asked interactively (there are better ways):
如果您确实需要指定密码,这样就不会交互询问密码(有更好的方法):
$UserName = <application_id>
$Password = <password> | ConvertTo-SecureString -AsPlainText -Force
$Credential = New-Object -TypeName System.Management.Automation.PSCredential -ArgumentList $UserName, $Password
Connect-AzureRmAccount -Credential $Credential -TenantId <tenant_id>
服务负责人 (Service Principal)
First of all, what is a service principal? We have to differentiate between the concept and the actual Azure implementation of it.
首先,什么是服务主体? 我们必须区分概念和实际的Azure实现。
In essence, it is a service account, i.e. an Azure AD user that is used by Azure applications or services to access other Azure resources. It is not meant to be interactively used as a normal user account. So put crudely it’s a userless user account.
本质上,它是一个服务帐户,即Azure应用程序或服务用来访问其他Azure资源的Azure AD用户。 它并不旨在以交互方式用作普通用户帐户。 简而言之,这是一个无用户的用户帐户 。
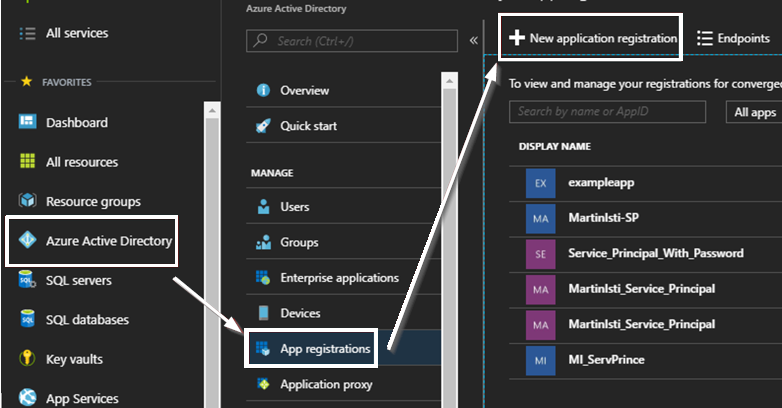
It gets a bit tricky in the Azure Portal as you can identify the same object using multiple notions:
在Azure门户中,它有点棘手,因为您可以使用多个概念来标识同一对象:
- Application / Managed Application 应用程序/托管应用程序
- App Registration 应用注册
- Service Principal 服务负责人
And voila the ID is revealed:
瞧瞧,这个ID被泄露了:
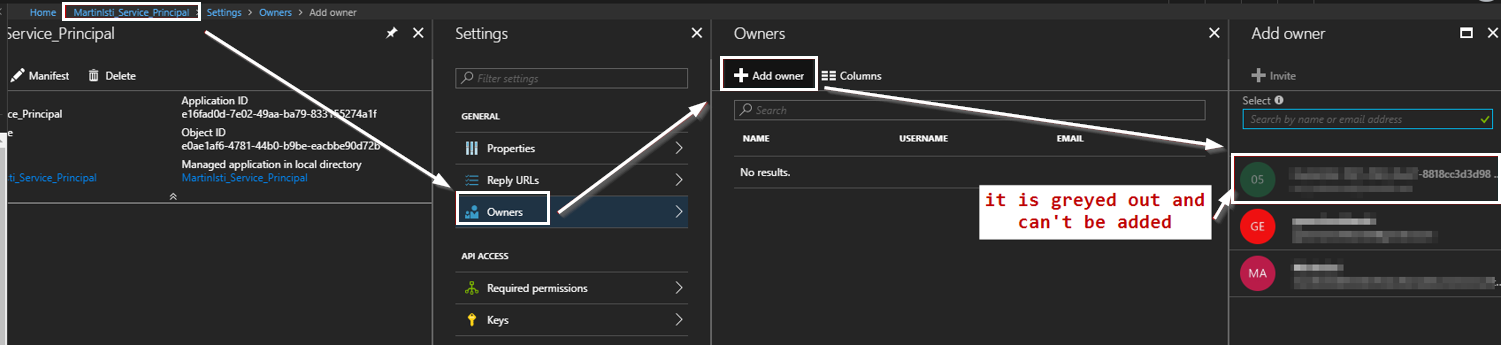
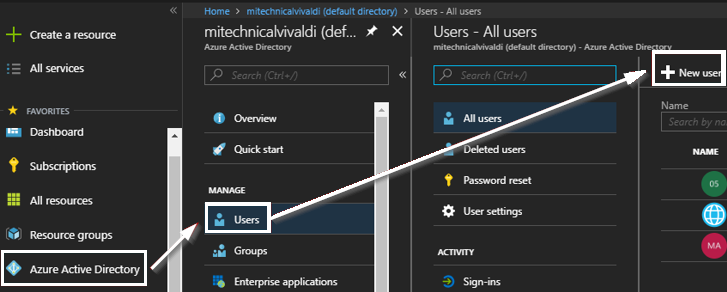
The reason why you might need to click to “View all applications” could be that you are logged on as the subscription admin which basically owns everything but not always explicitly. I created this Service Principal as that admin but that user can’t be specified as the owner:
之所以需要单击以“查看所有应用程序”,可能是因为您以订阅管理员身份登录,该管理员基本上拥有所有内容,但并不总是明确拥有。 我以该管理员身份创建了该服务主体,但无法将该用户指定为所有者:
Please note that the display name is given to me, it can be basically anything so usually, it doesn’t contain the text Service Principal.
请注意,显示名称是给我的,通常基本上可以是任何名称,它不包含文本Service Principal 。
If you plan to do away with using username/password combos, using service principals is the Azure way of doing it. It works like a charm once it’s implemented, but it takes more effort to set it up.
如果您打算不使用用户名/密码组合,则使用服务主体是Azure的实现方法。 实施后,它的工作原理就像一种魅力,但要花费更多的精力进行设置。
According to Microsoft service principals are accounts not tied to any particular user, which can have permissions on them assigned to pre-defined roles. Authenticating with a service principal is the best way to write secure scripts or programs, allowing you to apply both permissions restrictions and locally stored static credential information.
根据Microsoft的服务原则,帐户没有绑定到任何特定用户,这些用户可以将其权限分配给预定义角色。 使用服务主体进行身份验证是编写安全脚本或程序的最佳方法,允许您同时应用权限限制和本地存储的静态凭据信息。
Azure Log in with a service principal 使用服务主体登录AzureFirst of all, what you need – what a surprise! – is a service principal! You have to be an admin to go through this process. It’s easy to check if you are an admin:
首先,您需要什么–多么令人惊讶! –是服务负责人! 您必须是管理员才能完成此过程。 检查您是否是管理员很容易:
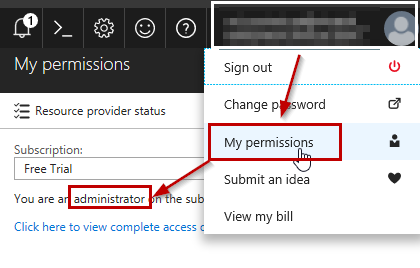
If you are not an admin, a much longer message is displayed, e.g. like this
如果您不是管理员,则会显示更长的消息,例如:
Once you’re signed in to the proper subscription with the proper account then follow the steps:
使用正确的帐户登录正确的订阅后,请按照以下步骤操作:
The initial process is very basic, just define the name and the sign-on URL (the application type for a service principal should be the default Web app / API)
初始过程非常基本,只需定义名称和登录URL(服务主体的应用程序类型应为默认的Web应用程序/ API )。
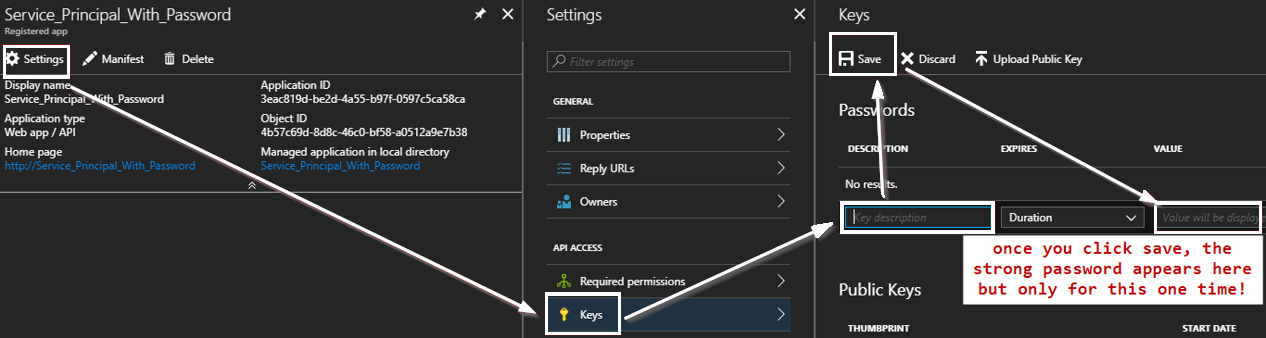
Then in the settings page, you can properly configure this service principal, including setting up a password for it:
然后,在设置页面中,您可以正确配置此服务主体,包括为其设置密码:
So, we have a service principal which is great! If using the GUI is too much hassle for you (it definitely is for me) both CLI and PS can make your life easier.
因此,我们有一个很棒的服务负责人! 如果使用GUI对您来说太麻烦了(这绝对对我来说),那么CLI和PS都可以使您的生活更轻松。
To run the below code, you have to log in to your Azure subscription with an account that has the required permissions to create a service principal.
若要运行以下代码,您必须使用具有创建服务主体所需权限的帐户登录到Azure订阅。
#create a service principal with a single password
az ad sp create-for-rbac --name Service_Principal_With_Password --password Y0ur_$tr0ng_P@$$w0rd

az logout

#login with the new service principal | the password won’t be accessible from the portal so store it safe and secure at the point of creation!
az login --service-principal --username http://Service_Principal_With_Password --tenant mitechnicalvivaldi.onmicrosoft.com --password Y0ur_$tr0ng_P@$$w0rd
As it looks when it’s created successfully
外观成功创建时的样子

And you are in!
你进来了!

What you can do with CLI, do it with PowerShell this time:
您可以使用CLI做什么,这次使用PowerShell可以做到:
$Credential = Get-Credential -UserName <application_id> -Message "Enter Password:"
Connect-AzureRmAccount -Credential $Credential -TenantId <tenant_id> -ServicePrincipal
But how to check its details? There are multiple ways (I use CLI in the below bullet points, but PS can also do it) but none of them are optimal:
但是如何查看其详细信息? 有多种方法(我在下面的要点中使用CLI,但是PS也可以做到),但都不是最佳方法:
- az ad sp list – this lists ALL service principals, not just the ones related to the account signed in so it’s basically next to useless (it’s reported across the net so hopefully will change)
- az ad sp列表 –列出了所有服务主体,而不仅是与登录帐户相关的主体,因此它几乎是无用的(它是通过网络报告的,因此希望会有所改变)
- az ad app list – this only lists your apps where you should be able to easily find what you are looking for
- az广告应用列表 –仅列出您的应用,您应该可以在其中轻松找到所需的内容
- az ad app show –id <id> – this shows the details for only your application
- az ad app show –id <id> –仅显示您的应用程序的详细信息
- az ad sp show –id <id> – this looks good but how to get the ID?
- az ad sp show –id <id> –看起来不错,但是如何获取ID?
-

- Use the GUI 使用GUI
托管服务身份– MSI (Managed Service Identity – MSI)
What is an MSI? It’s Microsoft’s solution to do away with passwords and the normal authentication methods. Let’s say you create a VM and you have a SQL Server instance. The VM can be imagined as a user in terms of AD, and you add that user to your SQL Server. That means all incoming connections from that VM are deemed as secure. No password is needed, the relationship between the two objects solves that. Of course, if your VM is compromised, there is no protection. However, if you consider that you can give users access to your SQL Server this way, they can’t go away and access the databases e.g. from local SSMS. It’s not unbreachable but enhances your security significantly.
什么是MSI? 这是Microsoft的解决方案,无需使用密码和常规身份验证方法。 假设您创建了一个VM,并且有一个SQL Server实例。 可以将VM想象为AD的用户,然后将该用户添加到SQL Server。 这意味着来自该VM的所有传入连接均被视为安全。 不需要密码,两个对象之间的关系可以解决该问题。 当然,如果您的VM受到威胁,则没有任何保护措施。 但是,如果您认为可以以这种方式授予用户访问SQL Server的权限,那么他们就不会离开并从本地SSMS访问数据库。 这并非不可逾越,但可以大大提高您的安全性。
This is your main guide: Tutorial: Use a Windows VM Managed Service Identity (MSI) to access Azure SQL
这是您的主要指南: 教程:使用Windows VM托管服务身份(MSI)访问Azure SQL
Beware that not all things work that straightforward as that tutorial describes! First set up your environment the following way:
请注意,并非所有内容都能像本教程中描述的那样简单! 首先通过以下方式设置您的环境:
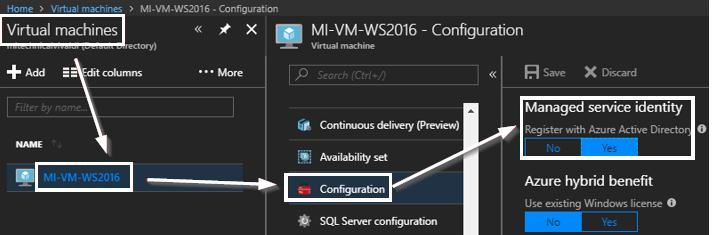
- Free SQL Server License: SQL Server 2017 Developer on Windows Server 2016 as this comes with SQL Server Management Studio preinstalled) and make sure that MSI is enabled on it! You can do that during the creation process: 免费SQL Server许可:Windows Server 2016上SQL Server 2017 Developer,因为它已预装了SQL Server Management Studio),并确保已启用MSI! 您可以在创建过程中执行以下操作:

-
Then make this user a Global administrator!
然后将此用户设置为全局管理员 !
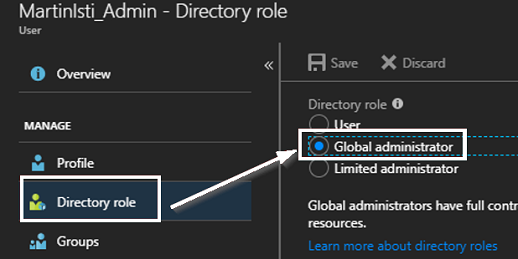
From now on use this user when authenticating in CLI / PS. The reason? The superuser who owns the whole subscription should also have all the rights you could imagine, but that God-mode, unfortunately, doesn’t always work as expected. I have run into authentication errors quite a few times with that account, whereas this normal, explicitly created admin user just whizzes through. It’s always better to explicitly grant rights as implicit permissions can sometimes fail and then no matter how much you scratch your head, it wouldn’t help. Trust me, I have tried!
从现在开始,在CLI / PS中进行身份验证时使用此用户。 原因? 拥有整个订阅的超级用户还应该拥有您可以想象的所有权利,但是不幸的是,上帝模式并不总是能按预期工作。 我已经用该帐户多次遇到身份验证错误,而这个正常的,显式创建的管理员用户却一头雾水。 显式授予权限总是更好,因为隐式权限有时可能会失败,然后无论您费了多少力气,都无济于事。 相信我,我已经尝试过!
Now we can follow the steps highlighted in the tutorial but be careful, as the behind-the-scenes information is not always explicitly mentioned, and it can catch you!
现在,我们可以按照教程中突出显示的步骤进行操作,但要小心,因为并非总是明确提及幕后信息,它可以抓住您!
Create an AD group and assign the VM MSI as a member
创建AD组并将VM MSI分配为成员
Let’s try this through the portal:
让我们通过门户尝试一下:
You can browse the Virtual Machine’s various settings, the MSI properties are not there. Yet you need the MSI’s object ID as the user in your scripts. Luckily it is easy to get that via another script command, but I couldn’t rest until I found that object on the portal as shown below:
您可以浏览虚拟机的各种设置,MSI属性不存在。 但是,您需要MSI的对象ID作为脚本中的用户。 幸运的是,通过另一个脚本命令可以很容易地获得该对象,但是直到我在门户网站上找到该对象后,我才能休息,如下所示:
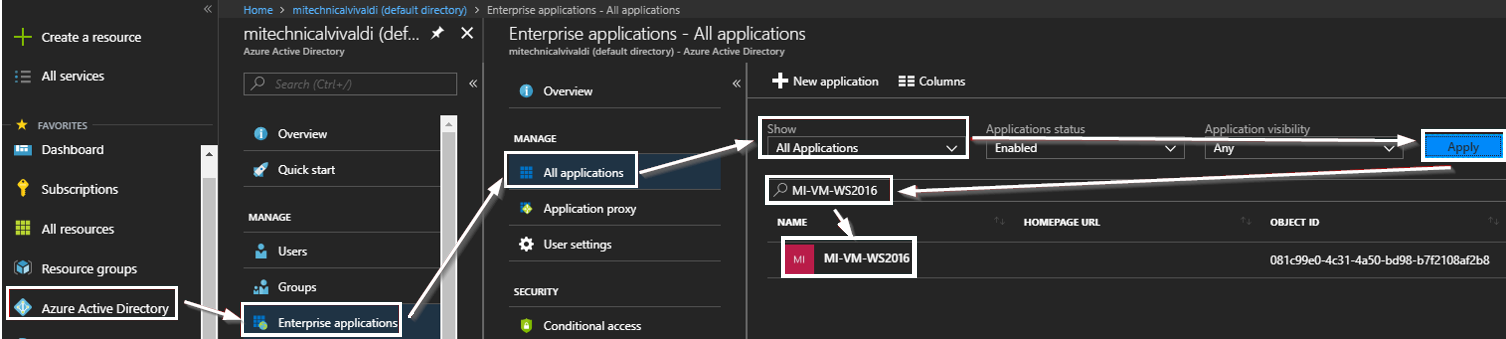
Go to Azure AD, choose Enterprise applications and then pick to show All Applications in the drop-down menu. After you click Apply, in the long list your VM should appear! I typed mine’s name into the search field to make the results clearer and there it was with relevant id values!
转到Azure AD,选择“ 企业应用程序” ,然后选择以在下拉菜单中显示“ 所有应用程序 ”。 单击“应用”后,您的VM应该会出现在长列表中! 我在搜索字段中键入了我的名字,以使结果更清晰,并且其中包含相关的ID值!
My code
我的密码
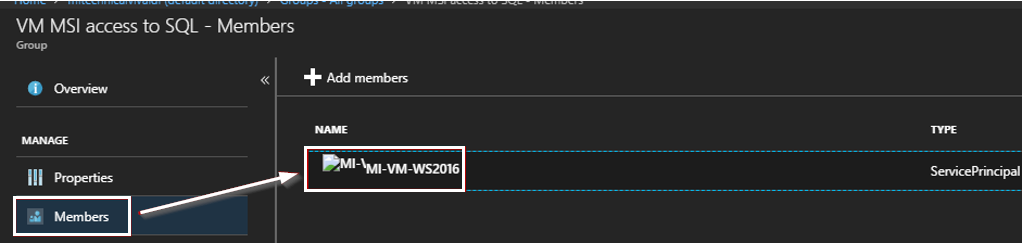
#use the new admin account I wrote about earlier
Connect-AzureRmAccount -TenantId <your tenant id>
Connect-AzureAD -TenantId <your tenant id>

$Group = New-AzureADGroup -DisplayName "VM MSI access to SQL" -MailEnabled $false -SecurityEnabled $true -MailNickName "NotSet"
$Group.ObjectId             # just if you want to see the actual id

$VM = Get-AzureRmVm -ResourceGroup "MartinIsti_Demo" -Name "MI-VM-WS2016"
$VM.Identity.PrincipalId    # just if you want to see the actual id

Add-AzureAdGroupMember -ObjectId $Group.ObjectId -RefObjectId $VM.Identity.PrincipalId # this came back with a failure for me all the time before using the new admin account!
Now you can check that the group does indeed contain the VM MSI:
现在,您可以检查该组是否确实包含VM MSI:
The next steps are aligned with the tutorial, they work as expected.
后续步骤与教程一致,它们可以按预期工作。
Enable AD auth for your SQL Server
为您SQL Server启用AD身份验证
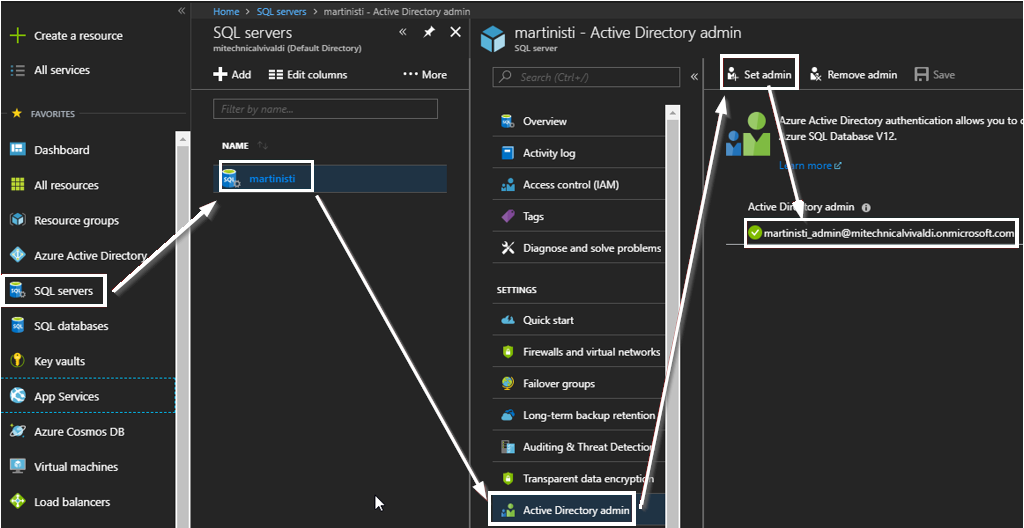
I chose my admin account to keep the security settings simple. Obviously, in a real-life environment, it is different.
我选择我的管理员帐户来保持安全设置简单。 显然,在现实环境中,情况有所不同。
Contained user in your SQL Server
SQL Server中包含的用户
First, you need to log on using SSMS. At this point, it can be from anywhere, but you need the log in credentials you set up as admin when you originally created your SQL Azure objects (not part of this article).
首先,您需要使用SSMS登录。 此时,它可以来自任何地方,但是您需要在最初创建SQL Azure对象时( 不属于本文的一部分 )设置为admin的登录凭据。
The server name always ends with .database.windows.net
服务器名称始终以.database.windows.net结尾
The user name to be used is the one who you set as admin in the previous step.
要使用的用户名是您在上一步中设置为admin的用户名。
Now run the below code against the database you want to give access to (I only have one so it’s easy)
现在,对您要访问的数据库运行以下代码(我只有一个,所以很简单)
CREATE USER [VM MSI access to SQL] FROM EXTERNAL PROVIDER
GO

ALTER ROLE db_datareader ADD MEMBER [VM MSI access to SQL]
GO
Open connection to Azure SQL Database
打开与Azure SQL数据库的连接
There are multiple ways to connect to a SQL database and unfortunately, the simple and most common one is not available: you can’t use SQL Server Management Studio for that authentication method. But it’s not designed for that anyway as developers are (at this point in time at least) human creatures and it’s best they have explicit individual access to a database.
有多种方法可以连接到SQL数据库,但是,最简单,最常见的一种方法不可用:您不能将SQL Server Management Studio用于该身份验证方法。 但这并不是针对开发人员而设计的,因为开发人员(至少在目前是开发人员)是人类,并且最好是他们对数据库具有明确的个人访问权限。
For applications using an MSI is a great method to connect and we can use PowerShell to test if the authentication works as expected.
对于使用MSI的应用程序来说,这是一种很好的连接方法,我们可以使用PowerShell测试身份验证是否按预期工作。
The first step is to get an access token. The simple way of merely using a connection string is not enough by itself, that will only be the second step. The actual PS code is fairly straightforward, and the official documentation is again very useful for this last step, too!
第一步是获取访问令牌。 仅使用连接字符串的简单方法本身是不够的,这仅是第二步。 实际的PS代码非常简单,对于最后一步,官方文档也非常有用!
- %3A and / as %3A和/作为%2F!%2F !
- Convert the JSON to a PS object 将JSON转换为PS对象
- Extract the access token from that freshly converted PS object 从新转换的PS对象中提取访问令牌
- Data Source/ and database name /数据源 /数据库名称/ initial catalog/ is required as the authentication is done with an access token初始目录 /是必需的,因为身份验证是通过访问令牌完成的
- Then as the real test, open that connection and if that’s successful (no error message), just run a query that returns something to have a positive confirmation! 然后,作为真正的测试,打开该连接,如果连接成功(没有错误消息),则只需运行查询即可返回肯定确认的查询!
#1 | get the access token | keep the uri as it is below
$response = Invoke-WebRequest `
    -Uri 'http://169.254.169.254/metadata/identity/oauth2/token?api-version=2018-02-01&resource=https%3A%2F%2Fdatabase.windows.net%2F' `
    -Method GET `
    -Headers @{Metadata="true"}

#2 | convert the JSON object to a PowerShell object
$content = $response.Content | ConvertFrom-Json

#3 | extract the access token
$AccessToken = $content.access_token

#4 | define and open the SqlConnection using your own server / database names
$SqlConnection = New-Object System.Data.SqlClient.SqlConnection
$SqlConnection.ConnectionString = "Data Source = <your server>.database.windows.net; Initial Catalog = <your database>"

#specify the authenticatoin method and use the extracted access token
$SqlConnection.AccessToken = $AccessToken
$SqlConnection.Open()

#5 | populate a dataset with a single query just to make sure you have a positive confirmation on screen
$SqlCmd = New-Object System.Data.SqlClient.SqlCommand
$SqlCmd.CommandText = "SELECT * from <your table>;"
$SqlCmd.Connection = $SqlConnection
$SqlAdapter = New-Object System.Data.SqlClient.SqlDataAdapter
$SqlAdapter.SelectCommand = $SqlCmd
$DataSet = New-Object System.Data.DataSet
$SqlAdapter.Fill($DataSet)

$DataSet.Tables[0]

#be tidy and close the connection
$SqlConnection.Close()
As a result, you will see the result of your query on the screen if your table wasn’t empty. Or even if it’s empty, it shows that the number of returned rows is 0.
结果,如果表不为空,您将在屏幕上看到查询的结果。 或即使它为空,也表明返回的行数为0。
翻译自: https://www.sqlshack.com/connecting-to-azure-sql-database/
azure云数据库


 1094
1094


 被折叠的 条评论
为什么被折叠?
被折叠的 条评论
为什么被折叠?
 到【灌水乐园】发言


