


ssis 列转换
In our previous article, Getting started with Biml, we have explained what Biml is, what are the related tools and resources and how to get started with this technology. In this article, we will explain how to generate scripts from existing SSIS packages by showing all related options. Then, we will analyze the generated script and identify how each object is mentioned in the script.
在上一篇文章“ Biml入门”中 ,我们解释了Biml是什么,相关的工具和资源以及如何使用该技术。 在本文中,我们将通过显示所有相关选项来说明如何从现有的SSIS包中生成脚本。 然后,我们将分析生成的脚本并确定在脚本中如何提及每个对象。
构建SSIS包 (Building SSIS package)
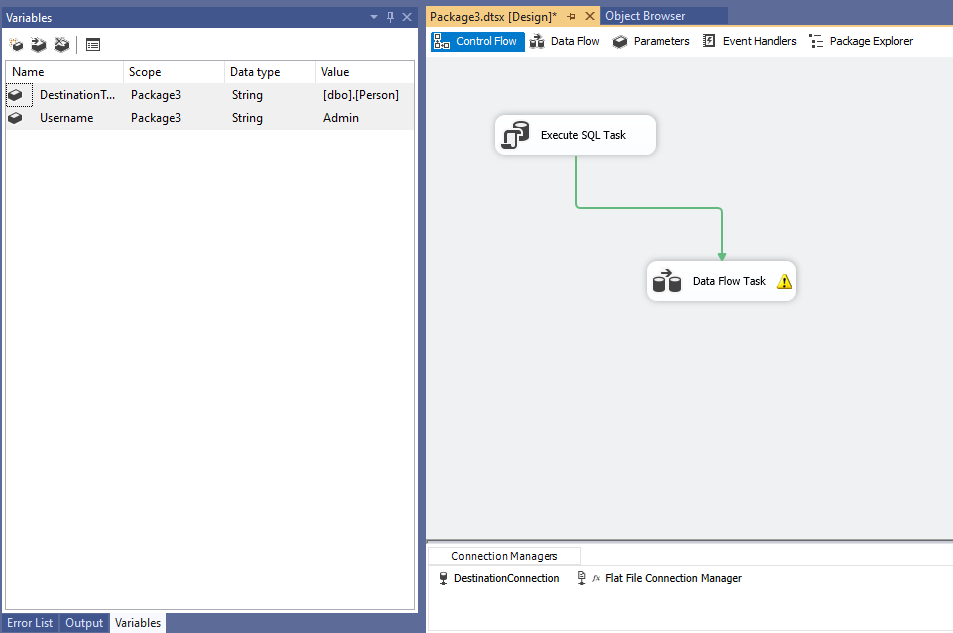
To run our experiment, we will first build manually an SSIS package that creates a SQL table, read data from a flat-file – where the path is entered as a parameter – and insert it into the created table after adding two derived columns that contain the current date-time and a text value from an SSIS variable.
为了进行实验,我们将首先手动构建一个SSIS包,该包创建一个SQL表,从平面文件中读取数据(在该文件中,路径作为参数输入),并在添加两个包含以下内容的派生列之后将其插入到创建的表中:当前日期时间和SSIS变量的文本值。
The SSIS package should contain the following objects:
SSIS程序包应包含以下对象:
-
- Flat File connection manager (Connection string property is evaluated as an expression) 平面文件连接管理器(连接字符串属性作为表达式求值)
- OLE DB connection manager OLE DB连接管理器
-
Execute SQL Task (Execute the command below):
执行SQL任务(执行以下命令):
CREATE TABLE [dbo].[Person]( [BusinessEntityID] [int] NOT NULL, [PersonType] [nchar](2) NOT NULL, [NameStyle] [nvarchar](50) NOT NULL, [Title] [nvarchar](8) NULL, [FirstName] [nvarchar](50) NOT NULL, [MiddleName] [nvarchar](50) NULL, [LastName] [nvarchar](50) NOT NULL, [Suffix] [nvarchar](10) NULL, [EmailPromotion] [int] NOT NULL, [ModifiedBy] [nvarchar](50) NOT NULL, [ModifiedDate] [datetime] NOT NULL) ON [PRIMARY]-
- Flat File Source 平面文件源
- Derived Column Transformation (Contains two column expressions) 派生列转换(包含两个列表达式)
- OLE DB Destination OLE DB目标
-
- FlatFilePath (Type = String, Required = True) FlatFilePath(类型=字符串,必填= True)
-
- Username (Type = String, Value = “Admin”) 用户名(类型=字符串,值=“管理员”)
- DestinationTable (Type = String, Value= “[dbo].[Person]”) DestinationTable(类型=字符串,值=“ [dbo]。[人]”)
将SSIS包转换为Biml
(Convert SSIS Package to Biml
)
In order to convert an SSIS package into a business intelligence markup language script, you should go to the “Solution Explorer” tab, click on the package and press on “Convert SSIS package to BIML” as shown in the image below (note that BimlExpress should be installed):
要将SSIS包转换为商业智能标记语言脚本,应转到“解决方案资源管理器”选项卡,单击该包,然后按“将SSIS包转换为BIML”,如下图所示(请注意BimlExpress应该安装):
After you click on this button, the following form is opened:
单击此按钮后,将打开以下表单:
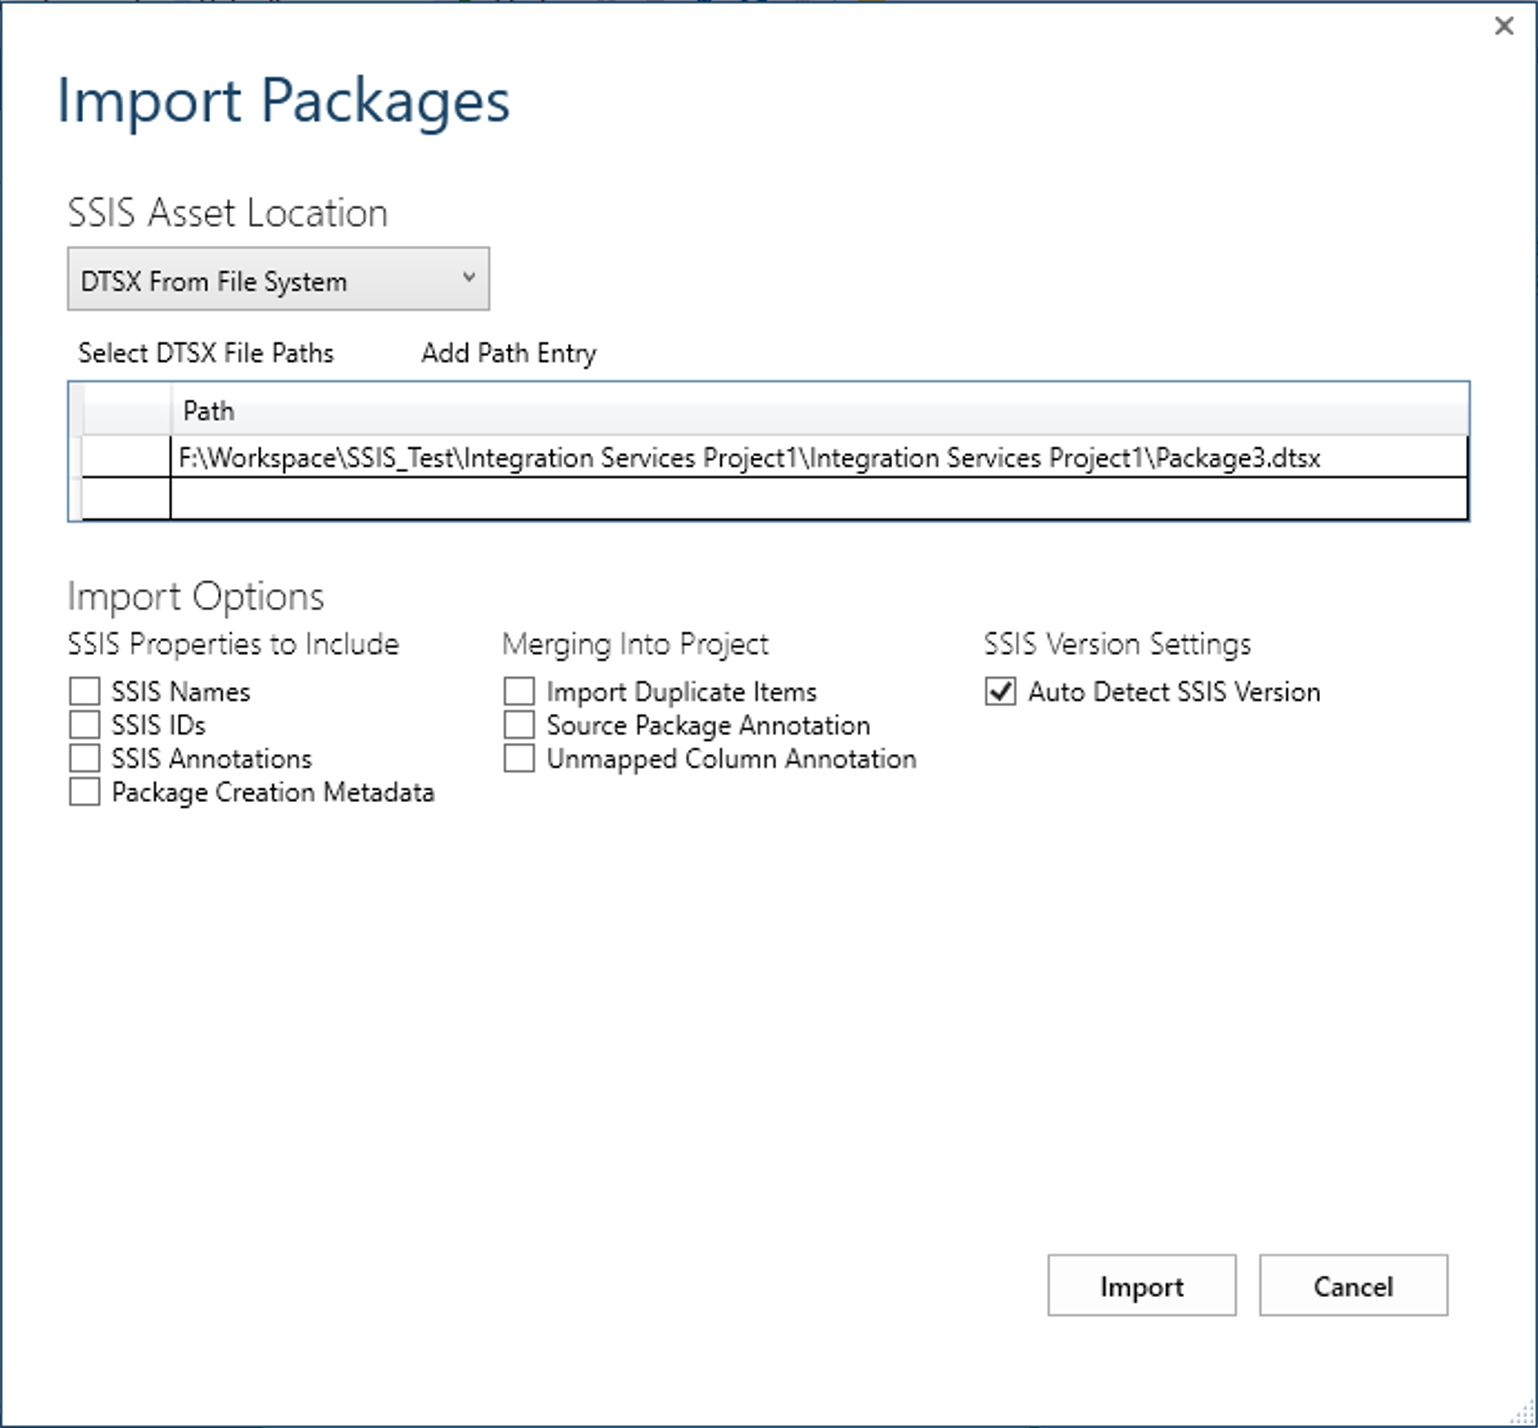
As you can see, there are many options that we should specify in this form:
如您所见,我们应该以这种形式指定许多选项:
- SSIS Asset Location: where we should select where SSIS package is located, there are four types of location available: SSIS资产位置:我们应该在哪里选择SSIS包的位置,有四种可用的位置类型:
- DTProj from File System: The *.dtproj file contains information about project configurations and items such as packages
- 来自文件系统的DTProj : * .dtproj文件包含有关项目配置和项目(例如软件包)的信息
- ISPAC from File System: The文件系统中的ISPAC: *.ISPAC file is a project deployment file *。 ISPAC文件是项目部署文件
- DTSX from File System: The *.dtsx file is an SSIS standalone package file (Note that in our case, this option is selected by default as shown above)
- 文件系统中的DTSX : * .dtsx文件是SSIS独立软件包文件(请注意,在我们的情况下,默认情况下如上所示选中此选项)
- Project from Package catalog: This option is to select a deployed project to an SSISDB database 软件包目录中的项目:此选项用于选择SSISDB数据库中已部署的项目
- Location: This control is to specify the location of the SSIS Asset; it depends on the type of location selected: 位置:此控件用于指定SSIS资产的位置; 这取决于所选位置的类型:
- If the location type is a DTProj or ISPAC file, it shows a textbox where the user should select the file path 如果位置类型是DTProj或ISPAC文件,则会显示一个文本框,用户应在其中选择文件路径
- (Note that the file path of the selected package is added by default as shown in the image above) (请注意,默认情况下,默认情况下已添加所选包的文件路径,如上图所示)。
- If Project from the package catalog is selected, you should specify the connection parameters 如果从包目录中选择“项目”,则应指定连接参数
- Import Options: This part contains some configuration related to the BIML script that will be generated; they are classified into three categories: 导入选项:这部分包含一些与将要生成的BIML脚本相关的配置; 它们分为三类:
- SSIS Properties to include: where we should select the properties that we need to include within the generated script such as: 要包括的SSIS属性:我们应该在其中选择需要包含在生成的脚本中的属性,例如:
- SSIS Names SSIS名称
- SSIS ID’s SSIS ID的
- SSIS Annotations SSIS注释
- Package creation metadata 包创建元数据
- Merging Into Project: this part contains some project-level configuration such as: 合并到项目中:此部分包含一些项目级别的配置,例如:
- Import duplicate items 导入重复项
- Source Package Annotation 源码包注释
- Unmapped Column Annotation 未映射的列注释
- SSIS Version settings: This part contains the following option only: SSIS版本设置:此部分仅包含以下选项:
- Auto Detect SSIS Version 自动检测SSIS版本
- SSIS Properties to include: where we should select the properties that we need to include within the generated script such as: 要包括的SSIS属性:我们应该在其中选择需要包含在生成的脚本中的属性,例如:
In this example, we will not select any of the “SSIS Properties to include” and “Merging Into Project” options, since we are looking to generate a script of a single package object only, and we will leave “Auto Detect SSIS Version” option selected. After finishing configuration, we must click on the “Import” button which will detect the main objects included in this package as shown in the following image:
在此示例中,我们将不会选择任何“要包括的SSIS属性”和“合并到项目”选项,因为我们希望仅生成单个包对象的脚本,因此将保留“自动检测SSIS版本”选择的选项。 完成配置后,我们必须单击“导入”按钮,该按钮将检测此软件包中包含的主要对象,如下图所示:
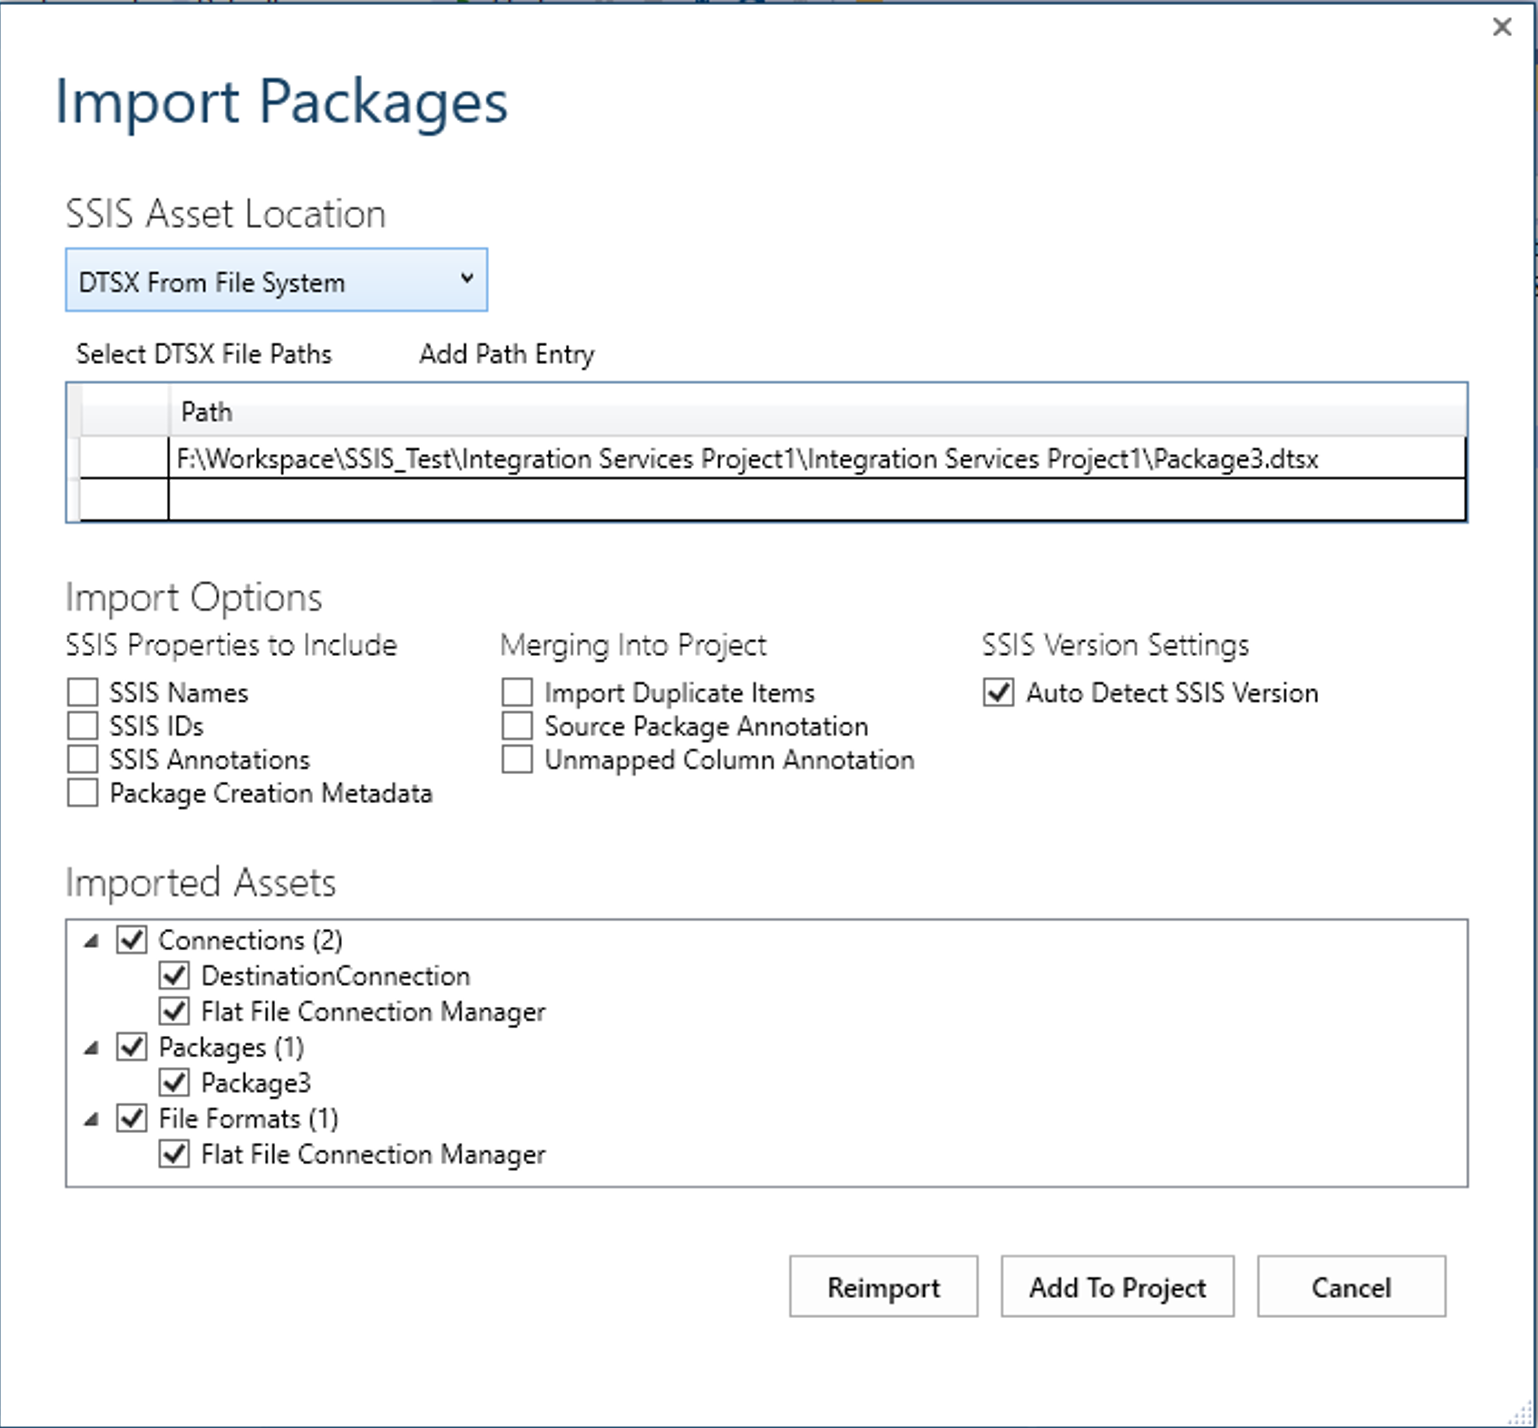
We can reconfigure the import task and click on “Reimport”, or we can select the assets that we need to include within the script from the “Imported Assets” tree view and click on “Add To Project” button to generate the Biml script and add it within the current solution.
我们可以重新配置导入任务,然后单击“重新导入”,或者我们可以从“导入的资产”树视图中选择需要包含在脚本中的资产,然后单击“添加到项目”按钮以生成Biml脚本和将其添加到当前解决方案中。
生成的Biml脚本
(Generated Biml Script
)
In the following section, we will try to analyze the generated Biml script and to illustrate all the objects mentioned, if we open “BimlScript1.biml” file we can see the following script:
在下一节中,我们将尝试分析生成的Biml脚本并说明所提到的所有对象,如果打开“ BimlScript1.biml”文件,则可以看到以下脚本:
<Biml xmlns="http://schemas.varigence.com/biml.xsd">
    <Connections>
        <Connection Name="DestinationConnection" ConnectionString="Data Source=.;Initial Catalog=tempdb;Provider=SQLNCLI11.1;Integrated Security=SSPI;Auto Translate=False;" />
        <FlatFileConnection Name="Flat File Connection Manager" FilePath="F:\SourceFile.txt" FileFormat="Flat File Connection Manager" />
    </Connections>
    <Packages>
        <Package Name="Package3" Language="None" ConstraintMode="LinearOnSuccess" ProtectionLevel="EncryptSensitiveWithUserKey">
            <Variables>
                <Variable Name="DestinationTable" DataType="String" IncludeInDebugDump="Exclude">[dbo].[Person]</Variable>
                <Variable Name="Username" DataType="String" IncludeInDebugDump="Exclude">Admin</Variable>
            </Variables>
            <Tasks>
                <ExecuteSQL Name="Execute SQL Task" ConnectionName="DestinationConnection">
                    <DirectInput>CREATE TABLE [dbo].[Person](
  [BusinessEntityID] [int] NOT NULL,
  [PersonType] [nchar](2) NOT NULL,
  [NameStyle] [nvarchar](50) NOT NULL,
  [Title] [nvarchar](8) NULL,
  [FirstName] [nvarchar](50) NOT NULL,
  [MiddleName] [nvarchar](50) NULL,
  [LastName] [nvarchar](50) NOT NULL,
  [Suffix] [nvarchar](10) NULL,
  [EmailPromotion] [int] NOT NULL,
  [ModifiedBy] [nvarchar](50) NOT NULL,
  [ModifiedDate] [datetime] NOT NULL) ON [PRIMARY] </DirectInput>
                </ExecuteSQL>
                <Dataflow Name="Data Flow Task">
                    <Transformations>
                        <FlatFileSource Name="Flat File Source" LocaleId="None" FileNameColumnName="" ConnectionName="Flat File Connection Manager" />
                        <DerivedColumns Name="Derived Column">
                            <Columns>
                                <Column Name="ModifiedBy" DataType="String" Length="5">@[User::Username]</Column>
                                <Column Name="ModifiedDate" DataType="DateTime">GETDATE()</Column>
                            </Columns>
                        </DerivedColumns>
                        <OleDbDestination Name="OLE DB Destination" ConnectionName="DestinationConnection">
                            <TableFromVariableOutput VariableName="User.DestinationTable" />
                        </OleDbDestination>
                    </Transformations>
                </Dataflow>
            </Tasks>
            <Connections>
                <Connection ConnectionName="Flat File Connection Manager">
                    <Expressions>
                        <Expression ExternalProperty="ConnectionString">@[$Package::FlatFilePath]</Expression>
                    </Expressions>
                </Connection>
            </Connections>
            <Parameters>
                <Parameter Name="FlatFilePath" DataType="String" IsRequired="true">F:\SourceFile.txt</Parameter>
            </Parameters>
        </Package>
    </Packages>
    <FileFormats>
        <FlatFileFormat Name="Flat File Connection Manager" CodePage="1252" TextQualifier="_x003C_none_x003E_" ColumnNamesInFirstDataRow="true" RowDelimiter="">
            <Columns>
                <Column Name="BusinessEntityID" Length="50" DataType="AnsiString" Delimiter="Comma" MaximumWidth="50" />
                <Column Name="PersonType" Length="50" DataType="String" Delimiter="Comma" MaximumWidth="50" />
                <Column Name="NameStyle" Length="50" DataType="String" Delimiter="Comma" MaximumWidth="50" />
                <Column Name="Title" Length="50" DataType="String" Delimiter="Comma" MaximumWidth="50" />
                <Column Name="FirstName" Length="50" DataType="String" Delimiter="Comma" MaximumWidth="50" />
                <Column Name="MiddleName" Length="50" DataType="String" Delimiter="Comma" MaximumWidth="50" />
                <Column Name="LastName" Length="50" DataType="String" Delimiter="Comma" MaximumWidth="50" />
                <Column Name="Suffix" Length="50" DataType="String" Delimiter="Comma" MaximumWidth="50" />
                <Column Name="EmailPromotion" Length="50" DataType="String" Delimiter="CRLF" MaximumWidth="50" />
            </Columns>
        </FlatFileFormat>
    </FileFormats>
</Biml>
We can note that there are three main nodes within the scripts:
我们可以注意到脚本中有三个主要节点:
- Connections: In this node, all created connection managers are defined 连接 :在此节点中,定义了所有创建的连接管理器
- Package: In this node, all variables, parameters, tasks and components defined within the SSIS package are defined 包 :在此节点中,定义了SSIS包中定义的所有变量,参数,任务和组件
- FileFormats: This node is related to the connections node since it contains all data structure information related to the external files connection managers (such a flat files, since all columns metadata redefined within the connection manager) FileFormats :此节点与连接节点有关,因为它包含与外部文件连接管理器(例如平面文件,因为所有列元数据在连接管理器中重新定义)有关的所有数据结构信息
The following table contains the XML tag related for each object:
下表包含与每个对象相关的XML标记:
Object Type | XML Tag |
OLE DB Connection manager | <Connection /> |
Flat File Connection manager | <FlatFileConnection /> |
Execute SQL Task | <ExecuteSQL></ExecuteSQL> |
Data Flow Task | <DataFlow></DataFlow> |
Flat File Source | <FlatFileSource></FlatFileSource> |
Derived Column Transformation | <DerivedColumns></DerivedColumns> |
OLE DB Destination | <OleDbDestination></OleDbDestination> |
Variable | <Variable></Variable> |
Parameter | <Parameter></Parameter> |
| 对象类型 | XML标签 |
OLE DB连接管理器 | <连接/> |
平面文件连接管理器 | <FlatFileConnection /> |
执行SQL任务 | <ExecuteSQL> </ ExecuteSQL> |
数据流任务 | <DataFlow> </ DataFlow> |
平面文件源 | <FlatFileSource> </ FlatFileSource> |
派生列转换 | <DerivedColumns> </ DerivedColumns> |
OLE DB目标 | <OleDbDestination> </ OleDbDestination> |
变量 | <Variable> </ Variable> |
参数 | <参数> </参数> |
You can refer to the script above to check the node hierarchy and how tasks and components are linked together.
您可以参考上面的脚本来检查节点层次结构以及如何将任务和组件链接在一起。
结论
(Conclusion
)
In this article, we illustrated the BimlExpress Import packages tool and how we can use it to convert existing SSIS projects or standalone packages into Biml scripts. In my opinion, using this tool can be the best way to learn this markup language since it lets you convert SSIS packages and analyze the generated script to see how each object was serialized.
在本文中,我们说明了BimlExpress导入软件包工具,以及如何使用它将现有的SSIS项目或独立软件包转换为Biml脚本。 我认为,使用此工具可能是学习此标记语言的最佳方法,因为它使您可以转换SSIS包并分析生成的脚本以查看每个对象的序列化方式。
目录 (Table of contents)
| Biml入门 |
| 将SSIS包转换为Biml脚本 |
| 使用Biml脚本生成SSIS包 |
| 使用C#脚本扩展Biml |
| 在Biml中使用外部C#脚本文件 |
| Biml替代品:使用ManagedDTS以编程方式构建SSIS包 |
| Biml替代品:使用EzAPI以编程方式构建SSIS包 |
翻译自: https://www.sqlshack.com/converting-ssis-packages-to-biml-scripts/
ssis 列转换


 1万+
1万+

 被折叠的 条评论
为什么被折叠?
被折叠的 条评论
为什么被折叠?
 到【灌水乐园】发言


