


azure 使用
介绍 (Introduction)
In the article How to create an Azure SQL Database using the Cloud Shell, we learned how to work with the Cloud Shell. In this new article, we will show how to automate Azure Active Directory tasks (AAD) using the Cloud Shell. We will work with loops, files and variables to automate tasks.
在“ 如何使用Cloud Shell创建Azure SQL数据库”一文中 ,我们学习了如何使用Cloud Shell。 在这篇新文章中,我们将展示如何使用Cloud Shell自动化Azure Active Directory任务(AAD)。 我们将使用循环,文件和变量来自动执行任务。
The following tasks will be included:
将包括以下任务:
- Show the list of Azure Active Directory Users 显示Azure Active Directory用户列表
- Show a specific Azure Active Directory user with a specific User principal name or Object ID 显示具有特定用户主体名称或对象ID的特定Azure Active Directory用户
- Create an Azure Active Directory User 创建一个Azure Active Directory用户
- Create an Azure Active Directory User using variables 使用变量创建Azure Active Directory用户
- Create multiple Azure Active Directory users from a list 从列表中创建多个Azure Active Directory用户
- Create an Azure Active Directory Group 创建一个Azure Active Directory组
- Show Active Directory Groups in different formats 以不同格式显示Active Directory组
- Filter results 筛选结果
- Add Azure Active Directory Users to an Azure Active Directory Group 将Azure Active Directory用户添加到Azure Active Directory组
- Check the Azure Active Directory User/Group Administrator in Azure SQL 在Azure SQL中检查Azure Active Directory用户/组管理员
- Remove the Azure Active Directory User/Group Administrator in Azure SQL 在Azure SQL中删除Azure Active Directory用户/组管理员
要求 (Requirements)
- A subscription to Azure 订阅Azure
- An Azure SQL Server installed 安装了Azure SQL Server
开始吧 (Get started)
Start the Cloud Shell:
启动Cloud Shell:
显示Azure Active Directory用户列表 (Show the list of Azure Active Directory Users)
We will first list all the Azure AD Users using the following command:
我们将首先使用以下命令列出所有Azure AD用户:
az ad user list
Az广告用户列表
This command will show all the users in JSON format by default:
默认情况下,此命令将以JSON格式显示所有用户:
Some important components are the object id, which is a unique identifier and the user principal name.
一些重要的组件是对象ID,它是唯一的标识符和用户主体名称。
显示具有特定用户主体名称或对象ID的特定Azure Active Directory用户 (Show a specific Azure Active Directory user with a specific User principal name or Object ID)
The following example will show the Azure Active Directory (AAD) User information of the AAD user whose user principal name is jlennon@dani671hotmail.onmicrosoft.com:
下面的示例将显示用户主体名称为jlennon@dani671hotmail.onmicrosoft.com的AAD用户的Azure Active Directory(AAD)用户信息:
az ad user show –upn jlennon@dani671hotmail.onmicrosoft.com
AZ广告用户显示–upn jlennon@dani671hotmail.onmicrosoft.com
You can also show the information of a specific user using the object id:
您还可以使用对象ID显示特定用户的信息:
az ad user show –upn 7ad85bb1-456c-400d-b39f-e14013127abc
az广告用户显示–upn 7ad85bb1-456c-400d-b39f-e14013127abc
创建一个Azure Active Directory用户 (Create an Azure Active Directory User)
The following example shows how to create an Azure Active Directory user named “psmith” with a password and a user principal name:
下面的示例演示如何使用密码和用户主体名称创建名为“ psmith”的Azure Active Directory用户:
az ad user create –display-name psmith –password Mypaermy2aa3434$$ –user-principal-name psmith@dani671hotmail.onmicrosoft.com
az广告用户create –显示名称psmith –密码Mypaermy2aa3434 $$ –user-principal-name psmith@dani671hotmail.onmicrosoft.com
To verify in the Azure Portal, go to more Services and User and Groups:
若要在Azure门户中进行验证,请转到更多服务以及用户和组:
In the Users section, verify that the user “psmith” was created:
在“ 用户”部分,验证是否已创建用户“ psmith”:
使用变量创建Azure Active Directory用户 (Create an Azure Active Directory User using variables)
Now, we will now learn how to work with variables and how to read user input.
现在,我们将学习如何使用变量以及如何读取用户输入。
First, let’s assign a value to a variable:
首先,让我们为变量分配一个值:
displayname=pjackson
displayname = pjackson
The variable displayname is storing the value “pjackson”. You can verify the value of the variable using the echo command like this:
变量displayname存储值“ pjackson”。 您可以使用echo命令验证变量的值,如下所示:
Echo $displayname
回声$ displayname
We will now read user input and store in a variable named password. To do that, run the following command:
现在,我们将读取用户输入并将其存储在名为password的变量中。 为此,请运行以下命令:
read password
读取密码
After that, you can write the password, which will be stored in the password variable.
之后,您可以编写密码,该密码将存储在password变量中。
To concatenate values, you just need to write the string together:
要串联值,您只需要一起写字符串:
userprincipalname=$displayname@dani671hotmail.onmicrosoft.com
userprincipalname=$displayname@dani671hotmail.onmicrosoft.com
In this example, we are concatenating the variable $dispalyname with the string “@dani671@hotmail.onmicrosoft.com”.
在此示例中,我们将变量$ dispalyname与字符串“ @ dani671 @ hotmail.onmicrosoft.com”连接起来。
The following example, will use the variables to create a new user:
下面的示例将使用变量创建一个新用户:
az ad user create –display-name $displayname –password $password –user-principal-name $userprincipalname
az广告用户create –显示名称$ displayname –密码$ password –用户主要名称$ userprincipalname

The command created a new Active Directory User in Azure named “pjackson” using the variables.
该命令使用变量在Azure中创建了一个新的Active Directory用户,名为“ pjackson”。
You can check in the Azure Portal in Users and Groups that the user “pjackson” was created:
您可以在“用户和组”中的Azure门户中检查是否创建了用户“ pjackson”:
从测试文件创建多个Azure Active Directory用户 (Create multiple Azure Active Directory users from a test file)
In the next example, we will create a list of users and we will create AAD users from that list automatically.
在下一个示例中,我们将创建一个用户列表,并从该列表中自动创建AAD用户。
We will first create a file named “listuser”. The first line will be ”jlopez”, which is an AAD user that we want to create:
我们将首先创建一个名为“ listuser”的文件。 第一行是“ jlopez”,这是我们要创建的AAD用户:
echo “jlopez” > listusers
回声“ jlopez”> listusers
We will append two more lines to the text file:
我们将在文本文件中追加两行:
echo “dtrump” >> listusers
echo “bobama” >> listusers
回声“ dtrump” >> listusers
回声“ bobama” >>列表用户
You can also specify a password:
您还可以指定密码:
read password
读取密码
The following lines of code will read the file listuser. It will create a user for each line of the file.:
以下代码行将读取文件listuser。 它将为每个用户创建一个 文件行:
cat listusers | while read line
do
az ad user create –display-name $line –password $password –user-principal-name $line@dani671hotmail.onmicrosoft.com
done
猫列表用户| 边读边
做
az广告用户创建–显示名称$ line –密码$ password –用户主要名称$line@dani671hotmail.onmicrosoft.com
做完了
The code will create 3 AAD Users: ”jlopez”, ”dtrump” and ”bobama”:
该代码将创建3个AAD用户:“ jlopez”,“ dtrump”和“ bobama”:

In the Azure Portal, you will be able to see the AAD Users created:
在Azure门户中,您将能够看到创建的AAD用户:
创建一个Azure Active Directory组 (Create an Azure Active Directory Group)
The following example will show how to create an AAD Group. We will first create a variable with the display name of the group:
以下示例将显示如何创建AAD组。 我们将首先使用组的显示名称创建一个变量:
groupname=marketing
组名=营销
We will next create a group named marketing:
接下来,我们将创建一个名为市场营销的组:
az ad group create –display-name $groupname –mail-nickname $groupname
az广告组创建–显示名称$ groupname –邮件昵称$ groupname
To verify, in the Portal go to User and Groups, All groups. You will be able to see the marketing group:
要进行验证,请在门户中转到“用户和组,所有组”。 您将能够看到营销组:
以不同格式显示Active Directory组 (Show Active Directory Groups in different formats)
A typical question is how can the output format of the Az CLI 2.0 commands be changed. By default, the results are displayed in JSON format but it is possible to change to a different format
一个典型的问题是如何更改Az CLI 2.0命令的输出格式。 默认情况下,结果以JSON格式显示,但可以更改为其他格式
The following example shows how to show the Active Directory Group information of the marketing group:
下面的示例显示如何显示市场营销组的Active Directory组信息:
az ad group show -g marketing
AZ广告组展示-G营销
The results are displayed in JSON format:
结果以JSON格式显示:
With the -o (output) parameters, you can change the format to a table or a tab-separated value format (tsv). The following example shows how to show the results as a table:
使用-o(输出)参数,可以将格式更改为表或制表符分隔的值格式(tsv)。 以下示例显示如何将结果显示为表格:
az ad group show -g marketing -o table
az广告组展示-g市场营销-o表
The results are displayed in a table format. You can also display the results in tsv format (-o tsv):
结果以表格格式显示。 您还可以以tsv格式(-o tsv)显示结果:
筛选结果 (Filtering results)
With the –query parameter, you can create filters. In the next example, we will show only the displayName and mail of the AAD Users in a tsv format:
使用–query参数,可以创建过滤器。 在下一个示例中,我们将仅以tsv格式显示AAD用户的displayName和邮件 :
az ad user list –query “[].{ name:displayName,mail:mail}” -o tsv
az广告用户列表–查询“ []。{name:displayName,mail:mail}” -o tsv
The results displayed are the following:
显示的结果如下:

The following example shows all the AAD Users whose display name is bobama. The query shows the display name and mail in table format:
下面的示例显示所有显示名称为bobama的AAD用户。 查询以表格格式显示显示名称和邮件:
az ad user list –query “[?displayName == ‘bobama’].{ name:displayName,mail:mail}” -o table
az广告用户列表–查询“ [?displayName =='bobama']。{name:displayName,mail:mail}” -o表
The result displayed is the following:
显示的结果如下:
将Azure Active Directory用户添加到Azure Active Directory组 (Adding Azure Active Directory Users to an Azure Active Directory Group)
To add a user to a group, you need the AAD Group name and the user Object Identifier. You can get the AAD User object identifier using the az ad user list command.
要将用户添加到组,您需要AAD组名和用户对象标识符。 您可以使用az ad user list命令获取AAD用户对象标识符。
We will first store and Object ID in a variable named oid:
我们首先将对象ID和对象ID存储在oid中:
oid=40d3f415-3384-438f-8997-cdddc7a34283
oid = 40d3f415-3384-438f-8997-cdddc7a34283
We will also store the group name of an existing group:
我们还将存储现有组的组名:
groupname=marketing
组名=营销
The following example will add the user with the Object identifier provided to the marketing AAD group:
以下示例将向用户添加提供给市场营销AAD组的对象标识符:
az ad group member add –group $groupname –member-id $oid
az广告组成员添加–group $ groupname –member-id $ oid
In the Azure Portal, go to User and Groups go to the marketing group and you will be able to see one member:
在Azure门户中,转到“用户”,然后转到“组”,再转到营销组,您将能够看到一个成员:
将多个Active Directory用户添加到组 (Adding multiple Active Directory Users to a group)
The following example will store the objects identifiers of all the AAD users in a file named Listobjects:
下面的示例将所有AAD用户的对象标识符存储在名为Listobjects的文件中:
az ad user list –query “[].{ objectId:objectId}” -o tsv >listobjects
az广告用户列表–查询“ []。{objectId:objectId}” -o tsv> listobjects
We will add all the AAD users to the marketing group. We will first set the groupname variable:
我们会将所有AAD用户添加到营销组。 我们将首先设置groupname变量:
groupname=marketing
组名=营销
We will next add all the users to the marketing group using the list of object IDs:
接下来,我们将使用对象ID列表将所有用户添加到营销组:
cat listobjects | while read line
do
az ad group member add –group $groupname –member-id $line
done
猫列表对象| 边读边
做
az广告组成员添加–group $ groupname –member-id $ line
做完了
In the Azure Portal, go to users and groups, and check the members. You will be able to see all the new members added in the marketing group:
在Azure门户中,转到用户和组,然后检查成员。 您将能够看到营销组中添加的所有新成员:
在Azure SQL中检查Azure Active Directory用户/组管理员 (Checking the Azure Active Directory User/Group Administrator in Azure SQL)
In the next example, we will show the command to check the AAD User or Group a specific Azure SQL Server.
在下一个示例中,我们将显示命令以检查AAD用户或对特定的Azure SQL Server进行分组。
We will go to more services in the Azure Portal and look for SQL Servers:
我们将在Azure门户中转到更多服务,并查找SQL Server:
Select your Azure SQL server and go to Active Directory Admin:
选择您的Azure SQL服务器并转到Active Directory管理员:
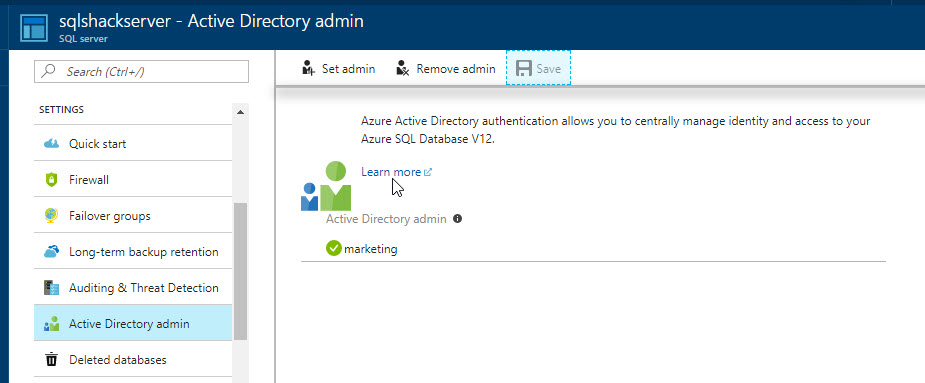
In the cloud shell, you can also view the AAD user or group who is the administrator of the Azure SQL Server. You need to check the servername and resource group:
在云外壳中,您还可以查看作为Azure SQL Server管理员的AAD用户或组。 您需要检查服务器名称和资源组:
You can see the server name and resource group in the Overview section of the Azure SQL Server:
您可以在Azure SQL Server的“概述”部分中查看服务器名称和资源组:
Once that you have the SQL Server name and resource group, you can run the command:
一旦有了SQL Server名称和资源组,就可以运行以下命令:
az sql server ad-admin list –resource-group mynewgp –server-name sqlshackserver
az sql server ad-admin列表–resource-group mynewgp –server-name sqlshackserver
The result displayed is the following:
显示的结果如下:
在Azure SQL中删除Azure Active Directory用户/组管理员 (Removing the Azure Active Directory User/Group Administrator in Azure SQL)
To remove the AAD User or Group administrator the following command is used:
要删除AAD用户或组管理员,请使用以下命令:
az sql server ad-admin delete –resource-group mynewgp –server-name sqlshackserver
az sql server ad-admin delete –资源组mynewgp –server-name sqlshackserver
Where ”mynewgp” is the resource group name and ”sqlshackserver” is the Azure SQL Server.
其中“ mynewgp”是资源组名称,“ sqlshackserver”是Azure SQL Server。
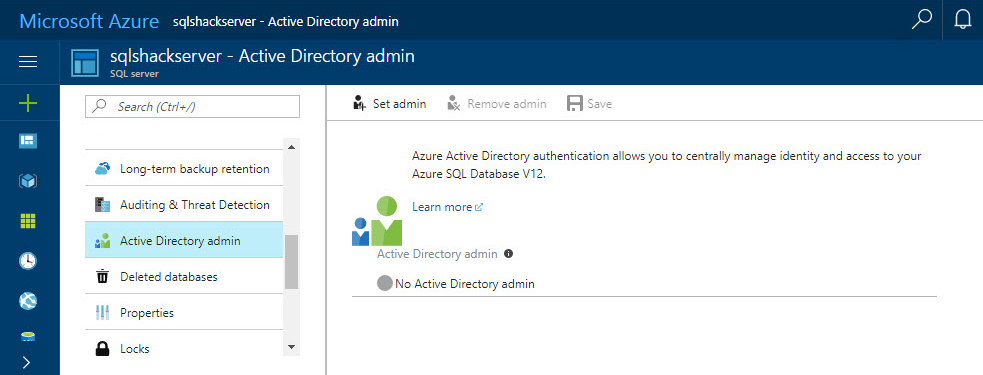
If everything is OK, in the Azure Portal in the Active Directory admin properties of the Azure SQL Server:
如果一切正常,请在Azure门户的Azure SQL Server的Active Directory管理员属性中:
结论 (Conclusion)
The Cloud Shell is a very powerful Shell that can be used to automate administrative tasks. In this article, we learned how to:
Cloud Shell是非常强大的Shell,可用于自动执行管理任务。 在本文中,我们学习了如何:
- create multiple AAD users, 创建多个AAD用户,
- add multiple users to a group, 将多个用户添加到一个组,
- filter information, 过滤信息,
- get AAD information using different formats. 使用不同的格式获取AAD信息。
We used loops, variables and code to automate our tasks.
我们使用循环,变量和代码来自动化我们的任务。
If you have questions related, feel free to share them in the comments below.
如果您有相关问题,请随时在下面的评论中分享。
Previous articles in this series:
本系列以前的文章:
- How to migrate MySQL tables to Microsoft Azure SQL database如何将MySQL表迁移到Microsoft Azure SQL数据库
- How to create an Azure SQL Database using the Cloud Shell如何使用Cloud Shell创建Azure SQL数据库
- How to copy an Azure SQL database using the Azure Portal, Cloud Shell and T-SQL如何使用Azure门户,Cloud Shell和T-SQL复制Azure SQL数据库
- Working with Azure Active Directory and Azure SQL Database使用Azure Active Directory和Azure SQL数据库
翻译自: https://www.sqlshack.com/automate-azure-active-directory-aad-tasks-using-cloud-shell/
azure 使用


 3万+
3万+


 被折叠的 条评论
为什么被折叠?
被折叠的 条评论
为什么被折叠?
 到【灌水乐园】发言


