css分页样式_样式CSS打印分页符

css分页样式

CSS Page Break

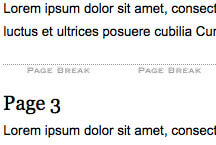
It's important to construct your websites in a fashion that lends well to print. I use a page-break CSS class on my websites to tell the browser to insert a page break at strategic points on the page. During the development of my websites, I style the page-break class for the "screen" media so I can see how pages will print without needing to "print preview" every time I want to find out where I put my page breaks. The following CSS is all I need.

以易于印刷的方式构建您的网站很重要。 我在网站上使用分页符CSS类来告诉浏览器在页面上的关键位置插入分页符。 在开发网站的过程中,我为“屏幕”媒体设置了分页符样式,这样我每次想查找分页符的位置时都可以看到页面的打印方式,而无需“打印预览”。 我只需要以下CSS。

CSS (The CSS)


@media screen {
	.page-break	{ height:10px; background:url(page-break.gif) 0 center repeat-x; border-top:1px dotted #999; margin-bottom:13px; }
}
@media print {
	.page-break { height:0; page-break-before:always; margin:0; border-top:none; }
}


Realize that this CSS doesn't account for browser-triggered page breaks; it only shows you where you've put your own custom page breaks. Note that we've also hidden all of the page break visuals for the "print" media.

意识到此CSS不能解决浏览器触发的分页符; 它只会显示您放置自定义分页符的位置。 请注意,我们还隐藏了“印刷”媒体的所有分页符视觉效果。

Just another styling tip to make your CSS print development easier!

另一个样式提示使您CSS打印开发更加轻松!

翻译自: https://davidwalsh.name/css-print-page-breaks

css分页样式

  • 0
    点赞
  • 0
    收藏
    觉得还不错? 一键收藏
  • 0
    评论
修改 Element 分页样式可以通过覆盖 Element 的 CSS 样式来实现。具体步骤如下: 1. 找到 Element 分页组件的 CSS 类名,例如默认分页样式的类名是 `.el-pagination`。 2. 在你的项目中创建一个新的 CSS 文件,例如 `custom.css`。 3. 在 `custom.css` 中定义新的样式,覆盖 Element 的默认样式。例如,要修改分页中每个页码之间的间距,可以添加以下样式: ``` .el-pagination .number { margin-right: 10px; } ``` 这将使每个页码之间的间距变为 10px。 4. 在你的项目中引入 `custom.css` 文件,例如在 HTML 文件中添加以下代码: ``` <link rel="stylesheet" href="path/to/custom.css"> ``` 这样就可以使用自定义的分页样式了。 基于 Element 封装可拖动放大缩小的弹窗,可以使用 Element UI 提供的 Dialog 组件,并结合 CSS 样式和 JavaScript 代码实现。具体步骤如下: 1. 在 HTML 文件中引入 Element UI 和你的自定义 CSS 文件和 JavaScript 文件。例如: ``` <link rel="stylesheet" href="path/to/element-ui.css"> <link rel="stylesheet" href="path/to/custom.css"> <script src="path/to/vue.js"></script> <script src="path/to/element-ui.js"></script> <script src="path/to/custom.js"></script> ``` 2. 在 JavaScript 文件中封装可拖动放大缩小的弹窗组件。以下是一个示例代码: ``` Vue.component('draggable-dialog', { template: ` <el-dialog :visible.sync="visible" :title="title" :width="width" :height="height"> <div :style="getContainerStyle()" @mousedown="startDrag" @mouseup="stopDrag"> <slot></slot> </div> <div class="resize-handle" @mousedown="startResize"></div> </el-dialog> `, props: { title: { type: String, default: '' }, width: { type: String, default: '50%' }, height: { type: String, default: '50%' } }, data() { return { visible: false, dragging: false, resizing: false, lastX: 0, lastY: 0, startX: 0, startY: 0, startWidth: 0, startHeight: 0 } }, methods: { startDrag(e) { this.dragging = true; this.lastX = e.clientX; this.lastY = e.clientY; }, stopDrag() { this.dragging = false; }, startResize(e) { this.resizing = true; this.startX = e.clientX; this.startY = e.clientY; this.startWidth = parseInt(this.width); this.startHeight = parseInt(this.height); }, stopResize() { this.resizing = false; }, getContainerStyle() { let style = { cursor: 'move' }; if (this.dragging) { style.left = (e.clientX - this.lastX) + 'px'; style.top = (e.clientY - this.lastY) + 'px'; } if (this.resizing) { let dx = e.clientX - this.startX; let dy = e.clientY - this.startY; this.width = (this.startWidth + dx) + 'px'; this.height = (this.startHeight + dy) + 'px'; } return style; } } }); ``` 3. 在 HTML 文件中使用自定义的弹窗组件。例如: ``` <draggable-dialog :visible="dialogVisible" :title="dialogTitle" :width="dialogWidth" :height="dialogHeight"> <p>这是一个可以拖动和缩放的弹窗。</p> </draggable-dialog> ``` 这样就可以使用自定义的可拖动放大缩小的弹窗组件了。
评论
添加红包

请填写红包祝福语或标题

红包个数最小为10个

红包金额最低5元

当前余额3.43前往充值 >
需支付:10.00
成就一亿技术人!
领取后你会自动成为博主和红包主的粉丝 规则
hope_wisdom
发出的红包
实付
使用余额支付
点击重新获取
扫码支付
钱包余额 0

抵扣说明:

1.余额是钱包充值的虚拟货币,按照1:1的比例进行支付金额的抵扣。
2.余额无法直接购买下载,可以购买VIP、付费专栏及课程。

余额充值