


synology nfs
“Create a backup of my NAS?” you might say. “isn’t the NAS the backup though?” Not so fast—not all backups are equal, and a backup isn’t truly a backup until there’s a cold storage copy of it somewhere. Let’s take a look at how to back up your Synology NAS for the ultimate data redundancy.
“创建NAS的备份吗?” 你可能会说。 “ NAS不是备份吗?” 并不是那么快-并非所有备份都是平等的,并且直到某处有冷存储副本时,备份才真正成为备份。 我们来看看如何备份Synology NAS以获得最终的数据冗余。
Although the Synology NAS platform—including the Disk Station Manager operating system that runs on it and the propriety automated Synology Hybrid Raid (SHR)—is a rock solid and easy way to back up data from your computers, it suffers, by the very nature of things, from some of the same issues that plague any always-on backup system.
尽管Synology NAS平台(包括在其上运行的Disk Station Manager操作系统和专有的自动Synology Hybrid Raid(SHR))是从计算机备份数据的坚如磐石且简便的方法,但从本质上讲,它却遭受了很大的麻烦的原因是困扰着任何永远在线的备份系统的一些相同问题。
Namely, because it’s always on and plugged into your home power, any awful fate that befalls your home also befalls it (like a house fire or lightning strike). Further, if you want to obey one of the cardinal rules of proper backup practice, no bit of data is ever truly backed up unless there is an offline cold-storage copy of it somewhere. Plus, if you’re planning on doing any serious overhauling of your Synology NAS (like a total swap of all the disks, migrating to a new NAS unit, or so on) even though the built-in tools for doing so provided by Synology are very user friendly, you should always back up your data to play it safe.
也就是说,由于它始终打开并插入您的家庭电源,因此,落在您房屋上的任何可怕的命运也会落在房屋上(例如房屋火灾或雷击)。 此外,如果您要遵守正确备份实践的基本原则之一,则除非真正在某处有离线的冷存储副本,否则不会真正备份任何数据。 另外,即使您打算对Synology NAS进行任何大修(例如,所有磁盘的总交换,迁移到新的NAS单元等),即使Synology提供了内置工具也可以这样做。对用户非常友好,您应该始终备份数据以确保安全。
准备备份 (Preparing for Your Backup)
To proceed, you’ll need the following things:
要继续,您需要满足以下条件:
- A Synology NAS with a data port and its Disk Station Manager software up to date. 带有数据端口的Synology NAS及其最新的Disk Station Manager软件。
- An external hard drive or hard drive array with sufficient storage space for the data you wish to back up. 外部硬盘驱动器或具有足够存储空间的硬盘驱动器阵列,用于存储您要备份的数据。
- The Hyper Backup application package installed on your Synology NAS (installed by default; download again via the package manager if necessary). Synology NAS上已安装的Hyper Backup应用程序软件包(默认情况下已安装;如有必要,请通过软件包管理器再次下载)。
To get started first locate the data ports on your Synology NAS. The particular unit we’re using for demonstration purposes, the DS916+, has one USB 3.0 port on the front of the unit as well as 2 USB 3.0 ports and a single eSATA port located on the back of the unit, seen below.
首先,请先找到Synology NAS上的数据端口。 我们用于演示目的的特定设备DS916 +,在设备正面具有一个USB 3.0端口,在设备背面具有2个USB 3.0端口和一个eSATA端口,如下所示。
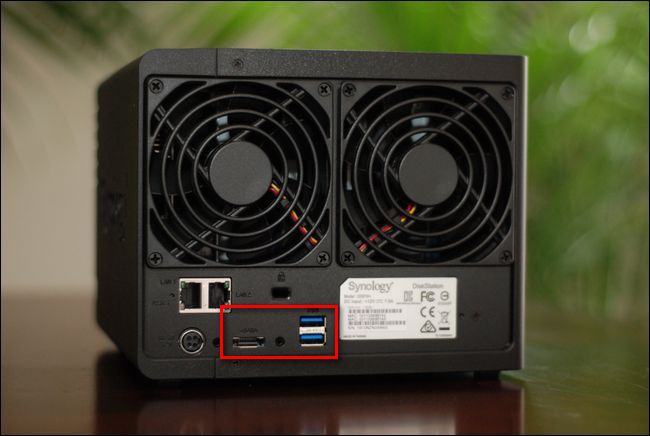
Plug your external enclosure into the appropriate port and, if applicable, make sure to turn the power on to the external enclosure. With the drive plugged in and powered up, you’re ready to follow along with the backup and restoration sections of the tutorial.
将您的外部机箱插入相应的端口,如果适用,请确保打开外部机箱的电源。 插入驱动器并打开电源后,您就可以按照本教程的备份和还原部分进行操作了。
使用Hyper Backup备份数据 (Backing Up Your Data with Hyper Backup)
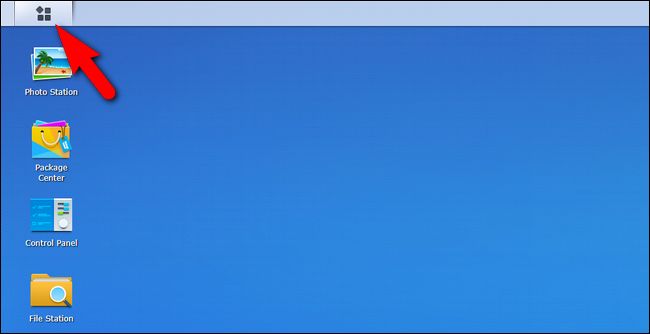
After that, simply open up the web-based interface for your Synology NAS and sign into the administrator account. Click on the menu button in the upper left-hand corner.
之后,只需打开Synology NAS的基于Web的界面并登录到管理员帐户即可。 单击左上角的菜单按钮。
Within the application menu, select “Hyper Backup”.
在应用程序菜单中,选择“超级备份”。

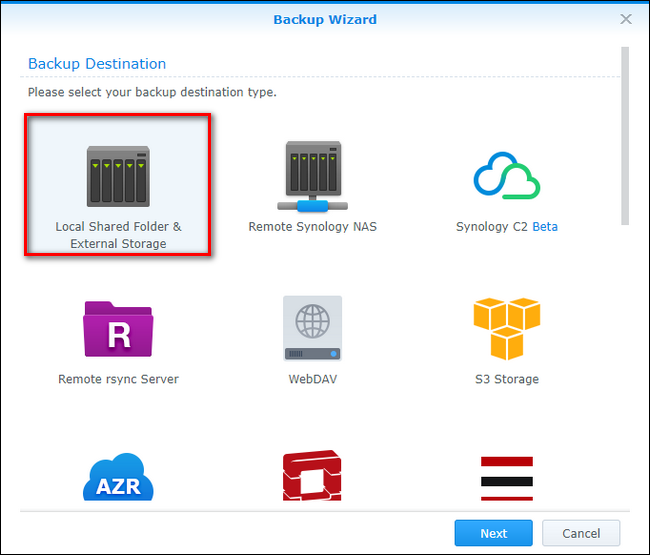
The first step in Hyper Backup is to select your backup destination. Select “Local Shared Folder & External Storage”. Click “Next”.
Hyper Backup的第一步是选择备份目标。 选择“本地共享文件夹和外部存储”。 点击下一步”。
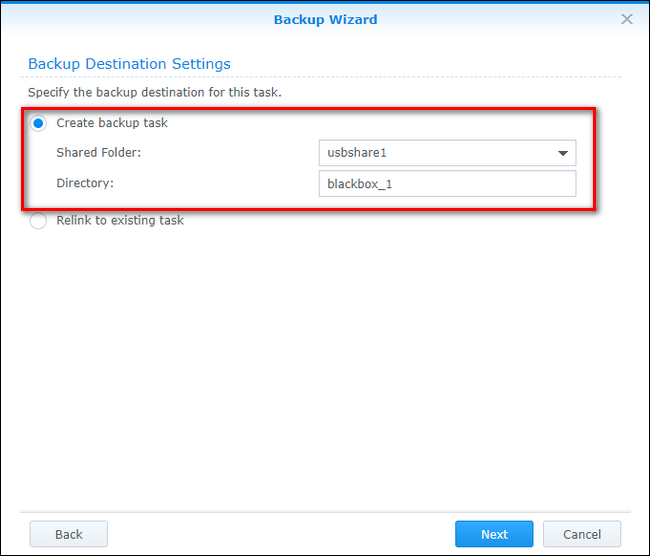
Select “Create Backup Task” and then, from the “Shared Folder” dropdown menu, select “usbshare1” to select your external drive. The default directory name is simply “[yournasname]_1”, but you can change it to whatever you want. Once you’ve selected the folder and directory name, click “Next”.
选择“创建备份任务”,然后从“共享文件夹”下拉菜单中选择“ usbshare1”以选择外部驱动器。 默认目录名称只是“ [yournasname] _1”,但您可以将其更改为所需的名称。 选择文件夹和目录名称后,单击“下一步”。
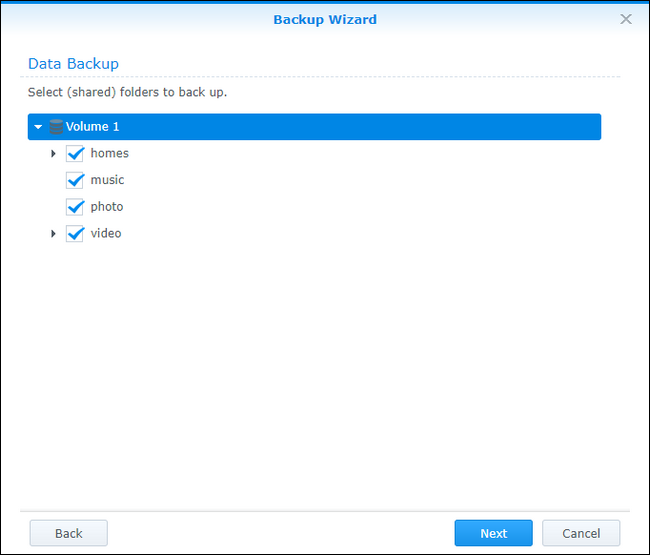
On the next screen, select all the folders whose data you wish to back up to your external drive. You do not need to select all the data on your NAS and can, if you wish, exclude any folders and/or volumes. Once you’ve selected the volume and/or folders you wish to back up, click “Next”.
在下一个屏幕上,选择要备份其数据到外部驱动器的所有文件夹。 您不需要选择NAS上的所有数据,并且可以根据需要排除任何文件夹和/或卷。 选择要备份的卷和/或文件夹后,单击“下一步”。
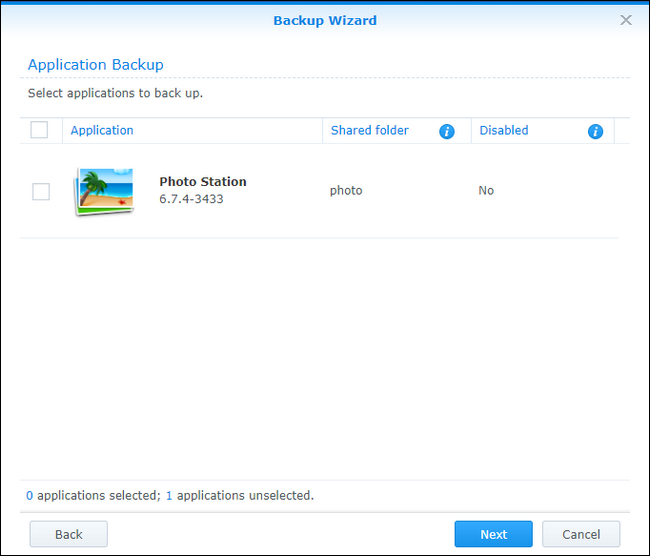
If you wish to back up any applications, now is the time to select them. Note: the list is not a complete list of all applications on your Synology NAS, merely those that have a component Hyper Backup can backup. Click “Next” to continue.
如果要备份任何应用程序,现在是时候选择它们了。 注意:该列表不是Synology NAS上所有应用程序的完整列表,只有具有Hyper Backup组件的应用程序可以备份。 点击“下一步”继续。
Next, you’ll be presented with quite a few potential options for your backup, including whether or not you want to compress the data, encrypt it, schedule a backup routine, and so on. Because our goal is not to leave the disk tethered to the NAS (we want a cold backup we can run, create, and then take offline) we’ll be unchecking “Enable Backup Schedule” and “Enable Integrity Check Schedule” as they are unnecessary for our purpose. Further, we’ll check “Remove destination external device when task has successfully finished”, so that the drive automatically unmounts when the task is done. Click “Next” to continue.
接下来,将为您提供许多潜在的备份选项,包括是否要压缩数据,加密数据,安排备份例程等等。 因为我们的目标不是将磁盘束缚在NAS上(我们希望冷备份可以运行,创建然后脱机),所以我们将取消选中“启用备份计划”和“启用完整性检查计划”对于我们的目的而言是不必要的。 此外,我们将选中“任务成功完成后删除目标外部设备”,以便在任务完成后自动卸载驱动器。 点击“下一步”继续。
NOTE: if you want to manually connect an external drive on a set routine (say, every Sunday night before you go to bed), then you can schedule things accordingly. We find that its much easier to simply run the routine (which will be saved when we’re done) manually when we need it.
注意:如果要按照设定的例程手动连接外部驱动器(例如,上床前的每个星期日晚上),则可以相应地安排事情。 我们发现,在需要时手动手动运行例程(完成后将被保存)会容易得多。

Finally, you can opt to enable “backup rotation”. This is great feature if the backup system in question will be running with a high degree of frequency but of negligible benefit for one-off backups. The backup rotation feature is essentially Synology’s take on incremental file versioning and, when active, will create versions of the files as they change over time (if there is available space on the backup media). This kind of versioning is handy if you find yourself, a year from now, in need of a much earlier version of some project files. Enabling backup rotation is completely optional, and given our focus on making a clean one-off backup, we skipped enabling it. Click “Apply” when ready and, when prompted, click “Yes” on the “Back up now?” pop-up dialogue box.
最后,您可以选择启用“备份循环”。 如果所讨论的备份系统将以较高的频率运行,但一次性备份的收益微不足道,则这是一个很大的功能。 备份轮换功能本质上是Synology进行增量文件版本控制的功能,并且在激活后,将随着时间的变化(如果备份媒体上有可用空间)创建文件的版本。 如果您一年后才发现自己需要某些项目文件的早期版本,则这种版本控制非常方便。 启用备份轮换是完全可选的,并且由于我们专注于进行干净的一次性备份,因此我们跳过了启用备份的过程。 准备就绪后,单击“应用”,然后在出现提示时,在“立即备份?”上单击“是”。 弹出对话框。

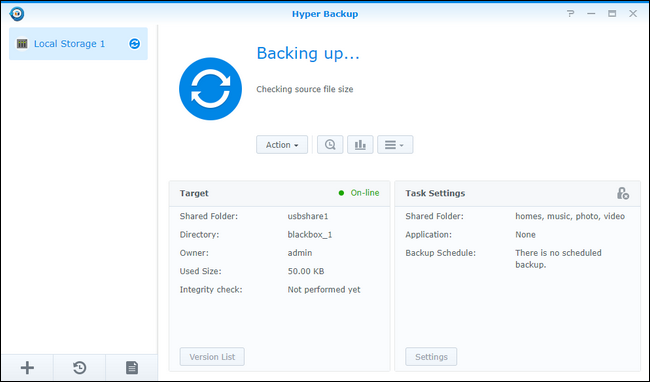
Once you’ve confirmed you wish to start the backup, you’ll see the Hyper Backup monitoring screen, as seen below:
确认要开始备份后,您将看到“超级备份”监视屏幕,如下所示:
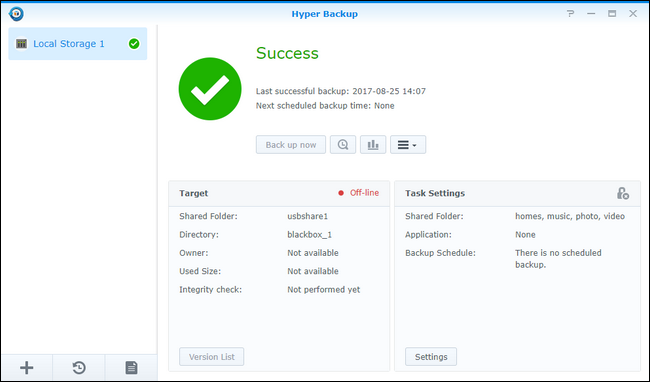
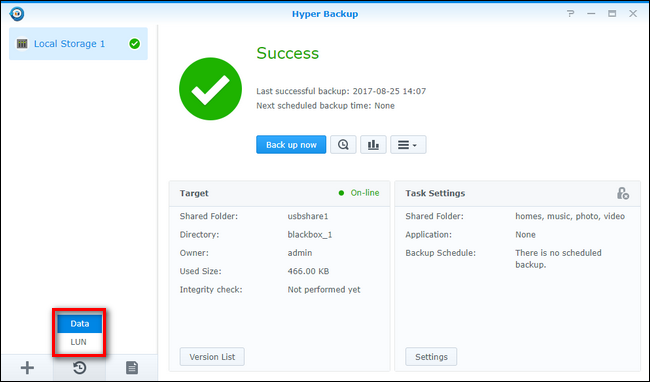
Once the process is complete (which, depending on the total size of the files you’re backing up, could take anywhere from minutes to days) you’ll see the success screen and your disk will be safely ejected.
该过程完成后(取决于所备份文件的总大小,可能需要几分钟到几天的时间),您将看到成功屏幕,并且磁盘将被安全弹出。
At this point you’ve successfully backed up your data and can now store the offline hard drive in a safe location.
至此,您已经成功备份了数据,现在可以将脱机硬盘驱动器存储在安全的位置。
使用Hyper Backup还原数据 (Restoring Your Data with Hyper Backup)
It’s simple to restore your data using Hyper Backup, whether you wish to restore a single file, single directory, or the entire backup. To do so, plug the external hard drive back into your Synology NAS to remount it and then open up Hyper Backup again.
无论您要还原单个文件,单个目录还是整个备份,使用Hyper Backup还原数据都很简单。 为此,请将外部硬盘驱动器重新插入Synology NAS以重新安装,然后再次打开Hyper Backup。
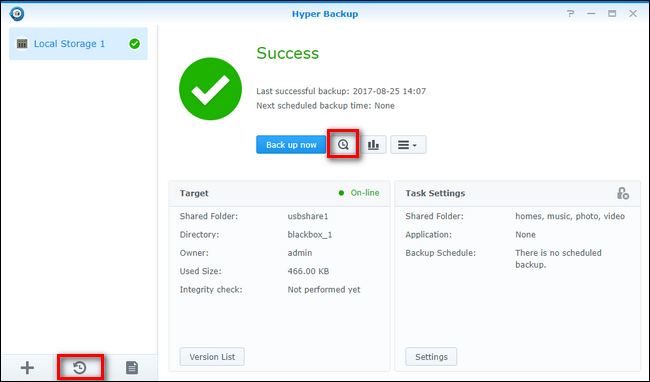
In the main screen of the application you’ll see three things of note. First, in the upper left corner, you’ll see a list of your backup routines. In the case of this tutorial, there is only one, called “Local Storage 1”. But if you have multiple routines, you’ll want to select the one you created for your cold storage backup.
在应用程序的主屏幕中,您将看到三件事。 首先,在左上角,您将看到一个备份例程列表。 在本教程中,只有一个称为“本地存储1”。 但是,如果您有多个例程,则需要选择为冷存储备份创建的例程。
In addition, you’ll also see the “Restore” button in the lower left corner, shaped like a clock with an arrow spinning around it and the “Backup Explorer” button, a small magnifying glass with a clock in the center, located next to the “Back up now” button.
此外,您还会在左下角看到“还原”按钮,其形状类似于带有箭头旋转的时钟,以及位于旁边的“备份资源管理器”按钮,即一个带有时钟的小放大镜。转到“立即备份”按钮。
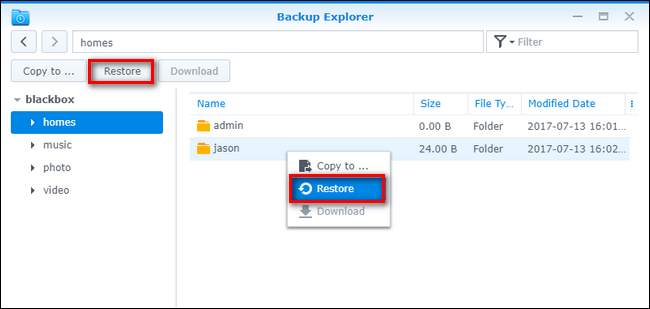
Which button you use depends on your goal. If you wish to restore a single file, then click on the “Backup Explorer” button. This will open a file explorer for the backup file you’ve selected. You can then browse through the directory structure of the backup to select either a directory of file you wish to restore, doing so by either clicking the “Restore” button while the entry is selected or right clicking on it and select “Restore” from the context menu.
您使用哪个按钮取决于您的目标。 如果要还原单个文件,请单击“备份资源管理器”按钮。 这将为您选择的备份文件打开文件浏览器。 然后,您可以浏览备份的目录结构以选择要还原的文件的目录,方法是在选择条目时单击“还原”按钮,或者右键单击该条目,然后从菜单中选择“还原”。上下文菜单。
The other restoration option involves clicking the “Restore” button from the main screen we highlighted above. Click on it and select “Data” (for the curious, “LUN” is an advanced enterprise level backup method that required specialized hardware outside the scope of both this tutorial and the capacity of most home users’ setups).
另一个还原选项涉及从我们上面突出显示的主屏幕中单击“还原”按钮。 单击它,然后选择“数据”(出于好奇,“ LUN”是一种高级企业级备份方法,需要本教程和大多数家庭用户设置能力范围之外的专用硬件)。
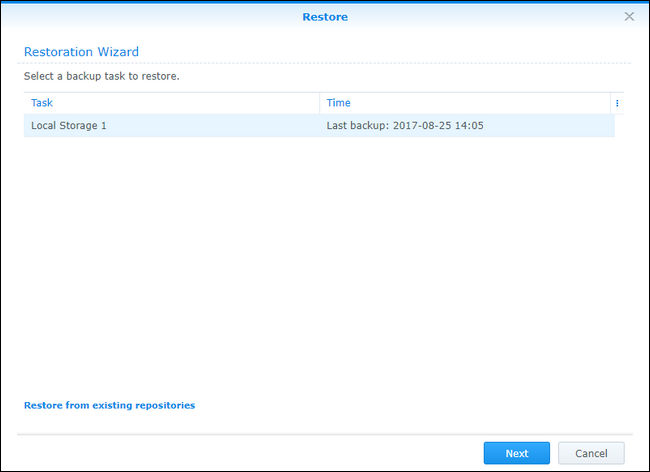
You’ll be prompted to select a backup task to restore (a simple affair for us, because there’s only one backup task in this set). Click “Next”. (Note: if you are restoring data from a data backup set for which you no longer have the backup task in Hyper Backup, you can click on “Restore from existing repositories” to manually select the backup archive.)
系统将提示您选择要还原的备份任务(对我们来说这很简单,因为在此任务集中只有一个备份任务)。 点击下一步”。 (注意:如果要从不再在Hyper Backup中拥有备份任务的数据备份集中还原数据,则可以单击“从现有存储库还原”以手动选择备份存档。)
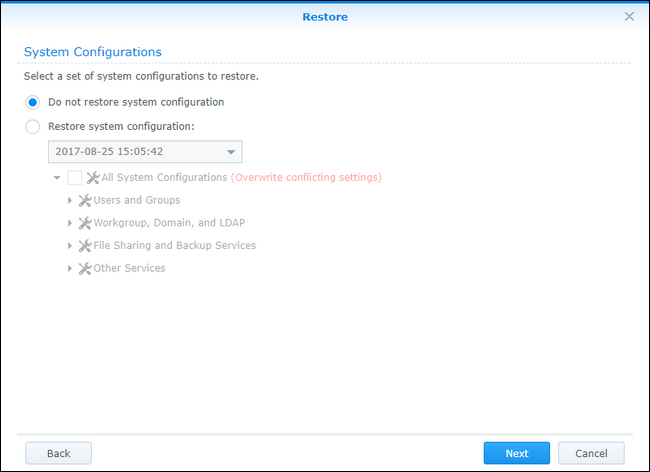
The system configuration was automatically backed up as part of the backup task, and is stored with the backup file created by Hyper Backup. Restoring it is option. If you are simply dealing with data and not restoring your entire Synology NAS, we recommend leaving it set to “Do not restore system configuration”. If you want more information about what the system configuration backup contains, and what it will potentially replace/overwrite, then definitely check out our guide to backing up your configuration file here.
系统配置作为备份任务的一部分自动备份,并与Hyper Backup创建的备份文件一起存储。 恢复它是选项。 如果您只是在处理数据而不是还原整个Synology NAS,我们建议将其设置为“不还原系统配置”。 如果您想了解有关系统配置备份包含的内容以及可能替换/覆盖的内容的更多信息,请务必在此处查看我们的备份配置文件的指南。
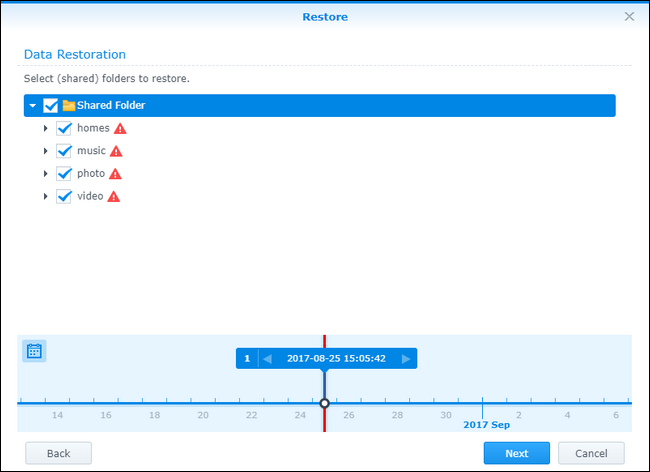
In the next screen, you’ll be prompted to select some or all of the folders contained in the backup. Unlike the file-by-file restoration in the previous Backup Explorer method, you do not have granular file-level selection options here, and can only opt to restore and not restore entire directories or sub-directories. Click “Next” when you’re ready.
在下一个屏幕中,系统将提示您选择备份中包含的部分或全部文件夹。 与以前的Backup Explorer方法中的逐个文件还原不同,您在此处没有细粒度的文件级选择选项,只能选择还原而不还原整个目录或子目录。 准备好后,单击“下一步”。
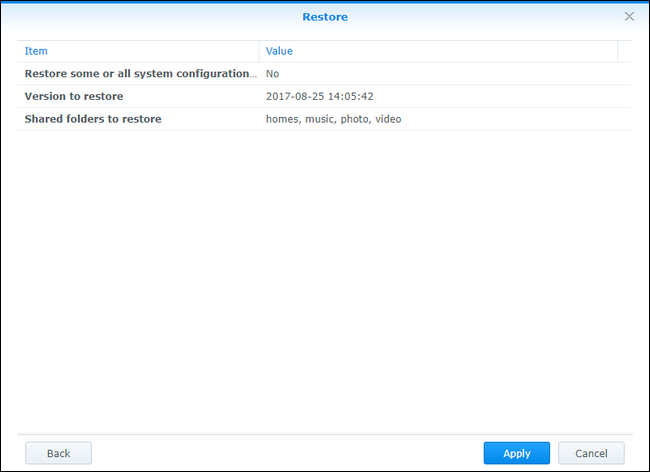
Finally, you’ll see a summary of what will be restored (the configuration file, if applicable, the version, and the folders). Click “Apply” to complete the process if the displayed information is satisfactory.
最后,您将看到要还原内容的摘要(配置文件(如果适用),版本和文件夹)。 如果显示的信息令人满意,请单击“应用”以完成该过程。
After clicking apply, the backup application will churn through the files and restore them, confirming the directories copied when complete. Once the process is over, you can manually eject your external drive by clicking on the eject icon located in the menu bar of Disk Station Manager:
单击“应用”后,备份应用程序将浏览文件并还原它们,并在完成后确认复制的目录。 该过程结束后,您可以通过单击Disk Station Manager菜单栏中的弹出图标来手动弹出外部驱动器:

With your disk(s) stored safely away after restoring your backup, you’re done. Your information is on your NAS, on the backup disks, and, thanks to the offline status of the backup disks, you’ve got a true blue cold-storage backup of your data.
还原备份后,将磁盘安全地存储起来,就可以了。 您的信息位于NAS,备份磁盘上,并且由于备份磁盘处于脱机状态,因此您的数据有了真正的蓝色冷存储备份。
翻译自: https://www.howtogeek.com/323810/how-to-create-a-local-backup-of-your-synology-nas/
synology nfs


 2475
2475


 被折叠的 条评论
为什么被折叠?
被折叠的 条评论
为什么被折叠?
 到【灌水乐园】发言


