


photoshop去除文字

Spots. Zits. Pimples. Acne. Everyone gets them at some point or another. No one, however, needs a permanent photographic reminder of the time they had a large spot on their nose.
景点。 痘痘青春痘。 粉刺。 每个人在某个时候都会得到它们。 但是,没有人需要永久性的照片提醒他们鼻子上有一个大斑点的时间。
There is a lot of backlash at the moment against over-edited images, but sometimes, you just need a little touch up here or there to reflect what you usually look like. With Photoshop, and other image editing apps like GIMP, it’s simple to do. I’m going to work in Photoshop but you should be able to follow along with any image editor–just use the equivalent tools and shortcuts.
目前,对于过度编辑的图像存在很多抵制,但是有时,您只需要在此处或此处进行一些修饰即可反映出通常的样子。 使用Photoshop和其他图像编辑应用程序(例如GIMP) ,很容易做到。 我将在Photoshop中工作,但是您应该能够与任何图像编辑器一起使用-只需使用等效的工具和快捷方式即可。
简单方法:斑点修复刷 (The Simple Way: Spot Healing Brush)
Open the image you want to edit in Photoshop. It’s a bad idea to modify any of the original image’s pixels, so I’m going to show you how to work non-destructively.
在Photoshop中打开要编辑的图像。 修改原始图像的任何像素都是一个坏主意,因此,我将向您展示如何进行非破坏性工作。
Start by pressing Control+J on your keyboard (or Command+J on a Mac) to select the background and duplicate it to a new layer.
首先,按下键盘上的Control + J(在Mac上为Command + J)以选择背景并将其复制到新图层。
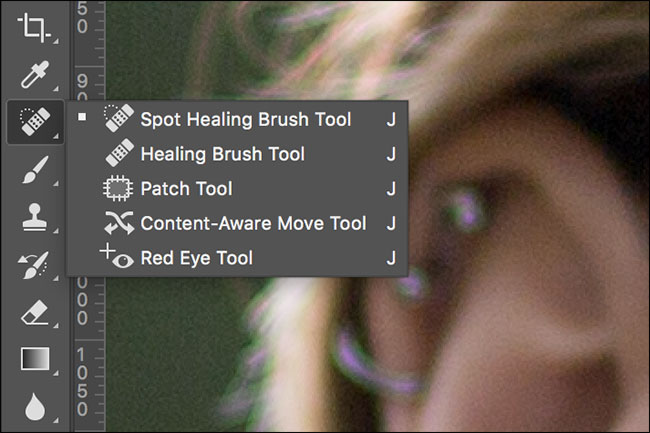
Then, select the Spot Healing Brush tool from the sidebar, or by pressing J on your keyboard. If one of the other healing tools is selected, click and hold on the sidebar icon or cycle through the options with Shift+J until you get the Spot Healing Brush.
然后,从侧边栏中选择“斑点修复刷”工具,或在键盘上按J。 如果选择了其他修复工具之一,请单击并按住侧边栏图标,或者使用Shift + J循环浏览选项,直到获得“斑点修复刷”。
Resize the brush so that it’s a little larger than the offending blemish. The easiest way to do this is with the [ and ] keys.
调整画笔的大小,使其比有问题的瑕疵大一点。 最简单的方法是使用[和]键。
Click on the pimple once, and Photoshop will go to work. It samples pixels from the surrounding area and uses them to replace the pixels to be healed.
单击一次粉刺,Photoshop将开始工作。 它从周围区域采样像素,并使用它们替换要修复的像素。
Repeat the process for any other blemishes you want to get rid of.
对要消除的其他任何瑕疵重复该过程。
The Spot Healing Brush tool can also be used to remove small creases or wrinkles. Resize the brush so it’s a little wider than the crease you want to remove and then carefully paint along it.
Spot Healing Brush工具也可以用于去除小折痕或皱纹。 调整画笔的大小,使其比您要去除的折痕稍宽一些,然后小心地沿其绘画。
先进的方式:修复刷 (The Advanced Way: Healing Brush)
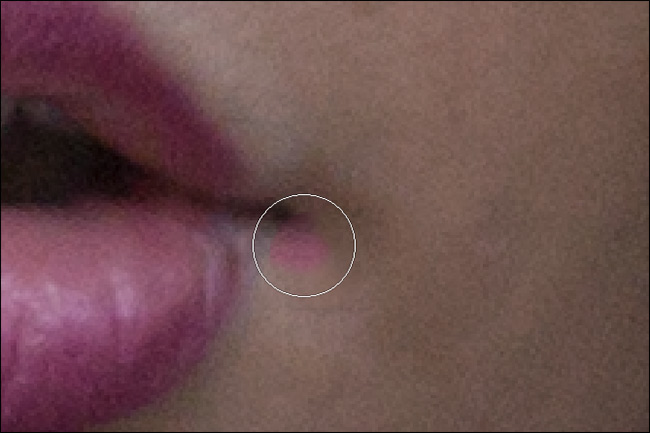
The Spot Healing Brush is great for small blemishes that are surrounded by plenty of good pixels. When there are spots close to areas of detail, such the subject’s lips or facial hair, Photoshop’s automatic sampling won’t work as well. You can see in the image below that when I try to heal the spot near the model’s lips Photoshop got confused. It tried to use some of the color from the model’s lips to cover the spot.
斑点修复刷非常适合小瑕疵,周围有很多优质像素。 当靠近细节区域的斑点(例如对象的嘴唇或面部毛发)时,Photoshop的自动采样也无法正常工作。 您可以在下面的图像中看到,当我尝试修复模型嘴唇附近的斑点时,Photoshop感到困惑。 它尝试使用模型嘴唇上的一些颜色遮盖斑点。
To overcome this, you need to use a slightly more advanced tool. The Healing Brush is similar to the Spot Healing Brush, but rather than letting Photoshop pick the sample area, you have to choose what to sample.
为了克服这个问题,您需要使用稍微更高级的工具。 修复刷与点修复刷类似,但是您必须选择要采样的内容,而不是让Photoshop选择采样区域。
If you have the Spot Healing Brush selected, you can change to the regular Healing Brush with the keyboard shortcut Shift+J. Alternatively, click and hold on the sidebar icon for the healing tools and select the Healing Brush from the list.
如果选择了“斑点修复刷”,则可以使用键盘快捷键Shift + J更改为常规修复刷。 或者,单击并按住修复工具的侧栏图标,然后从列表中选择“修复刷”。

For removing spots, make sure that the Healing Brush is set to Aligned, and Sample: Current & Below. Diffusion controls how quickly Photoshop blends the sampled pixels. In most case, a middle value of around 4 or 5 is perfect.
要去除斑点,请确保将“修复画笔”设置为“对齐”,然后将“样本:当前和以下”设置为“对齐”。 扩散控制Photoshop融合采样像素的速度。 在大多数情况下,理想的中间值为4或5。

Hold down Alt (or Option on a Mac) and click on an area to select a sample. You want to pick an area that’s as similar as possible to the one to be retouched. For example, if a spot sits directly on the subject’s lip line, sample from a similar point further down their lip.
按住Alt键(在Mac上为Option键),然后单击一个区域以选择示例。 您想要选择一个与要修饰的区域尽可能相似的区域。 例如,如果斑点直接位于对象的嘴唇线上,则从他们嘴唇下方的类似点进行采样。

Resize the brush so that it is slightly larger than the spot you want to heal. Click on the blemish, and Photoshop will do its magic.
调整画笔的大小,使其比要修复的斑点稍大。 单击瑕疵,Photoshop将发挥其魔力。
Repeat the process until you’re happy with how the image looks. Remember to select a new sample for every spot.
重复该过程,直到您对图像的外观满意为止。 切记为每个斑点选择一个新样品。
Removing acne is easy. It’s not a permanent facial feature so if the image you’re editing is going to be seen by people, it’s worth spending the 30 seconds in Photoshop to deal with it. There’s no need for your Facebook, LinkedIn, or even Tinder, profile picture to not reflect the best you.
去除粉刺很容易。 它不是永久性的面部特征,因此如果要编辑的图像将被人们看到,则值得在Photoshop中花费30秒来处理它。 您的Facebook,LinkedIn甚至Tinder个人资料图片都无需反映您的最佳状态。
翻译自: https://www.howtogeek.com/273331/how-to-remove-acne-and-other-blemishes-in-photoshop/
photoshop去除文字


 247
247


 被折叠的 条评论
为什么被折叠?
被折叠的 条评论
为什么被折叠?
 到【灌水乐园】发言


