
ssh方式路由web

Connecting to the internet from Wi-Fi hotspots, at work, or anywhere else away from home, exposes your data to unnecessary risks. You can easily configure your router to support a secure tunnel and shield your remote browser traffic—read on to see how.
从Wi-Fi热点,工作场所或家中其他任何地方连接到Internet,会使您的数据面临不必要的风险。 您可以轻松配置路由器以支持安全隧道并屏蔽远程浏览器流量-请继续阅读以了解操作方法。
什么是,为什么要建立安全隧道? (What is and Why Set Up a Secure Tunnel?)
You might be curious why you would even want to set up a secure tunnel from your devices to your home router and what benefits you would reap from such a project. Let’s lay out a couple different scenarios that involve you using the internet to illustrate the benefits of secure tunneling.
您可能很好奇,为什么甚至要建立一个从设备到家庭路由器的安全隧道,以及从该项目中获得什么好处。 让我们提出一些不同的场景,其中涉及您使用互联网来说明安全隧道的好处。
Scenario one: You’re at a coffee shop using your laptop to browse the internet through their free Wi-Fi connection. Data leaves your Wi-Fi modem, travels through the air unencrypted to the Wi-Fi node in the coffee shop, and then is passed on to the greater internet. During the transmission from your computer to the greater internet your data is wide open. Anyone with a Wi-Fi device in the area can sniff your data. It’s so painfully easy that a motivated 12 year old with a laptop and a copy of Firesheep could snatch up your credentials for all manner of things. It’s as though you’re in a room filled with English-only speakers, talking into a phone speaking Mandarin Chinese. The moment somebody who speaks Mandarin Chinese comes in (the Wi-Fi sniffer) your pseudo-privacy is shattered.
方案1:您在一家咖啡店中,使用笔记本电脑通过免费的Wi-Fi连接浏览互联网。 数据离开您的Wi-Fi调制解调器,未经加密就通过空中传输到咖啡店的Wi-Fi节点,然后再传递到更大的Internet。 从计算机传输到更大的互联网期间,您的数据是开放的。 该区域内装有Wi-Fi设备的任何人都可以嗅探您的数据。 这非常容易,以至于一个有动机的12岁小伙子带着一台笔记本电脑和一份Firesheep副本,可以抢走您用于各种事物的凭据。 就像您在一个只有讲英语的房间里,正在讲普通话的电话里聊天一样。 当有人说普通话的时候(Wi-Fi嗅探器),您的伪隐私权就被粉碎了。
Scenario two: You’re at a coffee shop using your laptop to browse the internet through their free Wi-Fi connection again. This time you’ve established an encrypted tunnel between your laptop and your home router using SSH. Your traffic is routed through this tunnel directly from your laptop to your home router which is functioning as a proxy server. This pipeline is impenetrable to Wi-Fi sniffers who would see nothing but a garbled stream of encrypted data. No matter how shifty the establishment, how insecure the Wi-Fi connection, your data stays in the encrypted tunnel and only leaves it once it has reached your home internet connection and exits to the greater internet.
方案二:您在一家咖啡店中,使用笔记本电脑再次通过其免费Wi-Fi连接浏览互联网。 这次,您已经使用SSH在笔记本电脑和家庭路由器之间建立了加密隧道。 您的流量通过该隧道直接从笔记本电脑路由到充当代理服务器的家用路由器。 Wi-Fi嗅探器无法穿透该管道,他们只会看到乱码的加密数据流。 无论建立的速度有多快,Wi-Fi连接多么不安全,您的数据都将保留在加密的隧道中,并且仅在到达您的家庭Internet连接并出口到更大的Internet时才保留。
In scenario one you’re surfing wide open; in scenario two you can login to your bank or other private web sites with the same confidence you would from your home computer.
在第一种情况下,您正在冲浪。 在第二种情况下,您可以以与家用计算机相同的信心登录到银行或其他私人网站。
Although we used Wi-Fi in our example you could use the SSH tunnel to secure a hardline connection to, say, launch a browser on a remote network and punch a hole through the firewall to surf as freely as you would on your home connection.
尽管在示例中我们使用了Wi-Fi,但是您可以使用SSH隧道来保护硬线连接,例如,在远程网络上启动浏览器,并在防火墙上打一个洞,从而像在家庭连接上一样自由地冲浪。
Sounds good doesn’t it? It’s incredibly easy to set up so there’s no time like the present—you can have your SSH tunnel up and running within the hour.
听起来不错吧? 设置非常容易,因此没有像现在这样的时间-您可以在一个小时内启动并运行SSH隧道。
你需要什么 (What You’ll Need)

There are many ways to setup an SSH tunnel to secure your web browsing. For this tutorial we’re focusing on setting up an SSH tunnel in the easiest possible way with the least amount of fuss for a user with a home router and Windows-based machines. To follow along with our tutorial you’ll need the following things:
有许多方法可以设置SSH隧道来保护您的Web浏览。 在本教程中,我们着重于以最简单的方式来建立SSH隧道,对于拥有家用路由器和基于Windows的计算机的用户来说,大惊小怪。 要遵循我们的教程,您需要满足以下条件:
An SSH client like PuTTY.
像PuTTY这样的SSH客户端。
A SOCKS-compatible web browser like Firefox.
兼容SOCKS的Web浏览器,例如Firefox 。
For our guide we’ll be using Tomato but the instructions are almost identical to the ones you would follow for DD-WRT so if you’re running DD-WRT feel free to follow along. If you don’t have modified firmware on your router check out our guide to installing DD-WRT and Tomato before proceeding.
对于我们的指南,我们将使用Tomato,但说明几乎与您对DD-WRT遵循的说明相同,因此,如果您正在运行DD-WRT,请随时遵循。 如果您尚未在路由器上修改固件,请先阅读我们的DD-WRT和Tomato安装指南,然后再继续。
为我们的加密隧道生成密钥 (Generating Keys for Our Encrypted Tunnel)

Although it might seem odd to jump right to generating the keys before we even configure the SSH server, if we have the keys ready we’ll be able to configure the server in a single pass.
尽管在甚至配置SSH服务器之前直接跳转生成密钥似乎有些奇怪,但是如果我们准备好了密钥,我们将能够通过一次配置服务器。
Download the full PuTTY pack and extract it to a folder of your choice. Inside the folder you’ll find PUTTYGEN.EXE. Launch the application and click Key –> Generate key pair. You’ll see a screen much like the one pictured above; move your mouse around to generate random data for the key creation process. Once the process has finished your PuTTY Key Generator window should look something like this; go ahead and enter a strong password:
下载完整的PuTTY包并将其解压缩到您选择的文件夹中。 在该文件夹内,您将找到PUTTYGEN.EXE。 启动应用程序,然后单击密钥–>生成密钥对。 您将看到一个与上图非常相似的屏幕。 移动鼠标以生成用于密钥创建过程的随机数据。 该过程完成后,您的PuTTY Key Generator窗口应如下所示; 继续并输入一个强密码:
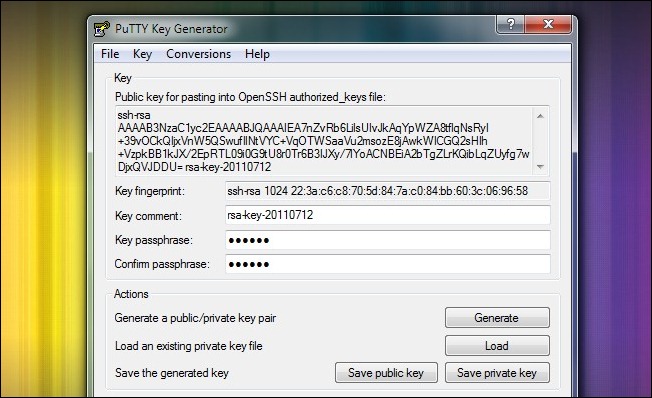
Once you’ve plugged in a password, go ahead and click Save private key. Stash the resulting .PPK file somewhere safe. Copy and paste the contents of the “Public key for pasting…” box into a temporary TXT document for now.
插入密码后,继续并点击保存私钥。 将生成的.PPK文件存储在安全的地方。 现在将“粘贴公钥...”框的内容复制并粘贴到临时TXT文档中。
If you plan on using multiple devices with your SSH server (such as a laptop, a netbook, and a smartphone) you need to generate key pairs for each device. Go ahead and generate, password, and save the additional key pairs you need now. Make sure you copy and paste each new public key into your temporary document.
如果计划在SSH服务器上使用多个设备(例如笔记本电脑,上网本和智能手机),则需要为每个设备生成密钥对。 继续生成并输入密码,然后保存您现在需要的其他密钥对。 确保将每个新的公共密钥复制并粘贴到临时文档中。
为SSH配置路由器 (Configuring Your Router for SSH)
Both Tomato and DD-WRT have built-in SSH servers. This is awesome for two reasons. First, it used to be a huge pain to telnet into your router to manually install an SSH server and configure it. Second, because you’re running your SSH server on your router (which likely consumes less power than a light bulb), you never have to leave your main computer on just for a lightweight SSH server.
Tomato和DD-WRT都具有内置的SSH服务器。 这很棒,有两个原因。 首先,以前使用telnet进入路由器以手动安装SSH服务器并对其进行配置非常麻烦。 其次,由于您正在路由器上运行SSH服务器(它可能比灯泡消耗的功率少),因此您不必将主机仅留在轻型SSH服务器上。
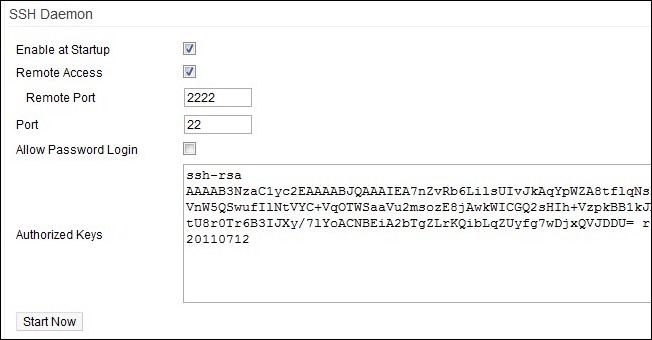
Open a web browser on a machine connected to your local network. Navigate to the web interface of your router, for our router—a Linksys WRT54G running Tomato—the address is http://192.168.1.1. Login to the web interface and the navigate to Administration –>SSH Daemon. There you need to check both Enable at Startup and Remote Access. You can change the remote port if you desire but the only benefit to doing so is that it marginally obfuscates the reason the port is open if anyone port scans you. Uncheck Allow Password Login. We will not be using a password login to access the router from afar, we will be using a key pair.
在连接到本地网络的计算机上打开Web浏览器。 导航到路由器的Web界面,对于我们的路由器(运行Tomato的Linksys WRT54G),地址为http://192.168.1.1 。 登录到Web界面,然后导航到Administration –> SSH Daemon 。 在那里,您需要选中“启动时启用”和“远程访问” 。 您可以根据需要更改远程端口,但是这样做的唯一好处是,如果有人扫描您的端口,它会在一定程度上模糊端口开放的原因。 取消选中“允许密码登录” 。 我们将不会使用密码登录从远处访问路由器,而是将使用密钥对。
Paste the public key(s) you generated in the last part of the tutorial into the Authorized Keys box. Each key should be its own entry separated by a line break. The first portion of the key ssh-rsa is very important. If you do not include it with each public key they will appear invalid to the SSH server.
将您在教程最后一部分中生成的公共密钥粘贴到“授权密钥”框中。 每个键应该是自己的条目,并以换行符分隔。 密钥ssh-rsa的第一部分非常重要。 如果未在每个公用密钥中都包含它,则它们将对SSH服务器无效。
Click Start Now and then scroll down to the bottom of the interface and click Save. At this point your SSH server is up and running.
单击立即开始,然后向下滚动到界面底部,然后单击保存。 此时,您的SSH服务器已启动并正在运行。
配置远程计算机以访问SSH服务器 (Configuring Your Remote Computer to Access Your SSH Server)
This is where the magic happens. You’ve got a key pair, you’ve got a server up and running, but none of that is of any value unless you’re able to remotely connect from the field and tunnel into your router. Time to bust out our trusty net book running Windows 7 and set to work.
这就是魔术发生的地方。 您有一个密钥对,您已经启动并运行了一个服务器,但是除非您能够从现场远程连接并通过隧道连接到路由器,否则这些都没有任何价值。 是时候结束运行Windows 7并运行的值得信赖的上网本了。
First, copy that PuTTY folder you created to your other computer (or simply download and extract it again). From here out all instructions are focused on your remote computer. If you ran the PuTTy Key Generator on your home computer make sure you’ve switched over to your mobile computer for the rest of the tutorial. Before you settle you’ll also need to make sure you have a copy of the .PPK file you created. Once you have PuTTy extracted and the .PPK in hand, we’re ready to proceed.
首先,将您创建的PuTTY文件夹复制到另一台计算机上(或直接下载并再次解压缩)。 从这里开始,所有说明都集中在您的远程计算机上。 如果您在家用计算机上运行PuTTy密钥生成器,请确保在本教程的其余部分中已切换到移动计算机。 解决之前,您还需要确保拥有创建的.PPK文件的副本。 提取PuTTy并准备好.PPK后,我们就可以开始了。
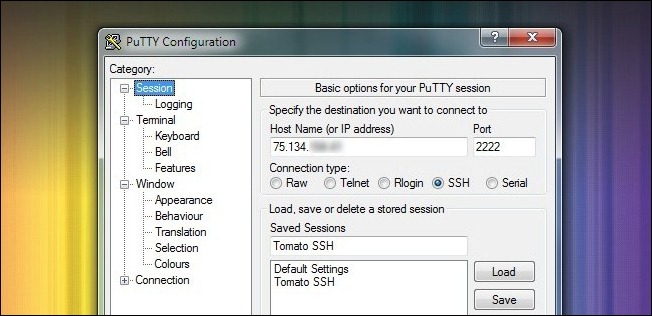
Launch PuTTY. The first screen you’ll see is the Session screen. Here you’ll need to enter the IP address of your home internet connection. This is not the IP of your router on the local LAN this is the IP of your modem/router as seen by the outside world. You can find it by looking at the main Status page in your router’s web interface. Change the Port to 2222 (or whatever you substituted in the SSH Daemon configuration process). Make sure SSH is checked. Go ahead and give your session a name so that you can save it for future use. We titled ours Tomato SSH.
启动PuTTY。 您将看到的第一个屏幕是“会话”屏幕。 在这里,您需要输入家庭互联网连接的IP地址。 这不是本地LAN上路由器的IP,这是外界所看到的调制解调器/路由器的IP。 您可以通过查看路由器Web界面中的“状态”主页面来找到它。 将端口更改为2222 (或在SSH Daemon配置过程中替换的端口)。 确保已检查SSH 。 继续并为您的会话命名,以便您保存它以备将来使用。 我们将其命名为Tomato SSH。
Navigate, via the left-hand pane, down to Connection –> Auth. Here you need to click the Browse button and select the .PPK file you saved and brought over to your remote machine.
通过左侧窗格导航至Connection –> Auth 。 在这里,您需要单击浏览按钮,然后选择保存并带到远程计算机上的.PPK文件。

While in the SSH sub-menu, continue down to SSH –> Tunnels. It is here we are going to configure PuTTY to function as proxy server for your mobile computer. Check both boxes under Port Forwarding. Below, in the Add new forwarded port section, enter 80 for the Source port and the IP address of your router for the Destination. Check Auto and Dynamic then click Add.
在SSH子菜单中,继续进行至SSH –>隧道。 在这里,我们将配置PuTTY以用作您的移动计算机的代理服务器。 选中端口转发下的两个框。 在下面的“添加新的转发端口”部分中,为Source端口输入80,并为Destination输入路由器的IP地址。 选中自动和动态,然后单击添加。
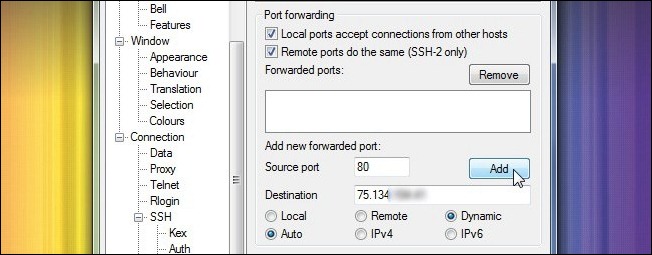
Double check that an entry has appeared in the Forwarded Ports box. Navigate back the Sessions section and click Save again to save all your configuration work. Now click Open. PuTTY will launch a terminal window. You may get a warning at this point indicating that the server’s host key is not in the registry. Go ahead and confirm that you trust the host. If you’re worried about it you can compare the fingerprint string it gives you in the warning message with the fingerprint of the key you generated by loading it up in PuTTY Key Generator. Once you’ve opened PuTTY and clicked through the warning you should see a screen that looks like this:
仔细检查是否在转发端口框中出现了一个条目。 导航回“会话”部分,然后再次单击“保存”以保存所有配置工作。 现在,单击“打开” 。 PuTTY将启动一个终端窗口。 此时,您可能会收到一条警告,指示服务器的主机密钥不在注册表中。 继续并确认您信任主机。 如果您担心它,可以将警告消息中提供的指纹字符串与通过将其加载到PuTTY密钥生成器中生成的密钥指纹进行比较。 打开PuTTY并单击警告后,您应该会看到类似以下的屏幕:
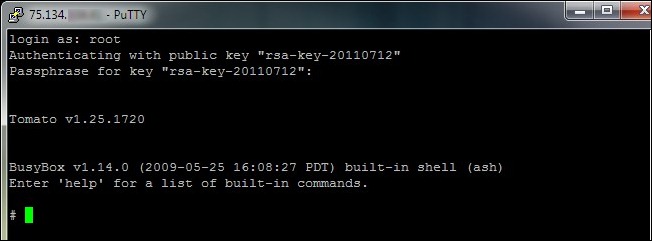
At the terminal you will only need to do two things. At the login prompt type root. At the passphrase prompt enter your RSA keyring password—this is the password you created a few minutes ago when you generated your key and not your router’s password. The router shell will load and you’re done at the command prompt. You’ve formed a secure connection between PuTTY and your home router. Now we need to instruct your applications how to access PuTTY.
在终端上,您只需要做两件事。 在登录提示下,键入root 。 在密码提示下,输入RSA密钥环密码-这是您几分钟前生成密钥时创建的密码,而不是路由器的密码。 路由器外壳将加载,并且在命令提示符下完成操作。 您已在PuTTY和家庭路由器之间建立了安全连接。 现在,我们需要指导您的应用程序如何访问PuTTY。
Note: If you want to simplify the process at the price of slightly decreasing your security you can generate a keypair without a password and set PuTTY to login to the root account automatically (you can toggle this setting under Connect –> Data –> Auto Login). This reduces the PuTTY connection process to simply opening the app, loading the profile, and clicking Open.
注意:如果要以稍微降低安全性为代价简化过程,则可以生成不带密码的密钥对,并将PuTTY设置为自动登录到根帐户(可以在“连接”->“数据”->“自动登录”下切换此设置) )。 这将PuTTY连接过程简化为仅打开应用程序,加载配置文件并单击“打开”。
配置浏览器以连接到PuTTY (Configuring Your Browser to Connect to PuTTY)

At this point in the tutorial your server is up and running, your computer is connected to it, and only one step remains. You need to tell the important applications to use PuTTY as a proxy server. Any application which supports SOCKS protocol can be linked to PuTTY—such as Firefox, mIRC, Thunderbird, and uTorrent, to name a few—if you’re unsure if an application supports SOCKS dig around in the options menus or consult the documentation. This is a critical element that shouldn’t be overlooked: all your traffic isn’t routed through the PuTTY proxy by default; it must be attached to the SOCKS server. You could, for example, have a web browser where you turned on SOCKS and a web browser where you didn’t—both on the same machine—and one would encrypt your traffic and one wouldn’t.
在本教程的这一点上,服务器已启动并正在运行,您的计算机已连接至服务器,仅剩一步。 您需要告诉重要的应用程序将PuTTY用作代理服务器。 如果不确定某个应用程序是否支持SOCKS,则可以将任何支持SOCKS协议的应用程序链接到PuTTY,例如Firefox,mIRC,Thunderbird和uTorrent,例如,不确定它们是否可以在选项菜单中浏览或查阅文档。 这是一个不容忽视的关键元素:默认情况下,您的所有流量都不会通过PuTTY代理进行路由; 它必须连接到SOCKS服务器。 例如,您可能有一个打开了SOCKS的网络浏览器,一个没有打开过SOCKS的网络浏览器(都在同一台机器上),一个会加密您的流量,而另一个不会。
For our purposes we want to secure our web browser, Firefox Portable, which is simple enough. The configuration process for Firefox translates to practically any application you’ll need to plug in SOCKS information for. Launch Firefox and navigate to Options –> Advanced –> Settings. From within the Connection Settings menu, select Manual proxy configuration and under SOCKS Host plug in 127.0.0.1—you’re connecting to the PuTTY application running on your local computer so you must put the local host IP, not the IP of your router as you’ve been putting in every slot so far. Set the port to 80, and click OK.
为了我们的目的,我们想要保护我们的Web浏览器Firefox Portable,它非常简单。 Firefox的配置过程几乎可以转换为您需要插入SOCKS信息的任何应用程序。 启动Firefox并导航至选项–>高级–>设置。 从“连接设置”菜单中,选择“手动代理配置”,然后在“ SOCKS主机”插件下的127.0.0.1中-您正在连接到本地计算机上运行的PuTTY应用程序,因此必须将本地主机IP(而不是路由器IP)到目前为止,您已经投入了所有位置。 将端口设置为80 ,然后单击“确定”。
We have one tiny little tweak to apply before we’re all set. Firefox, by default, doesn’t route DNS requests through the proxy server. This means that your traffic will always be encrypted but somebody snooping the connection would see all your requests. They’d know you were at Facebook.com or Gmail.com but they wouldn’t be able to see anything else. If you wan to route your DNS requests through the SOCKS, you’ll need to turn it on.
在我们准备好一切之前,我们有一个小小的调整要应用。 Firefox默认情况下不会通过代理服务器路由DNS请求。 这意味着您的流量将始终被加密,但是侦听连接的人将看到您的所有请求。 他们会知道您在Facebook.com或Gmail.com上,但是看不到其他任何内容。 如果要通过SOCKS路由DNS请求,则需要将其打开。

Type about:config in the address bar, then click “I’ll be careful, I promise!” if you get a stern warning about how you can screw up your browser. Paste network.proxy.socks_remote_dns into the Filter: box and then right click on the entry for network.proxy.socks_remote_dns and Toggle it to True. From here out, both your browsing and your DNS requests will be sent through the SOCKS tunnel.
在地址栏中输入about:config ,然后单击“我会保证,我保证!” 如果您收到关于如何改进浏览器的严厉警告。 将network.proxy.socks_remote_dns粘贴到Filter:框中,然后右键单击network.proxy.socks_remote_dns的条目并将其切换为True 。 从这里开始,您的浏览和DNS请求都将通过SOCKS隧道发送。
Although we’re configuring our browser for SSH-all-the-time, you may wish to easily toggle your settings. Firefox has a handy extension, FoxyProxy, that makes it super easy to toggle your proxy servers on and off. It supports tons of configuration options like switching between proxies based on the domain you’re on, the sites you’re visiting, etc. If you want to be able to easily and automatically turn your proxy service off based on whether you’re at home or away, for example, FoxyProxy has you covered. Chrome Users will want to check out Proxy Switchy! for similar functionality.
尽管我们一直在为SSH配置浏览器,但您可能希望轻松切换设置。 Firefox有一个方便的扩展名FoxyProxy ,它使打开和关闭代理服务器变得非常容易。 它支持大量的配置选项,例如根据您所在的域,所访问的站点在代理之间进行切换等。如果您希望能够根据自己是否在网络中轻松,自动地关闭代理服务,在家中或外出,例如,FoxyProxy可以满足您的需求。 Chrome用户将要签出Proxy Switchy! 类似的功能。
Let’s see if everything worked as planned, shall we? To test things out we opened up two browsers: Chrome (seen on the left) with no tunnel and Firefox (seen on the right) freshly configured to use the tunnel.
让我们看看一切是否按计划进行,对吗? 为了进行测试,我们打开了两个浏览器:Chrome(左侧)没有通道,而Firefox(右侧)则新配置为使用通道。
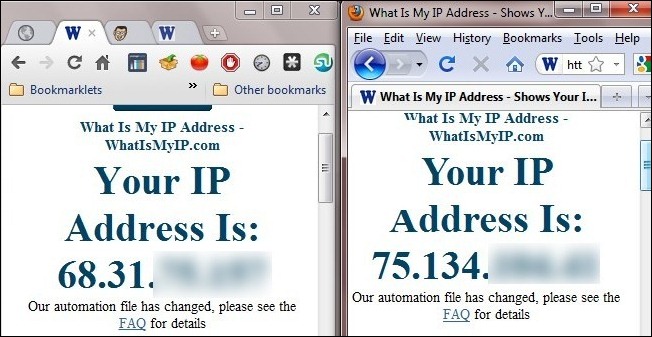
On the left we see the IP address of the Wi-Fi node we’re connecting to and on the right, courtesy of our SSH tunnel, we see the IP address of our distant router. All Firefox traffic is being routed through the SSH server. Success!
在左侧,我们看到要连接的Wi-Fi节点的IP地址;在右侧,根据我们的SSH隧道,我们看到了远程路由器的IP地址。 所有Firefox流量都通过SSH服务器进行路由。 成功!
Have a tip or trick for securing remote traffic? Use a SOCKS server/SSH with a particular app and love it? Need help figuring out how to encrypt your traffic? Let’s hear about it in the comments.
有确保远程通信安全的提示或技巧吗? 对特定应用程序使用SOCKS服务器/ SSH并喜欢吗? 需要帮助弄清楚如何加密您的流量吗? 让我们在评论中听到它。
翻译自: https://www.howtogeek.com/68061/setup-ssh-on-your-router-for-secure-web-access-from-anywhere/
ssh方式路由web


 被折叠的 条评论
为什么被折叠?


