


Want to move your Linux home folder to another drive? Here’s a straightforward and step by step way to do it that should work on any distribution. Moving your home folder means you can reinstall Linux and not have to worry about your personal files.
是否要将您Linux主文件夹移动到另一个驱动器? 这是一种简单易行的逐步方法,适用于任何发行版。 移动主文件夹意味着您可以重新安装Linux,而不必担心您的个人文件。
为什么要将您的主文件夹分开? (Why Keep Your home Folder Separate?)
If you’re setting up a new machine or adding a hard drive to an existing one, you may want to have your home directory on a different drive than the default location.
如果要设置一台新计算机或向现有计算机添加硬盘驱动器,则可能需要将主目录放置在默认位置以外的其他驱动器上。
An increasingly popular configuration for modern personal computers is to have a medium-sized Solid State Drive (SSD) holding your operating system and a larger Solid State Hybrid Drive (SSHD) or traditional hard drive (HD) as your the main storage for data. Or you may have a single traditional hard drive in your system, and you’ve added a new HD for increased storage. Whatever your reasons, here is a simple and blow by blow run-through of moving your home directory.
现代个人计算机越来越流行的配置是使用中型固态驱动器(SSD)保存您的操作系统,并使用较大的固态混合驱动器(SSHD)或传统硬盘驱动器(HD)作为数据的主要存储。 或者您的系统中可能只有一个传统的硬盘驱动器,并且添加了新的HD以增加存储量。 不管您是什么原因,这都是移动主目录的简单而快速的过程。
By the way, if you’re installing a Linux system from scratch, you’ll probably see an option to create a separate home directory in your Linux distribution’s installer. Generally, you’ll just need to go into the partitioning options, create a separate partition, and mount it at “/home”. But, if you’ve already installed a Linux distribution, you can use these instructions to move your current home directory to a new location without losing anything or reinstalling your operating system.
顺便说一句,如果要从头开始安装Linux系统,则可能会看到在Linux发行版的安装程序中创建单独主目录的选项。 通常,您只需要进入分区选项,创建一个单独的分区,然后将其安装在“ / home”即可。 但是,如果您已经安装了Linux发行版,则可以按照以下说明将当前主目录移动到新位置,而不会丢失任何内容或重新安装操作系统。
Now, before we start, go and make a backup.
现在,在开始之前,请进行备份。
识别驱动器 (Identify the Drive)
If you’ve just fitted a drive to a Linux computer, or installed Linux to one of the drives in a new multi-drive computer, and rebooted, there’s little evidence that the new drive is even present.
如果您只是将驱动器安装到Linux计算机上,或者将Linux安装到新的多驱动器计算机中的一个驱动器中,然后重新启动,则几乎没有证据表明新驱动器存在。
The fdisk command will list the drives and their partitions for us.
fdisk命令将为我们列出驱动器及其分区。
sudo fdisk -l

Scroll through the output until you have identified the new drive. The first drive is named /dev/sda , the second is /dev/sdb and so on, with the last letter increasing each time. So /dev/sde would be the fifth hard drive in the system.
滚动浏览输出,直到找到新的驱动器。 第一个驱动器名为/dev/sda ,第二个驱动器名为/dev/sda /dev/sdb ,依此类推,最后一个驱动器每次都增加。 因此/dev/sde将是系统中的第五个硬盘驱动器。
in this example, the new drive is the second drive to be fitted to the system. So we need to look for an entry for /dev/sdb.
在此示例中,新驱动器是要安装到系统的第二个驱动器。 因此,我们需要查找/dev/sdb的条目。
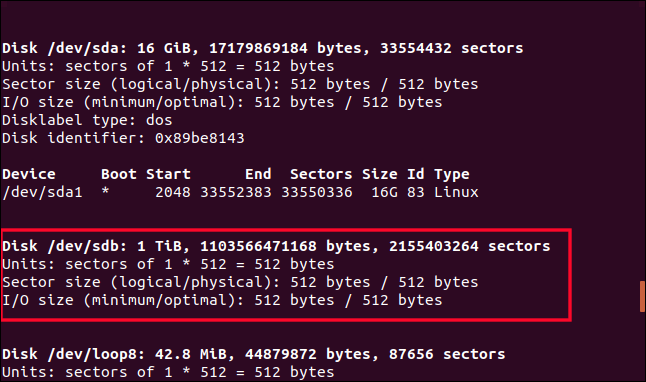
/dev/sdb is highlighted above. You’ll notice that it doesn’t have a line describing a partition on it. It’s a brand new drive so it won’t have one yet. We need to create the partition. We can do so using fdisk. If your hard drive is not /dev/sdb, make sure you substitute /dev/sdb with the actual drive identifier for your new hard drive in the command.
/dev/sdb在上方突出显示。 您会注意到,它上面没有描述分区的行。 这是一个全新的驱动器,所以还没有一个。 我们需要创建分区。 我们可以使用fdisk做到这一点。 如果您的硬盘不是/dev/sdb ,请确保在命令中将/dev/sdb替换为新硬盘的实际驱动器标识符。
sudo fdisk /dev/sdb
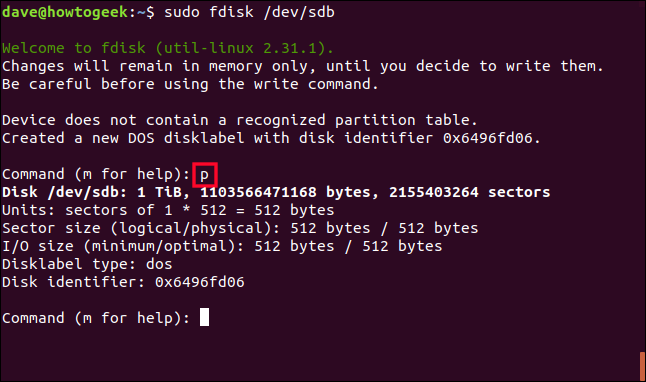
When fdisk prompts you for a command, press the letter p. This prints the partition table for the hard drive. We know it won’t have one, but we get some useful information about the drive. It gives us a good chance to make sure that the drive we’re going to create a partition for is the drive we intended to work with.
当fdisk提示您输入命令时,请按字母p 。 这将打印硬盘驱动器的分区表。 我们知道它没有一个,但是我们获得了有关该驱动器的一些有用信息。 这为我们提供了一个很好的机会,以确保要为其创建分区的驱动器是我们打算使用的驱动器。
It tells us that the drive is a 1TB drive, which matches what we expect in this test machine, so we’ll proceed.
它告诉我们该驱动器是1TB驱动器,与我们在该测试机上所期望的匹配,因此我们将继续进行。
创建分区 (Create a Partition)
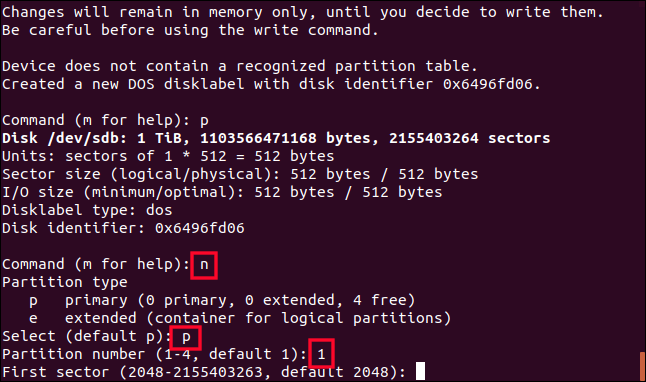
Press the letter n for a new partition, and then press p for a primary partition. When you are asked for the partition number, press the number 1.
按字母n表示新分区,然后按p表示主分区。 当要求您输入分区号时,请按数字1 。
We’re going to create a single partition for the whole disk, so when prompted for the first sector we can press Enter to accept the default value. You will then be prompted for the last sector, and Enter will accept the default value.
我们将为整个磁盘创建一个分区,因此当提示您输入第一个扇区时,我们可以按Enter接受默认值。 然后将提示您输入最后一个扇区,Enter将接受默认值。
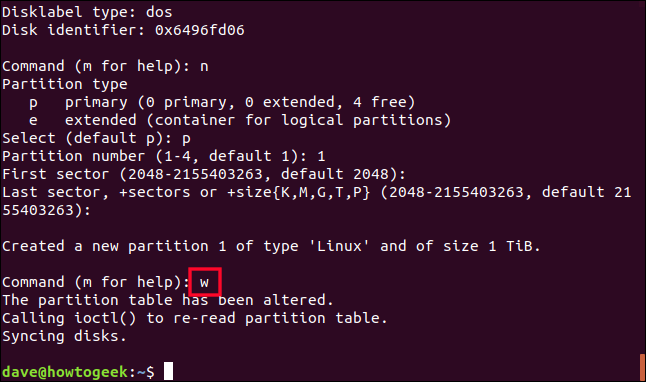
Although fdisk confirms that it has created a 1TB Linux partition, which is partition number 1, nothing has changed on the hard drive yet. Until you give fdisk the command to write the changes to the drive, the drive is untouched. Once you are certain you’re happy with our choices, press the letter w to write the changes to the drive.
尽管fdisk确认已创建了一个1TB Linux分区(分区号为1),但硬盘驱动器上没有任何更改。 除非您给fdisk命令将更改写入驱动器,否则驱动器将保持不变。 确定您对我们的选择感到满意后,请按字母w将更改写入驱动器。
The partition has been written to /dev/sdb . Let’s check what just happened. We’ll use fdisk once more on /dev/sdb.
该分区已被写入/dev/sdb 。 让我们检查一下发生了什么。 我们将在/dev/sdb上再次使用fdisk 。
sudo fdisk /dev/sdb
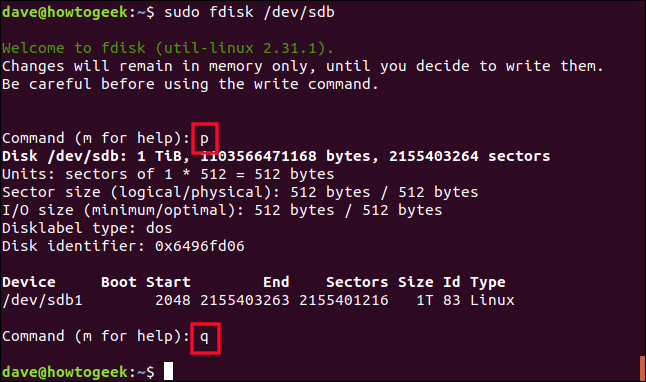
Press the letter p to print that partition table, and you’ll see that there is a partition listed for the drive now. Because it was the first partition on this drive, it is called /dev/sdb1. A second partition would be called /dev/sdb2, and so on.
按字母p打印该分区表,您将看到现在为驱动器列出了一个分区。 因为它是该驱动器上的第一个分区,所以称为/dev/sdb1 。 第二个分区称为/dev/sdb2 ,依此类推。
We don’t want to make any changes to the partition, so press the letter q to quit.
我们不想对分区进行任何更改,因此请按字母q退出。
在分区上创建文件系统 (Create a File System on the Partition)
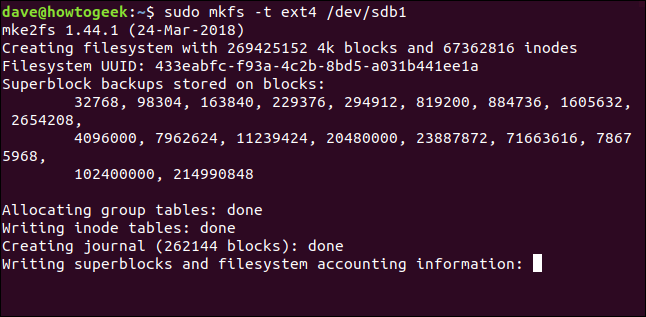
We need to create a filesystem on the partition. This is easily achieved with the mkfs command. Note that you must include the partition number in the command. Be careful to type /dev/sdb1 (the partition) and not /dev/sdb (the drive).
我们需要在分区上创建一个文件系统。 使用mkfs命令可以轻松实现。 请注意,您必须在命令中包括分区号。 请小心键入/dev/sdb1 (分区),而不是/dev/sdb (驱动器)。
sudo mkfs -t ext4 /dev/sdb1

The filesystem will be created for you, and you’ll be returned to the command prompt.
将为您创建文件系统,然后您将返回到命令提示符。
挂载新驱动器 (Mounting the New Drive)
To use the new drive, we must mount the partition on it to a mount point in the filesystem. Actually, to be perfectly accurate, we’re neither mounting the drive nor the partition, we’re mounting the filesystem on the partition, by grafting it onto your system’s filesystem tree.
要使用新驱动器,我们必须将分区挂载到文件系统中的挂载点。 实际上,准确地说,我们既没有安装驱动器也没有安装分区,而是通过将文件系统嫁接到系统的文件系统树上来将文件系统安装在分区上。
The /mnt point is as good a place as any. It is only a temporary mount point to allow us to copy data to the new drive. We’re going to use the mount command to mount the filesystem on the first partition on /dev/sdb, at /mnt .
/mnt点和其他地方一样好。 这只是允许我们将数据复制到新驱动器的临时安装点。 我们将使用mount命令在/dev/sdb的第一个分区/mnt上挂载文件系统。
sudo mount /dev/sdb1 /mnt

If all goes well, you’ll be returned to the command line with no error messages. Let’s see if we can change directory to our newly mounted filesystem.
如果一切顺利,您将返回命令行,而不会出现错误消息。 让我们看看是否可以将目录更改为新安装的文件系统。
cd /mnt

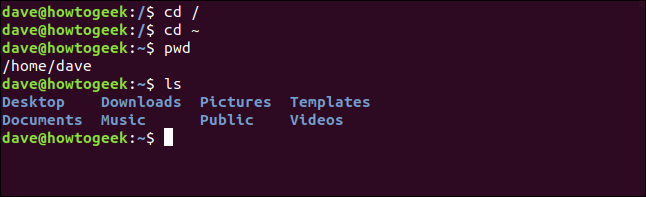
Yes, we can. let’s see what’s here.
我们可以。 让我们看看这里有什么。
ls -ahl
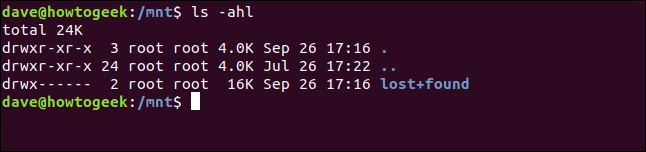
We’re in our new file system. The default “lost+found” directory is not required so we can remove it.
我们正在使用新文件系统。 不需要默认的“ lost + found”目录,因此我们可以将其删除。
sudo rm -rf lost+found

复制主文件夹 (Copying Your Home Folder)
We need to copy everything from the old home directory to the newly mounted filesystem. Using the r (recursive) and p (preserve) options will ensure all subdirectories are copied and that file ownerships, permissions, and other attributes are retained.
我们需要将所有内容从旧的主目录复制到新安装的文件系统。 使用r (递归)和p (保留)选项将确保复制所有子目录,并确保保留文件所有权,权限和其他属性。
sudo cp -rp /home/* /mnt

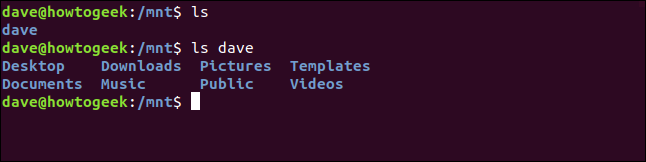
When the copy has completed, use ls to have a look around and verify that your data is where you expect it to be in the new filesystem. In other words, if /mnt was your home directory, is everything present and correct?
复制完成后,请使用ls进行浏览,并验证您的数据是否在新文件系统中。 换句话说,如果/mnt是您的主目录,则所有内容是否正确?
ls
ls dave
You’ll probably want to be a bit more thorough than we were on the test machine this article was researched on. As a safety net, we’re going to rename and keep your old /home directory until you’re satisfied that it is safe to delete it.
您可能想比我们在本文研究过的测试机上更全面。 作为安全网,我们将重命名并保留旧的/home目录,直到您对删除它的安全感到满意为止。
sudo mv /home /home.orig

And we’ll create a new, empty home directory.
然后,我们将创建一个新的空主目录。
sudo mkdir /home

We’ll use that new empty home directory as the mount point for our filesystem on the new hard drive. We need to unmount it from /mnt and remount it on /home. Note that the command umount doesn’t have an “n” after the “u.”
我们将使用该新的空主目录作为新硬盘驱动器上文件系统的安装点。 我们需要从/mnt卸载它,然后在/home上重新安装它。 请注意,命令umount在“ u”之后没有“ n”。
sudo umount /dev/sdb1
sudo mount /dev/sdb1 /home/

测试您的新主目录 (Testing Your New home Directory)
Let’s see what the attributes of the /dev/sdb1 partition are now:
让我们来看一下/dev/sdb1分区的属性:
df /dev/sdb1

We’re shown the name of the filesystem, the size of the partition and the used and available space on it, and importantly, where it is mounted. It is now our /home directory. That means we should be able to reference it exactly as we could the old /home directory.
向我们显示了文件系统的名称,分区的大小以及其上已使用和可用的空间,重要的是显示了该文件系统的安装位置。 现在是我们的/home目录。 这意味着我们应该能够像旧的/home目录一样完全引用它。
If we move to some arbitrary point in the filesystem, we ought to be able to change back to /home using the ~ tilde shortcut.
如果我们转移到一些任意点在文件系统中,我们应该能变回/home使用~波浪号快捷方式。
cd /
cd ~
pwd
ls
cd /home
ls
cd dave
ls
ls -a
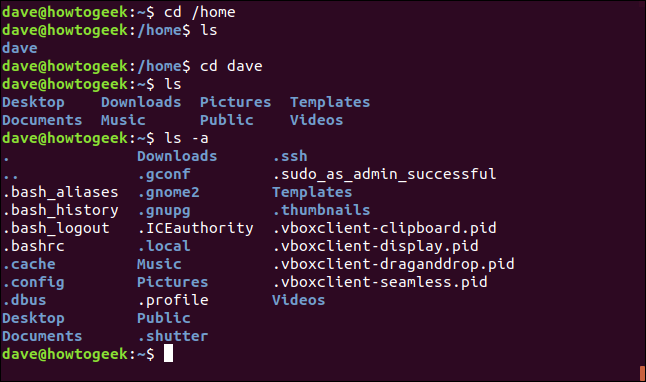
We can move through the filesystem back and forth to /home using explicit commands and using the ~ shortcut. The folders, files, and dotfiles we’d expect are all present. It’s all looking good.
我们可以使用显式命令并使用~快捷方式在文件系统中来回移动到/home 。 我们期望的文件夹,文件和点文件都存在。 一切都很好。
If anything was missing, we could copy it out of the /home.orig directory, which we still have access to in the root of the filesystem. But it all looks fine.
如果缺少任何内容,我们可以将其复制到/home.orig目录中,该目录仍然可以在文件系统的根目录中访问。 但这一切看起来都很好。
Now we need to have /dev/sdb1 mounted automatically every time your computer is started.
现在,我们需要在每次启动计算机时自动安装/dev/sdb1 。
编辑fstab (Editing fstab)
The “fstab” file contains descriptions of the filesystems that are going to be mounted when the system boots. Before we make any changes to it, we’ll make a backup copy of it that we can return to in the event of problems.
“ fstab”文件包含系统引导时将要挂载的文件系统的描述。 在对其进行任何更改之前,我们将对其进行备份,以便在出现问题时可以将其返回。
sudo cp /etc/fstab /etc/fstab.orig

Now we can edit the fstab file.
现在我们可以编辑fstab文件。
sudo gedit /etc/fstab

You must add a line at the bottom of the file to mount our new /home directory. If your drive and partition identifiers are different than the ones used in this example, substitute those for the /dev/sdb1 shown here.
您必须在文件底部添加一行以挂载新的/home目录。 如果您的驱动器和分区标识符与本示例中使用的标识符不同,请用此处显示的/dev/sdb1代替。
- Type the name of the partition at the start of the line, and then press Tab. 在行的开头键入分区的名称,然后按Tab。
Type the mount point,
/home, and press Tab.键入挂载点
/home,然后按Tab。Type the filesystem description
ext4, and press Tab.键入文件系统描述
ext4,然后按Tab。Type
defaultsfor the mount options, and press Tab.键入
defaults的安装选项,然后按Tab。Type the digit
0for the filesystem dump option, and press Tab.键入数字
0作为文件系统转储选项,然后按Tab。Type the digit
0for the filesystem check option.键入数字
0作为文件系统检查选项。
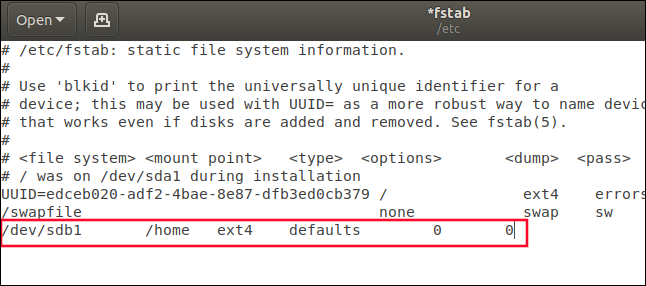
Save the fstab file.
保存fstab文件。
重新启动系统 (Reboot Your System)
We need to reboot to verify that everything has gone according to plan and that you have a seamless connection to your new /home directory.
我们需要重新启动以确认一切均按计划进行,并且您已无缝连接到新的/home目录。
If it doesn’t, you’ve still got the safety net of your original /home directory and fstab file that could be restored if required. Because of the precautions we’ve taken—copying the /home directory and fstab files—you could easily return your system to the state it was in before you started.
如果没有,您仍然拥有原始/home目录和fstab文件的安全网,可以根据需要恢复该文件。 由于采取了一些预防措施-复制/home目录和fstab文件-您可以轻松地将系统恢复为开始之前的状态。
sudo reboot now

最终检查 (Final Checks)
When your system restarts let’s just check that your /home directory is really on your new hard drive, and your system hasn’t somehow (miraculously) reverted to using the old /home directory.
当系统重新启动时,我们只需检查/home目录是否确实在新的硬盘驱动器上,并且您的系统就没有(奇迹般地)恢复为使用旧的/home目录。
df /dev/sdb1

Great, it’s mounted on /home. Mission accomplished.
很好,它安装在/home 。 任务完成。
Once you’re perfectly sure that you no longer need the safety copy of your old /home directory, you can delete it:
一旦完全确定不再需要旧的/home目录的安全副本,则可以将其删除:
cd /
sudo rm -rf home.orig/

And of course, if you do realize something didn’t copy over from the old /home to your new /home, you’ll be able to retrieve it from the backup you made before we started.
当然,如果您确实意识到某些内容没有从旧的/home复制到新的/home ,则可以从我们开始之前所做的备份中检索它。
家,甜蜜的家 (Home Sweet Home)
Now that you’ve separated your /home directory from the rest of the operating system’s partition, you can re-install your operating system, and your data will be untouched. All you have to do is edit the fstab file to mount your second drive on /home.
既然您已经将/home目录与操作系统的其余分区分开,则可以重新安装操作系统,并且数据将保持不变。 您所要做的就是编辑fstab文件,将第二个驱动器安装在/home 。
And because all of your dotfiles are in your /home directory, when you fire up your various applications, they’ll find all of your settings, preferences, and data.
并且由于所有点文件都在/home目录中,因此当您启动各种应用程序时,它们将找到所有设置,首选项和数据。
It takes the pain out of reinstalls and takes the risk out of upgrades.
它消除了重新安装的麻烦,消除了升级的风险。
翻译自: https://www.howtogeek.com/442101/how-to-move-your-linux-home-directory-to-another-hard-drive/


 2309
2309

 被折叠的 条评论
为什么被折叠?
被折叠的 条评论
为什么被折叠?
 到【灌水乐园】发言


