


 本文详细介绍了如何使用Windows 10内置的‘照片’应用和‘文件资源管理器’来创建和控制幻灯片展示。你可以通过双击图片启动‘照片’应用来开始幻灯片,或在‘文件资源管理器’中利用图片工具来浏览任意文件夹中的图片。两种方法都允许你选择特定图片进行播放,并提供了不同的控制选项。‘照片’应用提供方便的相册访问,而‘文件资源管理器’则提供了更详细的幻灯片控制功能。

You downloaded pictures from your camera, phone, or USB drive. Now you want to share these galleries with friends and family in a nice presentation. This guide shows you how to view a slideshow on Windows 10 using native tools.
您从相机,手机或USB驱动器下载了图片。 现在,您想在一个漂亮的演示文稿中与朋友和家人分享这些画廊。 本指南介绍了如何使用本机工具在Windows 10上查看幻灯片。
This guide explains two built-in methods: using the Photos app and using File Explorer. The benefit of the Photos app is that you have immediate access to other albums and folders without digging through File Explorer. Meanwhile, the File Explorer version provides built-in slideshow controls not present in the Photos app.
本指南介绍了两种内置方法:使用“照片”应用程序和使用“文件资源管理器”。 使用“照片”应用程序的好处是,您可以立即访问其他相册和文件夹,而无需通过“文件资源管理器”进行挖掘。 同时,“文件资源管理器”版本提供了“照片”应用程序中没有的内置幻灯片放映控件。
使用照片应用 (Use the Photos App)
Normally, all you need to do is double-click on an image file to launch the Photos app. If Photos isn’t set as the default image application on your computer, right-click on a photo, hover over “Open With,” and select “Photos.”
通常,您需要做的就是双击图像文件以启动“照片”应用程序。 如果未将照片设置为计算机上的默认图像应用程序,请右键单击照片,将鼠标悬停在“打开方式”上,然后选择“照片”。
Once the app loads, you’ll see the static picture on your screen. Hover your mouse over the picture’s left or right side and you can advance or “rewind” to another image using the virtual arrow overlays.
应用加载后,您会在屏幕上看到静态图片。 将鼠标悬停在图片的左侧或右侧,然后可以使用虚拟箭头叠加层前进或“快退”到另一张图像。
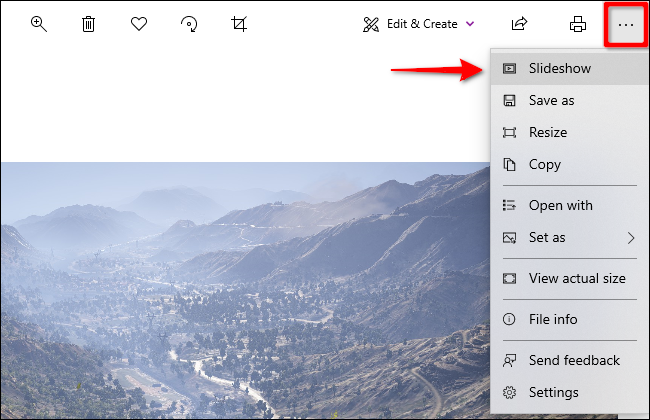
To start a slideshow, click the three-dot button located in the top-right corner. This expands a drop-down menu listing a “Slideshow” option at the top. Click this option to start the show.
要开始幻灯片播放,请单击右上角的三点按钮。 这将展开一个下拉菜单,在顶部列出一个“幻灯片”选项。 单击此选项开始播放。
Once the slideshow begins, it will cycle through all images stored in the initial photo’s associated folder. The slideshow will not add pictures stored in sub-folders.
幻灯片开始播放后,它将循环浏览存储在初始照片的关联文件夹中的所有图像。 幻灯片将不会添加存储在子文件夹中的图片。
For controls, you can press the Right Arrow key to move to the next picture or press the Left Arrow key to rewind back to the previous image.
对于控件,可以按向右箭头键移至下一张图片,或按向左箭头键后退至上一张图像。
Alternatively, you can add a folder to the Photos app and view a specific slideshow at any time.
或者,您可以在“照片”应用中添加文件夹,并随时查看特定的幻灯片。
First, click the Windows button in your taskbar followed by the Photos app located on the Start Menu. If you can’t find it, type in “Photos” immediately after hitting the Windows button.
首先,单击任务栏中的Windows按钮,然后单击“开始”菜单上的“照片”应用程序。 如果找不到,请在按Windows按钮后立即键入“照片”。

With the Photos app open, select “Folders” on the app’s toolbar followed by the “Add a Folder” tile.
打开“照片”应用程序后,在应用程序工具栏上选择“文件夹”,然后选择“添加文件夹”图块。

In this next step, you might see one of two scenarios:
在下一步中,您可能会看到以下两种情况之一:
- A pop-up window with suggested folders. Ignore those and click the “Add Another Folder” link to open File Explorer. You can always add folders later. 带有建议文件夹的弹出窗口。 忽略它们,然后单击“添加另一个文件夹”链接以打开文件资源管理器。 您以后可以随时添加文件夹。
- No pop-up window. The “Add a Folder” button sends you straight to File Explorer. 没有弹出窗口。 “添加文件夹”按钮直接将您发送到文件资源管理器。
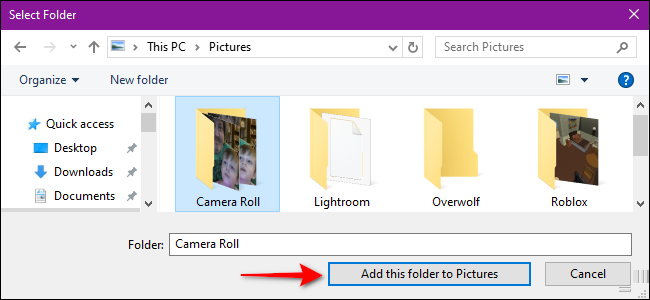
With File Explorer open, locate the folder you want to add and click the “Add This Folder to Pictures” button.
在“文件资源管理器”打开的情况下,找到要添加的文件夹,然后单击“将此文件夹添加到图片”按钮。
After File Explorer closes, click once to open the folder you just added in the Photos app. Once inside, click the three-dot button in the top-right corner followed by the Slideshow option in the drop-down menu.
关闭文件资源管理器后,单击一次以打开您刚刚在“照片”应用程序中添加的文件夹。 进入内部后,单击右上角的三点按钮,然后单击下拉菜单中的“幻灯片”选项。
Your display(s) will grow dark, and the slideshow will begin.
您的显示器将变暗,并且幻灯片将开始。
You can view specific images in a slideshow by holding down the CTRL key while selecting each image in the folder. You can also select a string of images at once by holding down the SHIFT button while selecting the first and last images.
您可以通过在选择文件夹中的每个图像的同时按住CTRL键来查看幻灯片中的特定图像。 您还可以通过在选择第一张和最后一张图像的同时按住SHIFT按钮来一次选择一串图像。
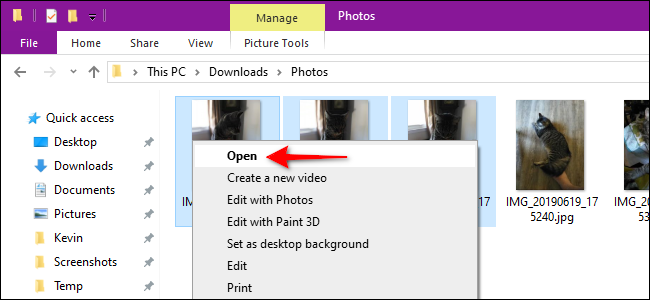
In both cases, right-click after selecting your images and select the “Open” option on the pop-up menu. Once the Photos app loads—if it’s set as your default—start the slideshow as instructed.
在这两种情况下,在选择图像后单击鼠标右键,然后在弹出菜单上选择“打开”选项。 加载“照片”应用程序后(如果已将其设置为默认设置),请按照说明开始幻灯片播放。
Read our guide for additional instructions on how to use Windows 10’s Photos app.
阅读我们的指南以获取有关如何使用Windows 10的“照片”应用程序的其他说明。
在文件资源管理器中使用图片工具 (Use the Picture Tools in File Explorer)
This method does not use the Photos app. Instead, it relies on built-in tools in File Explorer. You can view pictures in a slideshow located in any folder, whether it’s on your PC, a USB stick, or an external drive.
此方法不使用“照片”应用程序。 相反,它依赖于文件资源管理器中的内置工具。 您可以在任何文件夹中的幻灯片中查看图片,无论是在PC,U盘还是外接驱动器上。
For instance, if you have pictures stored in the Downloads folder, you can select any image and view them all in a slideshow, even if they’re all divided into separate subfolders.
例如,如果您有图片存储在“下载”文件夹中,则可以选择任何图像并以幻灯片形式查看它们,即使它们都被分为单独的子文件夹也是如此。
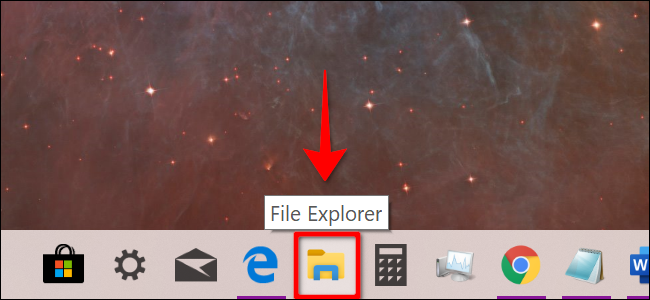
First, click the folder icon located on the taskbar. This opens File Explorer.
首先,单击任务栏上的文件夹图标。 这将打开文件资源管理器。
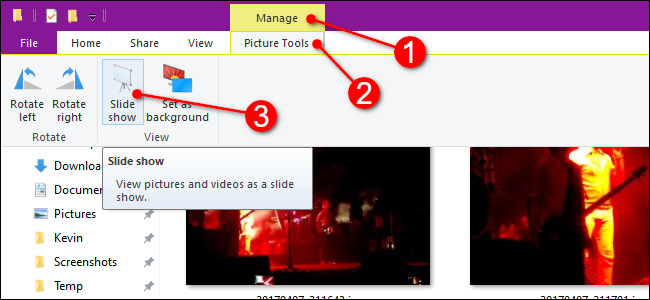
Navigate to the folder storing your pictures and single-click on any image to select it. The “Manage” tab appears along with the “Picture Tools” option on the toolbar. Click this new “Picture Tools” entry followed by the “Slideshow” button on the resulting drop-down menu.
导航到存储图片的文件夹,然后单击任意图片以将其选中。 工具栏上的“管理”选项卡与“图片工具”选项一起出现。 单击此新的“图片工具”条目,然后在出现的下拉菜单上单击“幻灯片”按钮。
Your displays(s) will grow dark, and the slideshow will begin.
您的显示将变暗,并且幻灯片将开始。
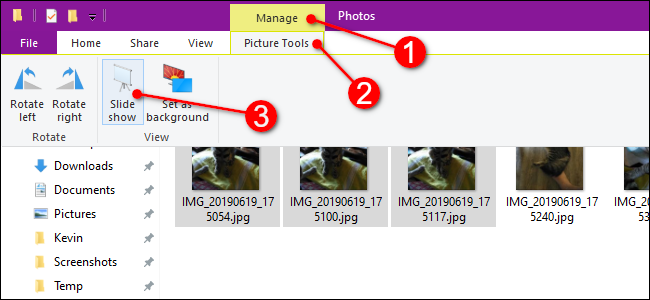
If you’d rather just view pictures in a specific subfolder, enter that folder, select an image, and follow the steps.
如果您只想查看特定子文件夹中的图片,请进入该文件夹,选择一个图像,然后按照以下步骤操作。
Similar to the Photos app, you can view specific images in a slideshow by holding down the CTRL key while selecting each image in the folder. You can also select a string of images at once by holding down the SHIFT key while selecting the first and last images.
与“照片”应用类似,您可以通过在选择文件夹中的每张图像的同时按住CTRL键来查看幻灯片中的特定图像。 您还可以通过在选择第一张和最后一张图像的同时按住SHIFT键来一次选择一串图像。
However, unlike the Photos app, select “Picture Tools” in both cases followed by “Slideshow” to watch your selected pictures in a presentation.
但是,与“照片”应用程序不同,在两种情况下均选择“图片工具”,然后选择“幻灯片”以观看演示文稿中的所选图片。
在文件资源管理器中控制幻灯片显示 (Control Your Slideshow in File Explorer)
This is simple: Just right-click on any image displayed during the slideshow. You’ll see this pop-up menu as a result:
这很简单:只需右键单击幻灯片显示期间显示的任何图像。 您将看到以下弹出菜单:
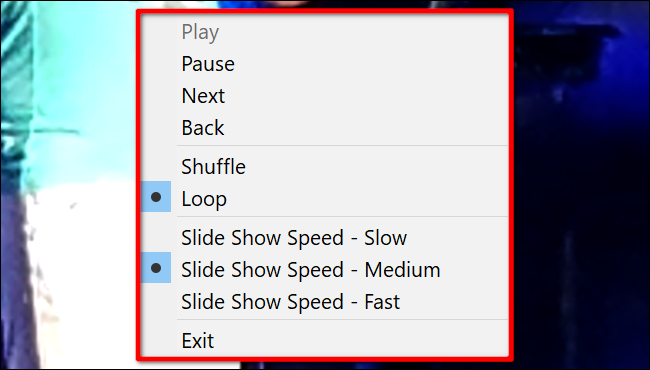
As shown, you can change the speed, shuffle or loop your pictures, and so on.
如图所示,您可以更改速度,随机播放或循环播放图片等。
This menu does not appear during slideshows within the Photos app.
在“照片”应用程序中进行幻灯片放映期间,此菜单不会出现。
翻译自: https://www.howtogeek.com/443529/how-to-view-a-slideshow-on-windows-10/


 被折叠的 条评论
为什么被折叠?
被折叠的 条评论
为什么被折叠?
 到【灌水乐园】发言


