


Windows 10’s new Sandbox feature lets you safely test programs and files downloaded from the internet by running them in a secure container. It’s easy to use, but its settings are buried in a text-based configuration file.
Windows 10的新沙盒功能可让您在安全的容器中运行它们,从而安全地测试从Internet下载的程序和文件。 它易于使用,但其设置被埋在基于文本的配置文件中。
Windows Sandbox易于使用(如果有) (Windows Sandbox Is Easy to Use If You Have It)
This feature is part of Windows 10’s May 2019 Update. Once you’ve installed the update, you’ll also have to be using the Professional, Enterprise, or Education editions of Windows 10. It isn’t available on Windows 10 Home. But, if it is available on your system, you can easily activate the Sandbox feature and then launch it from the Start menu.
此功能是Windows 10 2019年5月更新的一部分。 安装此更新后,您还必须使用Windows 10的专业版,企业版或教育版。Windows10 Home上不提供该版本。 但是,如果您的系统上有此功能,则可以轻松激活“沙箱”功能,然后从“开始”菜单启动它。
Sandbox will launch, make a copy of your current Windows operating system, remove access to your personal folders, and give you a clean Windows desktop with internet access. Before Microsoft added this configuration file, you couldn’t customize Sandbox at all. If you didn’t want internet access, you normally had to disable it right after launch. If you needed access to files on your host system, you had to copy and paste them into Sandbox. And, if you wanted particular third-party programs installed, you had to install them after launching Sandbox.
沙箱将启动,复制当前Windows操作系统,删除对个人文件夹的访问,并为您提供可以访问Internet的干净Windows桌面。 在Microsoft添加此配置文件之前,您根本无法自定义沙箱。 如果您不想上网,通常必须在启动后立即将其禁用。 如果需要访问主机系统上的文件,则必须将它们复制并粘贴到Sandbox中。 而且,如果要安装特定的第三方程序,则必须在启动沙箱后安装它们。
Because Windows Sandbox deletes its instance entirely when close it, you had to go through that process of customization every time you launch. On the one hand, that makes for a more secure system. If something goes wrong, close the Sandbox, and everything gets deleted. On the other hand, if you need to make changes regularly, having to do this on every launch gets frustrating quickly.
由于Windows Sandbox在关闭实例时会完全删除其实例,因此每次启动时都必须经过自定义过程。 一方面,这使得系统更加安全。 如果出现问题,请关闭沙箱,然后所有内容将被删除。 另一方面,如果您需要定期进行更改,则每次启动时都必须这样做,这会很快使您感到沮丧。
To alleviate that issue, Microsoft introduced a configuration feature for Windows Sandbox. Using XML files, you can launch Windows Sandbox with set parameters. You can tighten or loosen the sandbox’s restrictions. For example, you can disable the internet connection, configure shared folders with your host copy of Windows 10, or run a script to install applications. The options are a bit limited in the first release of the Sandbox feature, but Microsoft will probably add more in future updates to Windows 10.
为了缓解该问题,Microsoft引入了Windows Sandbox的配置功能。 使用XML文件,可以使用设置的参数启动Windows Sandbox。 您可以收紧或放松沙箱的限制。 例如,您可以禁用互联网连接,使用Windows 10的主机副本配置共享文件夹,或运行脚本来安装应用程序。 这些选项在沙盒功能的第一个版本中有所限制,但是Microsoft可能会在Windows 10的将来更新中添加更多功能。
如何配置Windows沙箱 (How to Configure Windows Sandbox)

This guide assumes you have already set up Sandbox for general use. If you haven’t done yet, you’ll need to enable it first with the Windows Features dialog.
本指南假定您已经设置了沙盒用于一般用途。 如果尚未完成操作,则需要先通过Windows功能对话框启用它。
To get started, you’ll need Notepad or your favorite text editor—we like Notepad++—and a blank new file. You’ll be creating an XML file for configuration. While familiarity with the XML coding language is helpful, it’s not necessary. Once you have your file in place, you’ll save it with a .wsb extension (think Windows Sand Box.) Double-clicking the file will launch Sandbox with the specified configuration.
首先,您需要记事本或您喜欢的文本编辑器(我们喜欢Notepad ++)和空白的新文件。 您将创建一个XML文件进行配置。 虽然熟悉XML编码语言会有所帮助,但这不是必需的。 放置好文件后,将使用.wsb扩展名保存文件(请考虑使用Windows Sand Box。)双击文件将启动具有指定配置的Sandbox。
As explained by Microsoft, you have several options to choose from when configuring the Sandbox. You can enable or disable the vGPU (virtualized GPU), toggle the network on or off, specify a shared host folder, set read/write permissions on that folder, or run a script on launch.
如Microsoft所述,在配置沙箱时,您有多个选项可供选择。 您可以启用或禁用vGPU(虚拟GPU),打开或关闭网络,指定共享主机文件夹,对该文件夹设置读/写权限,或在启动时运行脚本。
Using this configuration file, you can disable the virtualized GPU (it’s enabled by default), toggle the network off (it’s on by default), specify a shared host folder (sandboxed apps don’t have access to any by default), set read/write permissions on that folder, and/or run a script at launch
使用此配置文件,您可以禁用虚拟GPU(默认情况下处于启用状态),关闭网络(默认情况下处于打开状态),指定共享主机文件夹(默认情况下,沙盒应用程序无权访问任何主机),设置读取/对该文件夹的写入权限,和/或在启动时运行脚本
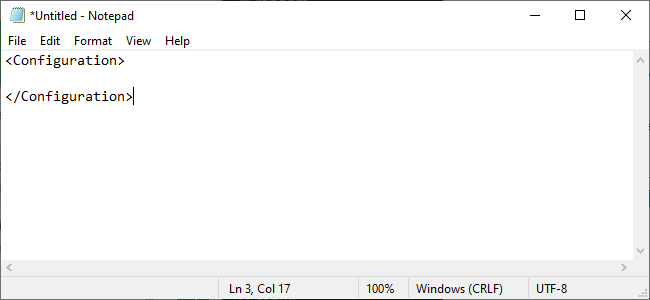
First, open Notepad or your favorite text editor and start with a new text file. Add the following text:
首先,打开记事本或您喜欢的文本编辑器,然后从一个新的文本文件开始。 添加以下文本:
<Configuration>

</Configuration>
All the options you’ll add must be between these two parameters. You can add just one option or all of them—you don’t have to include every single one. If you don’t specify an option, the default will be used.
您要添加的所有选项必须在这两个参数之间。 您可以仅添加一个选项,也可以全部添加-您不必包括每个选项。 如果您未指定选项,则将使用默认值。
如何禁用虚拟GPU或网络 (How to Disable the Virtual GPU or Networking)
As Microsoft points out, having the virtual GPU or Networking enabled increases the avenues malicious software can use to break out of the sandbox. So if you’re testing something you’re particularly worried about, it might be wise to disable them.
正如Microsoft指出的那样,启用虚拟GPU或网络功能可以增加恶意软件入侵沙箱的途径。 因此,如果您要测试特别担心的内容,则禁用它们可能是明智的。
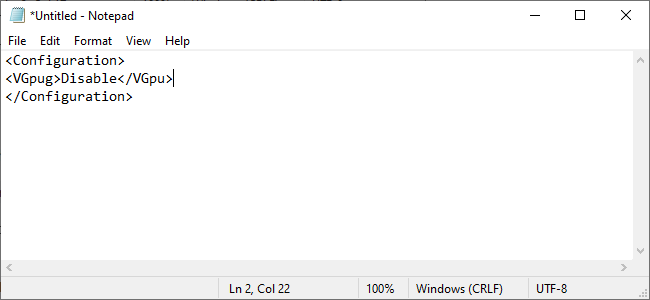
To disable the virtual GPU, which is enabled by default, add the following text to your configuration file.
要禁用默认启用的虚拟GPU,请在配置文件中添加以下文本。
<VGpu>Disable</VGpu>
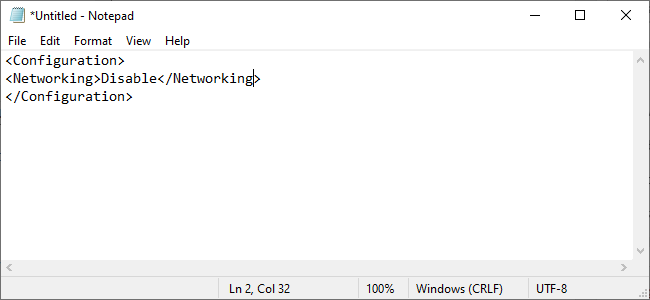
To disable network access, which is enabled by default, add the following text.
要禁用默认情况下启用的网络访问,请添加以下文本。
<Networking>Disable</Networking>
如何映射文件夹 (How to Map a Folder)
To map a folder you’ll need to detail out exactly what folder you want to share, and then specify whether the folder should be read-only or not.
要映射文件夹,您需要确切地详细说明要共享的文件夹,然后指定该文件夹是否应为只读。
Mapping a folder looks like this:
映射文件夹如下所示:
<MappedFolders>
<MappedFolder>
<HostFolder>C:\Users\Public\Downloads</HostFolder>
<ReadOnly>true</ReadOnly>
</MappedFolder>
</MappedFolders>
HostFolder is where you list the specific folder you’d like to share. In the above example, the Public Download folder found on Windows systems is being shared. ReadOnly sets whether Sandbox can write to the folder or not. Set it to true to make the folder read-only or false to make it writable.
HostFolder是您列出要共享的特定文件夹的地方。 在以上示例中,正在共享Windows系统上的“公共下载”文件夹。 ReadOnly设置沙盒是否可以写入文件夹。 将其设置为true可将文件夹设置为只读,将false为可写。
Just be aware, you’re essentially introducing risk to your system by linking a folder between your host and Windows Sandbox. Giving Sandbox write access increases that risk. If you’re testing anything you think may be malicious, you shouldn’t use this option.
请注意,实际上是通过在主机和Windows Sandbox之间链接文件夹来给系统带来风险。 授予沙盒写访问权限会增加该风险。 如果您正在测试任何您认为可能有害的东西,则不应使用此选项。
如何在启动时运行脚本 (How to Run a Script at Launch)
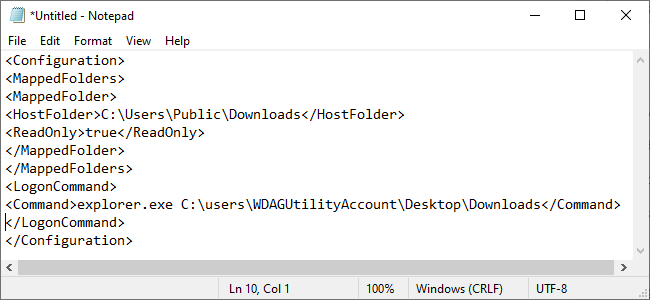
Finally, you can run custom created scripts or basic commands. You could, for instance, force the Sandbox to open a mapped folder upon launch. Creating that file would look like this:
最后,您可以运行自定义创建的脚本或基本命令。 例如,您可以强制沙盒在启动时打开映射的文件夹。 创建该文件将如下所示:
<MappedFolders>
<MappedFolder>
<HostFolder>C:\Users\Public\Downloads</HostFolder>
<ReadOnly>true</ReadOnly>
</MappedFolder>
</MappedFolders>
<LogonCommand>
<Command>explorer.exe C:\users\WDAGUtilityAccount\Desktop\Downloads</Command>
</LogonCommand>
WDAGUtilityAccount is the default user for Windows Sandbox, so you’ll always reference that when opening folders or files as part of a command.
WDAGUtilityAccount是Windows沙箱的默认用户,因此在打开文件夹或文件作为命令的一部分时,您将始终引用该名称。
Unfortunately, in the near-release build of Windows 10’s May 2019 Update, the LogonCommand option does not appear to be working as intended. It didn’t do anything at all, even when we used the example in Microsoft’s documentation. Microsoft will likely fix this bug soon.
不幸的是,在Windows 10的2019年5月更新的LogonCommand发布的版本中, LogonCommand选项似乎无法正常工作。 即使我们使用了Microsoft文档中的示例,它也什么也没做。 Microsoft可能会尽快修复此错误。
如何使用设置启动沙箱 (How to Launch Sandbox With Your Settings)
After you’re done, save your file and give it a .wsb file extension. For example, if your text editor saves it as Sandbox.txt, save it as Sandbox.wsb. To launch the Windows Sandbox with your settings, double-click the .wsb file. You can place it on your desktop or create a shortcut to it in the Start menu.
完成后,保存文件并给它一个.wsb文件扩展名。 例如,如果您的文本编辑器将其另存为Sandbox.txt,则将其另存为Sandbox.wsb。 要使用设置启动Windows沙箱,请双击.wsb文件。 您可以将其放在桌面上,也可以在“开始”菜单中为其创建快捷方式。
For your convenience, you can download this DisabledNetwork file to save you a few steps. The file has a txt extension, rename it with a .wsb file extension, and you’re ready to launch Windows Sandbox.
为了方便起见,您可以下载此DisabledNetwork文件来节省一些步骤。 该文件具有txt扩展名,使用.wsb文件扩展名重命名,您可以启动Windows Sandbox。
翻译自: https://www.howtogeek.com/411402/how-to-configure-the-windows-sandbox/


 1763
1763

 被折叠的 条评论
为什么被折叠?
被折叠的 条评论
为什么被折叠?
 到【灌水乐园】发言


