


上海流浪汉沈
There are many different ways to install python and work with python on Windows. You can install Canopy or Anaconda to have an entire python ecosystem self-contained or you can install python directly onto your machine and configure all the bits and bytes yourself. My current recommendation is to use Vagrant on Windows combined with Virtualbox to virtualize your development environment.
在Windows上有多种安装python和使用python的方法。 您可以安装Canopy或Anaconda来拥有完整的python生态系统,也可以将python直接安装到计算机上并自行配置所有位和字节。 我当前的建议是将Windows上的Vagrant与Virtualbox结合使用来虚拟化您的开发环境。
While I use a mac or the majority of my development, I do find myself using Windows 10 more and more, and may be moving to a Windows machine in the future for my day-to-day laptop. I have and do use Canopy and/or Anaconda but I’ve recently moved the majority of my python development on Windows into Linux (Ubuntu) virtual machines using Vagrant and Virtualbox. You can use other products like VMWare’s virtual machine platform, but Virtualbox is free and does a good enough job for day-to-day development.1
当我使用Mac或我开发的大部分内容时,我发现自己越来越多地使用Windows 10,并且将来可能会在日常笔记本电脑上使用Windows计算机。 我曾经并且确实使用过Canopy和/或Anaconda,但是最近我已经使用Vagrant和Virtualbox将Windows上的大部分python开发迁移到Linux(Ubuntu)虚拟机中。 您可以使用其他产品,例如VMWare的虚拟机平台,但是Virtualbox是免费的,并且可以很好地完成日常开发工作。1
One Caveat: if you’re doing processor / memory intensive development with python, this may not be the best option for you. That said, it can work for those types of development efforts if you configure your virtual machine with enough RAM and processors.
一个警告:如果您正在使用python进行处理器/内存密集型开发,那么这可能不是您的最佳选择。 就是说,如果您为虚拟机配置了足够的RAM和处理器,它就可以用于那些类型的开发工作。
To get started, you’ll need to download and install Vagrant and Virtualbox for your machine. I am using Vagrant 1.90 and Virtualbox 5.1.10 at the time of this post.
首先,您需要为计算机下载并安装Vagrant和Virtualbox 。 在撰写本文时,我正在使用Vagrant 1.90和Virtualbox 5.1.10。
Feel free to ‘run’ either of the programs, but there’s no need to enter either program just yet. To really use the Vagrant and the linux virtual machine, you’ll need to download a *nix emulator to allow you to do the things you need to with vagrant.
可以随意“运行”这两个程序,但是现在还不需要输入任何一个程序。 要真正使用Vagrant和linux虚拟机,您需要下载一个* nix模拟器,以允许您使用vagrant完成所需的操作。
I use Git’s “bash” to interface with my virtual machines and Vagrant. You could use putty or CygWin or any other emulator, but I’ve found Git’s bash to be the easiest and simplest to install and use. Jump over and download git for your machine and install it. At the time of writing, I’m using Git 2.11.0.
我使用Git的“ bash”与虚拟机和Vagrant进行交互。 您可以使用腻子或CygWin或任何其他仿真器,但是我发现Git的bash是最容易安装和使用的工具。 跳过并下载适用于您机器的git并安装它。 在撰写本文时,我正在使用Git 2.11.0。
While installing Git, I recommend leaving everything checked on the ‘select’ components window if you don’t currently have any git applications installed. If you want to use other git applications, you can uncheck the “associate .git* configuration files…” option. There is one ‘gotcha’ when installing git that you should be aware of.
安装Git时,如果您当前未安装任何git应用程序,建议您在“选择”组件窗口中选中所有内容。 如果要使用其他git应用程序,则可以取消选中“关联.git *配置文件…”选项。 在安装git时,您应该注意一个“陷阱”。
On the “adjusting your path” section (see figure 1), you’ll need to think about how you want to use git on the command line.
在“调整路径”部分(参见图1)上,您需要考虑如何在命令行上使用git。

I selected the third option when installing git. I do not use git from the windows command line though…I use a git GUI along with git from the command line within my virtual environment.
我在安装git时选择了第三个选项。 我不使用Windows命令行中的git ...而是在虚拟环境中使用git GUI和命令行中的git。
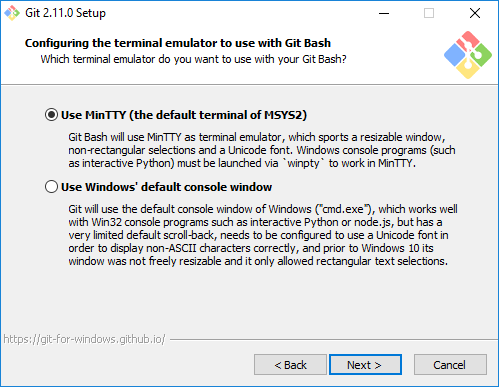
Another screen to consider is the “Configuring the terminal emulator…” screen (figure 2). I selected and use the MinTTY option because it gives me a much more *nix feel. This is personal preference. If you are going to be doing a lot of interactive python work in the console, you might want to select the 2nd option to use the windows default console window.
另一个需要考虑的屏幕是“配置终端仿真器...”屏幕(图2)。 我选择并使用MinTTY选项是因为它给了我* nix的感觉。 这是个人喜好。 如果要在控制台中进行大量交互式python工作,则可能需要选择第二个选项以使用Windows默认控制台窗口。
During the remainder of the installation, I left the rest of the options at the defaults.
在其余的安装过程中,我将其余选项保留为默认值。
Now that git (and bash) is installed, you can launch Git Bash to start working with Vagrant. You should see a window similar to Figure 3.
现在已经安装了git(和bash),您可以启动Git Bash来开始使用Vagrant。 您应该看到类似于图3的窗口。

From this point, you can do your ‘vagrant init’, ‘vagrant up’ and ‘vagrant ssh’ to initialize, create and ssh into your vagrant machine.
从这一点上,您可以执行“ vagrant init”,“ vagrant up”和“ vagrant ssh”来初始化,创建并ssh到您的vagrant计算机中。
在Windows上设置Vagrant (Setting up Vagrant on Windows)
For those of you that haven’t used Vagrant in the past, here’s how I set it up and use it. I generally use vagrant in this way to run jupyter, so I’ll walk you through setting things up for jupyter, pandas, etc.
对于那些过去从未使用过Vagrant的人,这是我设置和使用它的方式。 我通常以这种方式使用流浪汉来运行jupyter,所以我将引导您完成为jupyter,pandas等设置的工作。
First, set up a directory for your project. At the Bash command line, change into the directory you want to work from and type “mkdir vagrant_project” (or whatever name you want to use). Now, initialize your vagrant project by typing:
首先,为您的项目设置目录。 在Bash命令行中,切换到您要使用的目录,然后键入“ mkdir vagrant_project”(或您要使用的任何名称)。 现在,通过键入以下内容来初始化您的vagrant项目:
vagrant init
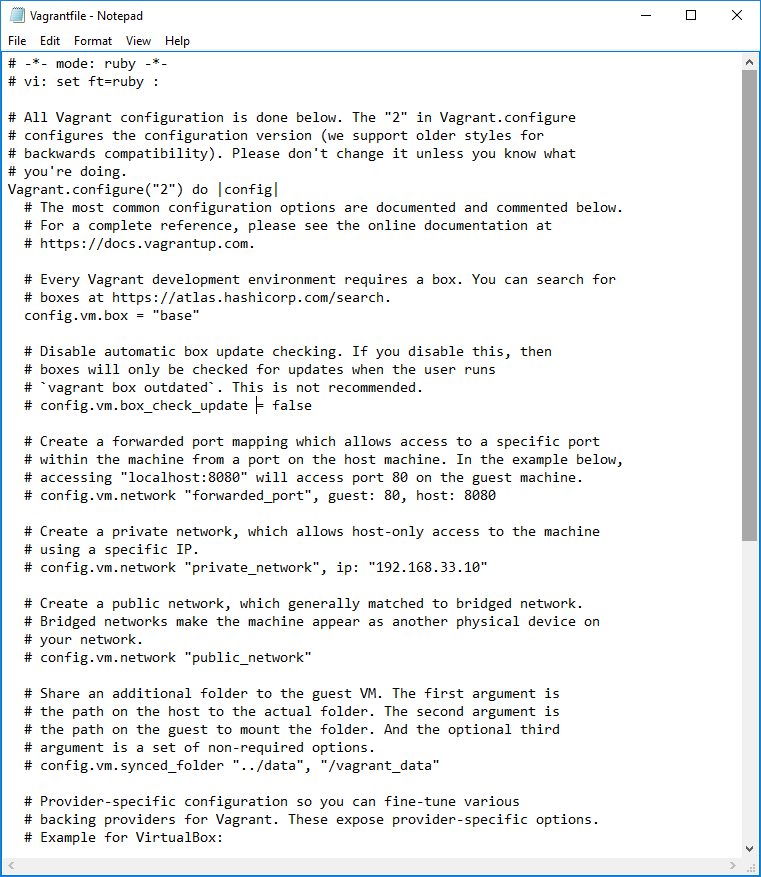
This will create a Vagrantfile in the directory you’re in. This will allow you to set the configuration of your virtual machine and Vagrant. The Vagrantfile should look something like this:
这将在您所在的目录中创建一个Vagrantfile。这将允许您设置虚拟机和Vagrant的配置。 Vagrantfile应该看起来像这样:
Before we go any further, open up your Vagrantfile and change the following line:
在继续之前,请打开您的Vagrantfile并更改以下行:
config.vm.box = "base"
change “base” to “ubuntu/xenial64” to run Ubuntu 16.04. The line should now read:
将“ base”更改为“ ubuntu / xenial64”以运行Ubuntu 16.04。 该行现在应显示为:
config.vm.box = "ubuntu/xenial64"
If you want to run other flavors of linux or other OS’s, you can find others at https://atlas.hashicorp.com/search.
如果要运行其他版本的linux或其他操作系统,可以在https://atlas.hashicorp.com/search上找到其他版本。
Since I’m setting this VM up to work with jupyter, I also want to configure port forwarding in the Vagrantfile. Look for the line that reads:
由于我已将此虚拟机设置为可与jupyter一起使用,因此我还想在Vagrantfile中配置端口转发。 查找显示以下内容的行:
# config.vm.network "forwarded_port", guest: 80, host: 8080
and add a line directly below that line to read:
并在该行的正下方添加一行以读取:
config.vm.network "forwarded_port", guest: 8888, host: 8888
This addition creates a forwarded port on your system from port 8888 on your host (your windows machine) to port 8888 on your guest (the virtual machine). This will allow you to access your jupyter notebooks from your Windows browser.
此添加在您的系统上创建了一个从主机(Windows计算机)上的端口8888到来宾(虚拟机)上的端口8888的转发端口。 这将允许您从Windows浏览器访问jupyter笔记本。
At this point, you could also configure lots of other vagrant options, but these are the bare minimums that you need to get started.
此时,您还可以配置许多其他无业游民的选项,但这是开始时的最低要求。
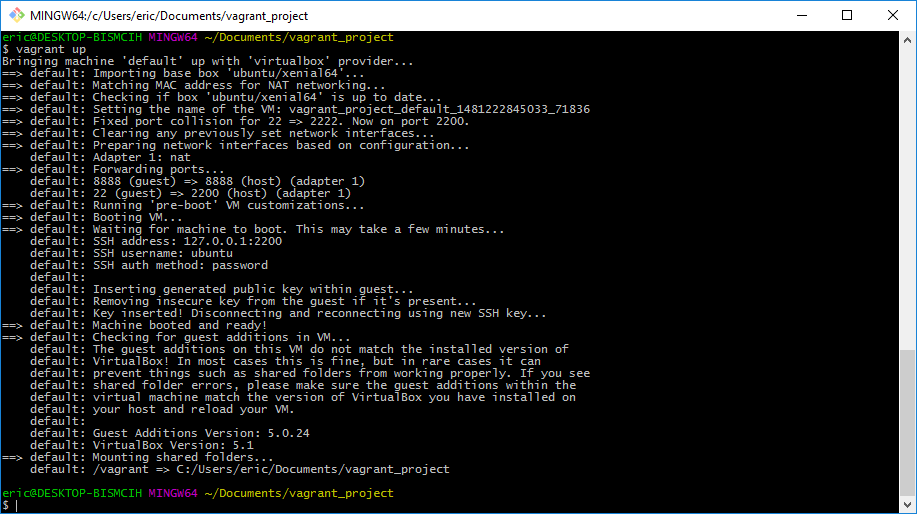
At the Bash command line, you can now type “vagrant up” to build your virtual machine. Since this is the first time you’ve run the command on this directory, it will go out and download the ubuntu/xenial64 ‘box’ and then build the virtual machine with the defaults. You might see a Windows alert asking to ‘approve’ vagrant to make some changes…go ahead and allow that.
在Bash命令行上,您现在可以键入“ vagrant up”来构建您的虚拟机。 由于这是您首次在此目录上运行命令,因此它将消失并下载ubuntu / xenial64'box',然后使用默认值构建虚拟机。 您可能会看到Windows警报,要求“批准”无业游民进行一些更改……继续进行并允许这样做。
Once the ‘vagrant up’ command is complete, you should see something similar to Figure 5 below.
一旦完成了“ vagrant up”命令,您应该会看到类似于以下图5的内容。
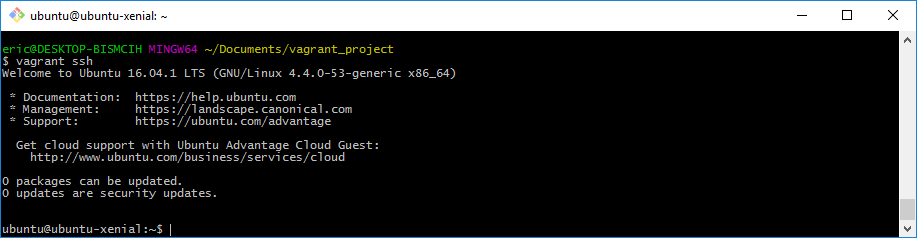
Now, you can ‘vagrant ssh’ to get into the virtual machine. You should then see something similar to Figure 6. Now your running vagrant on windows!
现在,您可以“ vagrant ssh”进入虚拟机。 然后,您应该会看到类似于图6的内容。现在,您在Windows上正在运行的流浪汉!
One of the really cool things that vagrant does by default is set up shared folders. This allows you to do your development work in your favorite IDE or editor and have the changes show up automatically in your vagrant virtual machine.
默认情况下,vagrant做的一件很酷的事情是设置共享文件夹。 这使您可以在自己喜欢的IDE或编辑器中进行开发工作,并使更改自动显示在无所事事的虚拟机中。
At the Bash command line, type:
在Bash命令行中,键入:
cd /vagrant
You should see a directory listing that has your Vagrantfile and a log file. If you visit your project directory using windows explorer, you should see the same two files. Shared folders for the win! I know its just a small thing, but it makes things easier for initial setup.
您应该看到一个目录列表,其中包含您的Vagrantfile和一个日志文件。 如果使用Windows资源管理器访问项目目录,则应该看到相同的两个文件。 共享文件夹取胜! 我知道这只是一件小事,但是它使初始设置变得更容易。
You now have vagrant on windows!
您现在在Windows上无所事事!
Enjoy!
请享用!
上海流浪汉沈


 2298
2298

 被折叠的 条评论
为什么被折叠?
被折叠的 条评论
为什么被折叠?
 到【灌水乐园】发言


