Backups are one of the best defense against any sort of security threat toward your site. Regular backups are one thing that every blogger/webmaster should have. In past we showed you how to keep your content safe with BackupBuddy, and how to manually create WordPress database backups. However, BackupBuddy costs money and manual backups take time. What if we told you that you can create complete WordPress backup for free? Not only that, you can also store them on the cloud, and schedule to do this automatically. In this article we will show you how to create a complete WordPress backup for free with BackWPup.
备份是防范针对您站点的任何类型安全威胁的最佳方法之一。 定期备份是每位博客/网站管理员应拥有的一件事。 过去,我们向您展示了如何使用BackupBuddy保护您的内容安全 ,以及如何手动创建WordPress数据库备份 。 但是, BackupBuddy会花钱,手动备份需要时间。 如果我们告诉您可以免费创建完整的WordPress备份怎么办? 不仅如此,您还可以将它们存储在云中,并计划自动执行此操作。 在本文中,我们将向您展示如何使用BackWPup免费创建完整的WordPress备份。
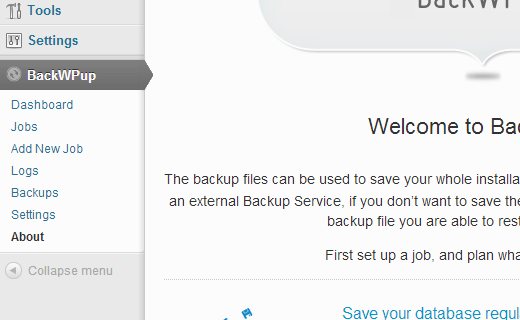
First thing you need to do is install and activate BackWPup plugin. Upon activation, the plugin will display a welcome page. It will also add a BackWPup menu item in your WordPress admin sidebar.
您需要做的第一件事是安装并激活BackWPup插件。 激活后,该插件将显示一个欢迎页面。 它还将在WordPress管理员侧栏中添加BackWPup菜单项。
使用BackWPup创建备份作业 (Creating Backup Jobs with BackWPup)
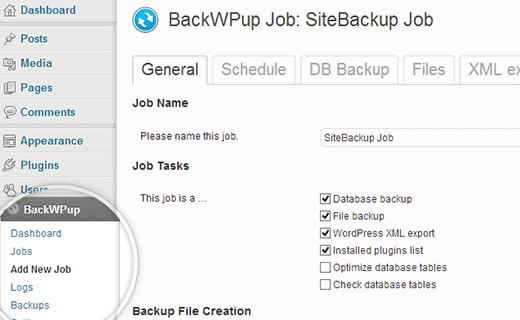
Click on Add New Job to create an automated backup job for your WordPress website. Under General tab, provide a name for this job. This name will be used internally and will help you identify each backup instance. Under the Job Tasks section, select the type of tasks you want this to perform. Available tasks include database backup, file backup, WordPress XML export, Installed plugins list, optimize database tables and check database tables. If you just want to create backup of your website, then you can select all options except for optimize and check database tables.
单击添加新作业 ,为您的WordPress网站创建自动备份作业。 在常规选项卡下,为此工作提供一个名称。 此名称将在内部使用,并将帮助您识别每个备份实例。 在“ 作业任务”部分下,选择要执行的任务类型。 可用的任务包括数据库备份,文件备份,WordPress XML导出,已安装的插件列表,优化数据库表和检查数据库表。 如果只想创建网站的备份,则可以选择除优化和检查数据库表以外的所有选项。
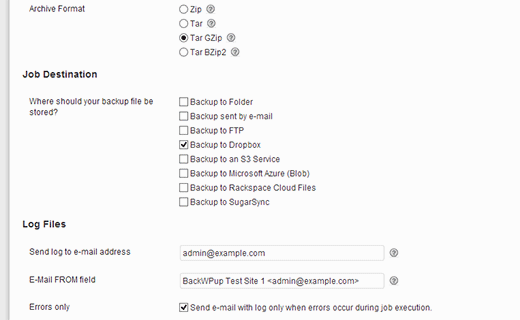
Under backup file creation section, choose an archive type. The default option is tar.gz, however you can choose zip archive if you want. Below this, you will see Job Destination section. This is where your backups will be stored. BackWPup provides multiple options to store your backup files. It can store backup file on your server, send it via email, backup to FTP, backup to dropbox, amazon S3, Windows Azure, Rackspace, and Sugarsync. Whatever you do, DO NOT store the backups on your server. For the sake of this WordPress tutorial, we will be using DropBox.
在“备份文件创建”部分下,选择一个存档类型。 默认选项是tar.gz,但是您可以根据需要选择zip存档。 在此下方,您将看到“作业目标”部分。 这是您备份的存储位置。 BackWPup提供了多个选项来存储备份文件。 它可以将备份文件存储在您的服务器上,通过电子邮件发送,备份到FTP,备份到保管箱,Amazon S3,Windows Azure,Rackspace和Sugarsync。 无论您做什么, 都不要将备份存储在服务器上。 为了这个WordPress教程 ,我们将使用DropBox。
使用BackWPup在WordPress中安排自动备份 (Scheduling Automated Backup in WordPress using BackWPup)
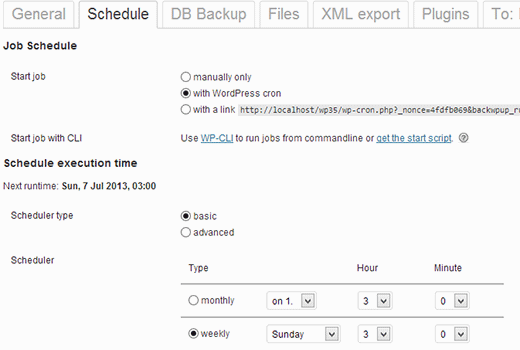
Click on Schedule tab and choose how often do you want to backup your site. You can schedule it to run monthly, weekly, or daily basis by choosing WordPress Cron option. Alternatively, you can choose to manually run the job, so that you can create on-demand backups of your site. For advance level users there are more choices like using a URL to start the job externally using some other software or starting the job using WP-CLI, a command line interface for WordPress. For beginner level users we would highly recommend scheduling a daily or weekly backup by choosing WordPres Cron option.
单击计划选项卡,然后选择要多久备份一次站点。 您可以通过选择WordPress Cron选项将其安排为每月,每周或每天运行。 或者,您可以选择手动运行作业,以便可以创建站点的按需备份。 对于高级用户,还有更多选择,例如使用URL从外部使用其他一些软件来开始工作,或者使用WP-CLI(WordPress的命令行界面)来开始工作。 对于初学者用户,我们强烈建议您通过选择WordPres Cron选项安排每日或每周备份。
要备份什么? (What to Backup?)
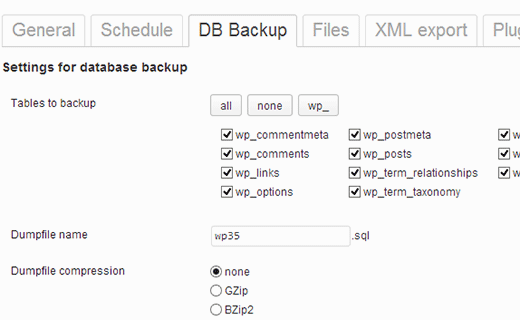
Click on DB Backup tab to select which tables you want to be included in the backup. Sometimes WordPress plugins create their own tables into your database, most of the time this data is not crucial and you may not need it. Unchecking these tables will reduce your backup size. However if you don’t know what you are doing, then keep all tables selected.
单击数据库备份选项卡,选择要包含在备份中的表。 有时WordPress插件会在您的数据库中创建自己的表,大多数时候此数据不是至关重要的,您可能不需要它。 取消选中这些表将减少备份大小。 但是,如果您不知道自己在做什么,那么请保持所有表处于选中状态。
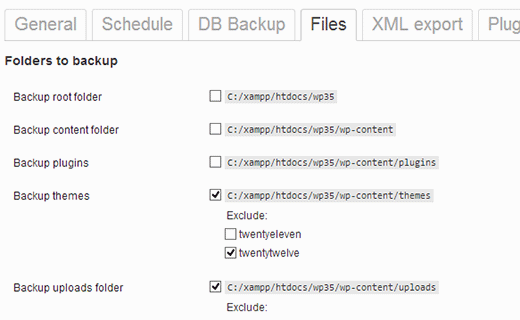
Under the Files tab you can select which directories and files you want to include in the backup job. We would recommend that you do not backup core WordPress files. Instead, only backup your wp-content/uploads folder. Uncheck Backup root folder. Exclude any folders in wp-content folder that you don’t want. For example, sometimes plugins will create their own directories inside wp-content folder to store plugin data. You can exclude these folders if you want.
在“ 文件”选项卡下,您可以选择要包括在备份作业中的目录和文件。 我们建议您不要备份核心WordPress文件。 相反,仅备份您的wp-content / uploads文件夹。 取消选中备份根文件夹。 排除您不需要的wp-content文件夹中的所有文件夹。 例如,有时插件会在wp-content文件夹中创建自己的目录来存储插件数据。 您可以根据需要排除这些文件夹。
将WordPress备份保存到Dropbox (Saving WordPress Backups To Dropbox)
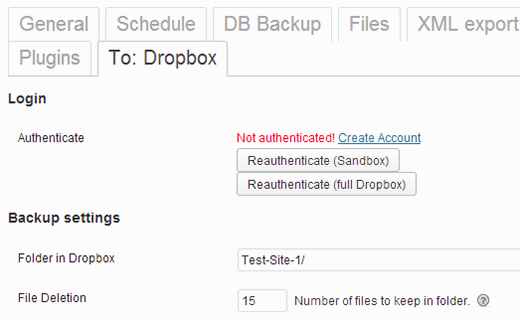
Depending on what you chose as destination for your backup, you will see a tab for it. In this tutorial we will show you how to automatically upload your WordPress backup to Dropbox using BackupWP plugin. So click on Dropbox tab and then click on Reauthenticate (full Dropbox).
根据您选择的备份目标位置,您将看到一个选项卡。 在本教程中,我们将向您展示如何使用BackupWP插件自动将WordPress备份上传到Dropbox。 因此,单击“保管箱”选项卡,然后单击“重新认证(完整的保管箱)”。
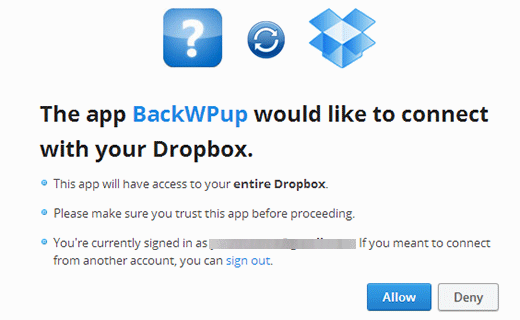
This will take you to the Dropbox website where you will be asked to provide your username and password. After signing in, DropBox will ask for your permission to grant BackWPup access to your DropBox account.
这将带您到Dropbox网站,要求您提供用户名和密码。 登录后,DropBox将询问您的权限,以授予BackWPup对您的DropBox帐户的访问权限。
After that, the plugin will take care of the rest.
之后,该插件将负责其余的工作。
使用BackWPup创建多个WordPress备份作业 (Creating Multiple WordPress Backup Jobs using BackWPup)
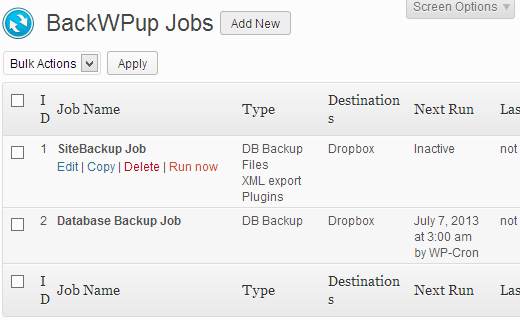
You can create multiple backup jobs with BackWPup. For example, you can create a scheduled job to run on a daily or weekly basis to backup your WordPress Database and another job to run manually for backing up your WordPress files only. You can see all jobs created by you on BackWPup » Jobs page. You can run any of the backup jobs by clicking on Run Now link below the job, even for scheduled jobs. You can also edit settings for a job or delete it entirely.
您可以使用BackWPup创建多个备份作业。 例如,您可以创建计划的作业以每天或每周运行以备份WordPress数据库,而创建另一个作业以手动运行以仅备份WordPress文件。 您可以在BackWPup»作业页面上查看您创建的所有作业。 您可以通过单击作业下方的“立即运行”链接来运行任何备份作业,即使是计划的作业也是如此。 您也可以编辑作业设置或将其完全删除。
运行备份作业 (Running a Backup Job)
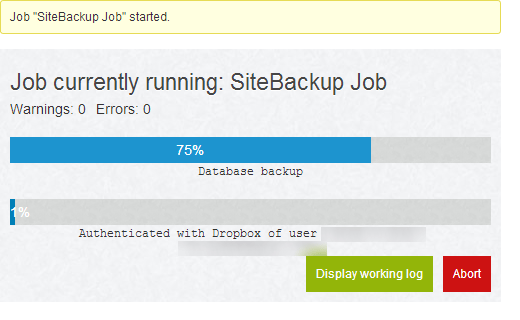
When you execute a Backup Job manually by clicking on Run Now link, BackWPup will display the backup progress. Clicking on display working log, you can see what is going on in the background. If for some reason the backup job fails, then this log will also display the reason. You can also abort a job during the progress by clicking on abort button.
通过单击“立即运行”链接手动执行备份作业时,BackWPup将显示备份进度。 单击显示工作日志,您可以看到后台发生了什么。 如果由于某种原因备份作业失败,那么此日志还将显示原因。 您也可以通过单击中止按钮来中止进度中的作业。
对BackWPup中的WordPress备份作业进行故障排除 (Troubleshooting WordPress Backup Jobs in BackWPup)
Running a backup job may cause extra load on your hosting server. This may result in unfinished backup jobs. Also on most shared hosting services, there is a limit on how much time or memory a script can consume. When your server stops BackWPup for crossing the time or memory limit, it waits for 5 minutes and then resumes the process. In this case, it would take a while for a backup job to finish.
运行备份作业可能会导致托管服务器上的额外负载。 这可能导致未完成的备份作业。 同样,在大多数共享托管服务上,脚本可以消耗多少时间或内存也有限制。 当服务器停止BackWPup越过时间或内存限制时,它将等待5分钟,然后恢复该过程。 在这种情况下,备份作业可能需要一段时间才能完成。
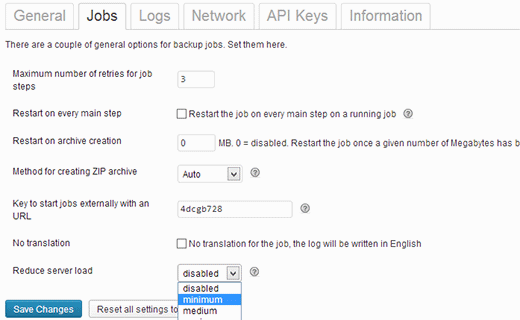
The first thing you should do is increase your PHP memory limit, then go to BackWPup » Settings and click on the Jobs tab. Increase Maximum number of restries for job steps option. The default value is 3, you can increase it to 5 and see if this works for you. After that scroll down to Reduce server load option and select medium or minimum server load options.
您应该做的第一件事是增加PHP内存限制 ,然后转到BackWPup»设置 ,然后单击Jobs选项卡。 增加作业步骤的最大重试次数选项。 默认值为3,您可以将其增加到5,然后查看是否适合您。 之后,向下滚动至减少服务器负载选项,然后选择中等或最小服务器负载选项。
最后的想法 (Final Thoughts)
You are probably wondering if a good free plugin like BackWPup exist, then why do people pay for plugins like BackupBuddy or VaultPress. One of the reason is support. When you pay for a product, then you are guaranteed to get support. Another thing that we notice with both BackupBuddy and VaultPress is that they offer malware scanning. We use VaultPress because it is a 100% managed service. The backup is stored in their cloud server, and it is a pretty fool-proof setup.
您可能想知道是否存在像BackWPup这样的免费免费插件,然后人们为什么要为BackupBuddy或VaultPress等插件付费。 原因之一是支持。 当您购买产品时,就可以保证获得支持。 我们同时注意到BackupBuddy和VaultPress的另一件事是它们提供了恶意软件扫描。 我们使用VaultPress,因为它是100%托管的服务。 备份存储在他们的云服务器中,这是一个非常简单的设置。
We can not stress this enough that you need to back up your site regularly. Do not wait for your WordPress site getting hacked or infected with malware, start backing up now, so that you can swiftly restore WordPress from backup when the time comes. We hope that this guide helped you automate your WordPress backups. Let us know which WordPress backup solution you use by leaving a comment below.
我们无法承受如此大的压力,您需要定期备份您的网站。 不要等待您的WordPress网站被黑客入侵或感染恶意软件,请立即开始备份,这样您就可以在需要时从备份中快速还原WordPress。 我们希望本指南可以帮助您自动化WordPress备份。 通过在下面留下评论,让我们知道您使用哪种WordPress备份解决方案。
Note: Due to a lot of request, we wrote an article about how to restore WordPress from Backup. If you use BackWPup, then you would be following the manual back restore option in the article.
注意:由于需求量很大,我们写了一篇有关如何从Backup还原WordPress的文章。 如果使用BackWPup,则将遵循本文中的手动反向还原选项。
翻译自: https://www.wpbeginner.com/plugins/how-to-create-a-complete-wordpress-backup-for-free-with-backwpup/


 838
838


 被折叠的 条评论
为什么被折叠?


