


puppeteer api
In my last article, we learnt how to create a PDF file using Node.js and puppeteer? Today we will learn how to create a PDF file from static HTML using node.js and puppeteer? We will be using Node.js and puppeteer which is a node library.
在上一篇文章中,我们学习了如何使用Node.js和puppeteer创建PDF文件 ? 今天,我们将学习如何使用node.js和puppeteer从静态HTML创建PDF文件? 我们将使用Node.js和puppeteer(这是一个节点库)。
Puppeteer is a Node library developed by Google and provides a high-level API for developers.
Puppeteer是Google开发的Node库,并为开发人员提供了高级API。
With Node.js already up and running, we will install puppeteer via NPM (node package manager).
在Node.js已经启动并运行的情况下,我们将通过NPM (节点程序包管理器) 安装puppeteer 。
Note: You should have Node.js installed in your PC and puppeteer installed via NPM (node package manager).
注意:您应该在PC中安装Node.js,并通过NPM(节点程序包管理器)安装操纵p。
If you don't yet have Node.js installed, visit the Node.js official website and download for your PC version.
如果尚未安装Node.js,请访问Node.js官方网站并下载PC版本。
After download, you can quickly install the puppeteer module by opening a command prompt window and type: npm I puppeteer
下载后,您可以通过打开命令提示符窗口并键入以下命令来快速安装puppeteer模块: npm I puppeteer
To get started, let's install puppeteer:
首先,让我们安装puppeteer:
Open the command prompt and type npm i puppeteer or npm install puppeteer
打开命令提示符,然后键入npm i puppeteer或npm install puppeteer
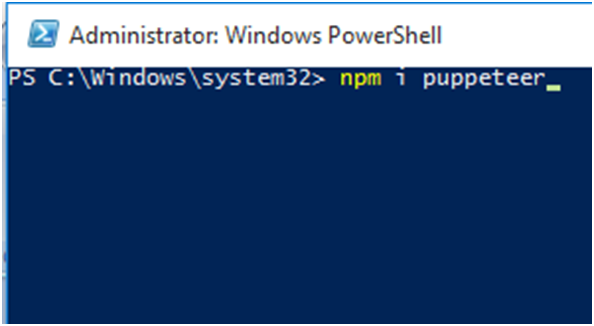
"npm" will download and install the puppeteer library together with other dependencies and Chromium.
“ npm”将下载并安装puppeteer库以及其他依赖项和Chromium。
Open a text editor and type the following code and save it with the file name as app.js
打开文本编辑器,然后输入以下代码,并将其保存为文件名app.js。
// Include puppeteer module
const puppeteer = require('puppeteer');
// file system node js module.
const fs = require('fs');
(async function() {
try {
// launch puppeteer API
const browser = await puppeteer.launch();
const page = await browser.newPage();
const htmlContent = // defines html/css content
`<body>
<style>
h1 {
background-color: green;
}
div {
background-color: lightblue;
}
p {
background-color: yellow;
}
</style>
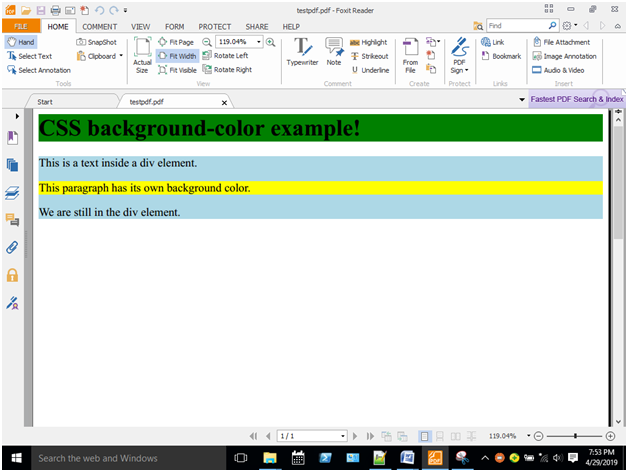
<h1>CSS background-color example!</h1>
<div>
This is a text inside a div element.
<p>This paragraph has its own background color.</p>
We are still in the div element.
</div>
</body>`;
await page.setContent(htmlContent);
await page.emulateMedia('screen');
await page.pdf({
// name of your pdf file in directory
path: 'testpdf.pdf',
// specifies the format
format: 'A4',
// print background property
printBackground: true
});
// console message when conversion is complete!
console.log('done');
await browser.close();
process.exit();
} catch (e) {
console.log('our error', e);
}
})();
The file should be saved in your Node.js directory.
该文件应保存在您的Node.js目录中。
From the code above, we first of all include the puppeteer module and the file system module. The puppeteer API is then launched and it creates a new A4 page with file name test.pdf.
从上面的代码,我们首先包括puppeteer模块和file system模块 。 然后启动puppeteer API,它将创建一个文件名为test.pdf的新A4页面 。
Run the code by initiating it in the command prompt like a regular Node.js file.
通过像常规Node.js文件一样在命令提示符下启动代码来运行代码。
Following our code, done will be printed out when the conversion is complete.
按照我们的代码,转换完成后将打印完成。

The Output pdf file is then stored in the default Node.js directory with name test.pdf.
然后,输出pdf文件存储在默认的Node.js目录中,名称为test.pdf 。

Output PDF file...
输出PDF文件...
puppeteer api


 892
892

 被折叠的 条评论
为什么被折叠?
被折叠的 条评论
为什么被折叠?
 到【灌水乐园】发言


