A little Linux VM on Azure is like $13 a month. You can get little Linux machines all over for between $10-15 a month. On Linode they are about $10 a month so I figured it would be interesting to setup an ASP.NET Core website running on .NET Core. As you may know, .NET Core is free, open source, cross platform and runs basically everywhere.
在Azure上安装一个小型Linux VM每月需要13美元。 您可以以每月10-15美元的价格买到几台Linux机器。 在Linode上,它们每个月约10美元,所以我认为建立一个在.NET Core上运行的ASP.NET Core网站会很有趣。 如您所知, .NET Core是免费的,开源的,跨平台的,并且基本上可以在任何地方运行。
步骤0-获得便宜的主机 (Step 0 - Get a cheap host)
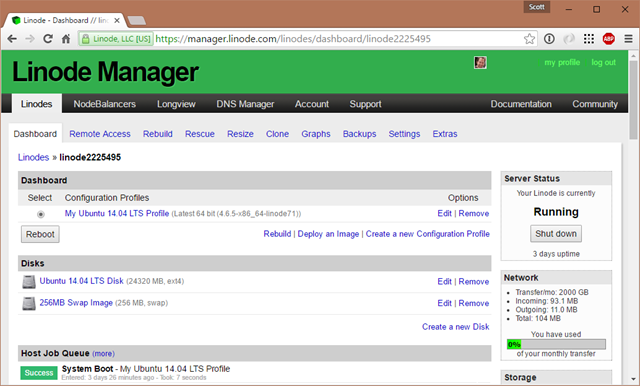
I went to Linode (or anywhere) and got the cheapest Linux machine they offered. In this case it's an Ubuntu 14.04 LTS Profile, 64-bit, 4.6.5 Kernel.
我去了Linode(或任何地方),并得到了他们提供的最便宜Linux机器。 在这种情况下,它是一个Ubuntu 14.04 LTS配置文件,64位,4.6.5内核。

Since I'm on Windows but I want to SSH into this Linux machine I'll need a SSH client. There's a bunch of options.
因为我在Windows上,但是我想通过SSH进入这台Linux计算机,所以我需要一个SSH客户端。 有很多选择。
If you have the latest Windows 10 you can just use the Bash/Ubuntu shell that is built into Windows itself. That's what I did. I ran bash, then ssh.
如果您拥有最新的Windows 10,则可以使用Windows本身内置的Bash / Ubuntu shell 。 那就是我所做的。 我跑了bash,然后ssh。
You can download OpenSSH for Windows. This is the one that the Windows/PowerShell team is bringing to Windows. It's a win32 port of OpenSSH.
您可以下载Windows的OpenSSH 。 这是Windows / PowerShell团队将其带到Windows的过程。 这是OpenSSH的win32端口。
SmarTTY - Nicer than Putty, this is a free multi-tabbed SSH client that also supports copying files
SmarTTY-比Putty好,这是一个免费的多选项卡SSH客户端,还支持复制文件
Putty or Bitvise - Both free and both work fine
腻子或Bitvise-既免费又正常
步骤0.5-设置非root用户(Step 0.5 - Setup a user that isn't root)
It's always a good idea to avoid being root. After logging into the system as root, I made a new user and give them sudo (super user do):
避免被扎根始终是一个好主意。 以root用户身份登录系统后,我创建了一个新用户,并给他们sudo(超级用户):
adduser scott
usermod -aG sudo scott
Then I'll logout and go back in as scott.
然后,我将注销并重新登录。
第1步-在Linux机器上获取.NET Core (Step 1 - Get .NET Core on your Linux Machine)
Head over to http://dot.net to get .NET Core and follow the instructions. There's at least 8 Linuxes supported in 6 flavors so you should have no trouble. I followed the Ubuntu instructions.
转到http://dot.net以获得.NET Core并按照说明进行操作。 至少有8种支持6种口味Linux,所以您应该不会遇到麻烦。 我遵循了Ubuntu的说明。
To make sure it works after you've set it up, make a quick console app like this and run it.
为了确保它在设置后能正常工作,请制作一个像这样的快速控制台应用程序并运行它。
mkdir testapp
cd testapp
dotnet new
dotnet restore
dotnet run
If it runs, then you've got .NET Core installed and you can move on to making a web app and exposing it to the internet.
如果它可以运行,则说明您已经安装了.NET Core,然后可以继续制作Web应用程序并将其公开给Internet。
NOTE: If "dotnet restore" fails with a segmentation fault, you may be running into this issue with some 64-bit Linux Kernels. Here's commands to fix it that worked for me on Ubuntu 14.04 when I hit this. The fix has been released as a NuGet now but it will be included with the next minor release of .NET Core, but if you ever need to manually update the CoreCLR you can.
注意:如果“ dotnet restore”因分段错误而失败,则可能是某些64位Linux内核遇到了此问题。 这是修复此命令的命令,适用于在Ubuntu 14.04上对我有效的命令。 该修补程序现已作为NuGet发布,但将包含在.NET Core的下一个次要版本中,但是如果您需要手动更新CoreCLR,则可以。
第2步-创建一个ASP.NET Core网站 (Step 2 - Make an ASP.NET Core website)
You can make an ASP.NET Core website that is very basic and very empty and that's OK. You can also get Yeoman and use the ASP.NET yeoman-based generators to get more choices. There is also the great ASP.NET MVC Boilerplate project for Visual Studio.
您可以创建一个非常基本,非常空的ASP.NET Core网站,这样就可以了。 您还可以获取Yeoman,并使用基于Yeoman的ASP.NET生成器获得更多选择。 还有一个很棒的Visual Studio ASP.NET MVC Boilerplate项目。
Or you can just start with:
或者,您可以从以下内容开始:
dotnet new -t web
Today, this default site uses npm, gulp, and bower to manage JavaScript and CSS dependencies. In the future there will be options that don't require as much extra stuff but for now, in order to dotnet restore this site I'll need npm and what not so I'll do this to get node, npm, etc.
今天,此默认站点使用npm,gulp和bower来管理JavaScript和CSS依赖项。 将来会有一些选项,不需要很多额外的东西,但是现在,要点网还原此站点,我需要npm,不需要什么,所以我将这样做以获得node,npm等。
sudo apt-get install npm
sudo npm install gulp
sudo npm install bower
Now I can dotnet restore easily and run my web app to test. It will startup on localhost:5000 usually.
现在,我可以轻松进行dotnet还原并运行我的Web应用程序进行测试。 通常它将在localhost:5000上启动。
$ dotnet restore
$ dotnet run
scott@ubuntu:~/dotnettest$ dotnet run
Project dotnettest (.NETCoreApp,Version=v1.0) was previously compiled. Skipping compilation.
info: Microsoft.Extensions.DependencyInjection.DataProtectionServices[0]
      User profile is available. Using '/home/scott/.aspnet/DataProtection-Keys' as key repository; keys will not be encrypted at rest.
Hosting environment: Production
Content root path: /home/scott/dotnettest
Now listening on: http://localhost:5000
Of course, having something startup on localhost:5000 doesn't help me as I'm over here at home so I can't test a local website like this. I want to expose this site (via a port) to the outside world. I want something like http://mysupermachine -> inside my machine -> localhost:5000.
当然,在localhost:5000上启动某个东西对我没有帮助,因为我在家中待在这里,所以我无法测试这样的本地网站。 我想将此网站(通过端口)暴露给外界。 我想要类似http:// mysupermachine- >我的机器内-> localhost:5000之类的东西。
第3步-将您的Web应用公开到外面。 (Step 3 - Expose your web app to the outside.)
I could tell Kestrel - that's the .NET Web Server - to expose itself to Port 80, although you usually want to have another process between you and the outside world.
我可以告诉Kestrel(这是.NET Web服务器)将其自身暴露给Port 80,尽管您通常希望在自己和外界之间进行另一个处理。
You can do this a few ways. You can open open Program.cs with a editor like "pico" and add a .UseUrls() call to the WebHostBuilder like this.
您可以通过几种方法执行此操作。 您可以使用“ pico”之类的编辑器打开打开的Program.cs,并向WebHostBuilder添加.UseUrls()调用,如下所示。
var host = new WebHostBuilder()
  .UseKestrel()
  .UseUrls("http://*:80")
  .UseContentRoot(Directory.GetCurrentDirectory())
  .UseStartup<Startup>()
  .Build();
Here the * binds to all the network adapters and it listens on Port 80. Putting http://0.0.0.0:80 also works.
此处*绑定到所有网络适配器,并在端口80上侦听。也可以使用http://0.0.0.0:80 。
You might have permission issues doing this and need to elevate the dotnet process and webserver which is also a problem so let's just keep it at a high internal port and reverse proxy the traffic with something like Nginx or Apache. We'll pull out the hard-coded port from the code and change the Program.cs to use a .json config file.
您可能在执行此操作时遇到权限问题,并且需要提升dotnet进程和Web服务器,这也是一个问题,因此让我们将其保持在较高的内部端口上,并使用Nginx或Apache之类的代理反向代理流量。 我们将从代码中拔出硬编码的端口,并将Program.cs更改为使用.json配置文件。
public static void Main(string[] args)
{
    var config = new ConfigurationBuilder()
        .SetBasePath(Directory.GetCurrentDirectory())
        .AddJsonFile("hosting.json", optional: true)
        .Build();

    var host = new WebHostBuilder()
        .UseKestrel()
        .UseConfiguration(config)
        .UseContentRoot(Directory.GetCurrentDirectory())
        .UseStartup<Startup>()
        .Build();

    host.Run();
}
The hosting.json file is just this:
Hosting.json文件就是这样:
{
  "server.urls": "http://localhost:5123"
}
We can also use "AddCommandLine(args) instead of "AddJsonFile()" and pass in --server.urls=http://*:5123 on the command line. It's up to you. You can also use the ASPNETCORE_URLS environment variable.
我们也可以使用“ AddCommandLine(args)代替” AddJsonFile()“并在命令行中传递--server.urls = http:// *:5123。这取决于您。您还可以使用ASPNETCORE_URLS环境变量。
NOTE: I'm doing this work a folder under my home folder ~ or now. I'll later compile and "publish" this website to something like /var/dotnettest when I want it seen.
注意:我正在执行此工作的主文件夹下的文件夹〜或现在。 稍后,当我希望看到它时,我将其编译并“发布”到/ var / dotnettest之类的网站。
第4步-设置像Nginx这样的反向代理 (Step 4 - Setup a Reverse Proxy like Nginx)
I'm following the detailed instructions at the ASP.NET Core Docs site called "Publish to a Linux Production Environment." (All the docs are on GitHub as well)
我正在遵循ASP.NET Core Docs网站上称为“发布到Linux生产环境”的详细说明。 (所有文档也在GitHub上)
I'm going to bring in Nginx and start it.
我将引入Nginx并开始它。
sudo apt-get install nginx
sudo service nginx start
I'm going to change the default Nginx site to point to my (future) running ASP.NET Core web app. I'll open and change /etc/nginx/sites-available/default and make it look like this. Note the port number. Nginx is a LOT more complex than this and has a lot of nuance, so when you are ready to go into Super Official Production, be sure to explore what the perfect Nginx Config File looks like and change it to your needs.
我将更改默认的Nginx网站,使其指向我(正在运行)正在运行的ASP.NET Core Web应用程序。 我将打开并更改/ etc / nginx / sites-available / default并使它看起来像这样。 记下端口号。 Nginx比这复杂得多,并且有很多细微差别,因此,当您准备开始超级官方制作时,请务必探索完美的Nginx Config File的外观,并根据需要进行更改。
server {
    listen 80;
    location / {
        proxy_pass http://localhost:5123;
        proxy_http_version 1.1;
        proxy_set_header Upgrade $http_upgrade;
        proxy_set_header Connection keep-alive;
        proxy_set_header Host $host;
        proxy_cache_bypass $http_upgrade;
    }
}
Then we'll check it and reload the config.
然后,我们将对其进行检查并重新加载配置。
sudo nginx -t
sudo nginx -s reload
Step 5 - Keep your website running
第5步-保持网站运行
The website isn't up and running on localhost:5123 yet (unless you've run it yourself and kept it running!) so we'll need an app or a monitor to run it and keep it running. There's an app called Supervisor that is good at that so I'll add it.
该网站尚未在localhost:5123上启动并运行(除非您自己运行并使其保持运行!),因此我们需要一个应用程序或监视器来运行它并使其保持运行。 有一个名为Supervisor的应用程序擅长于此,因此我将其添加。
sudo apt-get install supervisor
Here is where you/we/I/errbody needs to get the paths and names right, so be aware. I'm over in ~/testapp or something. I need to publish my site into a final location so I'm going to run dotnet publish, then copy the reuslts into /var/dotnettest where it will live.
这是您/我们/ I /主体需要正确获取路径和名称的地方,因此请注意。 我结束了〜/ testapp之类的事情。 我需要将站点发布到最终位置,因此我将运行dotnet publish,然后将reuslts复制到/ var / dotnettest所在的位置。
dotnet publish
  publish: Published to /home/scott/dotnettest/bin/Debug/netcoreapp1.0/publish
sudo cp -a /home/scott/dotnettest/bin/Debug/netcoreapp1.0/publish /var/dotnettest
Now I'm going to make a file (again, I use pico because I'm not as awesome as emacs or vim) called /src/supervisor/conf.d/dotnettest.conf to start my app and keep it running:
现在,我要制作一个名为/src/supervisor/conf.d/dotnettest.conf的文件(同样,我使用pico是因为我不如emacs或vim很棒)来启动我的应用程序并使它继续运行:
[program:dotnettest]
command=/usr/bin/dotnet /var/dotnettest/dotnettest.dll --server.urls:http://*:5123
directory=/var/dotnettest/
autostart=true
autorestart=true
stderr_logfile=/var/log/dotnettest.err.log
stdout_logfile=/var/log/dotnettest.out.log
environment=ASPNETCORE_ENVIRONMENT=Production
user=www-data
stopsignal=INT
Now we start and stop Supervisor and watch/tail its logs to see our app startup!
现在,我们启动和停止Supervisor,并观看/尾巴其日志以查看我们的应用程序启动!
sudo service supervisor stop
sudo service supervisor start
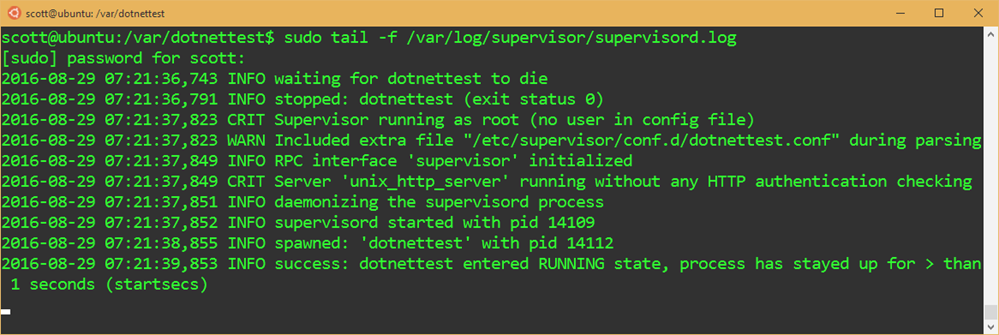
sudo tail -f /var/log/supervisor/supervisord.log
#and the application logs if you like
sudo tail -f /var/log/dotnettest.out.log
If all worked out (if it didn't, it'll be a name or a path so keep trying!) you'll see the supervisor log with dotnet starting up, running your app.
如果一切顺利(如果没有成功,那么它将是名称或路径,所以请继续尝试!),您将看到带有dotnet启动,运行应用程序的主管日志。

Remember the relationships.
记住关系。
- Dotnet - runs your website 点网-运行您的网站
- Nginx or Apache - Listens on Port 80 and forwards HTTP calls to your website Nginx或Apache-侦听端口80并将HTTP调用转发到您的网站
- Supervisor - Keeps your app running主管-保持您的应用运行
Next, I might want to setup a continuous integration build, or SCP/SFTP to handle deployment of my app. That way I can develop locally and push up to my Linux machine.
接下来,我可能想设置一个持续集成版本或SCP / SFTP来处理我的应用程序的部署。 这样,我可以在本地进行开发并升级到我Linux机器。

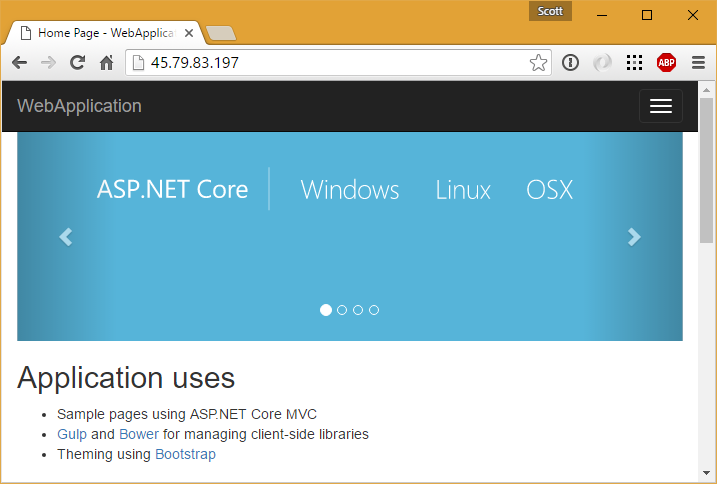
Of course, there are a dozen other ways to publish an ASP.NET Core site, not to mention Docker. I'll post about Docker another time, but for now, I was able to get my ASP.NET Core website published to a cheap $10 host in less than an hour. You can use the same tools to manage a .NET Core site that you use to manage any site be it PHP, nodejs, Ruby, or whatever makes you happy.
当然,还有许多其他发布ASP.NET Core网站的方法,更不用说Docker了。 我将再次发布有关Docker的文章,但现在,我能够在不到一个小时的时间内将我的ASP.NET Core网站发布到便宜的10美元主机上。 您可以使用与用于管理任何站点的.NET Core站点相同的工具来管理任何站点,无论它是PHP,nodejs,Ruby还是让您满意的任何东西。
Sponsor: Aspose makes programming APIs for working with files, like: DOC, XLS, PPT, PDF and countless more. Developers can use their products to create, convert, modify, or manage files in almost any way. Aspose is a good company and they offer solid products. Check them out, and download a free evaluation.
赞助者: Aspose制作用于处理文件的编程API,例如DOC,XLS,PPT,PDF等。 开发人员几乎可以使用其产品来创建,转换,修改或管理文件。 Aspose是一家优秀的公司,他们提供可靠的产品。 签出并下载免费评估版。
翻译自: https://www.hanselman.com/blog/publishing-an-aspnet-core-website-to-a-cheap-linux-vm-host


 940
940

 被折叠的 条评论
为什么被折叠?


