


layui跳转添加选项卡
Site Specific Browsers aren't a really new idea. In 2005 there was an app called Bubbles I ran for a while that would let you run a website with minimal "browser chrome." Mozilla Prism (né WebRunner) is a Firefox add-in that does a similar thing. Google Chrome includes the idea of Application Shortcuts. The idea of all this is that some web apps are really applications and you think about them as applications. For me, I think of Gmail and Facebook and Twitter and Basecamp as applications not necessarily as browser tabs. The notion of Site-Specific Browsers is definitely arriving.
特定于站点的浏览器并不是一个真正的新主意。 2005年,有一个名为Bubbles的应用程序我运行了一段时间,使您可以使用最少的“浏览器镶边”来运行网站。 Mozilla Prism(néWebRunner)是一个执行类似操作的Firefox加载项。 Google Chrome包含应用程序快捷方式的概念。 所有这些的想法是,某些Web应用程序实际上是应用程序,您将它们视为应用程序。 对我来说,我认为Gmail和Facebook,Twitter和Basecamp是应用程序,而不一定是浏览器选项卡。 特定站点浏览器的概念肯定会到来。
Internet Explorer 9 Beta (IE9) is out now and includes a featured called "Site Pinning" which is a effectively Site Specific Browsers. It's integrated nicely with Windows 7. It's easy for you as a developer or site owner to add these features to your site.
Internet Explorer 9 Beta(IE9)现已发布,其中包括一个称为“站点固定”的功能,它是有效的特定于站点的浏览器。 它与Windows 7很好地集成在一起。作为开发人员或网站所有者,您可以轻松地将这些功能添加到您的网站中。
Here's the basic idea from a markup perspective from a Channel 9 example:
这是从Channel 9示例的标记角度看的基本思想:
<meta name="application-name" content="Channel 9 Audio Player" />
<meta name="msapplication-tooltip" content="Channel 9 Podcasts" />
<meta name="msapplication-window" content="width=1024;height=768" />
<meta name="msapplication-task" content="name=Msdn Flash Podcasts;action-uri=./?topic=msdnFlash;icon-uri=Images/channel9_logo.ico" />
<meta name="msapplication-task" content="name=IE Podcasts;action-uri=./?topic=connectedShow;icon-uri=Images/channel9_logo.ico" />
<meta name="msapplication-task" content="name=Other Podcasts;action-uri=./?topic=other;icon-uri=Images/channel9_logo.ico" />
<meta name="msapplication-task" content="name=All Podcasts;action-uri=./;icon-uri=Images/channel9_logo.ico" />
<meta name="msapplication-navbutton-color" content="#FF3300" />
<meta name="msapplication-starturl" content="./" />
You add meta keywords (you don't need to add them all) to represent Jump List Tasks. Here's what Twitter added:
您可以添加元关键字(不必全部添加)来表示跳转列表任务。 这是Twitter添加的内容:
<meta name="msapplication-task" content="name=New Tweet; action-uri=http://twitter.com/home; icon-uri=images/ie/tweet.ico" />
<meta name="msapplication-task" content="name=Direct Messages; action-uri=http://twitter.com/inbox; icon-uri=images/ie/dm.ico" />
<meta name="msapplication-task" content="name=Mentions ; action-uri=http://twitter.com/replies; icon-uri=images/ie/mentions.ico" />
<meta name="msapplication-task" content="name=Favorites; action-uri=http://twitter.com/favorites; icon-uri=images/ie/fav.ico" />
<meta name="msapplication-task" content="name=Search; action-uri=http://search.twitter.com; icon-uri=images/ie/search.ico" />
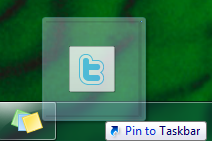
If I visit Twitter with IE9:
如果我使用IE9访问Twitter:
Then either drag the TAB or the FAVICON to the Taskbar:
然后将TAB或FAVICON拖动到任务栏:
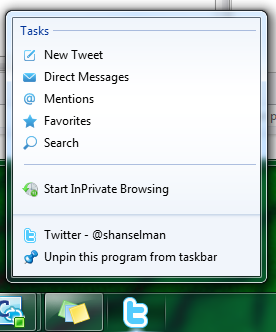
Then I'll get a Twitter icon in my Windows 7 Taskbar that looks nice like any other app. If I right click on it, I'll get a jump list like any other application. Compare this screenshot to the meta tags above:
然后,我将在Windows 7任务栏中获得一个Twitter图标,该图标看起来像其他任何应用程序一样不错。 如果右键单击它,我将获得与其他任何应用程序一样的跳转列表。 将此屏幕截图与上面的meta标签进行比较:
If I run Twitter, the Twitter app icon will show up to the left of the back button. The back and forward buttons also change color (it's subtle here because Twitter's icon is blue like the default blue, but you'll see later) and the home button is gone from the toolbar. Note that you CAN change the color (see the code above) if you don't like the automatically calculated color.
如果我运行Twitter,Twitter应用程序图标将显示在“后退”按钮的左侧。 前进和后退按钮也会更改颜色(此处很细微,因为Twitter的图标像默认的蓝色一样是蓝色,但稍后会看到),并且主页按钮从工具栏中消失了。 请注意,如果您不喜欢自动计算的颜色,则可以更改颜色(请参见上面的代码)。
Now, this browser is site-specific. The Pinned Tab will effectively become a Twitter app.
现在,此浏览器是特定于站点的。 固定标签将有效地成为Twitter应用。
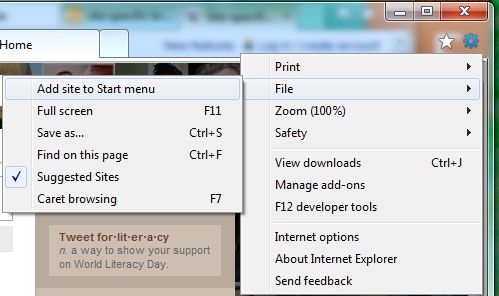
Rather than dragging the site to my taskbar, I could have click the Tools icon (the gear) and clicked File|Add To Start Menu:
与其将站点拖动到我的任务栏中,不如单击“工具”图标(齿轮),然后单击“文件” |“添加到开始”菜单:
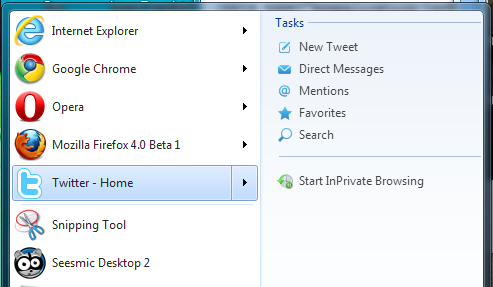
Now my app is in the Start Menu, as are my jump lists:
现在,我的应用程序以及跳转列表都在“开始”菜单中:
If you want, you can also use Javascript to push overlay icons to your pinned app. For example:
如果需要,还可以使用Javascript将叠加层图标推送到固定的应用程序。 例如:
Via code like this:
通过这样的代码:
//show
window.external.msSiteModeSetIconOverlay(iconUri, toolTip);
//hide an Overlay Icon:
window.external.msSiteModeClearIconOverlay();
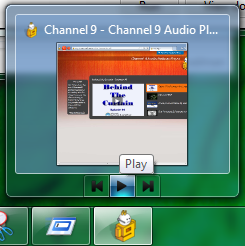
There's also the ability to add and remove jump list items dynamically to keep track of a search history or favorites, for examples. You can even add taskbar buttons like this:
例如,还具有动态添加和删除跳转列表项以跟踪搜索历史或收藏夹的功能。 您甚至可以添加任务栏按钮,如下所示:
Here's a little code for the example:
这是示例的一些代码:
document.addEventListener('msthumbnailclick', onButtonClicked, false);
var btnPlay = window.external.msSiteModeAddThumbBarButton(iconUri, toolTip);
window.external.msSiteModeShowThumbBar();
function onButtonClicked(e) {
    switch (e.buttonID) {
        case btnPlay:
            play();
            break;
        }
}
将基本跳转列表添加到您自己的站点 (Adding Basic Jump Lists to your own Site)
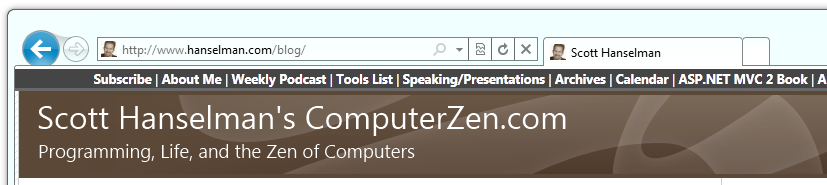
I'll add some jump lists to this blog. Here's my site visited in IE9. See my big head in there? That's just my favicon.ico that I made with IcoFX, a great free icon editor.
我将向此博客添加一些跳转列表。 这是我在IE9中访问过的网站。 看到我的大头在里面吗? 那只是我用很棒的免费图标编辑器IcoFX制作的favicon.ico。
You can't TELL me you haven't always wanted my tiny transparent head on your taskbars, Dear Reader. Come on! ;)
您不能告诉我,您并非一直都希望任务栏上的透明小头,亲爱的读者。 来吧! ;)
Here's the code I'll add..
这是我要添加的代码。
<meta name="msapplication-task" content="name=Complete Archives;action-uri=/blog/Archives.aspx;icon-uri=/blog/images/archives.ico" />
<meta name="msapplication-task" content="name=Speaking/Videos;action-uri=/blog/CategoryView.aspx?category=Speaking;icon-uri=/blog/images/videos.ico" />
<meta name="msapplication-task" content="name=Weekly Podcast;action-uri=/blog/CategoryView.aspx?category=Podcast;icon-uri=/blog/images/podcast.ico" />
<meta name="msapplication-task" content="name=Scott on Twitter;action-uri=http://twitter.com/shanselman;icon-uri=/blog/images/twitter.ico" />
<meta name="msapplication-task" content="name=Scott on Facebook;action-uri=http://facebook.com/scott.hanselman.public;icon-uri=/blog/images/facebook.ico" />
<meta name="msapplication-starturl" content="./" />
<meta name="application-name" content="Scott Hanselman's Blog" />
<meta name="msapplication-tooltip" content="Scott Hanselman's Blog" />
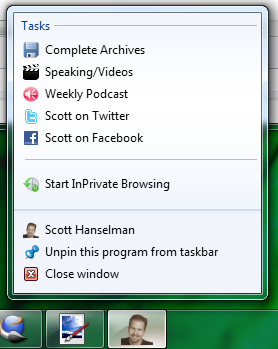
Then when I drag the favicon or tab to the task bar (or select File|Add to Start Menu) you'll see:
然后,当我将图标或选项卡拖到任务栏(或选择“文件” |“添加到开始”菜单)时,您将看到:
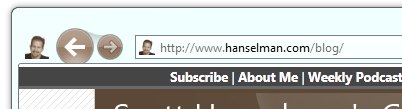
And the top of the browser changes:
浏览器的顶部发生了变化:
Pretty slick! While I don't see the world considering my blog an app, it was minimal effort to get this little bit of integration.
非常漂亮! 虽然我看不到全世界都在考虑将我的博客用作应用程序,但只需很少的精力就可以实现集成。
The more interesting ideas would be:
更有趣的想法是:
Adding a podcast player for Hanselminutes.com so the site could be an app
为Hanselminutes.com添加播客播放器,以便该站点可以成为应用
- Keeping a separate list of recently searched for terms单独保存最近搜索过的字词列表
Enjoy. Download IE9 here.
请享用。 在此处下载IE9 。
layui跳转添加选项卡


 2754
2754

 被折叠的 条评论
为什么被折叠?
被折叠的 条评论
为什么被折叠?
 到【灌水乐园】发言


