


nunit怎么测试
Here's a little technical content for y'all. I write this on my new iJoy as the wife watches Lifetime this New Year's Day.
这是你们的一些技术内容。 当妻子观看元旦的终生时,我在新的iJoy上写下了这篇文章。
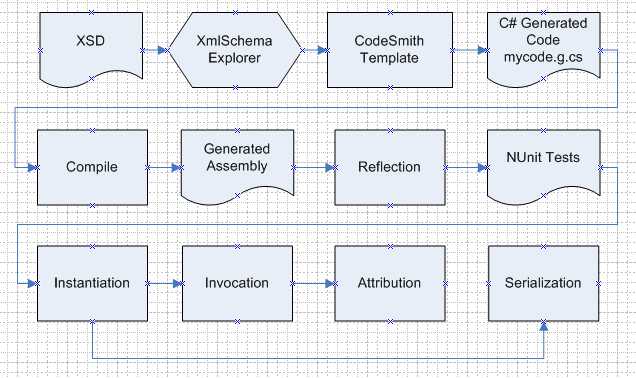
We're into Unit Testing here and getting more so every day. We also do a lot of code generation as well, and struggled with how to test that the code generation works from end to end.
我们正在这里进行单元测试,并且每天都在增加。 我们还进行了大量的代码生成,并且在如何测试代码生成从头到尾的工作上都遇到了麻烦。
We annotate XSDs to describe our objects. We have an XSD "DOM" Adapter that makes XML Schema documents look more friendly to consumers. We then use CodeSmith to spin through the "DOM" and generate code. Then we need to compile the generated code and hope it's correct. It's kind of a drawn out process.
我们注释XSD以描述我们的对象。 我们有一个XSD“ DOM”适配器,它使XML Schema文档对使用者看起来更加友好。 然后,我们使用CodeSmith来遍历“ DOM”并生成代码。 然后,我们需要编译生成的代码,并希望它是正确的。 这是一个拉长的过程。
However, since these objects are so fundamental to everything else that we do, it's important to test their generation. These objects should compile, have the correct attributes, be create-able at runtime, and serialize correctly.
但是,由于这些对象对于我们所做的所有其他事情都至关重要,因此测试它们的生成很重要。 这些对象应进行编译,具有正确的属性,在运行时可创建并正确序列化。
Here's how we run CodeSmith in the NUnit tests to generate into temporary .g.cs files. The ".g.cs" extension is our own invention, allowing us to keep track of what's generated and what's written by hand.
这是我们在NUnit测试中运行CodeSmith的方法,以生成临时的.g.cs文件。 “ .g.cs”扩展名是我们自己的发明,使我们能够跟踪生成的内容和手工编写的内容。
We store the XML Schemas that will be generated as embedded resources in the test assemblies. That makes the Unit tests self-contained. This embedding technique was described in an earlier post. We unfold the schemas into the temporary directory and create a Corillian CodeSmith CodeRunner. The CodeRunner is a wrapper that we've written around CodeSmith to allow us to more easily run CodeSmith templates and avoid shelling out to EXEs. All this is done in [TextFixtureSetup] and deleted in [TestFixtureTearDown].
我们将XML架构存储为测试程序集中的嵌入式资源。 这使单元测试成为独立的。 先前的文章中介绍了这种嵌入技术。 我们将模式展开到临时目录中,并创建一个Corillian CodeSmith CodeRunner。 CodeRunner是我们围绕CodeSmith编写的包装程序,它使我们可以更轻松地运行CodeSmith模板并避免炮轰到EXE。 所有这些都在[TextFixtureSetup]中完成,并在[TestFixtureTearDown]中删除。
[Test()]
public void WriteTestMessagesFile()
{
    CodeSmithRunner.Runner runner =
        new Corillian.CodeGeneration.CodeSmithRunner.Runner();
    runner.LoadTemplate(templatePath);
    GenerateSource(runner,outFileMessagesNamePath,schemaMessagesPath);
}

private void GenerateSource(CodeSmithRunner.Runner runner,
        string outputPath, string schemaPathIn)
{
    using(StreamWriter output = File.CreateText(outputPath))
    {
        //deal with the schema file
        Corillian.CodeGeneration.XmlSchemaExplorer.Schema schema =
            Corillian.CodeGeneration.XmlSchemaExplorer.Schema.Read(schemaPathIn);
        if(schema == null)
            throw new ApplicationException("Schema couldn't be loaded");
        Corillian.CodeGeneration.XmlSchemaExplorer.SchemaType[] types = schema.Parse();
        if(types == null || types.Length == 0)
            throw new ApplicationException("No types loaded from schema");
        Corillian.CodeGeneration.XmlSchemaExplorer.TypeCollection typeCol =
            new Corillian.CodeGeneration.XmlSchemaExplorer.TypeCollection(types,schemaPathIn);
        runner.SetProperty("SchemaTypeCollection",typeCol);
        runner.SetProperty("TargetNamespace","Test.Types");
        runner.GenerateOutput(output);
    }
}
The test above loads the CodeSmith .CST template from templatePath and outputs the resulting C# into outFileMessagesNamePath from the XSD in schemaMessagesPath.
上述负载测试从和的templatePath输出所得到的C#的CodeSmith中.CST模板到outFileMessagesNamePath从schemaMessagesPath的XSD。
Now that we've got generated C# in a temporary file, and assuming (since no exceptions stopped the tests) it worked, we'll want to compile the generated code into an assembly.
现在,我们已经在一个临时文件中生成了C#,并假设它(因为没有异常停止了测试)可以正常工作,我们希望将生成的代码编译为一个程序集。
private Assembly Compile(string scope, string[] outputPaths)
{
    Assembly retVal = compiledAsssemblies[outputPaths[0]+scope] as Assembly;
    if (retVal == null)
    {
        Microsoft.CSharp.CSharpCodeProvider prov =
            new Microsoft.CSharp.CSharpCodeProvider();
        ICodeCompiler comp = prov.CreateCompiler();
        string[] asms = new string[]{"System.Xml.dll",
            "System.Web.dll",
            "Corillian.Voyager.Common.dll",
            "Corillian.Voyager.ExecutionServices.Client.dll",
            "Corillian.CodeGeneration.Templates.Test.dll"};
        string assemblyFileName =
            Path.GetFileNameWithoutExtension(outputPaths[0]) + "." + scope + ".dll";
        CompilerParameters options = new CompilerParameters(asms,assemblyFileName,true);
        options.GenerateInMemory = false;
        CompilerResults res = comp.CompileAssemblyFromFileBatch(options,outputPaths);
        if(res.Errors.HasErrors)
        {
            Assert.Fail(res.Errors[0].ToString());
        }

        retVal = res.CompiledAssembly;
        compiledAsssemblies.Add(outputPaths[0]+scope,retVal);
    }
    Assert.IsNotNull(retVal);
    return retVal;
}
This Compile method takes an array of files to compile and returns the compiled System.Reflection.Assembly. We use the CSharpCodeProvider to compile the code. This is much cleaner and makes better use of what's available to us than doing something so coarse as shelling out to run csc.exe and loading the assembly. It also allows us to better detect compile errors. Notice the Assert.File if the CompilerResults has errors. We also keep the assembly stored away in a hashtable just in case another test calls Compile with the same main generated file.
此Compile方法采用文件数组进行编译,然后返回已编译的System.Reflection.Assembly。 我们使用CSharpCodeProvider编译代码。 这比做一些大胆的操作(例如运行csc.exe并加载程序集)要粗糙得多,它更清洁并且可以更好地利用我们提供的资源。 它还使我们能够更好地检测编译错误。 如果CompilerResults有错误,请注意Assert.File。 我们也将程序集存储在哈希表中,以防其他测试使用相同的主生成文件调用Compile。
Now that we can generate code and compile generated code into an Assembly, we need to actually create/instantiate the newly generated object and confirm that it has the characteristics we expect.
现在我们可以生成代码并将生成的代码编译到Assembly中,我们需要实际创建/实例化新生成的对象并确认其具有我们期望的特性。
[Test()]
public void CheckDerivationAcrossNamespaces()
{
    Assembly assembly = Compile("UI",
        new string[]{outFileMessagesNamePath,outFileUIOnlyPath,assemblyInfo});
    Type testResponse = assembly.GetType("Test.Types.SomeTestResponseMessage",true,true);
    object theTestMessage =
        testResponse.InvokeMember("cctor",BindingFlags.CreateInstance,null,null,null);
    Assert.IsNotNull(theTestMessage);
    PropertyInfo[] props = testResponse.GetProperties();
    bool SomeDerivedUser = false;
    bool FooTypedUser = false;
    foreach(PropertyInfo prop in props)
    {
        if (prop.PropertyType.Name == "SomeDerivedUser" && prop.Name == "SomeDerivedUser")
        {
            Assert.AreEqual("SomeBaseUser",prop.PropertyType.BaseType.Name);
            object[] attrs = prop.GetCustomAttributes(typeof(TagRemapAttribute),false);
            Assert.IsTrue(attrs.Length == 2);
            SomeDerivedUser = true;
        }
        if (prop.PropertyType.Name == "SomeDerivedComplexUser" && prop.Name == "FooTypedUser")
        {
            Assert.AreEqual("SomeBaseUser",prop.PropertyType.BaseType.Name);
            object[] attrs = prop.GetCustomAttributes(typeof(TagRemapAttribute),false);
            Assert.IsTrue(attrs.Length == 2);
            FooTypedUser = true;
        }
    }
    Assert.IsTrue(SomeDerivedUser ,"Didn't find a ID object of type
            SomeDerivedUser in the UI's SomeTestResponseMessage!");
    Assert.IsTrue(FooTypedUser,"Didn't find a ID object of type
            SomeDerivedComplexUser in the UI's SomeTestResponseMessage!");

}
Here we compile an assembly from generated code and call assembly.GetType() to get the particular Type we're interested in. Now it gets interesting. We call the constructor of our type with Type.InvokeMember("cctor") and get the instance object back.
在这里,我们从生成的代码编译一个程序集,然后调用assembly.GetType()以获取我们感兴趣的特定类型。现在,它变得很有趣。 我们使用Type.InvokeMember(“ cctor”)调用我们类型的构造函数,并返回实例对象。
It's important to note that we have NOW compile-time references to any of these objects. They never existed at the time we wrote the tests, so there's no casting or type coercion that can be done. Everything is dynamic, but the tests are still confirming that the expect steps occured successfully. The tests are aiming to test the lifecycle of our objects, even though the objects will not be instantiated using Reflection. It's a parallel, but valid, reality.
重要的是要注意,我们现在对这些对象中的任何一个都有编译时引用。 在我们编写测试时,它们还不存在,因此无法进行任何强制转换或类型强制转换。 一切都是动态的,但测试仍在确认预期步骤已成功完成。 这些测试旨在测试我们对象的生命周期,即使这些对象不会使用Reflection实例化。 这是一个并行但有效的现实。
In this year, we need to determine that our SomeTestResponseMessage contains two properties of specific types, with specific names, with specific custom attributes and we Assert each step of the way. If somehow make a subtle change that affects this use case, we'll hear about it via Test Failures.
在这一年中,我们需要确定SomeTestResponseMessage包含两个特定类型的属性,这些特定类型的属性具有特定的名称和特定的自定义属性,并且我们声明该方法的每一步。 如果以某种方式进行了会影响此用例的细微更改,我们将通过“测试失败”来得知。
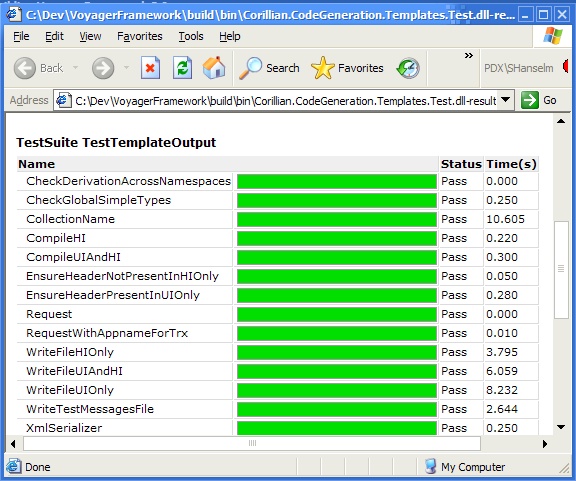
The test results for this suite are generated by NUnit into XML then styled into HTML and combined with the full Test Suite and emailed to the team. Here's the output for just this TextFixture shown at right.
NUnit将该套件的测试结果生成为XML,然后将其样式化为HTML,并与完整的Test Suite组合并通过电子邮件发送给团队。 这是如右图所示的此TextFixture的输出。
The only thing in these examples that is specific to what Corillian is our use of CodeSmith. Certainly tests could be written for other Code Generators that produce domain objects. I was particularly happy that CodeSmith provided a programmatic interface to it's stuff that allowed Patrick to create the CodeSmithRunner. That combined with the Microsoft CSharpCodeProvider makes these tests very robust (read: not fragile) and self contained. I've said it before, but I'd much rather use the correct public types than shell out whenever possible. You might remember I applied similar prejudices when calling Cassini's object model rather than running the command line.
这些示例中唯一针对Corillian的东西是我们对CodeSmith的使用。 当然,可以为产生域对象的其他代码生成器编写测试。 我特别高兴CodeSmith为它提供了一个编程接口,使Patrick可以创建CodeSmithRunner。 结合使用Microsoft CSharpCodeProvider,这些测试非常健壮(请阅读:不易碎)并且自成体系。 我之前已经说过,但是我宁愿使用正确的公共类型,而不是尽可能使用shell。 您可能还记得我在调用Cassini的对象模型而不是运行命令行时应用了类似的偏见。
nunit怎么测试


 501
501


 被折叠的 条评论
为什么被折叠?
被折叠的 条评论
为什么被折叠?
 到【灌水乐园】发言


