欢迎回到本系列,您将在其中学习如何使用React Native创建移动应用程序中常用的页面布局。 您正在创建的布局将无法使用-相反,本系列的主要重点是让您动手以布局React Native应用程序中的内容。
为了跟随本系列的进行,在您阅读本教程中的分步说明之前,我建议您先尝试自己重新创建每个屏幕。 仅仅阅读本教程,您将不会真正从中受益! 首先尝试,然后再在此处查找答案。 如果成功使它看起来像原始屏幕,则将您的实现与我的实现进行比较。 然后自己决定哪个更好!
在本系列的最后一篇教程中,您将创建以下新闻提要页面:
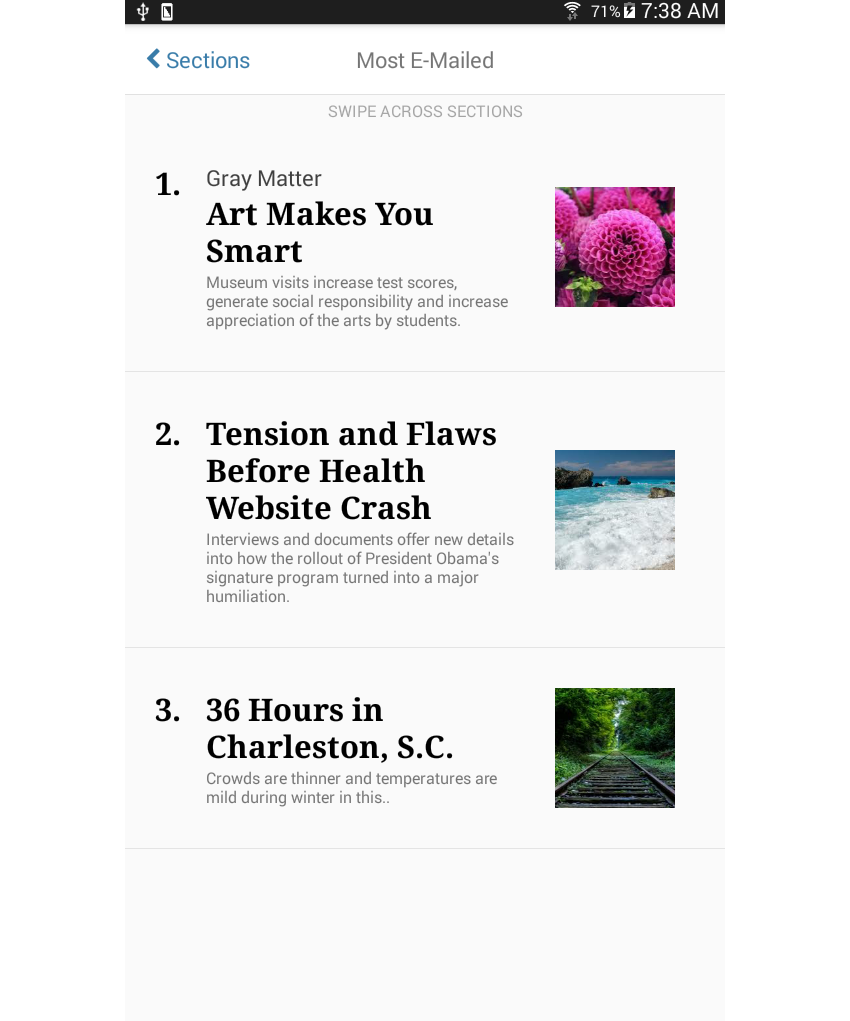
新闻订阅源布局用于以易于扫描的方式呈现信息。 在大多数情况下,它以列表格式显示,包括标题,摘要和表示每个新闻项的预览图像。
以下是在野外使用的这种类型的布局的几个示例:

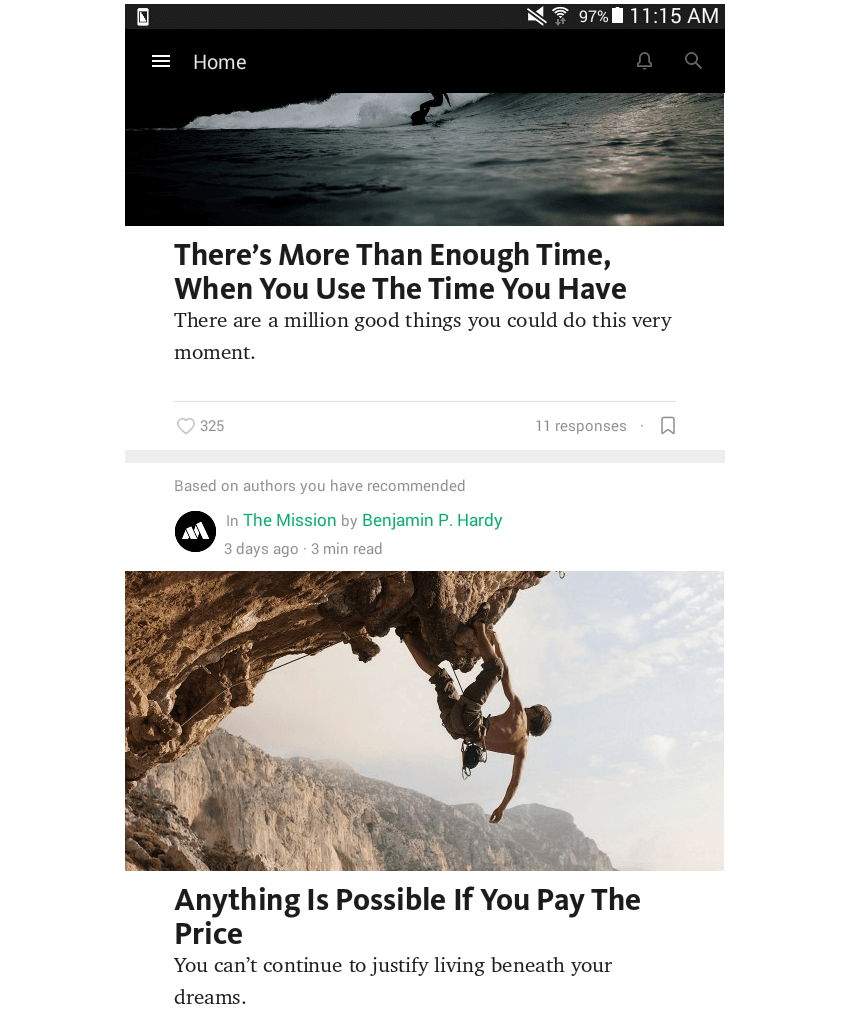
项目设置
当然,第一步是建立一个新的React Native项目:
react-native init react-native-common-screens 设置项目后,打开index.android.js文件,并将默认代码替换为以下代码:
import React, { Component } from 'react';
import {
  AppRegistry
} from 'react-native';

import News from './src/pages/News';

export default class ReactNativeCommonScreens extends Component {

  render() {
    return (
      <News />
    );
  }

}

AppRegistry.registerComponent('ReactNativeCommonScreens', () => ReactNativeCommonScreens); 创建一个src/pages文件夹,并在其中创建News.js文件。
您还需要react-native-vector-icons包。 这专门用于标题中的后退图标。
npm install --save react-native-vector-icons 打开android/app/build.gradle文件并添加对该包的引用:
dependencies {
    //rest of the dependencies are here at the top
    compile project(':react-native-vector-icons') //add this
} 通过在底部添加以下内容,对android/settings.gradle文件执行相同的操作:
include ':react-native-vector-icons'
project(':react-native-vector-icons').projectDir = new File(rootProject.projectDir, '../node_modules/react-native-vector-icons/android') 打开android/app/src/main/java/com/react-native-common-screens/MainApplication.java并导入软件包:
import java.util.Arrays;
import java.util.List;

import com.oblador.vectoricons.VectorIconsPackage; //add this
最后,初始化程序包:
@Override
protected List<ReactPackage> getPackages() {
  return Arrays.<ReactPackage>asList(
      new MainReactPackage(),
      new VectorIconsPackage() //add this
  );
}
创建新闻页面
好的,既然您已尝试自己编写布局代码(不作弊,对吗?),我将向您展示如何构建实现。
您现在必须已经注意到趋势。 我已经根据困难(或至少根据我发现的困难)进行了排列! 因此,最后一个屏幕基本上是您到目前为止创建的其他屏幕中的大老板。 不过,不用担心,因为我仍然会逐步引导您。
每个新闻项目的预览图像都需要一些图像。 我在存储库中添加了一些图像 ,您可以根据需要使用它们。
首先添加样板代码:
import React, { Component } from 'react';

import {
  StyleSheet,
  Text,
  View,
  ScrollView,
  Image
} from 'react-native';

import Icon from 'react-native-vector-icons/FontAwesome';

import Button from '../components/Button';
import NewsItem from '../components/NewsItem'; 这次有一个名为NewsItem的新NewsItem ( src/components/NewsItem )。 顾名思义,它用于呈现每个新闻项。 稍后我们将再次介绍它,但首先请看一下constructor()函数。 就像前面的图库屏幕一样,它使用状态存储新闻项的数据源。 标题和摘要来自《纽约时报》 ,但图像来自Google图像(并标记为各自所有者重用)。
constructor(props) {
    super(props);
	this.state = {
		news_items: [
			{
				pretext: 'Gray Matter',
				title: 'Art Makes You Smart',
				summary: 'Museum visits increase test scores, generate social responsibility and increase appreciation of the arts by students.',
				image: require('../images/pink.jpg'),
			},
			{
				pretext: '',
				title: 'Tension and Flaws Before Health Website Crash',
				summary: 'Interviews and documents offer new details into how the rollout of President Obama\'s signature program turned into a major humiliation.',
				image: require('../images/beach.jpg')
			},
			{
				pretext: '',
				title: '36 Hours in Charleston, S.C.',
				summary: 'Crowds are thinner and temperatures are mild during winter in this..',
				image: require('../images/rails.jpg')
			},

		]
	};
}
内容分为三部分:标题,说明文本和新闻项。 该标题与之前的日历屏幕中的标题非常相似。 唯一的区别是,只有三个可见元素,而不是三个。 (如果您想重新了解日历屏幕的制作方式 ,请继续阅读该教程。)
我说“可见”是因为实际上有三个元素-最后一个元素只是隐藏的! 这样可以使文本在中间轻松居中。 如果标头中只有两个元素,则很难弄清楚如何在两个元素之间划分空间,而中间的元素仍居中显示。 但是,如果您有三个元素,则每个元素可以具有相同的flex值,您可以仅使用textAlign alignItems文本或使用alignItems View组件。
render() {
    return (
		<View style={styles.container}>
			<View style={styles.header}>
				<Button
					noDefaultStyles={true}
                	styles={{button: styles.header_button}}
                	onPress={this.press.bind(this)}
				>
					<View style={styles.back_button}>
						<Icon name="chevron-left" size={20} color="#397CA9" />
                    	<Text style={[styles.back_button_label]}> Sections</Text>
					</View>
				</Button>

                <View style={styles.header_text}>
					<Text style={styles.header_text_label}>Most E-Mailed</Text>
                </View>
                <View style={styles.whitespace}></View>
			</View>

			<View style={styles.instruction}>
				<Text style={styles.instruction_text}>SWIPE ACROSS SECTIONS</Text>
			</View>

			<ScrollView style={styles.news_container}>
			{ this.renderNews() }
			</ScrollView>

		</View>
	);
} renderNews()函数是一种循环浏览状态中所有新闻项并使用NewsItem组件进行呈现的函数。
renderNews() {
    return this.state.news_items.map((news, index) => {
		return <NewsItem key={index} index={index} news={news} />
	});
} 接下来是NewsItem组件的代码。 首先添加样板React组件代码。 如前所述,该组件接受key , index和news作为其道具。 您只真正需要index和news 。 key只是React Native唯一标识列表中每一行的方式。 每次使用Array.map进行渲染时都需要提供它; 否则会抱怨。
使用功能组件时,道具将作为单个参数传递。 下面,使用解构分配来提取各个道具,因此{ news, index }基本上从道具中提取了news和index属性。 从那里您可以获取要渲染的数字。
import React, { Component } from 'react';

import {
  StyleSheet,
  Text,
  View,
  Image
} from 'react-native';

import Button from './Button';

const NewsItem = ({ news, index }) => {
    let number = (index + 1).toString();

	return (
        ...
	);
}
如果您看一下前面的屏幕截图,您会发现每个新闻项可以分为两组:一组显示新闻文本(数字,标题和摘录),另一组显示要素图像。
由于它只是一个元素,因此解决了特征图像的问题。 但是对于新闻文本,您仍然必须对其进行进一步划分。 您可能已经注意到,即使标题带有借口(例如“灰色物质”),数字也位于相同的位置。 借口还具有与标题和数字不同的样式。
利用这些知识,您可以得出结论,数字,借口和标题不应该放在一个容器中。 此外,借口,标题和摘录看起来好像是垂直堆叠的,因此您可以将它们放在单个容器中。 只应带出号码。 这样,您将获得以下标记:
<Button
	key={index}
	noDefaultStyles={true}
	onPress={onPress.bind(this, news)}
>
	<View style={styles.news_item}>
		<View style={styles.news_text}>
			<View style={styles.number}>
				<Text style={styles.title}>{number}.</Text>
			</View>
			<View style={styles.text_container}>
				{ getPretext(news) }
				<Text style={styles.title}>{news.title}</Text>
				<Text>{news.summary}</Text>
			</View>
		</View>
		<View style={styles.news_photo}>
			<Image source={news.image} style={styles.photo} />
		</View>
	</View>
</Button> 通过getPretext()函数,您可以仅在新闻项具有借口的情况下有条件地呈现Text组件。
function getPretext(news) {
    if(news.pretext){
		return (
			<Text style={styles.pretext}>{news.pretext}</Text>
		);
	}
} 这是onPress函数。 它所做的只是提醒新闻标题,但在实际应用中,应导航到实际文章:
function onPress(news) {
	alert(news.title);
}
此时,页面将如下所示:
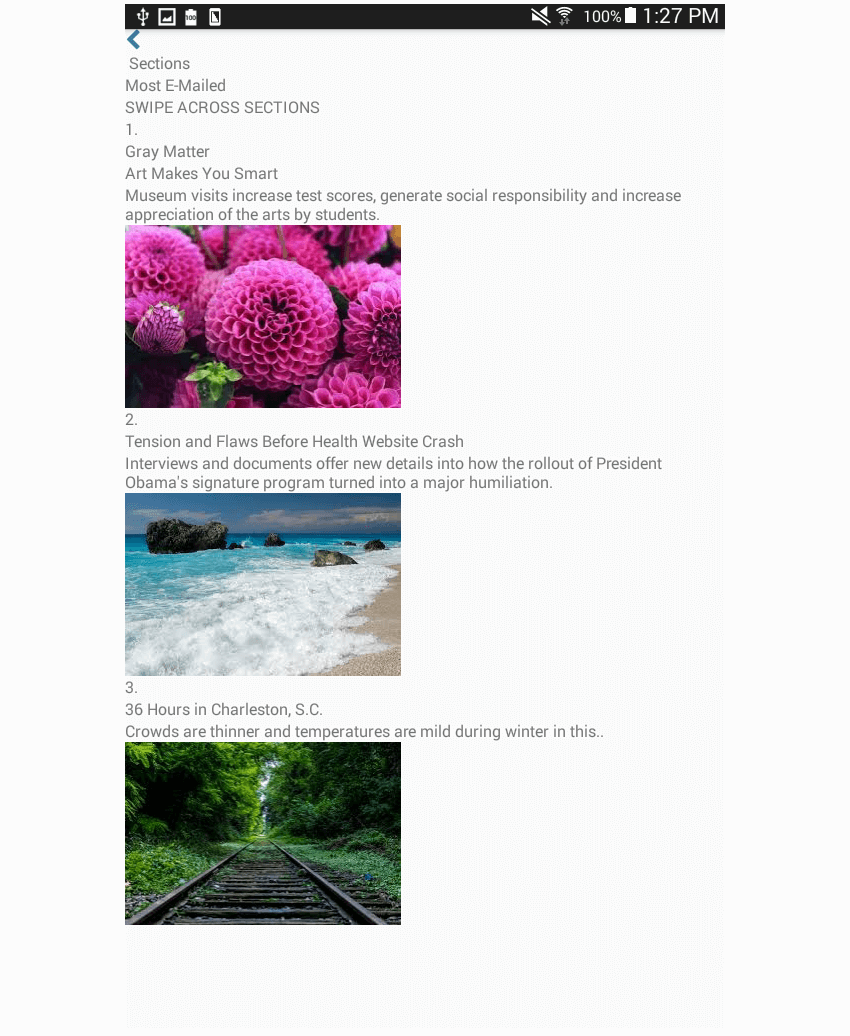
现在,将以下样式添加到“新闻”页面:
const styles = StyleSheet.create({
    container: {
		flex: 1
	},
	header: {
		flexDirection: 'row',
		backgroundColor: '#FFF',
		padding: 20,
		justifyContent: 'space-between',
		borderBottomColor: '#E1E1E1',
		borderBottomWidth: 1
	},
	header_button: {
		flex: 1,
	},
	whitespace: {
		flex: 1
	},
	back_button: {
		flexDirection: 'row',
		alignItems: 'center'
	},
	back_button_label: {
		color: '#397CA9',
		fontSize: 20,
	},
	instruction: {
		alignSelf: 'center',
		marginTop: 5
	},
	instruction_text: {
		color: '#A3A3A3'
	},
	header_text: {
		flex: 1,
		alignSelf: 'center'
	},
	header_text_label: {
		fontSize: 20,
		textAlign: 'center'
	},
	news_container: {
		flex: 1,
		flexDirection: 'column'
	},
});
我将不再逐步介绍每行代码的作用,因为它基本上采用了与本系列以前的教程中所学到的相同的概念。 应用上述样式后,页面的外观如下:
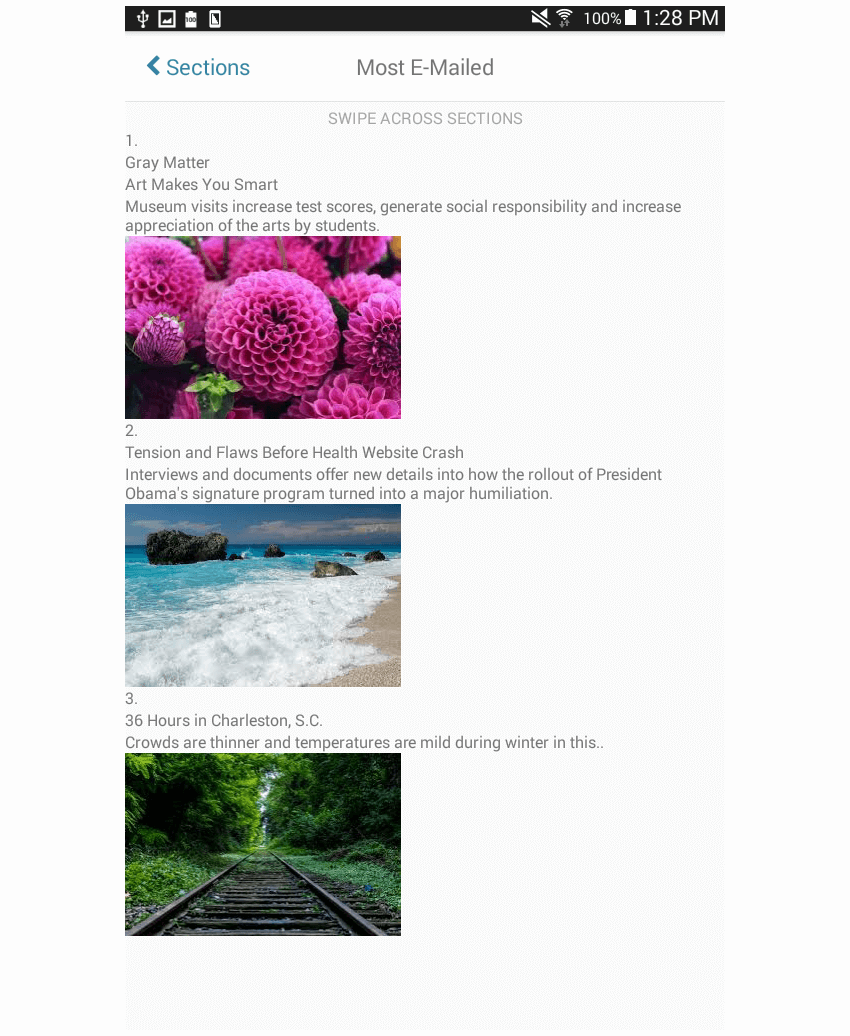
接下来,为每个新闻项添加样式。 每个news_item有flexDirection的row ,这样的消息文本和特色图片都在同一行。 news_text占可用空间的三分之二,而news_photo剩余空间。
const styles = StyleSheet.create({
    news_item: {
		flex: 1,
		flexDirection: 'row',
		paddingRight: 20,
		paddingLeft: 20,
		paddingTop: 30,
		paddingBottom: 30,
		borderBottomWidth: 1,
		borderBottomColor: '#E4E4E4'
	},
	news_text: {
		flex: 2,
		flexDirection: 'row',
		padding: 10
	},

});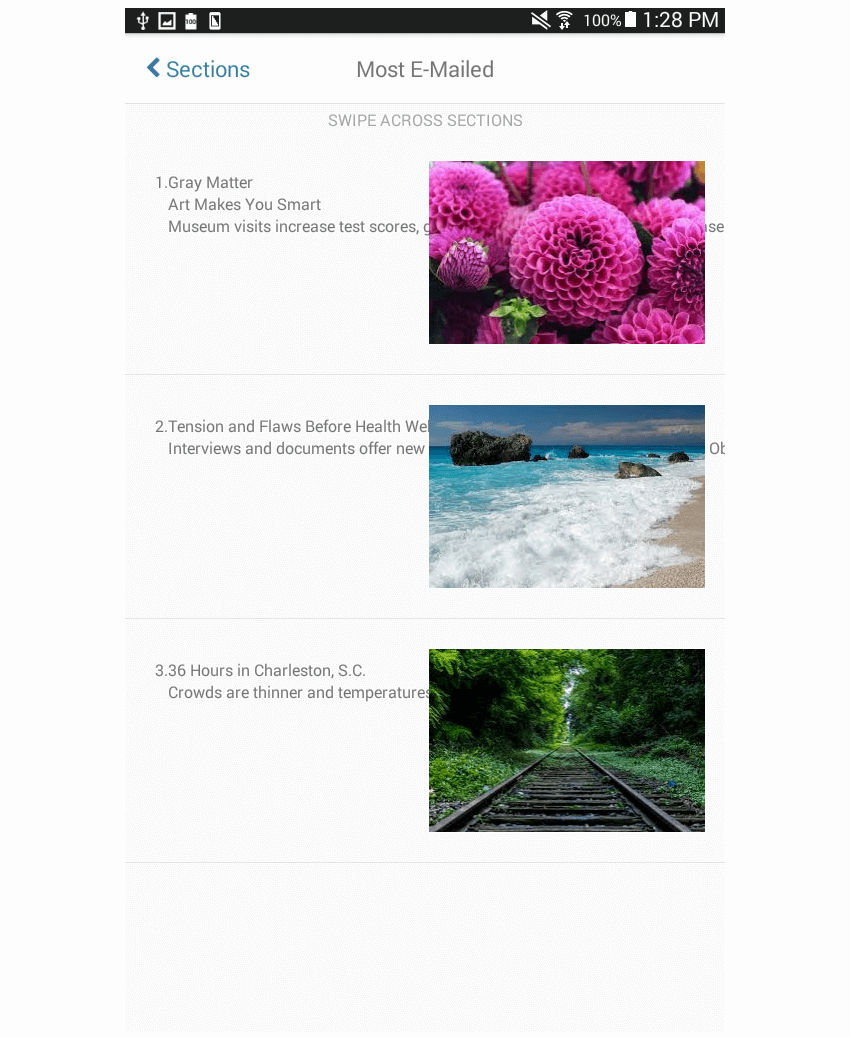
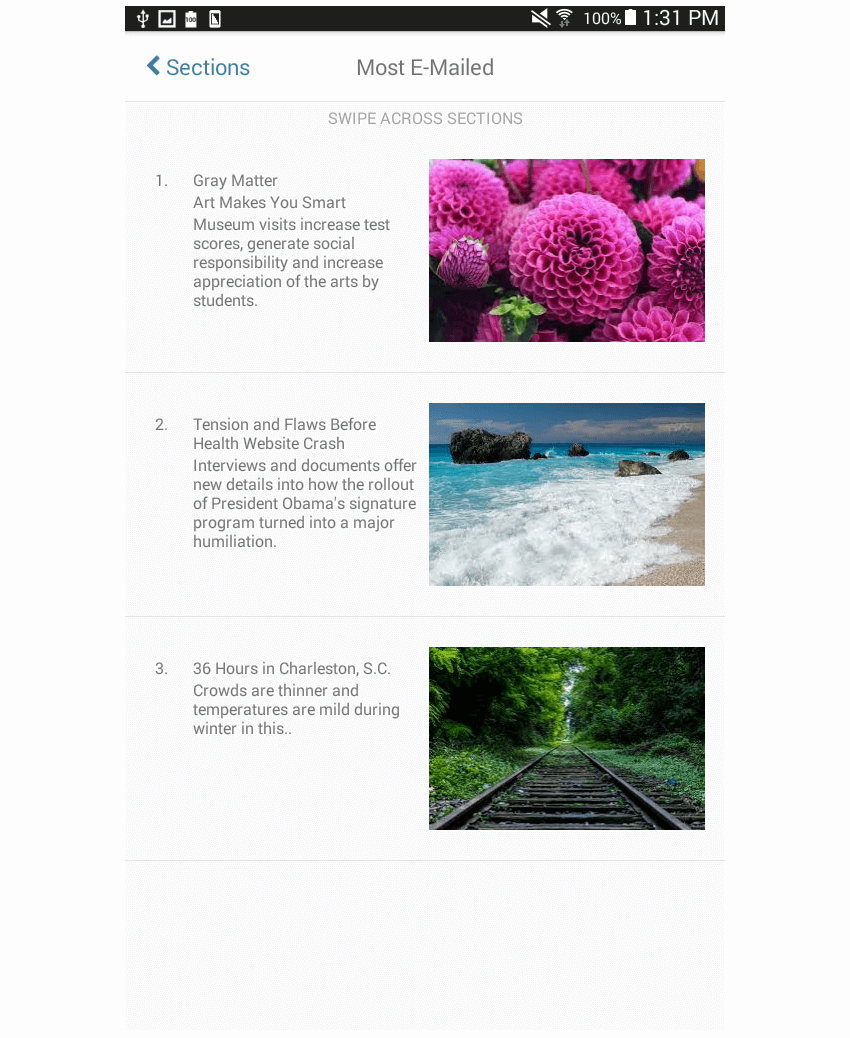
接下来,您需要添加样式以解决文本与预览图像重叠的问题。 您可以通过为news_text分配一个flex值来做到这news_text 。 一个flex值已经被分配给news_text ,但是由于在其中使用了View ,因此您还需要为其分配一个flex值,以使它们不会超出其父View的范围。
我们将指派的柔性值0.5的number ,而text_container将具有值3 。 使用这些值, text_container将占用number六倍的空间。
number: {
    flex: 0.5,
},
text_container: {
	flex: 3
},
现在,您要做的就是添加最后的修饰样式来设置文本样式:
pretext: {
    color: '#3F3F3F',
	fontSize: 20
},
title: {
	fontSize: 28,
	fontWeight: 'bold',
	color: '#000',
	fontFamily: 'georgia'
},
news_photo: {
	flex: 1,
	justifyContent: 'center',
	alignItems: 'center'
},
photo: {
	width: 120,
	height: 120
}
并且不要忘记导出组件!
export default NewsItem;最后的想法
而已! 在本系列的最后一部分中,您学习了如何实现新闻页面中常用的布局。 本教程将您在本系列前几部分中学到的所有东西都汇集在一起。 您已经使用了flexDirection: 'row'和flexDirection: 'column'来完成每个新闻项的样式。 您还利用自己的知识为预览图像对齐图像。
如果您尝试自己实施这些布局,失败然后再次尝试,则您应该已经具有足够的技能来实施任何类型的布局。 您可以应用在这里学到的东西来实现流行应用程序中常见的复杂布局。 如果您想进行更多练习,请尝试重新创建在流行的应用程序(例如Facebook或YouTube)中看到的布局。
翻译自: https://code.tutsplus.com/tutorials/common-react-native-app-layouts-news-feed--cms-27640


 1856
1856

 被折叠的 条评论
为什么被折叠?


