


微软工具包
Microsoft认知工具包(CNTK)-入门 (Microsoft Cognitive Toolkit (CNTK) - Getting Started)
Here, we will understand about the installation of CNTK on Windows and on Linux. Moreover, the chapter explains installing CNTK package, steps to install Anaconda, CNTK files, directory structure and CNTK library organisation.
在这里,我们将了解在Windows和Linux上CNTK的安装。 此外,本章还介绍了安装CNTK软件包,安装Anaconda,CNTK文件,目录结构和CNTK库组织的步骤。
先决条件 (Prerequisites)
In order to install CNTK, we must have Python installed on our computers. You can go to the link https://www.python.org/downloads/ and select the latest version for your OS, i.e. Windows and Linux/Unix. For basic tutorial on Python, you can refer to the link https://www.tutorialspoint.com/python3/index.htm.
为了安装CNTK,我们必须在计算机上安装Python。 您可以转到链接https://www.python.org/downloads/并为您的操作系统选择最新版本,即Windows和Linux / Unix。 有关Python的基本教程,您可以参考链接https://www.tutorialspoint.com/python3/index.htm 。

CNTK is supported for Windows as well as Linux so we will walk through both of them.
Windows和Linux支持CNTK,因此我们将逐步介绍它们。
在Windows上安装 (Installing on Windows)
In order to run CNTK on Windows, we will be using the Anaconda version of Python. We know that, Anaconda is a redistribution of Python. It includes additional packages like Scipy andScikit-learn which are used by CNTK to perform various useful calculations.
为了在Windows上运行CNTK,我们将使用Anaconda版本的Python。 我们知道,Anaconda是Python的重新分发。 它包括CNTK用于执行各种有用计算的其他软件包,例如Scipy和Scikit-learn 。
So, first let see the steps to install Anaconda on your machine −
因此,首先让我们看看在您的计算机上安装Anaconda的步骤-
Step 1−First download the setup files from the public website https://www.anaconda.com/distribution/.
步骤1-首先从公共网站https://www.anaconda.com/distribution/下载设置文件。
Step 2 − Once you downloaded the setup files, start the installation and follow the instructions from the link https://docs.anaconda.com/anaconda/install/.
步骤2-下载设置文件后,开始安装并按照链接https://docs.anaconda.com/anaconda/install/中的说明进行操作。
Step 3 − Once installed, Anaconda will also install some other utilities, which will automatically include all the Anaconda executables in your computer PATH variable. We can manage our Python environment from this prompt, can install packages and run Python scripts.
步骤3-一旦安装,Anaconda还将安装一些其他实用程序,这些实用程序将自动在您的计算机PATH变量中包含所有Anaconda可执行文件。 我们可以从此提示管理Python环境,可以安装软件包并运行Python脚本。
安装CNTK软件包 (Installing CNTK package)
Once Anaconda installation is done, you can use the most common way to install the CNTK package through the pip executable by using following command −
Anaconda安装完成后,可以使用以下命令通过最常见的方式通过pip可执行文件安装CNTK软件包-
pip install cntk
There are various other methods to install Cognitive Toolkit on your machine. Microsoft has a neat set of documentation that explains the other installation methods in detail. Please follow the link https://docs.microsoft.com/en-us/cognitive-toolkit/Setup-CNTK-on-your-machine.
还有多种其他方法可以在计算机上安装Cognitive Toolkit。 Microsoft提供了一套简洁的文档,详细介绍了其他安装方法。 请点击链接https://docs.microsoft.com/en-us/cognitive-toolkit/Setup-CNTK-on-your-machine 。
在Linux上安装 (Installing on Linux)
Installation of CNTK on Linux is a bit different from its installation on Windows. Here, for Linux we are going to use Anaconda to install CNTK, but instead of a graphical installer for Anaconda, we will be using a terminal-based installer on Linux. Although, the installer will work with almost all Linux distributions, we limited the description to Ubuntu.
Linux上CNTK的安装与Windows上的安装有些不同。 在这里,对于Linux,我们将使用Anaconda安装CNTK,但是我们将在Linux上使用基于终端的安装程序,而不是Anaconda的图形安装程序。 尽管该安装程序可与几乎所有Linux发行版一起使用,但我们仅将说明限于Ubuntu。
So, first let see the steps to install Anaconda on your machine −
因此,首先让我们看看在您的计算机上安装Anaconda的步骤-
安装Anaconda的步骤 (Steps to install Anaconda)
Step 1 − Before installing Anaconda, make sure that the system is fully up to date. To check, first execute the following two commands inside a terminal −
步骤1-在安装Anaconda之前,请确保系统是最新的。 要检查,首先在终端内执行以下两个命令:
sudo apt update
sudo apt upgrade
Step 2 − Once the computer is updated, get the URL from the public website https://www.anaconda.com/distribution/ for the latest Anaconda installation files.
步骤2-更新计算机后,从公共网站https://www.anaconda.com/distribution/获取URL,以获取最新的Anaconda安装文件。
Step 3 − Once URL is copied, open a terminal window and execute the following command −
步骤3-复制URL后,打开终端窗口并执行以下命令-
wget -0 anaconda-installer.sh url SHAPE \* MERGEFORMAT
     y


	             f


      x

|                     }
Replace the url placeholder with the URL copied from the Anaconda website.
用从Anaconda网站复制的URL替换url占位符。
Step 4 − Next, with the help of following command, we can install Anaconda −
步骤4-接下来,在以下命令的帮助下,我们可以安装Anaconda-
sh ./anaconda-installer.sh
The above command will by default install Anaconda3 inside our home directory.
默认情况下,以上命令将在我们的主目录中安装Anaconda3 。
安装CNTK软件包 (Installing CNTK package)
Once Anaconda installation is done, you can use the most common way to install the CNTK package through the pip executable by using following command −
Anaconda安装完成后,可以使用以下命令通过最常见的方式通过pip可执行文件安装CNTK软件包-
pip install cntk
检查CNTK文件和目录结构 (Examining CNTK files & directory structure)
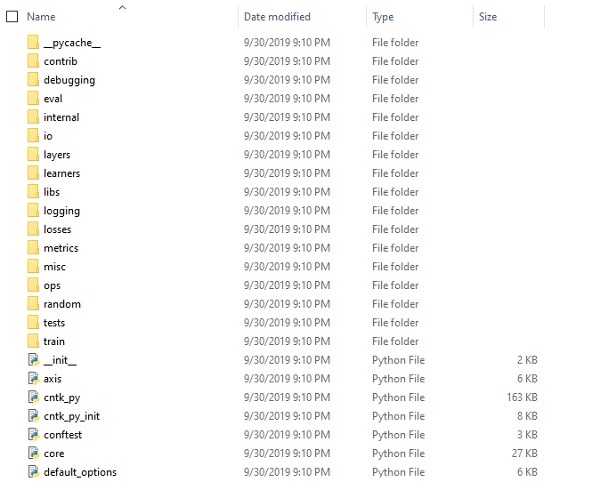
Once CNTK is installed as a Python package, we can examine its file and directory structure. It’s at C:\Users\ \Anaconda3\Lib\site-packages\cntk, as shown below in screenshot.
CNTK作为Python软件包安装后,我们可以检查其文件和目录结构。 在C:\ Users \ \ Anaconda3 \ Lib \ site-packages \ cntk, 如下面的屏幕快照所示。
验证CNTK安装 (Verifying CNTK installation)
Once CNTK is installed as a Python package, you should verify that CNTK has been installed correctly. From Anaconda command shell, start Python interpreter by entering ipython. Then, import CNTK by entering the following command.
将CNTK作为Python软件包安装后,您应验证CNTK已正确安装。 在Anaconda命令外壳中,通过输入ipython启动Python解释器。 然后,通过输入以下命令导入CNTK 。
import cntk as c
Once imported, check its version with the help of following command −
导入后,在以下命令的帮助下检查其版本-
print(c.__version__)
The interpreter will respond with installed CNTK version. If it doesn’t respond, there will be a problem with the installation.
解释器将响应已安装的CNTK版本。 如果没有响应,则说明安装存在问题。
CNTK图书馆组织 (The CNTK library organisation)
CNTK, a python package technically, is organised into 13 high-level sub-packages and 8 smaller sub-packages. Following table consist of the 10 most frequently used packages:
CNTK从技术上讲是python软件包,分为13个高级子软件包和8个较小的子软件包。 下表包含10个最常用的软件包:
| Sr.No | Package Name & Description |
|---|---|
| 1 | cntk.io Contains functions for reading data. For example: next_minibatch() |
| 2 | cntk.layers Contains high-level functions for creating neural networks. For example: Dense() |
| 3 | cntk.learners Contains functions for training. For example: sgd() |
| 4 | cntk.losses Contains functions to measure training error. For example: squared_error() |
| 5 | cntk.metrics Contains functions to measure model error. For example: classificatoin_error |
| 6 | cntk.ops Contains low-level functions for creating neural networks. For example: tanh() |
| 7 | cntk.random Contains functions to generate random numbers. For example: normal() |
| 8 | cntk.train Contains training functions. For example: train_minibatch() |
| 9 | cntk.initializer Contains model parameter initializers. For example: normal() and uniform() |
| 10 | cntk.variables Contains low-level constructs. For example: Parameter() and Variable() |
| 序号 | 包装名称和说明 |
|---|---|
| 1个 | cntk.io 包含读取数据的功能。 例如: next_minibatch() |
| 2 | 图层 包含用于创建神经网络的高级功能。 例如: Dense() |
| 3 | 学习者 包含培训功能。 例如: sgd() |
| 4 | 损失 包含测量训练误差的功能。 例如: squared_error() |
| 5 | 计量指标 包含测量模型误差的函数。 例如: classificatoin_error |
| 6 | cntk.ops 包含用于创建神经网络的底层函数。 例如: tanh() |
| 7 | 随机 包含生成随机数的函数。 例如: normal() |
| 8 | 火车 包含训练功能。 例如: train_minibatch() |
| 9 | cntk.initializer 包含模型参数初始化程序。 例如: normal()和uniform() |
| 10 | cntk.variables 包含低级构造。 例如: Parameter()和Variable() |
微软工具包


 1255
1255

 被折叠的 条评论
为什么被折叠?
被折叠的 条评论
为什么被折叠?
 到【灌水乐园】发言


