


图形修饰小工具
无力吐槽,这是我第三遍写这个了,到底是个什么意思???我只要一贴代码,浏览器直接崩溃,呵呵了,我也是,我现在只要写完一段字我就保存,尼玛在掉我就不写了,写到word里面,再贴上来。
效果
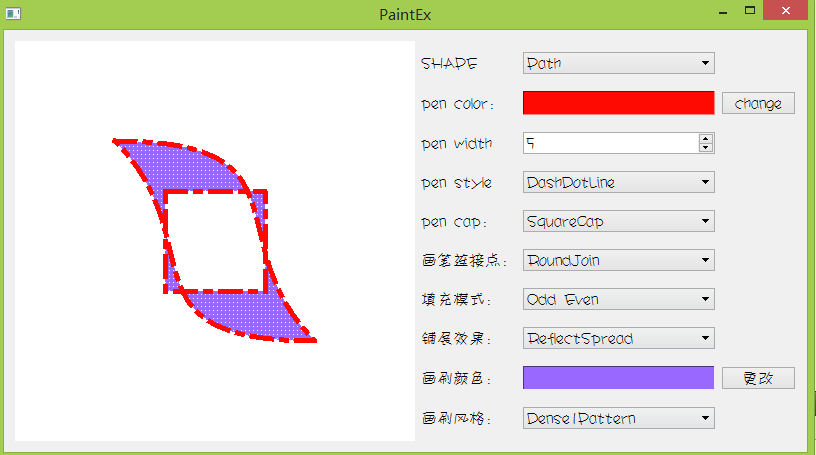
左边图形展示界面
paintarea.h
/**
* 书本:【Qt5开发及实例】
* 功能:实现绘画各种图形
* 文件:paintarea.h
* 时间:2015年1月21日16:59:25
* 作者:cutter_point
*/

#ifndef PAINTAREA_H
#define PAINTAREA_H

#include <QWidget>
#include <QPen>
#include <QBrush>
#include <QRect>

class PaintArea : public QWidget
{
  Q_OBJECT
public:
  //能绘画的各种形状
  enum Shape{Line, Rectangle, RoundRect, Ellipse, Polygon, Polyline, Points,    //我也是醉了,在括号里面"/**/"这样注释居然会报错= =
             Arc, Path, Text, Pixmap};    //线条,矩形,圆角矩形,椭圆,多边形,折线,点,弧线,路径,文字,像图
  explicit PaintArea(QWidget *parent = 0);

  void setShape(Shape);       //形状设置
  void setPen(QPen);    //画笔设置
  void setBrush(QBrush);      //设置画刷
  void setFillRule(Qt::FillRule);     //设置填充模式
  void paintEvent(QPaintEvent *);   //重画事件

signals:

public slots:

private:
  Shape shape;    //形状
  QPen pen;   //画笔
  QBrush brush;   //画刷
  Qt::FillRule fillRule;      //填充模式

};

#endif // PAINTAREA_H
paintarea.cpp
/**
* 书本:【Qt5开发及实例】
* 功能:实现绘画各种图形
* 文件:paintarea.h
* 时间:2015年1月21日16:59:25
* 作者:cutter_point
*/
#include "paintarea.h"
#include <QPainter>
PaintArea::PaintArea(QWidget *parent) :
QWidget(parent)
{
setPalette(QPalette(Qt::white)); //设置为白色
setAutoFillBackground(true); //设置背景颜色
setMinimumSize(400, 400); //大小范围
/*
和上面的写法效果一样
QPalette p = palette();
p.setColor(QPalette::Window, Qt::white);
setPalette(p);
*/
}
//设置形状,设置画笔,设置画刷,设置背景填充模式
void PaintArea::setShape(Shape s)
{
shape = s;
update(); //更新
}
void PaintArea::setPen(QPen p)
{
pen = p;
update();
}
void PaintArea::setBrush(QBrush b)
{
brush = b;
update();
}
void PaintArea::setFillRule(Qt::FillRule rule) //填充规则
{
fillRule = rule;
update(); //重画绘制区窗体
}
//重画函数
void PaintArea::paintEvent(QPaintEvent *)
{
QPainter p(this); //获得当前图画功能
p.setPen(pen);
p.setBrush(brush);
//QRect::QRect(int x, int y, int width, int height) Constructs a rectangle with (x, y) as its top-left corner and the given width and height.
QRect rect(50, 100, 300, 200); //画一个矩形,四个参数,第一和第二个是左上角开始的坐标x,y,然后就是宽和高
static const QPoint points[4] = //用来画多边形,点,多变线准备
{
QPoint(150, 100),
QPoint(300, 150),
QPoint(350, 250),
QPoint(100, 300)
};
int startAngle = 30 * 16; //起始角,这里用1/16来表示单位度,所以这个是30度,也就是16就是1°
int spanAngle = 120*16;
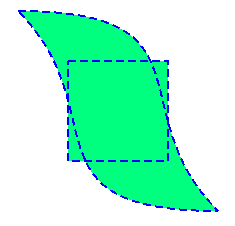
QPainterPath path; //画图像的类
path.addRect(150, 150, 100, 100); //开始画了一个矩形
path.moveTo(100, 100); //移动到新的画的起始点
path.cubicTo(300, 100, 200, 200, 300, 300); //画贝塞尔曲线
path.cubicTo(100, 300, 200, 200, 100, 100);
path.setFillRule(fillRule); //设置填充模式
//判断要画何种图形
switch(shape)
{
case Line: //一条直线
p.drawLine(rect.topLeft(), rect.bottomRight()); break;
case Rectangle: //长方形
p.drawRect(rect); break;
case RoundRect: //圆角方形
p.drawRoundRect(rect); break;
case Ellipse: //椭圆
p.drawEllipse(rect); break;
case Polygon: //多边形
p.drawPolygon(points, 4); break;
case Polyline: //多边线
p.drawPolyline(points, 4); break;
case Points: //点
p.drawPoints(points, 4); break;
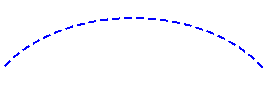
case Arc: //弧线
p.drawArc(rect, startAngle, spanAngle); break;
case Path: //路径
p.drawPath(path); break;
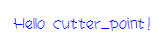
case Text: //文字
p.drawText(rect, Qt::AlignCenter, tr("Hello cutter_point!")); break;
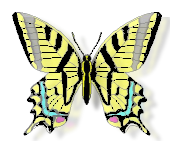
case Pixmap: //图片
p.drawPixmap(150, 150, QPixmap(":/butterfly.png")); break;
default: break;
}
}
哎,这个定义实现文件我贴了三遍,尼玛我发现贴代码,最后的空行还不能太多,不然这网站就会让你的浏览器崩溃,呵呵,我不知道别人是不是这样,我这里只要代码最后空行一多就会崩溃。。。。
主窗口实现
就是这些。
mainwidget.h
/**
* 书本:【Qt5开发及实例】
* 功能:实现绘画各种图形
* 文件:paintarea.h
* 时间:2015年1月21日17:59:59
* 作者:cutter_point
*/
#ifndef MAINWIDGET_H
#define MAINWIDGET_H

#include "paintarea.h"

#include <QWidget>
#include <QLabel>
#include <QComboBox>
#include <QSpinBox>
#include <QPushButton>
#include <QGridLayout>
#include <QGradient>

class MainWidget : public QWidget
{
  Q_OBJECT

public:
  MainWidget(QWidget *parent = 0);
  ~MainWidget();
private:
      PaintArea *paintArea;   //前面写的那个类的一个对象

      QLabel *shapeLabel;     //形状选择标签
      QComboBox *shapeComboBox;
      QLabel *penWidthLabel;      //画笔的线宽
      QSpinBox *penWidthSpinBox;
      QLabel *penColorLabel;      //画笔颜色
      QFrame *penColorFrame;      //画笔颜色的界面
      QPushButton *penColorBtn;   //颜色改变按钮
      QLabel *penStyleLabel;      //画笔风格
      QComboBox *penStyleComboBox;
      QLabel *penCapLabel;    //画笔顶帽
      QComboBox *penCapComboBox;
      QLabel *penJoinLabel;   //画笔连接点
      QComboBox *penJoinComboBox;
      QLabel *fillRuleLabel;      //填充模式
      QComboBox *fillRuleComboBox;
      QLabel *spreadLabel;      //铺展效果
      QComboBox *spreadComboBox;
      QGradient::Spread spread;
      QLabel *brushStyleLabel;      //画刷风格
      QComboBox *brushStyleComboBox;
      QLabel *brushColorLabel;      //画刷颜色
      QFrame *brushColorFrame;    //画刷颜色选择界面
      QPushButton *brushColorBtn;

      QGridLayout *rightLayout;

  protected slots:
      void ShowShape(int);    //显示改变的颜色
      void ShowPenWidth(int value);     //显示改变之后的画笔宽
      void ShowPenColor();      //显示改变之后的画笔颜色
      void ShowPenStyle(int);   //显示改变之后的画笔风格
      void ShowPenCap(int);   //显示改变之后的画笔顶帽
      void ShowPenJoin(int);  //显示改变之后的画笔连接点
      void ShowSpreadStyle();   //显示改变之后的铺展效果
      void ShowFillRule();          //显示改变之后的填充风格
      void ShowBrushColor();    //显示改变之后的画刷颜色
      void ShowBrush(int);    //显示改变之后的画刷

};

#endif // MAINWIDGET_H
mainwidget.cpp
/**
* 书本:【Qt5开发及实例】
* 功能:实现绘画各种图形
* 文件:paintarea.h
* 时间:2015年1月21日18:42:43
* 作者:cutter_point
*/
#include "mainwidget.h"

#include <QColorDialog>

MainWidget::MainWidget(QWidget *parent)
  : QWidget(parent)
{
  paintArea = new PaintArea;    //创建一个头文件对象

  shapeLabel = new QLabel(tr("SHAPE"));   //形状
  shapeComboBox = new QComboBox;
  shapeComboBox->addItem(tr("Line"), PaintArea::Line);
  shapeComboBox->addItem(tr("Rectangle"), PaintArea::Rectangle);
  shapeComboBox->addItem(tr("RoundedRect"),PaintArea::RoundRect);
  shapeComboBox->addItem(tr("Ellipse"),PaintArea::Ellipse);
  shapeComboBox->addItem(tr("Polygon"),PaintArea::Polygon);
  shapeComboBox->addItem(tr("Polyline"),PaintArea::Polyline);
  shapeComboBox->addItem(tr("Points"),PaintArea::Points);
  shapeComboBox->addItem(tr("Arc"),PaintArea::Arc);
  shapeComboBox->addItem(tr("Path"),PaintArea::Path);
  shapeComboBox->addItem(tr("Text"),PaintArea::Text);
  shapeComboBox->addItem(tr("Pixmap"),PaintArea::Pixmap);
  connect(shapeComboBox, SIGNAL(activated(int)), this, SLOT(ShowShape(int)));   //相应的连接

  penColorLabel = new QLabel(tr("pen color:"));     //画笔颜色选择控件
  penColorFrame = new QFrame;
  penColorFrame->setFrameStyle(QFrame::Panel|QFrame::Sunken);  //新创建的界面的风格是下凹的
  penColorFrame->setAutoFillBackground(true);   //设置背景颜色
  penColorFrame->setPalette(QPalette(Qt::blue));      //设置调色板为蓝色
  penColorBtn = new QPushButton(tr("change"));      //更改按钮
  connect(penColorBtn, SIGNAL(clicked()), this, SLOT(ShowPenColor()));

  penWidthLabel = new QLabel(tr("pen width"));    //画笔线宽
  penWidthSpinBox = new QSpinBox;
  penWidthSpinBox->setRange(0, 998);
  connect(penWidthSpinBox, SIGNAL(valueChanged(int)), this, SLOT(ShowPenWidth(int)));

  penStyleLabel = new QLabel(tr("pen style"));    //画笔风格选择
  penStyleComboBox = new QComboBox;
  penStyleComboBox->addItem(tr("SolidLine"), static_cast<int>(Qt::SolidLine));   //实线
  penStyleComboBox->addItem(tr("DashLine"), static_cast<int>(Qt::DashLine));   //虚线
  penStyleComboBox->addItem(tr("DotLine"), static_cast<int>(Qt::DotLine));   //点虚线
  penStyleComboBox->addItem(tr("DashDotLine"), static_cast<int>(Qt::DashDotLine));   //点虚线2
  penStyleComboBox->addItem(tr("DashDotDotLine"), static_cast<int>(Qt::DashDotDotLine));   //点虚线3
  penStyleComboBox->addItem(tr("CustomDashLine"), static_cast<int>(Qt::CustomDashLine));   //越来越虚线
  connect(penStyleComboBox, SIGNAL(activated(int)), this, SLOT(ShowPenStyle(int)));

  //画笔顶帽风格选择
  penCapLabel =new QLabel(tr("pen cap:"));        //画笔顶端风格选择下拉列表框
  penCapComboBox =new QComboBox;
  penCapComboBox->addItem(tr("SquareCap"),Qt::SquareCap);   //方向。。。,包含终止然后突出一半的线宽
  penCapComboBox->addItem(tr("FlatCap"),Qt::FlatCap);     //方向的线条,不包含终点
  penCapComboBox->addItem(tr("RoundCap"),Qt::RoundCap);   //一个圆形的线条
  connect(penCapComboBox,SIGNAL(activated(int)),this,SLOT(ShowPenCap (int)));

  penJoinLabel =new QLabel(tr("画笔连接点:"));     //画笔连接点风格选择下拉列表框
  penJoinComboBox =new QComboBox;
  penJoinComboBox->addItem(tr("BevelJoin"),Qt::BevelJoin);    //线连接处的转折处没有三角突出
  penJoinComboBox->addItem(tr("MiterJoin"),Qt::MiterJoin);      //线连接处的转折处有三角突出
  penJoinComboBox->addItem(tr("RoundJoin"),Qt::RoundJoin);  //线连接处的转折处圆润
  connect(penJoinComboBox,SIGNAL(activated(int)),this,SLOT(ShowPenJoin (int)));

  fillRuleLabel =new QLabel(tr("填充模式:"));    	//填充模式选择下拉列表框
  fillRuleComboBox =new QComboBox;
  fillRuleComboBox->addItem(tr("Odd Even"),Qt::OddEvenFill);      //以一个点画水平射线,有奇数个交点那么这儿点得填充
  fillRuleComboBox->addItem(tr("Winding"),Qt::WindingFill);   //设线,方向抵消之后不为0就填充
  connect(fillRuleComboBox,SIGNAL(activated(int)),this,SLOT (ShowFillRule()));

  spreadLabel =new QLabel(tr("铺展效果:"));    	//铺展效果选择下拉列表框
  spreadComboBox =new QComboBox;
  spreadComboBox->addItem(tr("PadSpread"),QGradient::PadSpread);    //对非渐变的区域填充单一起始颜色或终止颜色
  spreadComboBox->addItem(tr("RepeatSpread"),QGradient::RepeatSpread);    //对渐变器明显作用
  spreadComboBox->addItem(tr("ReflectSpread"),QGradient:: ReflectSpread);   //缓和的作用
  connect(spreadComboBox,SIGNAL(activated(int)),this,SLOT (ShowSpreadStyle()));

  brushColorLabel =new QLabel(tr("画刷颜色:"));   	//画刷颜色选择控件
  brushColorFrame =new QFrame;
  brushColorFrame->setFrameStyle(QFrame::Panel|QFrame::Sunken);
  brushColorFrame->setAutoFillBackground(true);
  brushColorFrame->setPalette(QPalette(Qt::green));
  brushColorBtn =new QPushButton(tr("更改"));
  connect(brushColorBtn,SIGNAL(clicked()),this,SLOT (ShowBrushColor()));

  brushStyleLabel =new QLabel(tr("画刷风格:"));   	//画刷风格选择下拉列表框
  brushStyleComboBox =new QComboBox;
  brushStyleComboBox->addItem(tr("SolidPattern"),static_cast<int>(Qt::SolidPattern));
  brushStyleComboBox->addItem(tr("Dense1Pattern"),static_cast<int>(Qt::Dense1Pattern));
  brushStyleComboBox->addItem(tr("Dense2Pattern"),static_cast<int>(Qt::Dense2Pattern));
  brushStyleComboBox->addItem(tr("Dense3Pattern"),static_cast<int>(Qt::Dense3Pattern));
  brushStyleComboBox->addItem(tr("Dense4Pattern"),static_cast<int>(Qt::Dense4Pattern));
  brushStyleComboBox->addItem(tr("Dense5Pattern"),static_cast<int>(Qt::Dense5Pattern));
  brushStyleComboBox->addItem(tr("Dense6Pattern"),static_cast<int>(Qt::Dense6Pattern));
  brushStyleComboBox->addItem(tr("Dense7Pattern"),static_cast<int>(Qt::Dense7Pattern));
  brushStyleComboBox->addItem(tr("HorPattern"),static_cast<int>(Qt::HorPattern));
  brushStyleComboBox->addItem(tr("VerPattern"),static_cast<int>(Qt::VerPattern));
  brushStyleComboBox->addItem(tr("CrossPattern"),static_cast<int>(Qt::CrossPattern));
  brushStyleComboBox->addItem(tr("BDiagPattern"),static_cast<int>(Qt::BDiagPattern));
  brushStyleComboBox->addItem(tr("FDiagPattern"),static_cast<int>(Qt::FDiagPattern));
  brushStyleComboBox->addItem(tr("DiagCrossPattern"),static_cast<int>(Qt:: DiagCrossPattern));
  brushStyleComboBox->addItem(tr("LinearGradientPattern"),static_cast<int>(Qt:: LinearGradientPattern));
  brushStyleComboBox->addItem(tr("ConicalGradientPattern"),static_cast<int>(Qt:: ConicalGradientPattern));
  brushStyleComboBox->addItem(tr("RadialGradientPattern"),static_cast<int>(Qt:: RadialGradientPattern));
  brushStyleComboBox->addItem(tr("TexturePattern"),static_cast<int>(Qt::TexturePattern));
  connect(brushStyleComboBox,SIGNAL(activated(int)),this,SLOT (ShowBrush(int)));

  rightLayout =new QGridLayout;                   //控制面板的布局,网格布局
  rightLayout->addWidget(shapeLabel,0,0);
  rightLayout->addWidget(shapeComboBox,0,1);
  rightLayout->addWidget(penColorLabel,1,0);
  rightLayout->addWidget(penColorFrame,1,1);
  rightLayout->addWidget(penColorBtn,1,2);
  rightLayout->addWidget(penWidthLabel,2,0);
  rightLayout->addWidget(penWidthSpinBox,2,1);
  rightLayout->addWidget(penStyleLabel,3,0);
  rightLayout->addWidget(penStyleComboBox,3,1);
  rightLayout->addWidget(penCapLabel,4,0);
  rightLayout->addWidget(penCapComboBox,4,1);
  rightLayout->addWidget(penJoinLabel,5,0);
  rightLayout->addWidget(penJoinComboBox,5,1);
  rightLayout->addWidget(fillRuleLabel,6,0);
  rightLayout->addWidget(fillRuleComboBox,6,1);
  rightLayout->addWidget(spreadLabel,7,0);
  rightLayout->addWidget(spreadComboBox,7,1);
  rightLayout->addWidget(brushColorLabel,8,0);
  rightLayout->addWidget(brushColorFrame,8,1);
  rightLayout->addWidget(brushColorBtn,8,2);
  rightLayout->addWidget(brushStyleLabel,9,0);
  rightLayout->addWidget(brushStyleComboBox,9,1);

  //总布局分配
  QHBoxLayout *mainLayout = new QHBoxLayout(this);      //整体的布局
  mainLayout->addWidget(paintArea);
  mainLayout->addLayout(rightLayout);   //右边的一大块添加进去
  mainLayout->setStretchFactor(paintArea, 1);     //弹簧如果有那就返回true,没有这个界面的布局的话false
  mainLayout->setStretchFactor(rightLayout, 0);   //??????

  ShowShape(shapeComboBox->currentIndex());   //显示默认的图形
}


//根据选择的形状设定形状显示
void MainWidget::ShowShape(int value)
{
  PaintArea::Shape shape = PaintArea::Shape(shapeComboBox->itemData(value, Qt::UserRole).toInt());
  paintArea->setShape(shape);
}

//显示画笔
void MainWidget::ShowBrush(int value)
{
  //首先得到画刷的颜色
  QColor color = brushColorFrame->palette().color(QPalette::Window);
  Qt::BrushStyle style = Qt::BrushStyle(brushStyleComboBox->itemData(value, Qt::UserRole).toInt());   //得到画刷的风格

  if(style == Qt::LinearGradientPattern)    //如果当前选定的风格是线性渐变
    {
      QLinearGradient linearGradient(0, 0, 400, 400);   //整个页面的起始位置和结束位置
      linearGradient.setColorAt(0.0, Qt::white);   //前面的那个数字是整个长度的0.x来表示
      linearGradient.setColorAt(0.2, color);    //这个表示在长度的五分之一的时候设置颜色是color
      linearGradient.setColorAt(1.0, Qt::black);    //这三个是颜色的渐变过程
      linearGradient.setSpread(spread);   //对这个spread进行渐变
      paintArea->setBrush(linearGradient);    //设置画刷
    }
  else if(style == Qt::RadialGradientPattern)   //圆形渐变
    {
      QRadialGradient radialGradient(200, 200, 150, 150, 100);    //分别是圆心,半径,焦点坐标,焦点就是颜色渐变的开始地方
      radialGradient.setColorAt(0.0, Qt::white);
      radialGradient.setColorAt(0.2, color);
      radialGradient.setColorAt(1.0, Qt::black);
      radialGradient.setSpread(spread);   //设置扩散
    }
  else if(style == Qt::TexturePattern)    //这个是为了画图形
    {
      //设置画刷是一个图形就可以了
      paintArea->setBrush(QBrush(QPixmap(":/butterfly.png")));
    }
  else
    {
      paintArea->setBrush(QBrush(color, style));    //设置一个普通的画刷
    }

}

//设置画刷颜色,然后调用展示画刷来实现
void MainWidget::ShowBrushColor()
{
  QColor color = QColorDialog::getColor(static_cast<int>(Qt::blue));    //强制转化蓝色为int类型,然后赋值给颜色选择对话框
  brushColorFrame->setPalette(QPalette(color));   //设置调色板颜色给定
  ShowBrush(brushStyleComboBox->currentIndex());  //选择当前选中的画笔风格,调用ShowBrush函数来显示

}

//铺展效果展示
void MainWidget::ShowSpreadStyle()
{
  spread = QGradient::Spread(spreadComboBox->itemData(spreadComboBox->currentIndex(), Qt::UserRole).toInt());   //设置铺展方式
}

//填充颜色的选择
void MainWidget::ShowFillRule()
{
  Qt::FillRule rule = Qt::FillRule(fillRuleComboBox->itemData(fillRuleComboBox->currentIndex(), Qt::UserRole).toInt()); //把当前选择的填充方式拿出来
  paintArea->setFillRule(rule);   //设定新的填充规则

}

//获得与画笔相关的属性
void MainWidget::ShowPenColor()
{
  //显示画笔的颜色
  QColor color = QColorDialog::getColor(static_cast<int> (Qt::blue));   //画笔颜色
  penColorFrame->setPalette(QPalette(color));     //设置画笔颜色界面的初始颜色
  int value = penWidthSpinBox->value();     //设置画笔宽度

  //画笔风格
  Qt::PenStyle style = Qt::PenStyle(penStyleComboBox->itemData(penStyleComboBox->currentIndex(), Qt::UserRole).toInt());
  //顶帽
  Qt::PenCapStyle cap = Qt::PenCapStyle(penCapComboBox->itemData(penCapComboBox->currentIndex(), Qt::UserRole).toInt());
  //连接点
  Qt::PenJoinStyle join = Qt::PenJoinStyle(penJoinComboBox->itemData(penJoinComboBox->currentIndex(), Qt::UserRole).toInt());

  //设置这个块区域画笔
  paintArea->setPen(QPen(color, value, style, cap, join));

}


//获取当前选中对的所对应的画笔,只是这个是改变了宽度
void MainWidget::ShowPenWidth(int value)
{
  //显示画笔的颜色
//  QColor color = QColorDialog::getColor(static_cast<int> (Qt::blue));   //画笔颜色
  QColor color = penColorFrame->palette().color(QPalette::Window);     //设置画笔颜色界面的初始颜色
//  int value = penWidthSpinBox->value();     //设置画笔宽度

  //画笔风格
  Qt::PenStyle style = Qt::PenStyle(penStyleComboBox->itemData(penStyleComboBox->currentIndex(), Qt::UserRole).toInt());
  //顶帽
  Qt::PenCapStyle cap = Qt::PenCapStyle(penCapComboBox->itemData(penCapComboBox->currentIndex(), Qt::UserRole).toInt());
  //连接点
  Qt::PenJoinStyle join = Qt::PenJoinStyle(penJoinComboBox->itemData(penJoinComboBox->currentIndex(), Qt::UserRole).toInt());

  //设置这个块区域画笔
  paintArea->setPen(QPen(color, value, style, cap, join));
}

void MainWidget::ShowPenStyle(int styleValue)
{
  //显示画笔的颜色
//  QColor color = QColorDialog::getColor(static_cast<int> (Qt::blue));   //画笔颜色
  QColor color = penColorFrame->palette().color(QPalette::Window);     //设置画笔颜色界面的初始颜色
  int value = penWidthSpinBox->value();     //设置画笔宽度

  //画笔风格
  Qt::PenStyle style = Qt::PenStyle(penStyleComboBox->itemData(styleValue, Qt::UserRole).toInt());    //设置style
  //顶帽
  Qt::PenCapStyle cap = Qt::PenCapStyle(penCapComboBox->itemData(penCapComboBox->currentIndex(), Qt::UserRole).toInt());
  //连接点
  Qt::PenJoinStyle join = Qt::PenJoinStyle(penJoinComboBox->itemData(penJoinComboBox->currentIndex(), Qt::UserRole).toInt());

  //设置这个块区域画笔
  paintArea->setPen(QPen(color, value, style, cap, join));
}

void MainWidget::ShowPenCap(int capValue)
{
  //显示画笔的颜色
//  QColor color = QColorDialog::getColor(static_cast<int> (Qt::blue));   //画笔颜色
  QColor color = penColorFrame->palette().color(QPalette::Window);     //设置画笔颜色界面的初始颜色
  int value = penWidthSpinBox->value();     //设置画笔宽度

  //画笔风格
  Qt::PenStyle style = Qt::PenStyle(penStyleComboBox->itemData(penStyleComboBox->currentIndex(), Qt::UserRole).toInt());
  //顶帽
//  Qt::PenCapStyle cap = Qt::PenCapStyle(penCapComboBox->itemData(penCapComboBox->currentIndex(), Qt::UserRole).toInt());
  Qt::PenCapStyle cap = Qt::PenCapStyle(penCapComboBox->itemData(capValue, Qt::UserRole).toInt());
  //连接点
  Qt::PenJoinStyle join = Qt::PenJoinStyle(penJoinComboBox->itemData(penJoinComboBox->currentIndex(), Qt::UserRole).toInt());

  //设置这个块区域画笔
  paintArea->setPen(QPen(color, value, style, cap, join));
}

void MainWidget::ShowPenJoin(int joinValue)
{
  //显示画笔的颜色
//  QColor color = QColorDialog::getColor(static_cast<int> (Qt::blue));   //画笔颜色
  QColor color = penColorFrame->palette().color(QPalette::Window);     //设置画笔颜色界面的初始颜色
  int value = penWidthSpinBox->value();     //设置画笔宽度

  //画笔风格
  Qt::PenStyle style = Qt::PenStyle(penStyleComboBox->itemData(penStyleComboBox->currentIndex(), Qt::UserRole).toInt());
  //顶帽
  Qt::PenCapStyle cap = Qt::PenCapStyle(penCapComboBox->itemData(penCapComboBox->currentIndex(), Qt::UserRole).toInt());
//  Qt::PenCapStyle cap = Qt::PenCapStyle(penCapComboBox->itemData(capValue, Qt::UserRole).toInt());
  //连接点
//  Qt::PenJoinStyle join = Qt::PenJoinStyle(penJoinComboBox->itemData(penJoinComboBox->currentIndex(), Qt::UserRole).toInt());
  Qt::PenJoinStyle join = Qt::PenJoinStyle(penJoinComboBox->itemData(joinValue, Qt::UserRole).toInt());

  //设置这个块区域画笔
  paintArea->setPen(QPen(color, value, style, cap, join));
}


MainWidget::~MainWidget()
{
}
这里我就得说一下里面的那个渐变的实现了,我觉得理解是有点麻烦的,比如线性渐变和圆形渐变的差别,还有圆形渐变的焦点的作用
我们先看看几张图就会明白了。
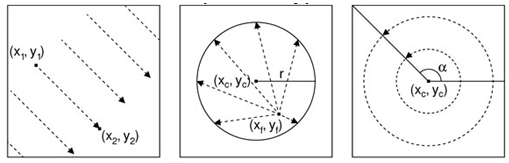
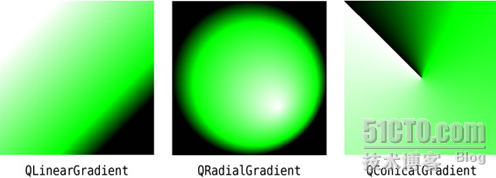
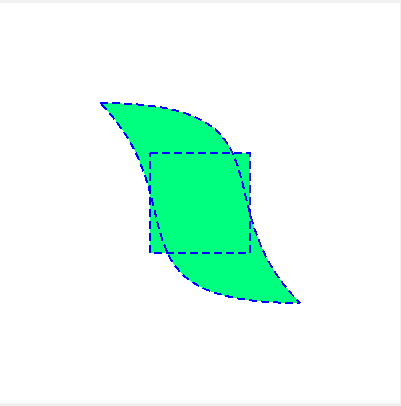
好的,这个是我在网上找的图,我做的那个不知道为什么没有显示,但是代码应该是没有错的,好的线性渐变这里有好几个变化
linearGradient.setColorAt(0.0, Qt::white);   //前面的那个数字是整个长度的0.x来表示
      linearGradient.setColorAt(0.2, color);    //这个表示在长度的五分之一的时候设置颜色是color
      linearGradient.setColorAt(1.0, Qt::black);    //这三个是颜色的渐变过程
这里就是线性变化的代码,没错就是里面注释说的,从图中(X1,Y1)到(X2, Y2)的变化是从白到黑的
radialGradient.setColorAt(0.0, Qt::white);
      radialGradient.setColorAt(0.2, color);
      radialGradient.setColorAt(1.0, Qt::black);
而第二个图就是那个白色的地方就是第三个参数焦点了
主函数显示
/**
* 书本:【Qt5开发及实例】
* 功能:实现绘画各种图形
* 文件:main.cpp
* 时间:2015年1月23日18:42:54
* 作者:cutter_point
*/
#include "mainwidget.h"
#include <QApplication>
#include <QFont>

int main(int argc, char *argv[])
{
  QApplication a(argc, argv);
  QFont f("迷你简丫丫", 12);   //设置字体
  a.setFont(f);

  MainWidget w;
  w.show();

  return a.exec();
}
最后,我们展示一下这个程序:


 6530
6530


 被折叠的 条评论
为什么被折叠?
被折叠的 条评论
为什么被折叠?
 到【灌水乐园】发言


