


由于很多控件缺少关闭按钮,所以就需要自行绘制来解决。WPF提供了强大的绘制和动画功能,为绘制任务提供了强大支持。本文记录了具体实现过程:
一、开发环境
Visual Studio 2017 C#/WPF/Net4.52
二、实现方式
1.新建一个C# WPF 应用程序项目 Sample 1
2. MainWindow.xaml中,将下面代码,加入网络元素中。
<!--Close button-->
<Button Name="closeButton"  Width="50" Height="50" Margin="10"  Click="CloseButtonRectangle_Click"  >
    <Button.Template>
        <ControlTemplate>
            <Canvas>
                <Rectangle Name="border" Width="50" Height="50" Stroke="IndianRed" StrokeThickness="4" RadiusX="3" RadiusY="3" Fill="Red" />
                <Line X1="10" Y1="10" X2="40" Y2="40" Stroke="White" StrokeThickness="5" StrokeEndLineCap="Round" StrokeStartLineCap="Round" />
                <Line X1="40" Y1="10" X2="10" Y2="40" Stroke="White" StrokeThickness="5" StrokeEndLineCap="Round" StrokeStartLineCap="Round" />

            </Canvas>
        </ControlTemplate>
    </Button.Template>
</Button>
显示效果如图

3.加入触发器并指定路由事件
<Canvas.Triggers>
<!-- Make semi-opaque when mouse is over close button -->
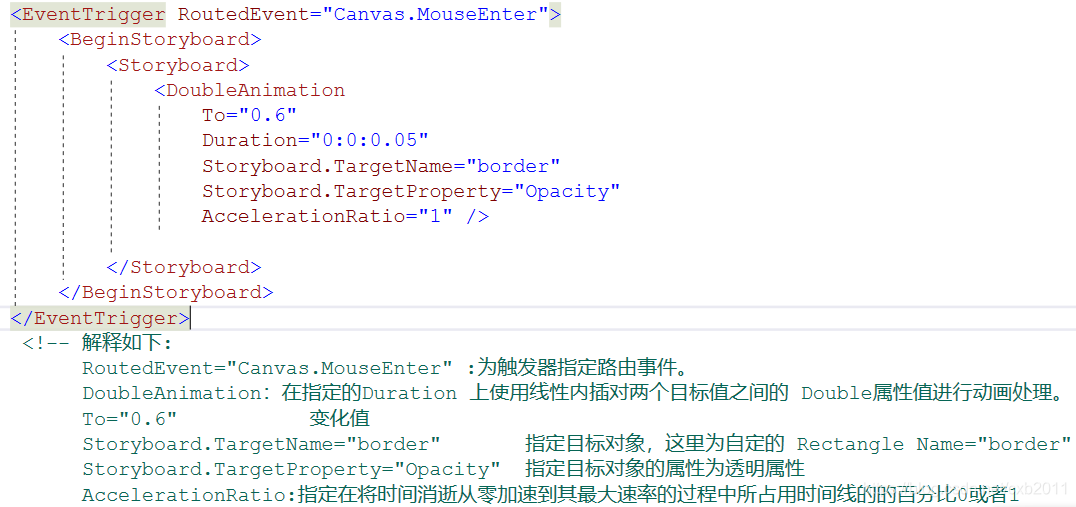
<EventTrigger RoutedEvent="Canvas.MouseEnter">
<BeginStoryboard>
<Storyboard>
<DoubleAnimation To="0.6" Duration="0:0:0.05" Storyboard.TargetName="border" Storyboard.TargetProperty="Opacity" AccelerationRatio="1" />
</Storyboard>
</BeginStoryboard>
</EventTrigger>
<!-- Make fully-opaque when mouse moves away from close button -->
<EventTrigger RoutedEvent="Canvas.MouseLeave">
<BeginStoryboard>
<Storyboard>
<DoubleAnimation To="1" Duration="0:0:0.05" Storyboard.TargetName="border" Storyboard.TargetProperty="Opacity" AccelerationRatio="1" />
</Storyboard>
</BeginStoryboard>
</EventTrigger>
<!-- Make fully-opaque when mouse is down and over close button -->
<EventTrigger RoutedEvent="Canvas.MouseLeftButtonDown">
<BeginStoryboard>
<Storyboard>
< To="1" Duration="0:0:0.05" Storyboard.TargetName="border" Storyboard.TargetProperty="Opacity" AccelerationRatio="1" />
</Storyboard>
</BeginStoryboard>
</EventTrigger>
</Canvas.Triggers>
详细解释如下图

三、自定义UI
在上述代码基础上,增加部分代码,建立自定义UI
AllowsTransparency=“True” 设置窗体允许透明
Background=“Transparent” 设置窗体背景色为透明
Thumb 表示可以由用户拖动的控件。 Thumb 内绘制椭圆形(Ellipse)
 <Window
    x:Class="CustomWindowUI.CustomWindowChrome"
    xmlns="http://schemas.microsoft.com/winfx/2006/xaml/presentation"
    xmlns:x="http://schemas.microsoft.com/winfx/2006/xaml"
    Title="CustomChromeWindowSample"
	WindowStyle="None"
    Width="348" Height="321"
    MinWidth="100" MinHeight="100"
	AllowsTransparency="True"
	Background="Transparent"
    MouseLeftButtonDown="Window_MouseLeftButtonDown">

    <Border BorderBrush="DarkBlue" BorderThickness="10" CornerRadius="20" Background="White">
        <Grid>
            <Grid.ColumnDefinitions>
                <ColumnDefinition />
                <ColumnDefinition Width="Auto" />
            </Grid.ColumnDefinitions>
            <Grid.RowDefinitions>
                <RowDefinition Height="Auto" />
                <RowDefinition />
                <RowDefinition Height="Auto" />
            </Grid.RowDefinitions>

            <!--Close button-->
            <Button Name="closeButton" Grid.Column="1" TabIndex="0" Grid.Row="0" Click="CloseButtonRectangle_Click" Width="50" Height="50" Margin="10">
                <Button.Template>
                    <ControlTemplate>
                        <Canvas>
                            <Canvas.Triggers>
                                <!-- Make semi-opaque when mouse is over close button -->
                                <EventTrigger RoutedEvent="Canvas.MouseEnter">
                                    <BeginStoryboard>
                                        <Storyboard>
                                            <DoubleAnimation To="0.6" Duration="0:0:0.05" Storyboard.TargetName="border" Storyboard.TargetProperty="Opacity" AccelerationRatio="1" />
                                        </Storyboard>
                                    </BeginStoryboard>
                                </EventTrigger>
                                <!-- Make fully-opaque when mouse moves away from close button -->
                                <EventTrigger RoutedEvent="Canvas.MouseLeave">
                                    <BeginStoryboard>
                                        <Storyboard>
                                            <DoubleAnimation To="1" Duration="0:0:0.05" Storyboard.TargetName="border" Storyboard.TargetProperty="Opacity" AccelerationRatio="1" />
                                        </Storyboard>
                                    </BeginStoryboard>
                                </EventTrigger>
                                <!-- Make fully-opaque when mouse is down and over close button -->
                                <EventTrigger RoutedEvent="Canvas.MouseLeftButtonDown">
                                    <BeginStoryboard>
                                        <Storyboard>
                                            <DoubleAnimation To="1" Duration="0:0:0.05" Storyboard.TargetName="border" Storyboard.TargetProperty="Opacity" AccelerationRatio="1" />
                                        </Storyboard>
                                    </BeginStoryboard>
                                </EventTrigger>
                            </Canvas.Triggers>

                            <Rectangle Name="border" Width="50" Height="50" Stroke="Black" StrokeThickness="4" RadiusX="3" RadiusY="3" Fill="Red" />
                            <Line X1="10" Y1="10" X2="40" Y2="40" Stroke="White" StrokeThickness="5" StrokeEndLineCap="Round" StrokeStartLineCap="Round" />
                            <Line X1="40" Y1="10" X2="10" Y2="40" Stroke="White" StrokeThickness="5" StrokeEndLineCap="Round" StrokeStartLineCap="Round" />

                        </Canvas>
                    </ControlTemplate>
                </Button.Template>
            </Button>

            <!-- Resize thumb -->
            <Thumb Name="resizeThumb" Grid.Column="1" Grid.Row="2" Width="50" Height="50" Cursor="SizeAll" Margin="10" ToolTip="Drag to resize" DragDelta="ResizeThumb_DragDelta">
                <Thumb.Template>
                    <ControlTemplate>
                        <Canvas>
                            <Canvas.Triggers>
                                <!-- Make semi-opaque when mouse is over resizing thumb -->
                                <EventTrigger RoutedEvent="Canvas.MouseEnter">
                                    <BeginStoryboard>
                                        <Storyboard>
                                            <DoubleAnimation To="0.6" Duration="0:0:0.05" Storyboard.TargetName="resizeEllipse" Storyboard.TargetProperty="Opacity" AccelerationRatio="1" />
                                        </Storyboard>
                                    </BeginStoryboard>
                                </EventTrigger>
                                <!-- Make fully-opaque when mouse moves away from resizing thumb -->
                                <EventTrigger RoutedEvent="Canvas.MouseLeave">
                                    <BeginStoryboard>
                                        <Storyboard>
                                            <DoubleAnimation To="1" Duration="0:0:0.05" Storyboard.TargetName="resizeEllipse" Storyboard.TargetProperty="Opacity" AccelerationRatio="1" />
                                        </Storyboard>
                                    </BeginStoryboard>
                                </EventTrigger>
                                <!-- Make fully-opaque when mouse is down and over resizing thumb -->
                                <EventTrigger RoutedEvent="Canvas.MouseLeftButtonDown">
                                    <BeginStoryboard>
                                        <Storyboard>
                                            <DoubleAnimation To="1" Duration="0:0:0.05" Storyboard.TargetName="resizeEllipse" Storyboard.TargetProperty="Opacity" AccelerationRatio="1" />
                                        </Storyboard>
                                    </BeginStoryboard>
                                </EventTrigger>
                            </Canvas.Triggers>
                            <Ellipse Name="resizeEllipse" Width="50" Height="50" Fill="Red" Stroke="Black" StrokeThickness="5" />
                        </Canvas>
                    </ControlTemplate>
                </Thumb.Template>
            </Thumb>
        </Grid>
    </Border>
</Window>
后台代码:
其中 DragMove(); 允许通过使用其左键按下鼠标拖动窗口的工作区的暴露区域上方的窗口。
private void CloseButtonRectangle_Click(object sender, RoutedEventArgs e)
{
    Close();
}

private void Window_MouseLeftButtonDown(object sender, MouseButtonEventArgs e)
{
    DragMove();
}

private void ResizeThumb_DragDelta(object sender, DragDeltaEventArgs e)
{
    // Resize window width (honoring minimum width)
    var desiredWidth = (int) (ActualWidth + e.HorizontalChange);
    var minWidth = (int) (MinWidth + resizeThumb.Width + resizeThumb.Margin.Right);
    Width = Math.Max(desiredWidth, minWidth);

    // Resize window height (honoring minimum height)
    var desiredHeight = (int) (ActualHeight + e.VerticalChange);
    var minHeight = (int) (MinHeight + resizeThumb.Height + resizeThumb.Margin.Bottom);
    Height = Math.Max(desiredHeight, minHeight);
}


 3689
3689


 被折叠的 条评论
为什么被折叠?
被折叠的 条评论
为什么被折叠?
 到【灌水乐园】发言


