


Sharing and reusing layouts is very easy with Android thanks to the <include /> tag, sometimes even too easy and you might end up with user interfaces that contain a large number of views, some of which are rarely used. Thankfully, Android offers a very special widget called ViewStub, which brings you all the benefits of the <include /> without polluting your user interface with rarely used views.
A ViewStub is a dumb and lightweight view. It has no dimension, it does not draw anything and does not participate in the layout in any way. This means a ViewStub is very cheap to inflate and very cheap to keep in a view hierarchy. A ViewStub can be best described as a lazy include. The layout referenced by a ViewStub is inflated and added to the user interface only when you decide so.
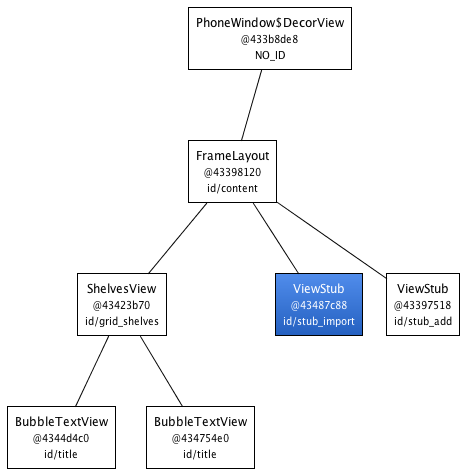
The following screenshot comes from the Shelves application. The main purpose of the activity shown in the screenshot is to present the user with a browsable list of books:

The same activity is also used when the user adds or imports new books. During such an operation, Shelves shows extra bits of user interface. The screenshot below shows the progress bar and cancel button that appear at the bottom of the screen during an import:

Because importing books is not a common operation, at least when compared to browsing the list of books, the import panel is originally represented by a ViewStub:
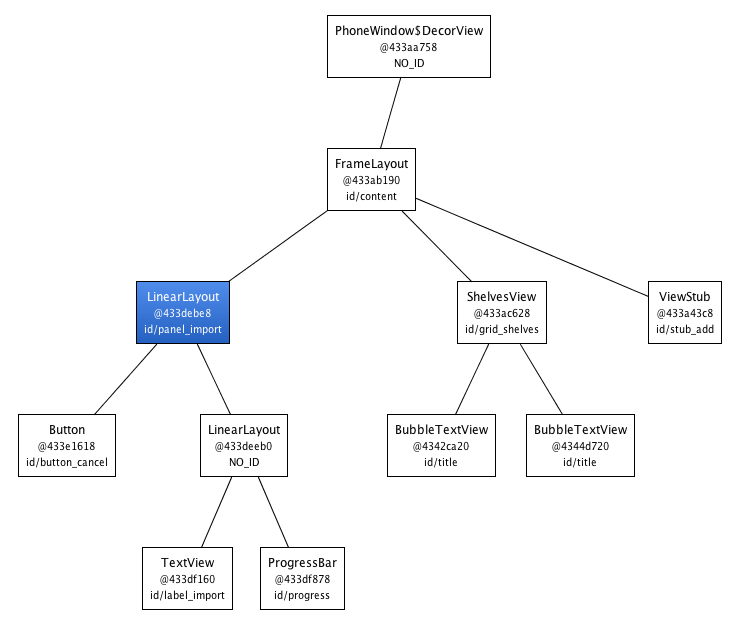
When the user initiates the import process, the ViewStub is inflated and replaced by the content of the layout file it references:
To use a ViewStub all you need is to specify an android:id attribute, to later inflate the stub, and an android:layout attribute, to reference what layout file to include and inflate. A stub lets you use a third attribute, android:inflatedId, which can be used to override the id of the root of the included file. Finally, the layout parameters specified on the stub will be applied to the roof of the included layout. Here is an example:
<ViewStub
    android:id="@+id/stub_import"
    android:inflatedId="@+id/panel_import"

    android:layout="@layout/progress_overlay"

    android:layout_width="fill_parent"
    android:layout_height="wrap_content"
    android:layout_gravity="bottom" />
When you are ready to inflate the stub, simply invoke the inflate() method. You can also simply change the visibility of the stub to VISIBLE or INVISIBLE and the stub will inflate. Note however that the
inflate()
method has the benefit of returning the root
View
of the inflate layout:
((ViewStub) findViewById(R.id.stub_import)).setVisibility(View.VISIBLE);
// or
View importPanel = ((ViewStub) findViewById(R.id.stub_import)).inflate();
It is very important to remember that after the stub is inflated, the stub is removed from the view hierarchy. As such, it is unnecessary to keep a long-lived reference, for instance in an class instance field, to a ViewStub.
A ViewStub is a great compromise between ease of programming and efficiency. Instead of inflating views manually and adding them at runtime to your view hierarchy, simply use a ViewStub. It’s cheap and easy. The only drawback of ViewStub is that it currently does not support the <merge /> tag.
Happy coding!
原文URL:http://www.curious-creature.com/2009/03/16/android-layout-tricks-4-optimize-part-2/


 5198
5198

 被折叠的 条评论
为什么被折叠?
被折叠的 条评论
为什么被折叠?
 到【灌水乐园】发言


