


docker使用代理下载国外镜像(google镜像)
使用VMware搭建centos虚拟机
-
使用VMware搭建centos7虚拟机,
参照: -
在windows主机上面搭建好代理服务
记录下socket5代理端口是10808,用于后面配置代理

-
虚拟机使用nat共享主机网络
参照:http://blog.itpub.net/25906825/viewspace-733077/ -
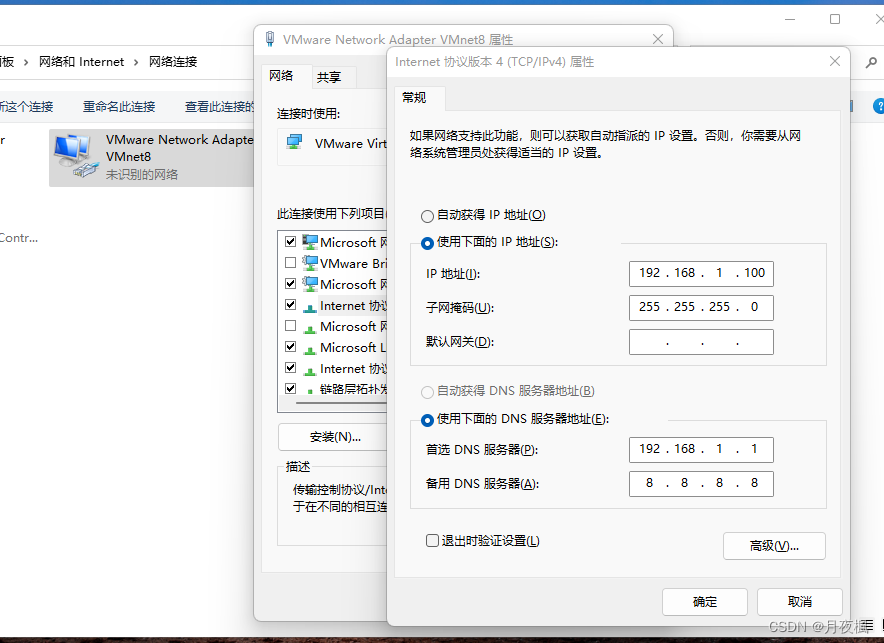
配置网络VMnet8
-
配置虚拟机网络
[root@localhost tmp]# vim /etc/sysconfig/network-scripts/ifcfg-ens33
TYPE=Ethernet
PROXY_METHOD=none
BROWSER_ONLY=no
BOOTPROTO=none
DEFROUTE=yes
IPV4_FAILURE_FATAL=no
IPV6INIT=yes
IPV6_AUTOCONF=yes
IPV6_DEFROUTE=yes
IPV6_FAILURE_FATAL=no
IPV6_ADDR_GEN_MODE=stable-privacy
NAME=ens33
UUID=a15f2236-7ebc-4f52-acf9-ef638d0ac019
DEVICE=ens33
ONBOOT=yes
IPADDR=192.168.1.128
GATEWAY=192.168.1.1
NETMASK=255.255.255.0
DNS1=192.168.1.1
DNS2=8.8.8.8
PREFIX=24
重启网络
[root@localhost tmp]# systemctl restart network
- windows主机网络如下
C:\Users\cyxin>ipconfig

Windows IP 配置


无线局域网适配器 本地连接* 3:

   媒体状态  . . . . . . . . . . . . : 媒体已断开连接
   连接特定的 DNS 后缀 . . . . . . . :

无线局域网适配器 本地连接* 4:

   媒体状态  . . . . . . . . . . . . : 媒体已断开连接
   连接特定的 DNS 后缀 . . . . . . . :

以太网适配器 以太网:

   连接特定的 DNS 后缀 . . . . . . . :
   本地链接 IPv6 地址. . . . . . . . : fe80::1540:6bb3:494b:a463%5
   IPv4 地址 . . . . . . . . . . . . : 172.60.10.219
   子网掩码  . . . . . . . . . . . . : 255.255.255.0
   默认网关. . . . . . . . . . . . . : 172.60.10.1

以太网适配器 VMware Network Adapter VMnet1:

   连接特定的 DNS 后缀 . . . . . . . :
   本地链接 IPv6 地址. . . . . . . . : fe80::1d7f:d2f9:532d:d536%21
   IPv4 地址 . . . . . . . . . . . . : 192.168.42.1
   子网掩码  . . . . . . . . . . . . : 255.255.255.0
   默认网关. . . . . . . . . . . . . :

以太网适配器 VMware Network Adapter VMnet8:

   连接特定的 DNS 后缀 . . . . . . . :
   本地链接 IPv6 地址. . . . . . . . : fe80::bcdc:12ee:dee6:3f54%3
   IPv4 地址 . . . . . . . . . . . . : 192.168.1.100
   子网掩码  . . . . . . . . . . . . : 255.255.255.0
   默认网关. . . . . . . . . . . . . :

无线局域网适配器 WLAN:

   媒体状态  . . . . . . . . . . . . : 媒体已断开连接
   连接特定的 DNS 后缀 . . . . . . . :

以太网适配器 蓝牙网络连接:

   媒体状态  . . . . . . . . . . . . : 媒体已断开连接
   连接特定的 DNS 后缀 . . . . . . . :

以太网适配器 vEthernet (WSL):

   连接特定的 DNS 后缀 . . . . . . . :
   本地链接 IPv6 地址. . . . . . . . : fe80::6047:7d4b:10ad:fb67%48
   IPv4 地址 . . . . . . . . . . . . : 172.31.64.1
   子网掩码  . . . . . . . . . . . . : 255.255.240.0
   默认网关. . . . . . . . . . . . . :
- 在虚拟机上面
发现只有VMnet1网络可以ping通,也可以telnet到代理端口,用来配置后面的代理
VMnet8不能ping通,不知道为什么。。。
[root@localhost proxychains-ng-4.16]# telnet 192.168.42.1 10808
Trying 192.168.42.1...
Connected to 192.168.42.1.
Escape character is '^]'.
^CConnection closed by foreign host.
[root@localhost proxychains-ng-4.16]# telnet 192.168.42.1 10809
Trying 192.168.42.1...
Connected to 192.168.42.1.
Escape character is '^]'.
^CConnection closed by foreign host.
[root@localhost tmp]# ping 192.168.1.100
PING 192.168.1.100 (192.168.1.100) 56(84) bytes of data.
Linux杂记–Docker pull下载镜像时无法使用proxychains4的解决方案
-
引言
大部分命令都可以使用 proxychains4 访问国外资源,但 docker 下载镜像的时候不行。于是就有了这篇文章。 -
解决方案
1. 新建systemctl下的配置文件夹:[root@localhost tmp]# mkdir -p /etc/systemd/system/docker.service.d2. 添加配置文件[root@localhost tmp]# cat > /etc/systemd/system/docker.service.d/https-proxy.conf << EOF Environment="HTTPS_PROXY=socks5://127.0.0.1:1080" ## Environment="HTTP_PROXY=socks5://127.0.0.1:1080" "HTTPS_PROXY=socks5://127.0.0.1:1080" "NO_PROXY=localhost,127.0.0.1,docker-registry.somecorporation.com" EOF -
下载docker镜像:
[root@localhost tmp]# systemctl daemon-reload
[root@localhost tmp]# systemctl restart docker.service
# 验证是否配置成功
[root@localhost tmp]# systemctl show --property=Environment docker
Environment=HTTPS_PROXY=socks5://192.168.42.1:10808
[root@localhost tmp]# docker pull gcr.io/arrikto/kubeflow/oidc-authservice:28c59ef
28c59ef: Pulling from arrikto/kubeflow/oidc-authservice
89d9c30c1d48: Pull complete
ea4459d96104: Pull complete
24977737bc93: Pull complete
0d01eb5c4c7b: Pull complete
44c115dfbcfa: Pull complete
Digest: sha256:c9450b805ad5c333f6a0d9491719a1d3fb4449fe017e37d3ad4c7591c763746b
Status: Downloaded newer image for gcr.io/arrikto/kubeflow/oidc-authservice:28c59ef
gcr.io/arrikto/kubeflow/oidc-authservice:28c59ef
如果使用containerd,则需要修改如下内容:
[root@node5 ~]# vim /usr/lib/systemd/system/containerd.service
[Unit]
Description=containerd container runtime
Documentation=https://containerd.io
After=network.target local-fs.target

[Service]
Environment="HTTP_PROXY=socks5://172.60.10.219:10808/"
Environment="HTTPS_PROXY=socks5://172.60.10.219:10808/"
Environment="NO_PROXY=10.96.0.0/12,10.244.0.0/16,127.0.0.1,localhost" #这部分必须添加,否则,k8s中的网络会默认都走代理,服务和pod网络将不可用
ExecStartPre=-/sbin/modprobe overlay
ExecStart=/usr/bin/containerd

Type=notify
Delegate=yes
KillMode=process
Restart=always
RestartSec=5
# Having non-zero Limit*s causes performance problems due to accounting overhead
# in the kernel. We recommend using cgroups to do container-local accounting.
LimitNPROC=infinity
LimitCORE=infinity
LimitNOFILE=infinity
# Comment TasksMax if your systemd version does not supports it.
# Only systemd 226 and above support this version.
TasksMax=infinity
OOMScoreAdjust=-999

[Install]
WantedBy=multi-user.target
重启服务:
systemctl daemon-reload
systemctl restart containerd
192.168.10.1:1080是对应代理的url,如果是vmess代理且提供服务的protocol是http,均可为containerd的http与https的代理。
NO_PROXY的设置也是必须的。10.96.0.0与192.168.0.0分别是clusterIP与Pod的内网网段,如果不设置NO_PROXY Pod与Pod之间的通信会出现问题。
在ubuntu20.04环境下
root@node1:~/clash# cp /home/cyxinda/下载/Clash_1658308267.yaml config.yaml
root@node1:~/clash# cp /home/cyxinda/下载/clash-linux-amd64-v1.11.4.gz clash.gz
root@node1:~/clash# ls
clash  clash.gz  config.yml
root@node1:~/clash# gunzip clash.gz
root@node1:~/clash# ls
clash  config.yml

root@node1:~/clash# ll
总用量 14304
drwxr-xr-x  2 root root    4096 7月  20 17:42 ./
drwx------ 16 root root    4096 7月  20 17:42 ../
-rw-r--r--  1 root root   16384 7月  20 17:42 cache.db
-rwxr-xr-x  1 root root 9064448 7月  20 17:33 clash*
-rw-r--r--  1 root root   48833 7月  20 17:46 config.yaml
-rw-r--r--  1 root root      16 7月  20 17:40 config.yml
-rw-r--r--  1 root root 5501635 7月  20 17:40 Country.mmdb
root@node1:~/clash# nohup ./clash -d .  > clash.log &
[1] 4083547
root@node1:~/clash# nohup: 忽略输入重定向错误到标准输出端
root@node1:~/clash# tail -f clash.log
time="2022-07-20T18:01:50+08:00" level=info msg="Start initial compatible provider AsianTV"
time="2022-07-20T18:01:50+08:00" level=info msg="Start initial compatible provider Others"
time="2022-07-20T18:01:50+08:00" level=info msg="Start initial compatible provider GlobalTV"
time="2022-07-20T18:01:50+08:00" level=info msg="Start initial compatible provider Proxy"
time="2022-07-20T18:01:50+08:00" level=info msg="Start initial compatible provider Domestic"
time="2022-07-20T18:01:50+08:00" level=info msg="HTTP proxy listening at: [::]:7890"
time="2022-07-20T18:01:50+08:00" level=info msg="SOCKS proxy listening at: [::]:7891"
time="2022-07-20T18:01:50+08:00" level=info msg="RESTful API listening at: [::]:9090"
time="2022-07-20T18:01:50+08:00" level=info msg="Redirect proxy listening at: [::]:7892"


time="2022-07-20T18:02:05+08:00" level=info msg="[TCP] 127.0.0.1:52048 --> www.google.com:443 match DomainKeyword(google) using Proxy[V4-中转2919|广东G-新加坡|x2.5|V2ray]"
time="2022-07-20T18:02:17+08:00" level=info msg="[TCP] 127.0.0.1:52050 --> csdnimg.cn:443 match GeoIP(CN) using Domestic[DIRECT]"
会出现如下错误:
错误1:
INFO[0000] Can't find config, create a initial config file
## 将配置文件名称改成config.yaml即可
INFO[0000] Can't find MMDB, start download
##打开:https://github.com/wp-statistics/GeoLite2-Country
## 然后下载:https://cdn.jsdelivr.net/npm/geolite2-country@1.0.2/GeoLite2-Country.mmdb.gz
## 或者https://gitee.com/mirrors/Pingtunnel/blob/master/GeoLite2-Country.mmdb
## 解压重命名文件mmdb 即可
root@node1:~/clash# gunzip GeoLite2-Country.mmdb.gz
root@node1:~/clash# mv GeoLite2-Country.mmdb Country.mmdb
ubuntu上面用代理拉取镜像
当在ubuntu上面设置clash代理时,只有浏览器可以正常使用代理,且不能使用该ubuntu作为其他containerd的代理服务器。
于是乎,在root用户下,通过如下方式设置代理,最终成功使用代理:
修改其它服务器的 ~/.bash_profile 文件,添加以下内容。
function proxy_off(){
    unset http_proxy
    unset https_proxy
    unset all_proxy
    echo -e "已关闭代理"
}

function proxy_on() {
    export no_proxy="localhost,127.0.0.1,localaddress,.localdomain.com"
    # 将 10.10.10.10 改为你的代理节点
    export http_proxy="http://10.10.10.10:7890"
    export https_proxy="http://10.10.10.10:7890"
    export all_proxy="socks5://10.10.10.10:7890"
    echo -e "已开启代理"
}
令配置生效
$ source ~/.bash_profile
打开代理
root@node1:~# proxy_on
已开启代理
关理代理
$ proxy_off
拉取镜像
root@node1:~# nerdctl pull registry.k8s.io/ingress-nginx/kube-webhook-certgen:v1.1.1@sha256:64d8c73dca984af206adf9d6d7e46aa550362b1d7a01f3a0a91b20cc67868660
registry.k8s.io/ingress-nginx/kube-webhook-certgen@sha256:64d8c73dca984af206adf9d6d7e46aa550362b1d7a01f3a0a91b20cc67868660: resolved       |++++++++++++++++++++++++++++++++++++++|
index-sha256:64d8c73dca984af206adf9d6d7e46aa550362b1d7a01f3a0a91b20cc67868660:                                              done           |++++++++++++++++++++++++++++++++++++++|
manifest-sha256:23a03c9c381fba54043d0f6148efeaf4c1ca2ed176e43455178b5c5ebf15ad70:                                           done           |++++++++++++++++++++++++++++++++++++++|
config-sha256:c41e9fcadf5a291120de706b7dfa1af598b9f2ed5138b6dcb9f79a68aad0ef4c:                                             done           |++++++++++++++++++++++++++++++++++++++|
layer-sha256:b90aa28117d4ba924f7df4067ed1a7592d435eb671106a6b5696678a79070907:                                              done           |++++++++++++++++++++++++++++++++++++++|
layer-sha256:ec52731e927332d44613a9b1d70e396792d20a50bccfa06332a371e1c68d7785:                                              done           |++++++++++++++++++++++++++++++++++++++|
elapsed: 53.2s                                                                                                              total:  787.0  (14.8 KiB/s)
k3s代理配置
当使用k3s,用crictl拉取镜像时,设置全局的代理并不好用,需要进行如下设置:
[root@ds2 ~]# vim /etc/systemd/system/k3s-agent.service.env
HTTP_PROXY="http://172.60.10.82:7890"
HTTPS_PROXY="http://172.60.10.82:7890"
ALL_PROXY="socks5://172.60.10.82:7890"
NO_PROXY="10.96.0.0/12,10.244.0.0/16,127.0.0.1,172.70.0.0/8,localhost,nexus.knowdee.com,harbor.knowdee.com"
[root@ds2 ~]# crictl pull registry.k8s.io/ingress-nginx/kube-webhook-certgen@sha256:64d8c73dca984af206adf9d6d7e46aa550362b1d7a01f3a0a91b20cc67868660
Image is up to date for sha256:c41e9fcadf5a291120de706b7dfa1af598b9f2ed5138b6dcb9f79a68aad0ef4c


 2070
2070


 被折叠的 条评论
为什么被折叠?
被折叠的 条评论
为什么被折叠?
 到【灌水乐园】发言


