


2 开发社区登录模块
2.1 发送邮件
(1)邮箱设置,开启客户端SMTP服务
(2.1)导入spring email依赖
<dependency>
    <groupId>org.springframework.boot</groupId>
    <artifactId>spring-boot-starter-mail</artifactId>
</dependency>
(2.2)邮箱参数配置,在application.properties中配置邮箱的账号、密码等
#声明发送邮箱的域名
spring.mail.host=smtp.sina.com
#声明发送邮箱的端口,一般邮箱都是465
spring.mail.port=465
#发送邮箱的账号
spring.mail.username=sangxuewl@sina.com
#发送邮箱的授权码
spring.mail.password=qwee67wesde8dse1a35
#指定协议
spring.mail.protocol=smtps。
#发邮件时采用ssl安全连接
spring.mail.properties.mail.smtp.ssl.enable=true
(2.3)使用javaMailSender发送邮件,封装一个发送邮件的工具方便之后复用
@Component
public class MailClient {
    private static final Logger logger = LoggerFactory.getLogger(MailClient.class);
    @Autowired
    private JavaMailSender mailSender;
    @Value("${spring.mail.username}")
    private String from;

    /**
     *
     * @param to 接收方邮箱
     * @param subject 邮件标题
     * @param content 邮件内容
     */
    public void sendMail(String to, String subject, String content) {
        try {
            MimeMessage mimeMessage = mailSender.createMimeMessage();
            MimeMessageHelper mimeMessageHelper = new MimeMessageHelper(mimeMessage);
            mimeMessageHelper.setFrom(from);
            mimeMessageHelper.setTo(to);
            mimeMessageHelper.setSubject(subject);
            mimeMessageHelper.setText(content,true);//true表示支持html文本
            mailSender.send(mimeMessageHelper.getMimeMessage());
        } catch (MessagingException e) {
            logger.error("发送邮件失败:" + e.getMessage());
        }
    }
}
(3)使用thymeleaf发送html格式的邮件
(3.1)在templates下创建mail目录,在其下创建html
<!doctype html>
<html lang="en" xmlns:th="http://www.thymeleaf.org">
<head>
    <meta charset="utf-8">
    <title>邮件示例</title>
</head>
<body>
<div>
   <p>欢迎你,<span style="color: red" th:text="${username}"></span></p>
</div>
</body>
</html>
(3.2)mvc模型下controller返回路径,前端控制器会自动调用模板引擎,发邮件或测试这里需要主动调用模板引擎。
 @Autowired
 private MailClient mailClient;
 @Autowired
 TemplateEngine templateEngine;
@Test
void testMailHtxml() {
	//往模板中传参
	Context context = new Context();
    context.setVariable("username","张三");
    //调用模板引擎生成动态网页,第一个参数是网页的位置
    String process = templateEngine.process("/mail/demo", context);
    mailClient.sendMail("1090259732@qq.com","test1",process);
    }
2.2开发注册功能
2.2.1 访问注册页面
点击注册选项,发送注册请求,显示注册页面
这里的重点是thymeleaf如何让复用一段标签
- 编写controller访问register.html
@Controller
public class LoginController {
    @GetMapping("/register")
    public String getRegisterPage() {
        return "/site/register";
    }
}
- 处理页面静态资源的路径
index.html的头部的代码在多个页面都有,直接利用进行复用,复用步骤如下:
(1)起名:用th:fragment="header"给index.html的头部起名为header
给index.html的头部起名为header
<header class="bg-dark sticky-top" th:fragment="header">
(2)复用:用th:replace="index::header"在register.html的头部用index的header进行替换
在register.html的头部用index的header进行替换
<header class="bg-dark sticky-top" th:replace="index::header">
2.2.2 提交注册数据
导包commons-lang3——用于判断字符串、集合等常用数据空值的情况;
  <dependency>
            <groupId>org.apache.commons</groupId>
            <artifactId>commons-lang3</artifactId>
            <version>3.9</version>
        </dependency>
在application.properties配置网站域名,因为没有域名这里就是配置本机的ip地址,注册的过程要发邮件,邮件里要带激活链接,激活链接链接到配置的网站,链接在开发测试上线阶段不同所以要做成可配的。
pycommunity.path.domain是自定义的内容
pycommunity.path.domain=http://localhost:8080
写一个工具类,提供两个静态方法方便注册时使用,其一是生成随机字符串,其二是MD5加密
MD5算法加密:对于同一密码MD5加密后的结果相同、如果密码不加盐,对于简单密码,破解密码的人可直接在其数据库中查简单密码对应的加密结果。
public class PycommunityUtil {
    //生成随机字符串
    //生成的随机字符串由字母和-组成,通过replaceAll去掉生成的字符串中的-
    public static String generateUUID() {
        return UUID.randomUUID().toString().replaceAll("-","");
    }
    //MD5加密 通过MD5算法对拼接了盐的密码进行加密
    //对于同一密码MD5加密后的结果相同
    //如果密码不加盐,对于简单密码,破解密码的可直接在其数据库中查密码对应的加密结果
    public static String md5(String key) {
        if(StringUtils.isBlank(key)) {
            //如果key是null、""、" "等均返回null
            return null;
        }
        return DigestUtils.md5DigestAsHex(key.getBytes());
    }
}
编写service,因为注册时要发邮件,所有把MailClient和TemplatesEngine注入,同时注入域名和项目名;方法的返回值是map用于封装错误信息
public class UserService {
    @Autowired
    UserMapper userMapper;

    @Autowired
    MailClient mailClient;

    @Autowired
    TemplateEngine templateEngine;

    @Value("${pycommunity.path.domain}")
    String domain;
    @Value("${server.servlet.context-path}")
    String contextPath;

    public User findUserById(int id) {
        return userMapper.selectById(id);
    }
    public Map<String,Object> register(User user) {
        Map<String,Object> map = new HashMap<>();
        //空值处理
        if(user == null) {
            throw new IllegalArgumentException("参数不能为空");
        }
        if(StringUtils.isBlank(user.getUsername())) {
            map.put("usernameMsg","用户名不能为空!");
            return map;
        }
        if(StringUtils.isBlank(user.getPassword())) {
            map.put("passwoMsg","密码不能为空!");
            return map;
        }
        if(StringUtils.isBlank(user.getEmail())) {
            map.put("emailMsg","邮箱不能为空!");
            return map;
        }
        //验证账号
        User u = userMapper.selectByName(user.getUsername());
        if(u != null) {
            map.put("usernameMsg","该账号已存在!");
            return map;
        }
        //验证邮箱
        u = userMapper.selectByEmail(user.getEmail());
        if(u != null) {
            map.put("emailMsg","该邮箱已被注册!");
            return map;
        }
        //注册用户
        user.setSalt(PycommunityUtil.generateUUID().substring(0,5));
        user.setPassword(PycommunityUtil.md5(user.getPassword()+user.getSalt()));
        user.setType(0);//0表示普通用户
        user.setStatus(0);//0表示没有激活
        user.setActivationCode(PycommunityUtil.generateUUID());
        //nextInt(1001)产生[0,1000]的整数
        user.setHeaderUrl(String.format("http://images.nowcoder.com/head/%dt.png",new Random().nextInt(1001)));
        user.setCreateTime(new Date());

        userMapper.insertUser(user);
        //激活邮件
        Context context = new Context();
        context.setVariable("email",user.getEmail());
        //指定url为http://localhost:8080/项目路径/功能路径/用户id/激活码
        String url = domain + contextPath + "/activation/" + user.getId() + "/" + user.getActivationCode();
        context.setVariable("url", url);
        String process = templateEngine.process("/mail/activation", context);
        mailClient.sendMail(user.getEmail(),"激活账号",process);
        return map;
    }
编写controller,逻辑是注册成功跳转到首页,注册失败回到注册页面,激活成功跳转到登录页面
  @Autowired
    private UserService userService;
  @RequestMapping(path = "/register",method = RequestMethod.POST)
    public String register(Model model, User user) {
        //方法调用前,springmvc会自动实例化Model和User,同时把User注入到Model
        Map<String, Object> map = userService.register(user);
        if(map.isEmpty()) {
            model.addAttribute("msg","您已成功注册,请尽快去邮箱进行激活");
            model.addAttribute("target","/index");
            return "/site/operate-result";
        }else {
            model.addAttribute("usernameMsg",map.get("usernameMsg"));
            model.addAttribute("passwordMsg",map.get("passwordMsg"));
            model.addAttribute("emailMsg",map.get("emailMsg"));
            return "/site/register";
        }
    }
确认密码是前端的逻辑,不用传到后台
如果注册失败回到注册页面,希望在表单项中仍保留有填过的内容,可以用th:value="${user==null?‘’:user.username}"完成
input框的class属性决定了错误信息是否显示
<!-- 内容 -->
<div class="main">
<div class="container pl-5 pr-5 pt-3 pb-3 mt-3 mb-3">
<h3 class="text-center text-info border-bottom pb-3">注 册</h3>
<form class="mt-5" method="post" th:action="@{/register}">
<div class="form-group row">
<label for="username" class="col-sm-2 col-form-label text-right">账号:</label>
<div class="col-sm-10">
<input type="text"
th:class="|form-control ${usernameMsg!=null?'is-invalid':''}|"
id="username" name="username"
th:value="${user==null?'':user.username}"
placeholder="请输入您的账号!" required>
<div class="invalid-feedback" th:text="${usernameMsg}">
该账号已存在!
</div>
</div>
</div>
<div class="form-group row mt-4">
<label for="password" class="col-sm-2 col-form-label text-right">密码:</label>
<div class="col-sm-10">
<input type="password"
th:class="|form-control ${passwordMsg!=null?'is-invalid':''}|"
id="password" name="password"
th:value="${user==null?'':user.password}"
placeholder="请输入您的密码!" required>
<div class="invalid-feedback" th:text="${passwordMsg}">
密码长度不能小于8位!
</div>
</div>
</div>
<div class="form-group row mt-4">
<label for="confirm-password" class="col-sm-2 col-form-label text-right">确认密码:</label>
<div class="col-sm-10">
<input type="password" class="form-control" id="confirm-password"
th:value="${user==null?'':user.password}"
placeholder="请再次输入密码!" required>
<div class="invalid-feedback">
两次输入的密码不一致!
</div>
</div>
</div>
<div class="form-group row">
<label for="email" class="col-sm-2 col-form-label text-right">邮箱:</label>
<div class="col-sm-10">
<input type="email"
th:class="|form-control ${emailMsg!=null?'is-invalid':''}|"
id="email" name="email"
th:value="${user==null?'':user.email}"
placeholder="请输入您的邮箱!" required>
<div class="invalid-feedback" th:text="${emailMsg}">
该邮箱已注册!
</div>
</div>
</div>
<div class="form-group row mt-4">
<div class="col-sm-2"></div>
<div class="col-sm-10 text-center">
<button type="submit" class="btn btn-info text-white form-control">立即注册</button>
</div>
</div>
</form>
</div>
</div>
2.2.3 激活注册账号
点击邮件中的链接,访问服务端的激活服务;
激活的时候可能会出现三种状态:激活成功、激活失败、重复激活,可以把这三种状态写在一个接口中做一个常量声明,方波复用。
public interface PycommunityConstant {
    //激活成功
    int ACTIVATION_SUCCESS = 0;
    //重复激活
    int ACTIVATION_REPEAT = 1;
    //激活失败
    int ACTIVATION_FAILURE = 2;
}
编写service层代码
public int activation(int userId, String code) {
        User user = userMapper.selectById(userId);
        if(user.getStatus() == 1) {
            return ACTIVATION_REPEAT;
        }else if(!user.getActivationCode().equals(code)) {
            return ACTIVATION_FAILURE;
        }else {
            userMapper.updateStatus(userId,1);
            return ACTIVATION_SUCCESS;
        }
    }
编写controller层代码
 @RequestMapping(path = "/activation/{userId}/{code}",method = RequestMethod.GET)
    public String activation(Model model,
                             @PathVariable("userId") int id,
                             @PathVariable("code") String code) {
        int result = userService.activation(id, code);
        if(result == ACTIVATION_SUCCESS) {
            model.addAttribute("msg","激活成功,可以正常使用了");
            model.addAttribute("target","/login");
        }else if(result == ACTIVATION_REPEAT) {
            model.addAttribute("msg","重复激活!");
            model.addAttribute("target","/index");
        }else {
            model.addAttribute("msg","激活失败,提供的激活码不正确");
            model.addAttribute("target","/index");
        }
        return "/site/operate-result";
    }
2.3 开发登录功能
2.3.1 会话管理
http是简单的、可扩展的、无状态、有会话的。
HTTP 是无状态的:在同一个连接中,两个执行成功的请求之间是没有关系的。这就带来了一个问题,用户没有办法在同一个网站中进行连续的交互,比如在一个电商网站里,用户把某个商品加入到购物车,切换一个页面后再次添加了商品,这两次添加商品的请求之间没有关联,浏览器无法知道用户最终选择了哪些商品。而使用 HTTP 的头部扩展,HTTP Cookies 就可以解决这个问题。把 Cookies 添加到头部中,创建一个会话让每次请求都能共享相同的上下文信息,达成相同的状态。
注意,HTTP 本质是无状态的,使用 Cookies 可以创建有状态的会话。
Cookie是服务器发送到用户浏览器并保存在浏览器本地的一小块数据,它会在浏览器下次向同一服务器再发起请求时被携带并发送到服务器上。通常,它用于告知服务端两个请求是否来自同一浏览器,如保持用户的登录状态。Cookie 使基于无状态的 HTTP 协议记录稳定的状态信息成为了可能。但是cookie存在两大致命缺陷:cookie数据保存至浏览器端,安全性不高;每次发送请求会携带cookie数据,长此以往发送的cookie数据越来越多,影响性能。
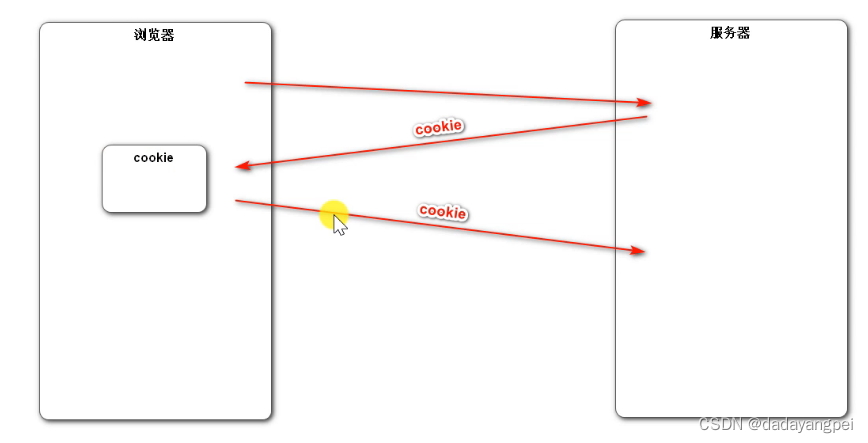
cookie使用步骤:创建cookie、设置cookie生效范围,仅在生效路径及其子路径携带cookie、设置cookie生存时间,默认关闭浏览器cookie消失;
    @GetMapping("/cookie/set")
    @ResponseBody
    public String setCookie(HttpServletResponse response) {
        //创建cookie
        Cookie cookie = new Cookie("code", PycommunityUtil.generateUUID());
        //设置cookie生效范围,仅在生效范围内携带cookie
        cookie.setPath("/pycommunity");
        //设置cookie生存时间,默认关闭浏览器cookie消失
        cookie.setMaxAge(60);
        response.addCookie(cookie);
        return "set cookie";
    }
由于该方法的访问路径是http://localhost:8080/pycommunity/cookie/get,在cookie的生效范围内,因此这次从浏览器发送的请求会携带cookie。@CookieValue(“code”)会获得key是code的cookie数据
   @GetMapping("/cookie/get")
    @ResponseBody
    public String getCookie(@CookieValue("code") String code) {
        System.out.println(code);
        return "get cookie";
    }
session:用于在服务器端记录客户端数据,数据存放在服务器端更安全,但也增加服务器端内存压力。session是依赖cookie的
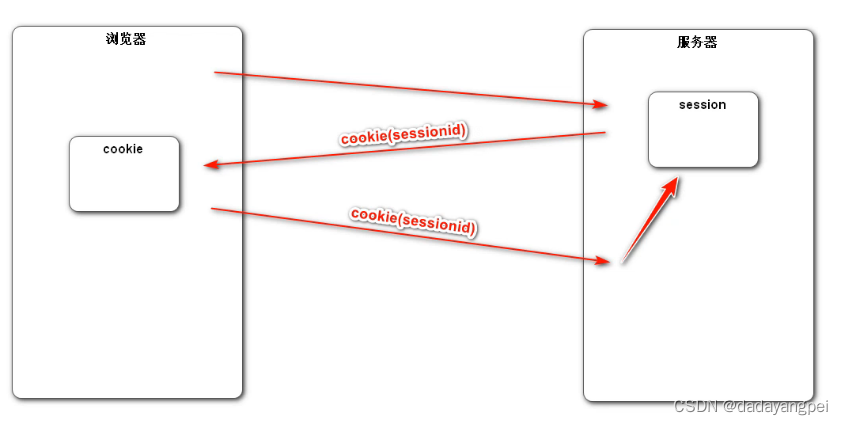
session使用步骤:由springmvc自动创建session;往session中存数据;
    @GetMapping("/session/set")
    @ResponseBody
    public String setSession(HttpSession session) {
        session.setAttribute("id",1);
        session.setAttribute("name","test");
        return "set session";
    }
    @GetMapping("/session/get")
    @ResponseBody
    public String getSession(HttpSession session) {
        System.out.println(session.getAttribute("id"));
        System.out.println(session.getAttribute("name"));
        return "get session";
    }
cookie vs session:
- springmvc可以自动创建session并注入,cookie需要手动创建;
- cookie只能存字符串,session可以存任何类型的数据;
- cookie只能存少量数据,session可以存大量数据;
能用cookie尽量用cookie,减小服务端的压力,如果是单体应用即只部署在一台服务器的应用,session可以随便用,但是现在网站都很大,用户数比较多,采用的都是分布式部署,session逐渐用的越来越少。
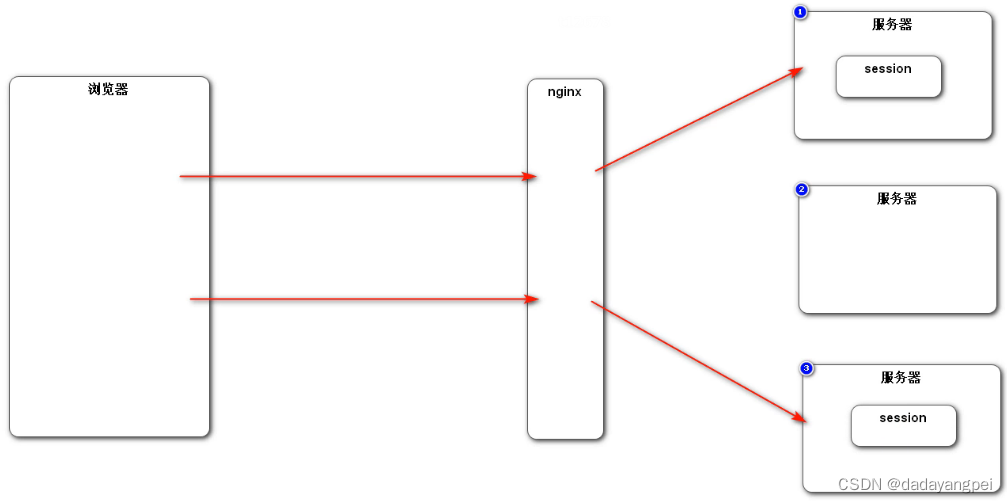
为什么分布式部署使用session会有问题,如何解决这个问题?
第一次请求过来,代理服务器nginx根据负载均衡的策略,将该请求分发给1号服务器处理,1号服务器在本地创建session,并把sessionid返回给浏览器,这时浏览器发送第二次请求时会携带该sessionid,代理服务器nginx根据负载均衡的策略,将该请求分发给3号服务器处理,3号服务器本地没有该sessionid,只能创建一个新的session,第二次请求就获取不了1号服务器session中的内容。
解决方法:粘性session——指将用户锁定到某一个服务器上,用户第一次请求时,负载均衡器将用户的请求转发到了A服务器上,如果负载均衡器设置了粘性Session的话,那么用户以后的每次请求都会转发到A服务器上,相当于把用户和A服务器粘到了一块,但是这样难以保证服务器是负载均衡的;同步session——当某一服务器创建了session后,会把这个session同步给其他服务器,但是同步耗费资源影响性能,而且服务器间产生耦合;共享session——单独搞一台服务器负责存储session,别的服务器向该台服务器获取session,但是万一存储session的服务器崩了,其他服务器也无法正常工作;主流方法是把客户端的身份数据不存到session中去了,能存到cookie中就尽量存在cookie中,不方便存到cookie的敏感数据存到数据库里,传统的关系型数据库是把数据存到硬盘里,从硬盘中读数据比从内存中读数据慢,当并发量大时性能很差,这时就需要用非关系型数据库来解决比如redis
2.3.2 生成验证码
利用kaptcha在服务器端内存生成验证码图片
生成验证码步骤:(1)导入jar包;
<dependency>
    <groupId>com.github.penggle</groupId>
    <artifactId>kaptcha</artifactId>
    <version>2.3.2</version>
</dependency>
(2)编写kaptcha配置类,进行相关配置,将该配置类加载到spring容器中,由spring容器对其进行初始化
@Configuration
public class KaptchaConfig {
    @Bean
    public Producer kaptchaProducer() {
        //config依赖于一个properties对象
        Properties properties = new Properties();
        properties.setProperty("kaptcha.image.width","100");
        properties.setProperty("kaptcha.image.height","40");
        properties.setProperty("kaptcha.textproducer.font.size","32");
        //字符颜色黑色
        properties.setProperty("kaptcha.textproducer.font.color","0,0,0");
        //随机字符的范围
        properties.setProperty("kaptcha.textproducer.char.string","0123456789ABCDEFGHIJKLMNOPQRSTUVWXYZ");
        //生成四个随机字符
        properties.setProperty("kaptcha.textproducer.char.length","4");
        //生成的图片的噪声类是nonoise即不加噪声
        properties.setProperty("kaptcha.noise.impl","com.google.code.kaptcha.impl.NoNoise");
        DefaultKaptcha kaptcha = new DefaultKaptcha();
        //创建config对象,封装配置kaptcha的参数
        Config config = new Config(properties);
        kaptcha.setConfig(config);
        return kaptcha;
    }
}
(3)生成随机字符,根据字符生成图片。在controller中编写相关内容,由于Producer kaptchaProducer由spring容器初始化,这里进行自动注入,验证码文本需要跨请求(进入登录页的请求和点击登录按钮登录的请求)使用,因此将生成的验证码文本保存在session中,方便后续登录使用
private static final Logger logger = LoggerFactory.getLogger(LoginController.class);

@Autowired
private Producer kaptchaProducer;
@RequestMapping(path = "/kaptcha", method = RequestMethod.GET)
public void getKaptcha(HttpSession session, HttpServletResponse response) {
   //生成验证码和图片
   String text = kaptchaProducer.createText();
   BufferedImage image = kaptchaProducer.createImage(text);
   //将验证码存入session
   session.setAttribute("kaptcha",text);
   //把图片输出给浏览器
   response.setContentType("image/png");
   try {
       ServletOutputStream outputStream = response.getOutputStream();
       ImageIO.write(image,"png",outputStream);
   } catch (IOException e) {
       logger.error("响应验证码失败" + e.getMessage());
   }
}

 @GetMapping("/login")
    public String getLoginPage() {
        return "/site/login";
    }
(4)修改login.html中的相关内容,编写js代码,实现点击刷新验证码,验证码自动刷新。
由于每个文件都引用了/js/global.js文件,为了减少硬编码, CONTEXT_PATH是定义在/js/global.js中的常量,为了使每次点击刷新验证码的路径变化,给路径加上随机参数p,p没有任何意义只是为了改变路径。
<script>
		function refresh_kaptcha() {
			var path = CONTEXT_PATH +"/kaptcha?p=" + Math.random();
			$("#kaptcha").attr("src",path);
		}
	</script>
2.3.3 开发登录、退出功能
2.3.3.1 登录功能
(1)点击首页顶部区域的登录按钮,可以打开登录页面,之前已经实现
 @GetMapping("/login")
    public String getLoginPage() {
        return "/site/login";
    }
(2)填写账号、密码、验证码进行登录,成功则生成登录凭证,并将其中的ticket发送给客户端,失败则跳转登录页。
登录凭证里包含了用户id等敏感数据这部分数据需要保存到数据库中,status代表凭证的状态,0表示有效,1表示过期,expired表示过期日期。

- 编写登录凭证实体类和数据访问层
实体类:
@Data
@ToString
public class LoginTicket {
    private int id;
    private int userId;
    private String ticket;
    private int status;
    private Date expired;
}
用注解的方式完成数据访问层的编写
@Options(useGeneratedKeys = true, keyProperty = “id”)的作用是将自动生成的主键注入给id
每个sql末尾留一个空格,以免拼接时出错
@Mapper
public interface LoginTicketMapper {
    @Insert({
            "insert into login_ticket(user_id, ticket, status, expired) ",
            "values (#{userId},#{ticket},#{status},#{expired})"
    })
    //声明主键自动生成,并将生成的主键注入给id
    @Options(useGeneratedKeys = true, keyProperty = "id")
    int insertLoginTicket(LoginTicket loginTicket);

    @Select({
            "select id,user_id, ticket, status, expired from login_ticket ",
            "where ticket=#{ticket}"
    })
    LoginTicket selectByTicket(String ticket);

    @Update({
            "update login_ticket set status=#{status} where ticket=#{ticket}",
    })
    int updateStatus(String ticket, int status);
}
注解也可以用动态sql,使用动态sql时sql语句要被script标签包裹。
@Update({
            "<script> ",
            "update login_ticket set status=#{status} where ticket=#{ticket}",
            "<if test=\"ticket!=null\"> ",
            "and 1=1 ",
            "</if>",
            "</script>"
    })
    int updateStatus(String ticket, int status);
开发业务层
  public Map<String,Object> login(String username, String password, int expiredSeconds) {
        Map<String,Object> map = new HashMap<>();
        //空值处理
        if(StringUtils.isBlank(username)) {
            map.put("usernameMsg","账号不能为空");
            return map;
        }
        if(StringUtils.isBlank(password)) {
            map.put("password","密码不能为空");
            return map;
        }
        //验证账号
        User user = userMapper.selectByName(username);
        if(user == null) {
            map.put("usernameMsg","该账号不存在");
            return map;
        }
        //验证状态
        if(user.getStatus() == 0) {
            map.put("usernameMsg","该账号未激活");
            return map;
        }
        if(!user.getPassword().equals(PycommunityUtil.md5(password + user.getSalt()))) {
            map.put("passwordMsg","密码错误");
            return map;
        }
        //生成登录凭证
        LoginTicket loginTicket = new LoginTicket();
        loginTicket.setUserId(user.getId());
        loginTicket.setTicket(PycommunityUtil.generateUUID());
        loginTicket.setStatus(0);//o表示有效
        loginTicket.setExpired(new Date(System.currentTimeMillis() + expiredSeconds * 1000));
        loginTicketMapper.insertLoginTicket(loginTicket);
        map.put("ticket",loginTicket.getTicket());
        return map;
    }
编写表现层
/***
     *
     * @param username
     * @param password
     * @param code   网页输入的验证码
     * @param rememberMe 勾选记住我保存时间久一点
     * @param model
     * @param session 从session中取验证码
     * @param response 登录成功了把生成的ticket存到cookie中
     * @return
     */
    @RequestMapping(path = "/login", method = RequestMethod.POST)
    public String login(String username, String password,
                        String code, boolean rememberMe,
                        Model model,HttpSession session,HttpServletResponse response) {
        //springmvc会把实体参数自动存进model,但是字符串和基本类型不会自动存,字符串和基本类型存在于request域
        //检查验证码
        String kaptcha = (String) session.getAttribute("kaptcha");
        if(StringUtils.isBlank(kaptcha) || StringUtils.isBlank(code) || !code.equalsIgnoreCase(kaptcha)) {
            model.addAttribute("codeMsg","验证码错误");
            return "/site/login";
        }
        //检查账号密码
        int expiredSeconds = rememberMe ? REMEMBER_EXPIRED_SECONDS : DEFAULT_EXPIRED_SECONDS;
        Map<String, Object> map = userService.login(username, password, expiredSeconds);
        if(map.containsKey("ticket")) {
            String ticket = (String) map.get("ticket");
            Cookie cookie = new Cookie("ticket",ticket);
            cookie.setPath(contextPath);
            cookie.setMaxAge(expiredSeconds);
            response.addCookie(cookie);
            return "redirect:/index";
        }else {
            model.addAttribute("usernameMsg",map.get("usernameMsg"));
            model.addAttribute("passwordMsg",map.get("passwordMsg"));
            return "/site/login";
        }
    }
补充规则
下面的的代码springmvc会自动把实体参数例如user对象存进model,但是字符串和基本类型不会自动存,字符串和基本类型存在于request域。存进model的参数在用thymeleaf的页面中通过${user.username}取对应的属性,存进request域中的属性通过${param.username}取对应的属性。
@RequestMapping(path = "/login", method = RequestMethod.POST)
    public String login(String username, String password,
                        String code, boolean rememberMe,
                        Model model,HttpSession session,HttpServletResponse response) {}
2.3.3.2 退出功能
点击退出,将登录凭证改为失效状态,跳回首页
(1)编写业务层
public void logout(String ticket) {
        loginTicketMapper.updateStatus(ticket,1);
    }
(2)编写表现层,这里最后重定向到了首页,由于重定向是二次请求,所以必须通过controller来访问templates下的html
@RequestMapping(path = "/logout",method = RequestMethod.GET)
    public String logout(@CookieValue("ticket") String ticket) {
        userService.logout(ticket);
        return "redirect:/login";//重定向是二次请求,必须通过controller来访问templates下的html
    }
2.3.2.3 忘记密码功能
开发忘记密码的功能:
点击登录页面上的“忘记密码”链接,打开忘记密码页面。
在表单中输入注册的邮箱,点击获取验证码按钮,服务器为该邮箱发送一份验证码。
在表单中填写收到的验证码及新密码,点击重置密码,服务器对密码进行修改。
这个功能可以拆解为两个请求:其一是在输入邮箱后,点击获取验证码按钮,发送请求,完成给邮箱发送验证码的工作;其二是在输入从邮箱中获取的验证码后,点击重置密码按钮,发送请求,完成密码的重置工作。
先完成第一个请求:
(1)先把login.html中的获取验证码的路径改成请求路径,并把mail/forget.html以及site/forget.html中引入thymeleaf模板引擎,修改js和css的相对路径。
(2)编写业务层,具体是方法传入email参数,返回包含错误信息的map集合。首先对邮箱进行判断,邮箱不能为空,其次通过邮箱查到user对象,如果user对象为空则说明邮箱不存在,如果user的status属性为0说明账号未激活,接着给邮箱发送邮件,同时将发给邮箱的验证码和验证码过期时间存在map中。
 public Map<String,Object> getForgetActivationCode(String email) {
        Map<String,Object> map = new HashMap<>();
        if(StringUtils.isBlank(email)) {
            map.put("emailMsg","邮箱不能为空");
            return map;
        }
        User user = userMapper.selectByEmail(email);
        if(user == null) {
            map.put("emailMsg","邮箱未注册");
            return map;
        }
        if(user.getStatus() == 0) {
            map.put("emailMsg","账号未激活");
            return map;
        }
        Context context = new Context();
        context.setVariable("email",email);
        String forgetActivationCode = PycommunityUtil.generateUUID().substring(0,5);
        context.setVariable("forgetActivationCode",forgetActivationCode);
        String process = templateEngine.process("/mail/forget", context);
        mailClient.sendMail(email,"忘记密码",process);
        map.put("forgetActivationCode",forgetActivationCode);//map中存放一份,为了之后和用户输入的验证码进行对比
        map.put("expirationTime", LocalDateTime.now().plusMinutes(5L));//过期时间
        return map;
    }
(3)然后编写视图层controller,调用业务层的方法,如果返回的map包含emailMsg,说明邮箱存在问题,否则从map中获取验证码和过期时间保存在session中,最后返回/site/forget
 @RequestMapping(path = "/getForgetActivationCode",method = RequestMethod.GET)
    public String getForgetActivationCode(String email, HttpSession session, Model model) {
        Map<String, Object> map = userService.getForgetActivationCode(email);
        if(map.containsKey("emailMsg")) {
            model.addAttribute("emailMsg",map.get("emailMsg"));
        }else {
            session.setAttribute("forgetActivationCode",map.get("forgetActivationCode"));
            session.setAttribute("expirationTime",map.get("expirationTime"));
        }
        return "/site/forget";
    }
(4)编写/site/forget中点击获取验证码的方法,这里是前端部分,从别的博客抄的。
<a href="#" th:onclick="get_code()" class="btn btn-info form-control">获取验证码</a>


<script>
		function get_code() {
			var email = $("#your-email").val();	//获取input框内的值;
			if (email == null || email == ""){
				alert("邮箱未填写!");	//如果值为空,提示用户填写
				return;
			}else{
				// 点击该超链接会发送请求给浏览器
				window.location.href = CONTEXT_PATH + "/getForgetActivationCode?email=" + email;
			}
		}
	</script>
在前一个请求的基础上,如果邮箱没有问题,则点击获取验证码,就会跳转到/site/forget,(其实点击忘记密码后就已经跳到了/site/forget),然后从邮箱中读取验证码,并将验证码和新的密码填写在对应的位置,之后编写第二个请求:
(1)先编写业务层,这里就是页面传来了邮箱和密码,进行更新密码即可。(判断验证码正确与否的逻辑放在了controller层)
方法返回的也是map,map中记录了密码错误的信息。其实这一步我认为完全可以放到controller层统一处理,但是还是这样做了。
public Map<String,Object> forget(String email, String password) {
        Map<String,Object> map = new HashMap<>();
        if(StringUtils.isBlank(password)) {
            map.put("passwordMsg","密码不能为空");
            return map;
        }
        User user = userMapper.selectByEmail(email);
        userMapper.updatePassword(user.getId(),PycommunityUtil.md5(password+user.getSalt()));
        return map;
    }
(2)再编写视图层controller,这里要从session域中取验证码和过期时间进行判断,对页面传来的验证码是否为空进行判断,对验证码是否正确进行判断,对是否超期进行判断,如果验证码没有问题,则调用业务层的方法,对其返回值进行判断,如果返回的map集合不为空说明密码错误,则返回/site/forget,否则说明没有问题,返回结果处理的页面。
@RequestMapping(path = "/forget",method = RequestMethod.POST)
    public String forget(HttpSession session, Model model,
                         String email, String verifycode, String password) {
        if(verifycode == null) {
            model.addAttribute("verifycodeMsg","验证码不能为空");
            return "/site/forget";
        }
        if(!verifycode.equalsIgnoreCase((String) session.getAttribute("forgetActivationCode"))) {
            model.addAttribute("verifycodeMsg","验证码错误");
            return "/site/forget";
        }
        if (LocalDateTime.now().isAfter((LocalDateTime) session.getAttribute("expirationTime"))) {
            model.addAttribute("verifycodeMsg", "验证码已过期,请重新获取验证码!");
            return "/site/forget";
        }
        Map<String, Object> map = userService.forget(email, password);
        if(map.size() == 0) {
            model.addAttribute("msg","忘记密码已经成功修改");
            model.addAttribute("target","/login");
            return "/site/operate-result";
        }else {
            model.addAttribute("passwordMsg",map.get("passwordMsg"));
            return "/site/forget";
        }
    }
总结:总体看下来,这个功能实现并不困难,主要是前端部分的代码实在是不会。
2.3.4 开发显示登录信息功能
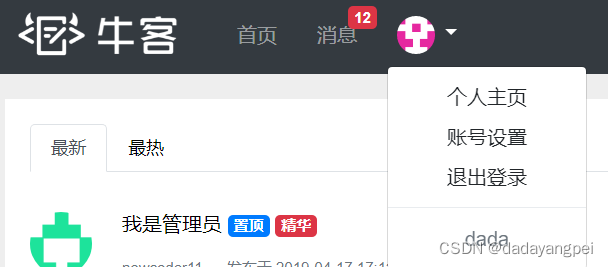
根据用户的登录情况,调整头部显示的内容。如果用户没有登录,在页面头部显示登录、注册;如果用户已经登录,则显示消息和用户信息,可以使用拦截器完成。
未登录时头部如下
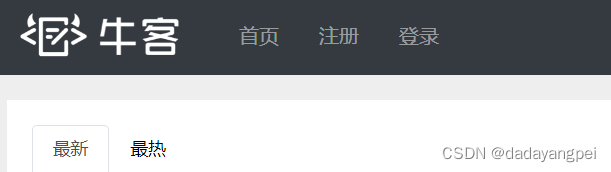
登陆后头部如下
2.3.4.1 拦截器的使用
定义拦截器类,实现HandlerInterceptor接口;
拦截器处理的是请求也属于表现层的代码,因此可以放在controller包下
@Component
public class AlaphaInterceptor implements HandlerInterceptor {
    //在controller执行之前执行
    @Override
    public boolean preHandle(HttpServletRequest request, HttpServletResponse response, Object handler) throws Exception {
        return true;//true后面才会执行,false就不执行后面的请求了
    }
    //在controller执行之后模板引擎之前执行
    @Override
    public void postHandle(HttpServletRequest request, HttpServletResponse response, Object handler, ModelAndView modelAndView) throws Exception {

    }
    //在模板引擎之后执行
    @Override
    public void afterCompletion(HttpServletRequest request, HttpServletResponse response, Object handler, Exception ex) throws Exception {

    }
配置拦截器拦截、排除的路径。用配置类进行配置,一般配置类是用于把第三方的bean放到spring容器。
@Configuration
public class WebMvcConfig implements WebMvcConfigurer {
    @Autowired
    private AlaphaInterceptor alaphaInterceptor;

    @Override
    public void addInterceptors(InterceptorRegistry registry) {
        registry.addInterceptor(alaphaInterceptor)
        .excludePathPatterns("/**/*.css","/**/*.png","/js/*.js","/**/*.jpg","/**/*.jpeg")//表示排除静态资源
        .addPathPatterns("/index");//只拦截/index
        // **表示任意级目录
        //以上配置只拦截/index
    }
}
2.3.4.2 使用拦截器显示登录信息
功能描述:
- 在请求开始时查询登录用户;
- 在本次请求中持有用户数据;
- 在视图中显示用户数据;
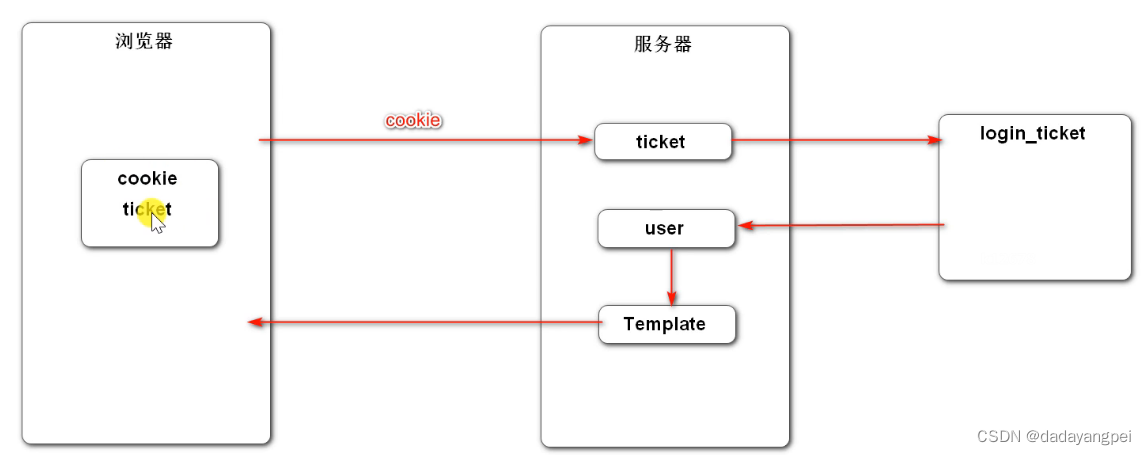
- 在请求结束时清理用户数据;
具体逻辑如下图,登录成功后浏览器的cookie里存有ticket数据,利用ticket数据可以在服务器查到用户数据,将用户数据存到model中便可以在模板引擎中使用。由于每次请求模板上都要显示登录信息,这套逻辑是要反复实现的,因此应该由拦截器处理。
(1)实现拦截器的编写
在preHandle方法中查询cookie中的ticket数据,这里封装了从request中取cookie的逻辑,方便复用。
public class CookieUtil {
    public static String getValue(HttpServletRequest request, String name) {
        if(request == null || name == null) {
            throw new IllegalArgumentException("参数为空");
        }
        Cookie[] cookies = request.getCookies();
        for(Cookie cookie : cookies) {
            if(name.equals(cookie.getName())) {
                return cookie.getValue();
            }
        }
        return null;
    }
}
然后根据ticket数据查询登录凭证loginticket,判断登录凭证是否有效,有效的话根据登录凭证查询用户数据。最后在本次请求中持有用户数据,通过封装HostHolder用于在线程隔离的前提下持有数据。
@Component
public class LoginTicketInterceptor implements HandlerInterceptor {
    @Autowired
    private UserService userService;
    @Autowired
    private HostHolder hostHolder;
    @Override
    public boolean preHandle(HttpServletRequest request, HttpServletResponse response, Object handler) throws Exception {
        String ticket = CookieUtil.getValue(request, "ticket");
        if(ticket != null) {
            //查询凭证
            LoginTicket loginTicket = userService.findLoginTicket(ticket);
            //检查凭证是否有效
            if(loginTicket != null && loginTicket.getStatus() == 0 && loginTicket.getExpired().after(new Date())) {
                User user = userService.findUserById(loginTicket.getUserId());
                //在本次请求中持有数据
                hostHolder.setUser(user);
            }

        }
        return true;
    }

    @Override
    public void postHandle(HttpServletRequest request, HttpServletResponse response, Object handler, ModelAndView modelAndView) throws Exception {
        User user = hostHolder.getUser();
        if(user != null && modelAndView != null) {
            modelAndView.addObject("loginUser",user);
        }
    }

    @Override
    public void afterCompletion(HttpServletRequest request, HttpServletResponse response, Object handler, Exception ex) throws Exception {
        hostHolder.clear();
    }
}
一个服务器能处理来自多个浏览器的请求,是并发的,每个浏览器访问服务器,服务器会创建一个线程来解决请求,服务器处理请求是一个多线程的环境,在多线程环境下存数据需要满足每个线程单独存一份且不会相互干扰即线程隔离,因此使用ThreadLocal来完成。
@Component
//持有用户用于代替session对象
public class HostHolder {
    private ThreadLocal<User> threadLocal = new ThreadLocal<>();
    public void setUser(User user) {
        threadLocal.set(user);
    }
    public User getUser() {
        return threadLocal.get();
    }
    //请求结束后清理threadLocal中的user
    public void clear() {
        threadLocal.remove();
    }
}
在postHandle方法中将用户数据存到model中方便模板引擎使用,在afterCompletion方法中清除用户数据。
2.3.5 开发账号设置功能
账号设置功能描述:上传头像,修改密码
2.3.5.1 上传头像
上传头像就是上传文件,需要注意以下三点:请求必须是post请求;增加表单的enctype属性设置,enctype=“multipart/form-data”;springmvc通过MultipartFile接收并处理上传文件。
(1)访问账号设置页面。编写controller层代码,修改/site/setting.html页面;
@RequestMapping(path = "/setting", method = RequestMethod.GET)
    public String getSettingPage() {
        return "/site/setting";
    }
(2)上传头像,首先在配置文件中配置文件保存在哪个路径,
#配置上传文件保存路径
pycommunity.path.upload=d:/upload
然后编写service层代码,根据userId更新用户头像路径
 public int updateHeader(int userId, String headerUrl) {
        return userMapper.updateHeader(userId, headerUrl);
    }
之后编写controller层代码,注入域名、项目路径、文件存放路径,编写上传头像的方法,如果上传失败,返回账号设置页,否则生成文件名,并将文件保存至存放路径,更新用户的headerUrl属性,最后重定向到首页。
    @Value("${pycommunity.path.upload}")
    private String uploadPath;

    @Value("${pycommunity.path.domain}")
    private String domain;

    @Value("${server.servlet.context-path}")
    private String contextPath;

@RequestMapping(path = "/upload", method = RequestMethod.POST)
    public String uploadHeader(MultipartFile headerImg, Model model) {
        if(headerImg == null) {
            model.addAttribute("error","尚未选择图片");
            return "/site/setting";
        }
        String fileName = headerImg.getOriginalFilename();
        String suffix = fileName.substring(fileName.lastIndexOf("."));
        if(StringUtils.isBlank(suffix)) {
            model.addAttribute("error","文件格式不正确");
            return "/site/setting";
        }
        //生成随机文件名
        fileName = PycommunityUtil.generateUUID() + suffix;
        //确定文件存放路径
        File file = new File(uploadPath + "/" + fileName);
        try {
        	//保存文件
            headerImg.transferTo(file);
        } catch (IOException e) {
            logger.error("文件上传失败:" + e.getMessage());
            throw new RuntimeException("文件上传失败",e);
        }
        //更新用户头像路径(web访问路径)
        //http://localhost:8080/pycommunity/user/header/xxx.xx
        User user = hostHolder.getUser();
        String url = domain + "/" + contextPath + "/user/header/" + fileName;
        userService.updateHeader(user.getId(),url);
        //重定向到首页
        return "redirect:/index";
    }
(3)获取头像。在controller层编写如下代码用于获取头像,上一步中已经把数据库中用户的headerUrl改变,原始的headerUrl是http://images.nowcoder.com/head/11t.png,访问的是牛客的服务器,现在变成了http://localhost:8080/pycommunity/user/header/xxx.xx,需要写一个方法用于处理该请求
    @RequestMapping(path = "/header/{fileName}", method = RequestMethod.GET)
    public void getHeader(@PathVariable("fileName") String fileName, HttpServletResponse response) {
        //服务器存放的路径
        fileName = uploadPath + "/" + fileName;
        //向浏览器输出图片,声明输出的文件的格式
        String suffix = fileName.substring(fileName.lastIndexOf(".") + 1);
        response.setContentType("image/" + suffix);
        try(
                OutputStream outputStream = response.getOutputStream();
                FileInputStream fis = new FileInputStream(fileName);
                ) {

            byte[] buffer = new byte[1024];
            int b = 0;
            while((b = fis.read(buffer)) != -1) {
                outputStream.write(buffer,0,b);
            }
        } catch (IOException e) {
            logger.error("读取头像失败" + e.getMessage());
        }
    }
2.3.5.2 修改密码
业务层代码如下
public int updatePassword(int userId, String password) {
        return userMapper.updatePassword(userId,password);
    }
视图层代码如下,必须使用重定向才能从一个请求跳转到另一个请求。
  @RequestMapping(path = "/updatePassword",method = RequestMethod.POST)
    public String updatePassword(Model model, String oldPassword, String newPassword, String checkNewPassword) {
        if(oldPassword == null) {
            model.addAttribute("oldPasswordError","原始密码不能为空");
            return "/site/setting";
        }
        User user = hostHolder.getUser();
        if(!user.getPassword().equals(PycommunityUtil.md5(oldPassword+user.getSalt()))) {
            model.addAttribute("oldPasswordError","原始密码不正确");
            return "/site/setting";
        }
        if(newPassword == null) {
            model.addAttribute("newPasswordError","新密码不能为空");
            return "/site/setting";
        }
        if(!newPassword.equals(checkNewPassword)) {
            model.addAttribute("checkNewPasswordError","两次密码不一致");
            return "/site/setting";
        }
        newPassword = PycommunityUtil.md5(newPassword + user.getSalt());
        userService.updatePassword(user.getId(),newPassword);
        return "redirect:/logout";
    }
2.3.6 检查登录状态
在没有登录时,不能访问一些网站,例如,未登录时不能访问账号设置页面。可以使用拦截器完成。
这里写的拦截器不通过配置类配置拦截路径而是通过在要被拦截的方法上加注解完成,因此需要自定义注解。
拦截器结合自定义注解使用步骤如下:
(1)自定义注解,需要使用元注解定义自己的注解,常用的元注解有@Target(声明自定义的注解可以作用在哪个类型上)、@Retention(声明自定义注解生效的时间)、@Document(声明自定义的注解在生成文档时要不要把该自定义注解带上)、@Inherited(用于继承),读取注解用Method.getDeclaredAnnotations返回该元素上直接存在的所有注解和method.getannotation返回指定类型的注解。
@Target(ElementType.METHOD)//声明注解作用的位置是方法上
@Retention(RetentionPolicy.RUNTIME)//声明注解生效的时间是程序运行时
public @interface LoginRequired {
}
(2)使用注解,在想要拦截的方法上使用注解
 @LoginRequired
 @RequestMapping(path = "/setting", method = RequestMethod.GET)
 public String getSettingPage() {
     return "/site/setting";
 }
 @LoginRequired
 @RequestMapping(path = "/upload", method = RequestMethod.POST)
(3)创建拦截器,通过反射技术 method.getAnnotation获得方法上标注的特定注解
@Component
public class LoginRequiredInterceptor implements HandlerInterceptor {
    @Autowired
    private HostHolder hostHolder;
    @Override
    public boolean preHandle(HttpServletRequest request, HttpServletResponse response, Object handler) throws Exception {
        if(handler instanceof HandlerMethod) {//判断拦截到的是不是方法类型
            handler = (HandlerMethod)handler;
            Method method = ((HandlerMethod) handler).getMethod();
            LoginRequired annotation = method.getAnnotation(LoginRequired.class);
            if(annotation != null && hostHolder.getUser() == null) {
                response.sendRedirect(request.getContextPath() + "/login");
                return false;
            }
        }
        return true;
    }
}
(4)为了进一步提升运行效率,配置拦截路径排除静态资源,拦截器的注册顺序决定了执行的先后顺序
@Configuration
public class WebMvcConfig implements WebMvcConfigurer {
    @Autowired
    private LoginTicketInterceptor loginTicketInterceptor;
    @Autowired
    private LoginRequiredInterceptor loginRequiredInterceptor;
    @Override
    public void addInterceptors(InterceptorRegistry registry) {
        registry.addInterceptor(loginTicketInterceptor)
        .excludePathPatterns("/**/*.css","/**/*.png","/js/*.js","/**/*.jpg","/**/*.jpeg");
        // **表示任意级目录
        registry.addInterceptor(loginRequiredInterceptor)
                .excludePathPatterns("/**/*.css","/**/*.png","/js/*.js","/**/*.jpg","/**/*.jpeg");
        //注册顺序决定了执行先后顺序
    }
}


 371
371


 被折叠的 条评论
为什么被折叠?
被折叠的 条评论
为什么被折叠?
 到【灌水乐园】发言


