


文章列表查询
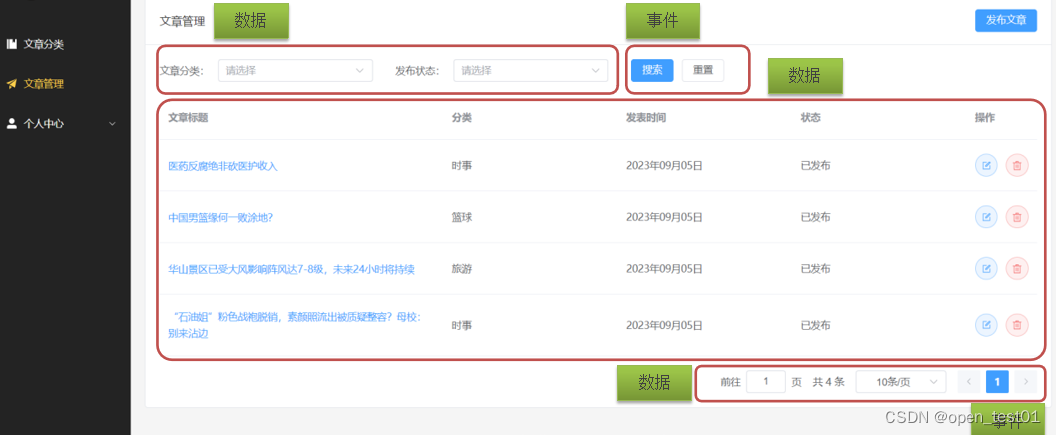
页面主体结构
在ArticleManage.vue 文件中编写文章列表页面组件

<script setup>
import {
    Edit,
    Delete
} from '@element-plus/icons-vue'

import { ref } from 'vue'

//文章分类数据模型
const categorys = ref([
    {
        "id": 3,
        "categoryName": "美食",
        "categoryAlias": "my",
        "createTime": "2023-09-02 12:06:59",
        "updateTime": "2023-09-02 12:06:59"
    },
    {
        "id": 4,
        "categoryName": "娱乐",
        "categoryAlias": "yl",
        "createTime": "2023-09-02 12:08:16",
        "updateTime": "2023-09-02 12:08:16"
    },
    {
        "id": 5,
        "categoryName": "军事",
        "categoryAlias": "js",
        "createTime": "2023-09-02 12:08:33",
        "updateTime": "2023-09-02 12:08:33"
    }
])

//用户搜索时选中的分类id
const categoryId=ref('')

//用户搜索时选中的发布状态
const state=ref('')

//文章列表数据模型
const articles = ref([
    {
        "id": 5,
        "title": "陕西旅游攻略",
        "content": "兵马俑,华清池,法门寺,华山...爱去哪去哪...",
        "coverImg": "https://big-event-gwd.oss-cn-beijing.aliyuncs.com/9bf1cf5b-1420-4c1b-91ad-e0f4631cbed4.png",
        "state": "草稿",
        "categoryId": 2,
        "createTime": "2023-09-03 11:55:30",
        "updateTime": "2023-09-03 11:55:30"
    },
    {
        "id": 5,
        "title": "陕西旅游攻略",
        "content": "兵马俑,华清池,法门寺,华山...爱去哪去哪...",
        "coverImg": "https://big-event-gwd.oss-cn-beijing.aliyuncs.com/9bf1cf5b-1420-4c1b-91ad-e0f4631cbed4.png",
        "state": "草稿",
        "categoryId": 2,
        "createTime": "2023-09-03 11:55:30",
        "updateTime": "2023-09-03 11:55:30"
    },
])

//分页条数据模型
const pageNum = ref(1)//当前页
const total = ref(20)//总条数
const pageSize = ref(3)//每页条数

//当每页条数发生了变化,调用此函数
const onSizeChange = (size) => {
    pageSize.value = size
}
//当前页码发生变化,调用此函数
const onCurrentChange = (num) => {
    pageNum.value = num
}
</script>
<template>
    <el-card class="page-container">
        <template #header>
            <div class="header">
                <span>文章管理</span>
                <div class="extra">
                    <el-button type="primary">添加文章</el-button>
                </div>
            </div>
        </template>
        <!-- 搜索表单 -->
        <el-form inline>
            <el-form-item label="文章分类:">
                <el-select placeholder="请选择" v-model="categoryId">
                    <el-option
                        v-for="c in categorys"
                        :key="c.id"
                        :label="c.categoryName"
                        :value="c.id">
                    </el-option>
                </el-select>
            </el-form-item>

            <el-form-item label="发布状态:">
                <el-select placeholder="请选择" v-model="state">
                    <el-option label="已发布" value="已发布"></el-option>
                    <el-option label="草稿" value="草稿"></el-option>
                </el-select>
            </el-form-item>
            <el-form-item>
                <el-button type="primary">搜索</el-button>
                <el-button>重置</el-button>
            </el-form-item>
        </el-form>
        <!-- 文章列表 -->
        <el-table :data="articles" style="width: 100%">
            <el-table-column label="文章标题" width="400" prop="title"></el-table-column>
            <el-table-column label="分类" prop="categoryId"></el-table-column>
            <el-table-column label="发表时间" prop="createTime"> </el-table-column>
            <el-table-column label="状态" prop="state"></el-table-column>
            <el-table-column label="操作" width="100">
                <template #default="{ row }">
                    <el-button :icon="Edit" circle plain type="primary"></el-button>
                    <el-button :icon="Delete" circle plain type="danger"></el-button>
                </template>
            </el-table-column>
            <template #empty>
                <el-empty description="没有数据" />
            </template>
        </el-table>
        <!-- 分页条 -->
        <el-pagination v-model:current-page="pageNum" v-model:page-size="pageSize" :page-sizes="[3, 5 ,10, 15]"
            layout="jumper, total, sizes, prev, pager, next" background :total="total" @size-change="onSizeChange"
            @current-change="onCurrentChange" style="margin-top: 20px; justify-content: flex-end" />
    </el-card>
</template>
<style lang="scss" scoped>
.page-container {
    min-height: 100%;
    box-sizing: border-box;

    .header {
        display: flex;
        align-items: center;
        justify-content: space-between;
    }
}
</style>
文章列表数据回显
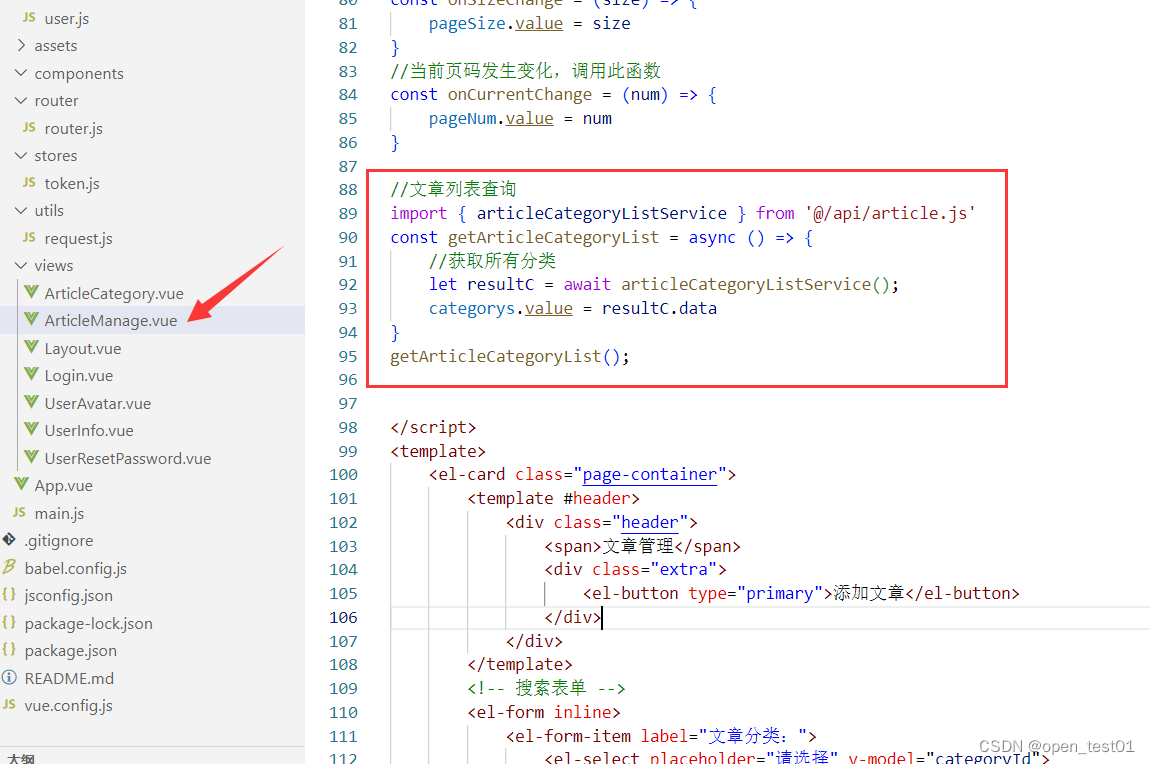
//文章列表查询
import { articleCategoryListService } from '@/api/article.js'
const getArticleCategoryList = async () => {
    //获取所有分类
    let resultC = await articleCategoryListService();
    categorys.value = resultC.data
}
getArticleCategoryList();
接口文档

接口调用
在article.js文件中提供获取文章列表数据的函数

//文章列表查询
export const articleListService = (params) => {
    return request.get('/article', { params: params })
}
在ArticleManage.vue文件中,定义调用接口获取数据的函数

//文章列表查询
import { articleListService } from '@/api/article.js'
const getArticles = async () => {
    let params = {
        pageNum: pageNum.value,
        pageSize: pageSize.value,
        categoryId: categoryId.value ? categoryId.value : null,
        state: state.value ? state.value : null
    }
    let result = await articleListService(params);
    //渲染列表数据
    articles.value = result.data.items
    //渲染总条数
    total.value=result.data.total
    //为列表中添加categoryName属性
    for(let i=0;i<articles.value.length;i++){
        let article = articles.value[i];
        for(let j=0;j<categorys.value.length;j++){
            if(article.categoryId===categorys.value[j].id){
                article.categoryName=categorys.value[j].categoryName
            }
        }
    }

}
getArticles();
在分类列绑定为categoryName
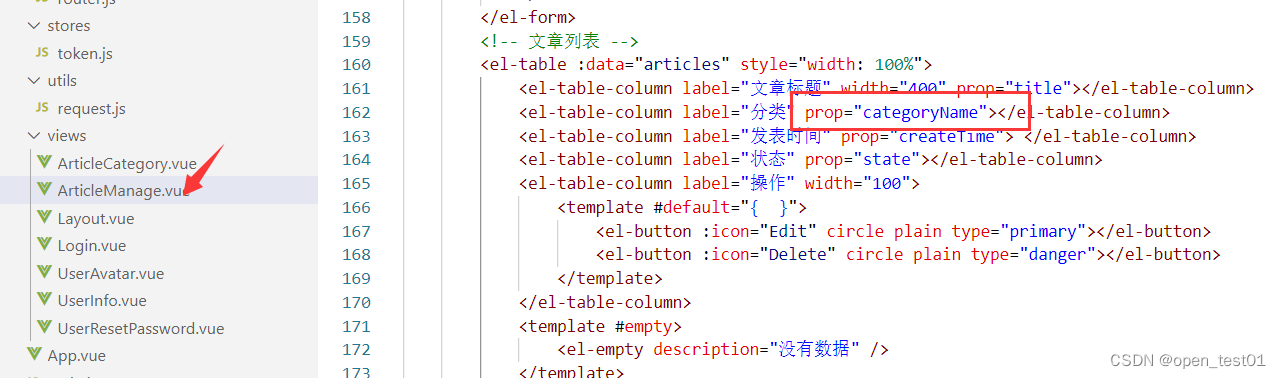
<el-table-column label="分类" prop="categoryName"></el-table-column>保存查看效果

为搜索按钮绑定单击事件,调用getArticles函数即可

<el-button type="primary" @click="getArticles()">搜索</el-button>为重置按钮绑定单击事件,清除categoryId和state的之即可

<el-button @click="categoryId='';state='';getArticles()">重置</el-button>当分页条的当前页和每页条数发生变化,重新发送请求获取数据

//当每页条数发生了变化,调用此函数
const onSizeChange = (size) => {
    pageSize.value = size
    getArticles()

}
//当前页码发生变化,调用此函数
const onCurrentChange = (num) => {
    pageNum.value = num
    getArticles()
}
添加文章列表

添加组件
在ArticleManage.vue文件中添加抽屉组件

import {Plus} from '@element-plus/icons-vue'
//控制抽屉是否显示
const visibleDrawer = ref(false)
//添加表单数据模型
const articleModel = ref({
    title: '',
    categoryId: '',
    coverImg: '',
    content:'',
    state:''
})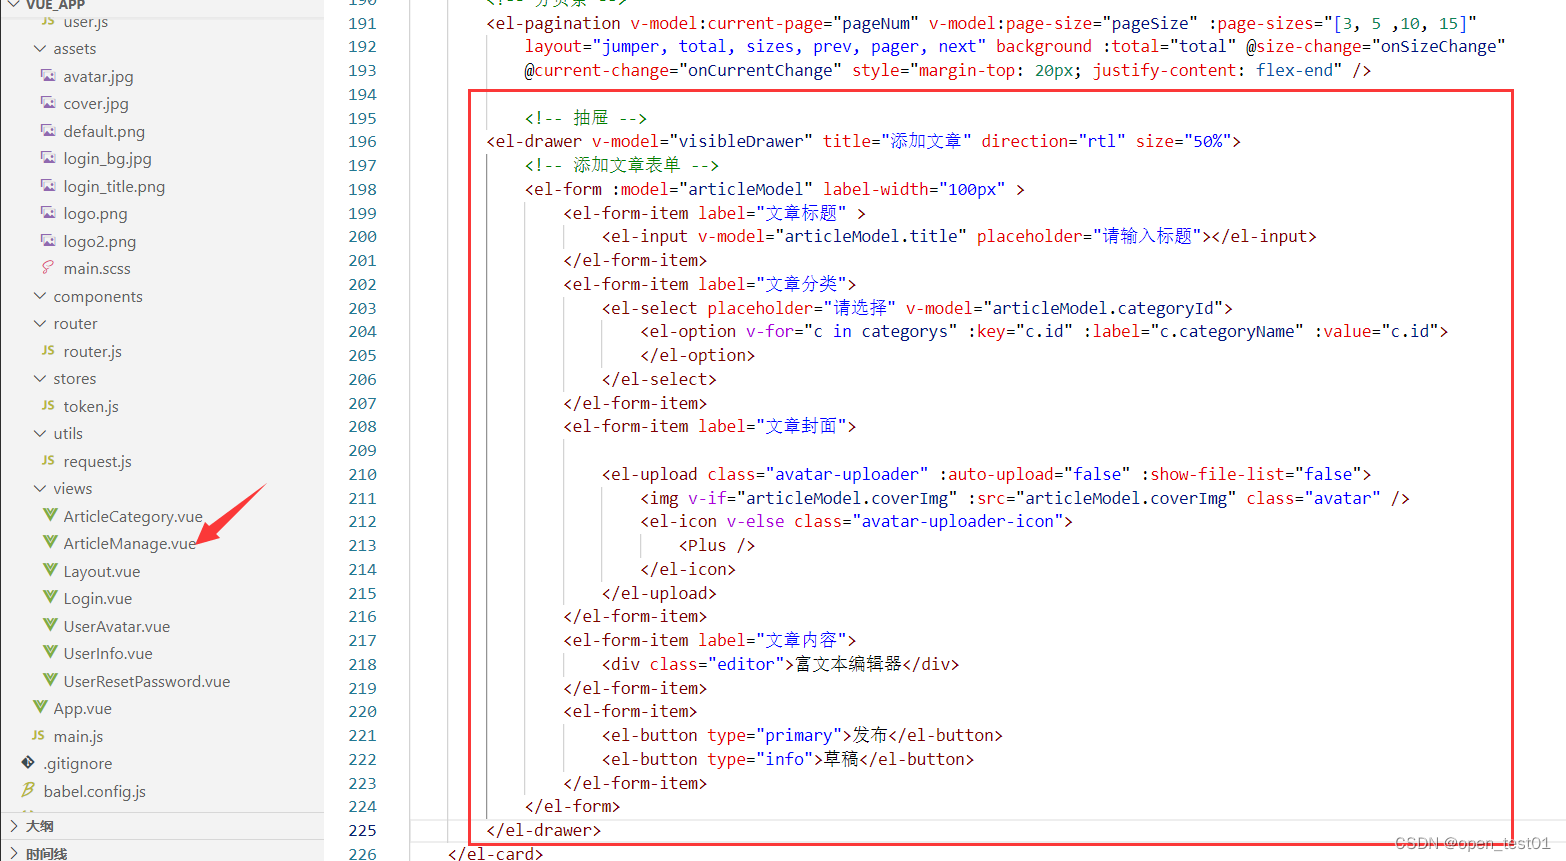
<!-- 抽屉 -->
        <el-drawer v-model="visibleDrawer" title="添加文章" direction="rtl" size="50%">
            <!-- 添加文章表单 -->
            <el-form :model="articleModel" label-width="100px" >
                <el-form-item label="文章标题" >
                    <el-input v-model="articleModel.title" placeholder="请输入标题"></el-input>
                </el-form-item>
                <el-form-item label="文章分类">
                    <el-select placeholder="请选择" v-model="articleModel.categoryId">
                        <el-option v-for="c in categorys" :key="c.id" :label="c.categoryName" :value="c.id">
                        </el-option>
                    </el-select>
                </el-form-item>
                <el-form-item label="文章封面">

                    <el-upload class="avatar-uploader" :auto-upload="false" :show-file-list="false">
                        <img v-if="articleModel.coverImg" :src="articleModel.coverImg" class="avatar" />
                        <el-icon v-else class="avatar-uploader-icon">
                            <Plus />
                        </el-icon>
                    </el-upload>
                </el-form-item>
                <el-form-item label="文章内容">
                    <div class="editor">富文本编辑器</div>
                </el-form-item>
                <el-form-item>
                    <el-button type="primary">发布</el-button>
                    <el-button type="info">草稿</el-button>
                </el-form-item>
            </el-form>
        </el-drawer>
在ArticleManage.vue文件中抽屉组件样式

/* 抽屉样式 */
.avatar-uploader {
    :deep() {
        .avatar {
            width: 178px;
            height: 178px;
            display: block;
        }

        .el-upload {
            border: 1px dashed var(--el-border-color);
            border-radius: 6px;
            cursor: pointer;
            position: relative;
            overflow: hidden;
            transition: var(--el-transition-duration-fast);
        }

        .el-upload:hover {
            border-color: var(--el-color-primary);
        }

        .el-icon.avatar-uploader-icon {
            font-size: 28px;
            color: #8c939d;
            width: 178px;
            height: 178px;
            text-align: center;
        }
    }
}
.editor {
  width: 100%;
  :deep(.ql-editor) {
    min-height: 200px;
  }
}
在添加文章按钮处绑定抽屉显示事件

<el-button type="primary" @click="visibleDrawer = true">添加文章</el-button>富文本编辑器
文章内容需要使用到富文本编辑器,这里咱们使用一个开源的富文本编辑器 Quill
官网: https://vueup.github.io/vue-quill/
在项目目录下安装富文本编辑器

npm install @vueup/vue-quill@latest --save导入组件和样式

import { QuillEditor } from '@vueup/vue-quill'
import '@vueup/vue-quill/dist/vue-quill.snow.css'
在页面中使用quill组件

保存后查看效果

封面图片上传
将来当点击+图标,选择本地图片后,el-upload这个组件会自动发送请求,把图片上传到指定的服务器上,而不需要我们自己使用axios发送异步请求,所以需要给el-upload标签添加一些属性,控制请求的发送
- auto-upload:是否自动上传
- action: 服务器接口路径
- name: 上传的文件字段名
- headers: 设置上传的请求头
- on-success: 上传成功的回调函数
文件上传接口文档


导入token

//导入token
import { useTokenStore } from '@/stores/token.js'
const tokenStore = useTokenStore();
定义上传成功后的回调函数

//上传图片成功回调
const uploadSuccess = (img) => {
    //img就是后台响应的数据,格式为:{code:状态码,message:提示信息,data: 图片的存储地址}
    articleModel.value.coverImg=img.data
    console.log(img.data);
}
设置el-upload标签属性

<el-upload class="avatar-uploader" :auto-upload="true" :show-file-list="false"
action="/api/upload" name = 'file' :headers="{'Authorization':tokenStore.token}" :on-success="uploadSuccess">
练习项目后端使用的是本地文件存储,所以没有用到网络url,传入本地文件地址后端会报如下错误

点击上传由于这里练习项目没有网络服务器 数据是上传到本地的所以浏览器会拦截本地文件加载导致不能造成数据回显,但是目录下是有图片成功上传到的。
后续继续完成项目建议修改src中的值为模拟的固定网络图片url地址:R-C.4bdc8f7f0e0201905fe400fb5156b7c7 (592×362) (bing.net)
<img v-if="articleModel.coverImg" :src="'https://ts1.cn.mm.bing.net/th/id/R-C.4bdc8f7f0e0201905fe400fb5156b7c7?rik=MVFo1SU7cYgFqg&riu=http%3a%2f%2fwww.spasvo.com%2fckfinder%2fuserfiles%2fimages%2f2020061536450116.jpg&ehk=r7Pp%2fX3wIOhP%2fcuW0ITLAHeD0sZPNatsyfpC3XWOM0s%3d&risl=&pid=ImgRaw&r=0'" class="avatar" />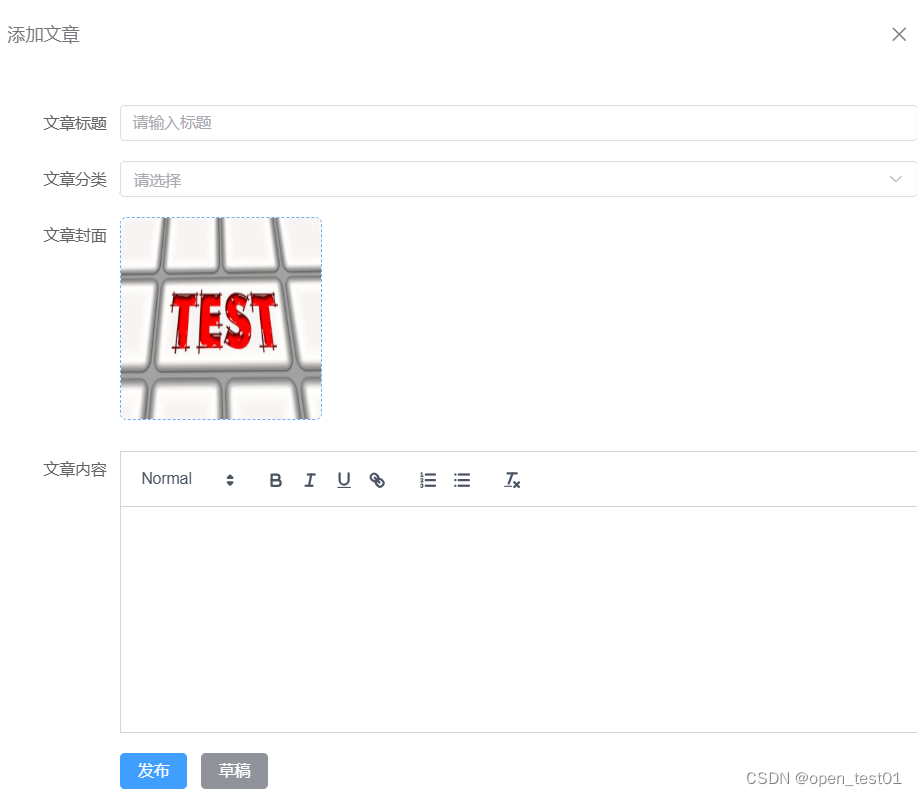
如果自己有网络服务器可以使用网络服务器的图片url
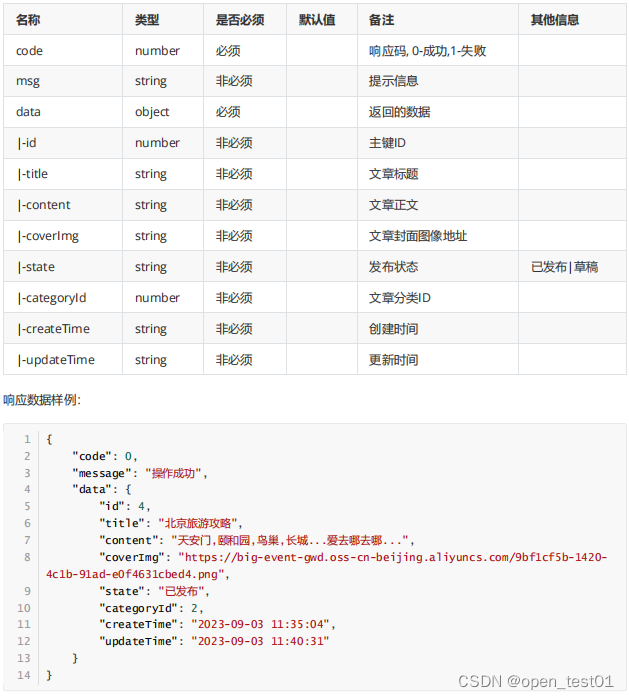
接口文档


接口调用
在article.js文件中提供添加文章列表数据的函数

//添加文章
export const articleAddService = (articleModel)=>{
    return request.post('/article',articleModel)
}
在ArticleManage.vue中提供addArticle函数完成添加文章接口的调用
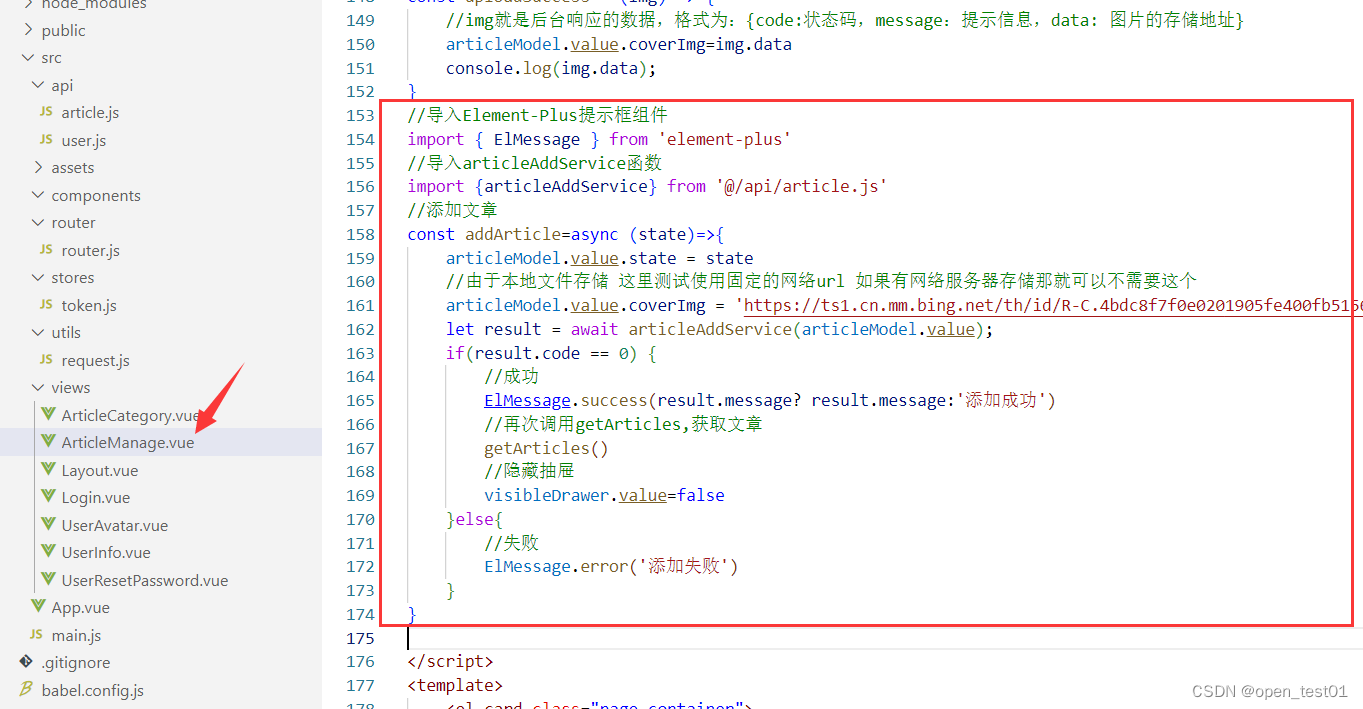
//导入Element-Plus提示框组件
import { ElMessage } from 'element-plus'
//导入articleAddService函数
import {articleAddService} from '@/api/article.js'
//添加文章
const addArticle=async (state)=>{
    articleModel.value.state = state
    //由于本地文件存储 这里测试使用固定的网络url 如果有网络服务器存储那就可以不需要这个
    articleModel.value.coverImg = 'https://ts1.cn.mm.bing.net/th/id/R-C.4bdc8f7f0e0201905fe400fb5156b7c7?rik=MVFo1SU7cYgFqg&riu=http%3a%2f%2fwww.spasvo.com%2fckfinder%2fuserfiles%2fimages%2f2020061536450116.jpg&ehk=r7Pp%2fX3wIOhP%2fcuW0ITLAHeD0sZPNatsyfpC3XWOM0s%3d&risl=&pid=ImgRaw&r=0'
    let result = await articleAddService(articleModel.value);
    if(result.code == 0) {
        //成功
        ElMessage.success(result.message? result.message:'添加成功')
        //再次调用getArticles,获取文章
        getArticles()
        //隐藏抽屉
        visibleDrawer.value=false
    }else{
        //失败
        ElMessage.error('添加失败')
    }
}
给已发布和草稿按钮绑定事件

<el-button type="primary" @click="addArticle('已发布')">发布</el-button>
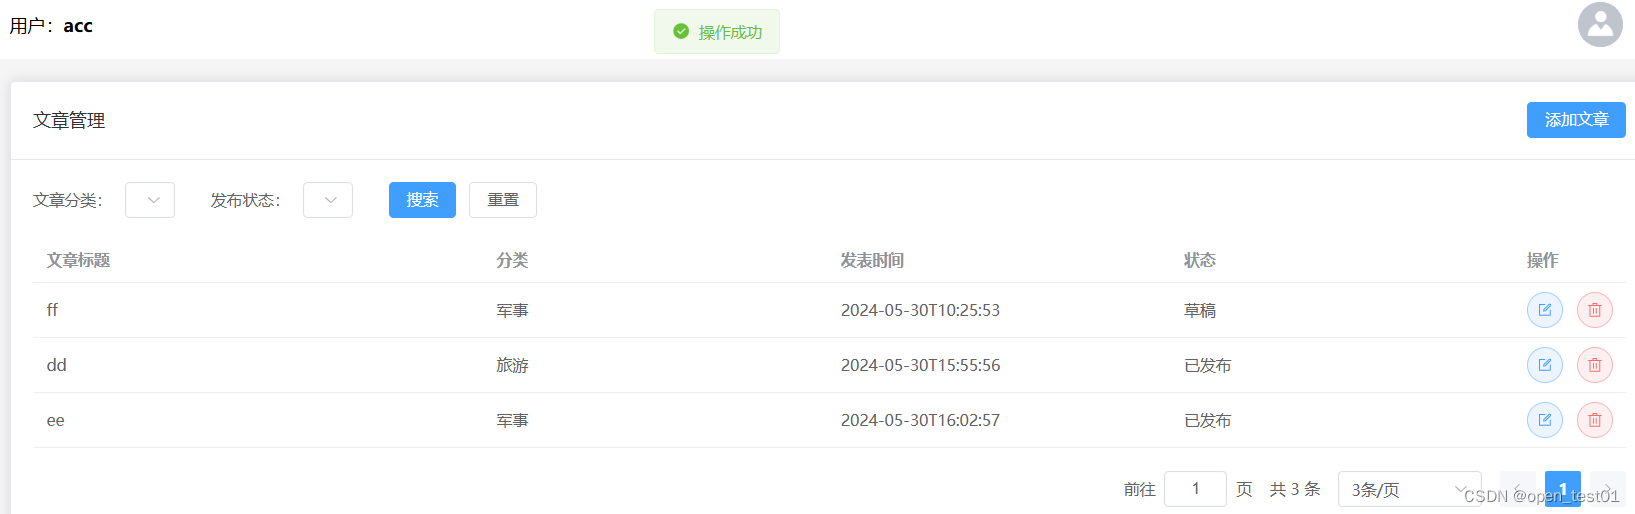
<el-button type="info" @click="addArticle('草稿')">草稿</el-button>保存后发布文章查看已成功发布
编辑文章列表
结构调整
在编辑按钮处添加事件,点击后显示弹框

//定义变量控制弹窗标题
const titles=ref('')
在弹窗标题中绑定变量

<el-drawer v-model="visibleDrawer" :title="titles" direction="rtl" size="50%">在添加文章按钮中赋值给标题变量

<el-button type="primary" @click="visibleDrawer = true;titles='添加文章'" >添加文章</el-button>在编辑按钮中赋值标题变量

<el-button :icon="Edit" circle plain type="primary" @click="visibleDrawer = true;titles='编辑文章'"></el-button>数据回显
定义数据回显函数

//编辑文章回显
const updateCategoryEcho = (row) => {
    titles.value = '编辑文章'
    visibleDrawer.value = true
    //将row中的数据赋值给categoryModel
    articleModel.value.title = row.title
    articleModel.value.categoryId = row.categoryId
    articleModel.value.coverImg = row.coverImg
    articleModel.value.content = row.content
    articleModel.value.state = row.state
    //修改的时候必须传递分类的id,所以扩展一个id属性
    articleModel.value.id=row.id
}
通过插槽的方式得到被点击按钮所在行的数据

<el-button :icon="Edit" circle plain type="primary" @click="updateCategoryEcho(row)"></el-button>保存后点击编辑 文本框回显效果

接口文档

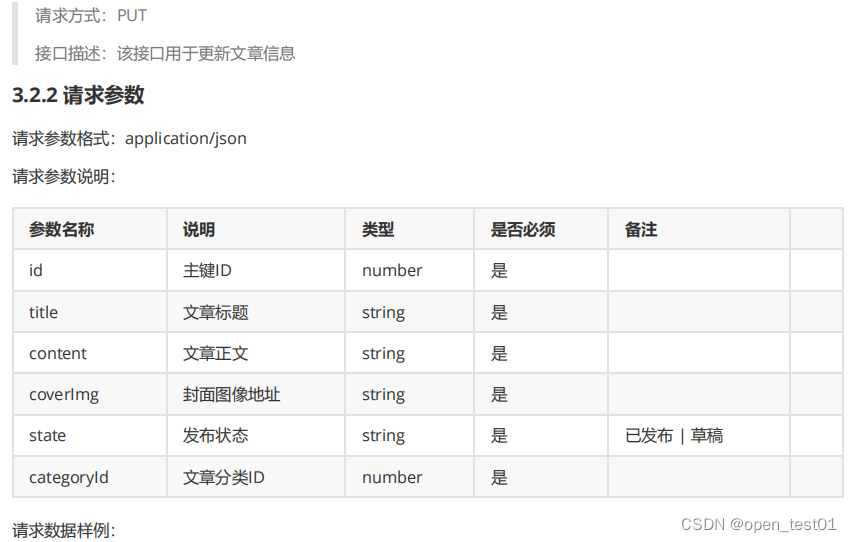


绑定请求数据
在article.js文件中添加请求函数
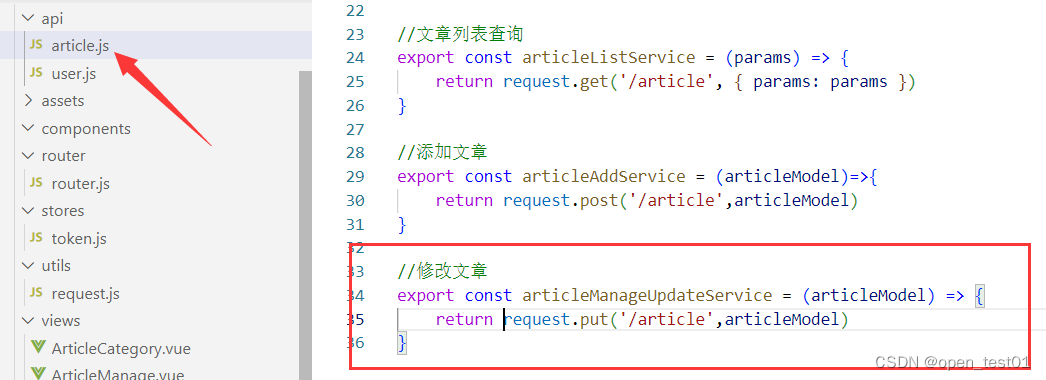
//修改文章
export const articleManageUpdateService = (articleModel) => {
    return request.put('/article',articleModel)
}
在文章列表页面ArticleManage.vue文件中添加修改文章单击事件请求函数

//导入articleManageUpdateService函数
import {articleManageUpdateService} from '@/api/article.js'
//编辑文章
const updateManage = async () => {
    let result = await articleManageUpdateService(articleModel.value)
    if(result.code === 0){
        //成功
        ElMessage.success(result.message ? result.message:'编辑成功')
        //隐藏弹窗
        visibleDrawer.value = false
        //刷新分类列表 再次调用getArticles,获取文章
        getArticles()
    }else{
        //失败
        ElMessage.error('编辑失败')
    }
}
由于现在修改和新增共用了一个数据模型,所以在点击添加分类后,有时候会显示数据,此时可以将categoryModel中的数据清空

//清空模型数据
const clearData = () => {
    visibleDrawer.value = ''
    articleModel.value.title = ''
    articleModel.value.categoryId = ''
    articleModel.value.coverImg = ''
    articleModel.value.content = ''
    articleModel.value.state = ''
}
给添加文章按钮的绑定清空数据回显单击事件
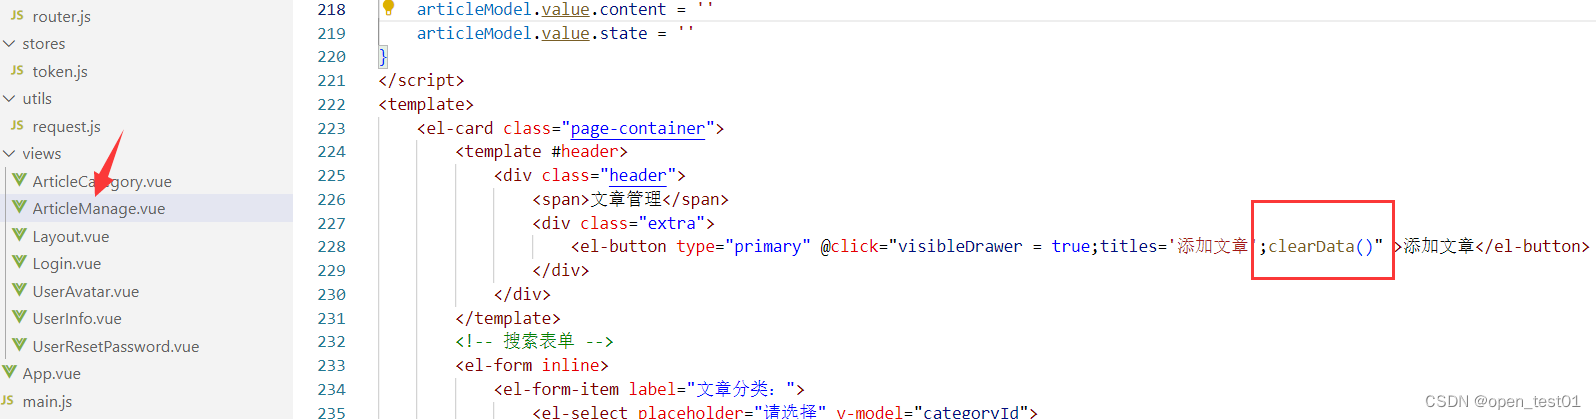
<el-button type="primary" @click="visibleDrawer = true;titles='添加文章';clearData()" >添加文章</el-button>修改发布和草稿按钮的绑定事件
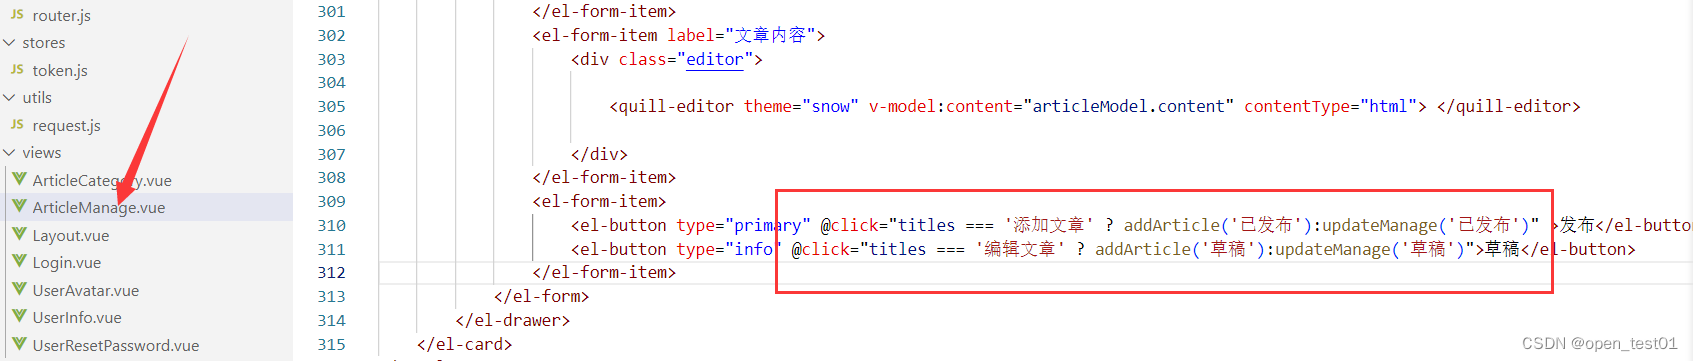
<el-button type="primary" @click="titles === '添加文章' ? addArticle('已发布'):updateManage('已发布')" >发布</el-button>
<el-button type="info" @click="titles === '编辑文章' ? addArticle('草稿'):updateManage('草稿')">草稿</el-button>
保存之后就能完成添加和修改的功能了

删除文章列表
接口文档


绑定请求数据
在article.js文件中添加请求函数

//删除文章
export const articleManageDeleteService = (id) => {
    return request.delete('/article?id='+id)
}
在文章分类页面ArticleManage.vue文件中编写删除文章单击事件请求函数并在函数内部添加提示框组件

//导入element的ElMessageBox提示框组件
import { ElMessageBox } from 'element-plus'
//导入articleManageDeleteService函数
import {articleManageDeleteService} from '@/api/article.js'
//删除分类
const deleteManage = (row) => {
    ElMessageBox.confirm(
        '确认是否删除该分类信息?',
        '提示',
        {
            confirmButtonText: '确认',
            cancelButtonText: '取消',
            type: 'warning',
        }
    )
        .then(async () => {
            //用户点击了确认
            let result = await articleManageDeleteService(row.id)
            ElMessage.success(result.message?result.message:'删除成功')
            //再次调用getAllCategory,获取所有文章分类
            getArticles()
        })
        .catch(() => {
            //用户点击了取消
            ElMessage({
                type: 'info',
                message: '取消删除',
            })
        })
}
在删除图标按钮处绑定该点击事件函数

<el-button :icon="Delete" circle plain type="danger" @click="deleteManage(row)"></el-button>保存后即可正常删除文章


 839
839


 被折叠的 条评论
为什么被折叠?
被折叠的 条评论
为什么被折叠?
 到【灌水乐园】发言


