


Mybatis实例应用
1、新建空项目
打开软件,点击“Empty Project”。
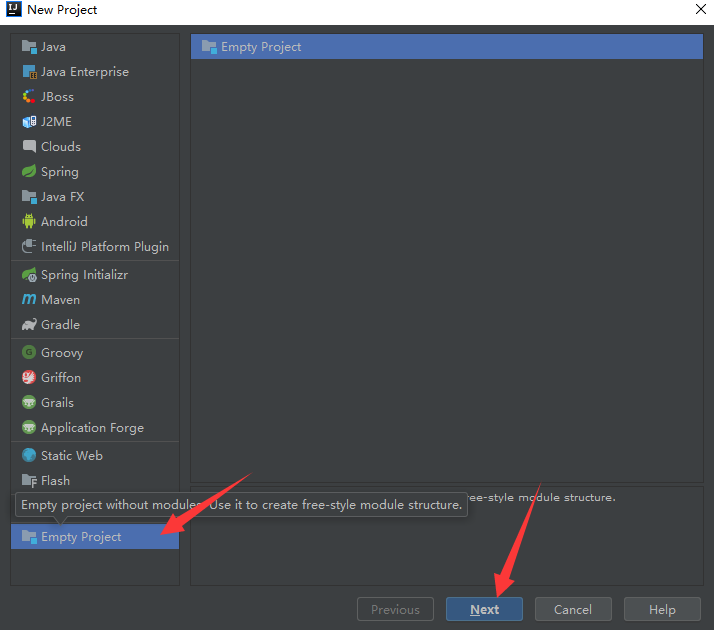
项目命名任意,例如我的是“day003”。
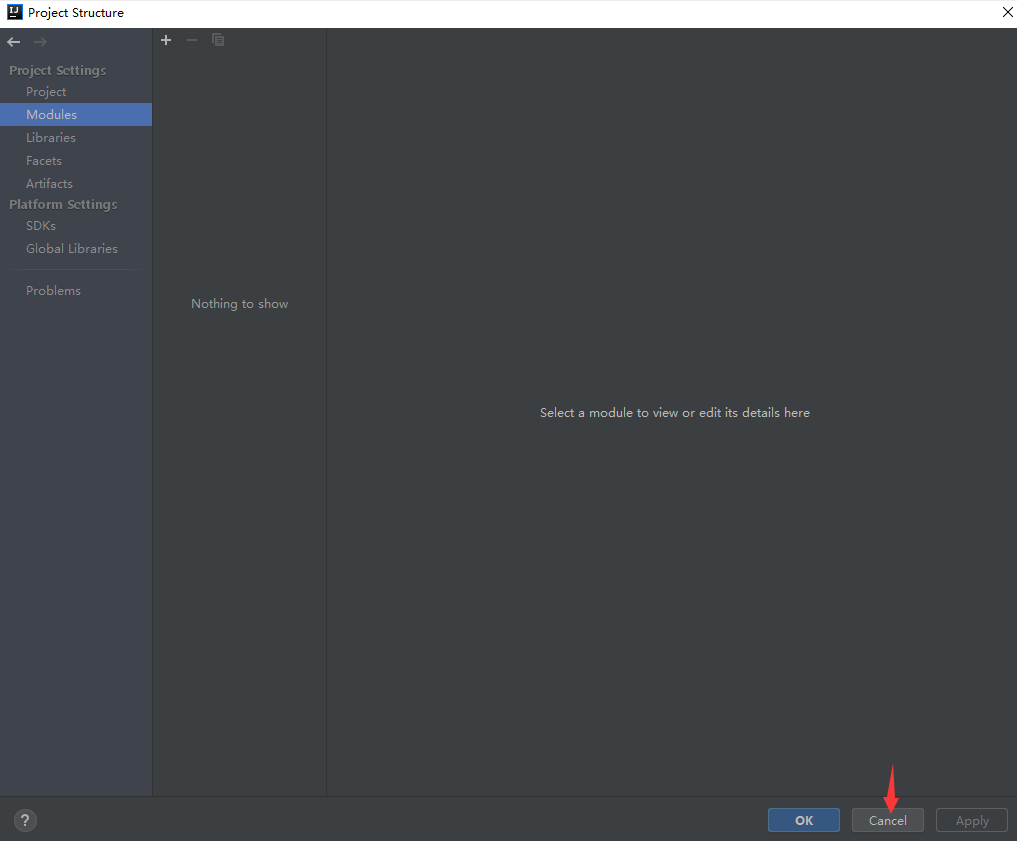
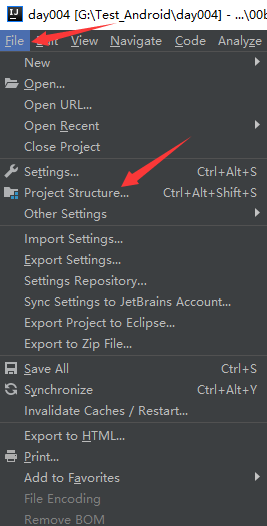
 弹出以下对话框,先“取消”,先检查配置。
2、配置检查
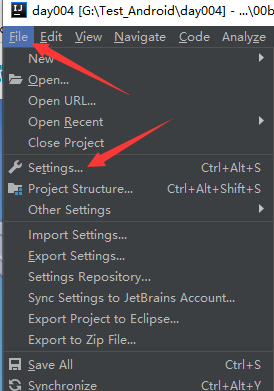
主要检查maven的配置,因为是通过它构建的。这里有一个前提,就是你的电脑已经安装了maven,这里不作展开。检查maven设置,先根据下图打开setting。
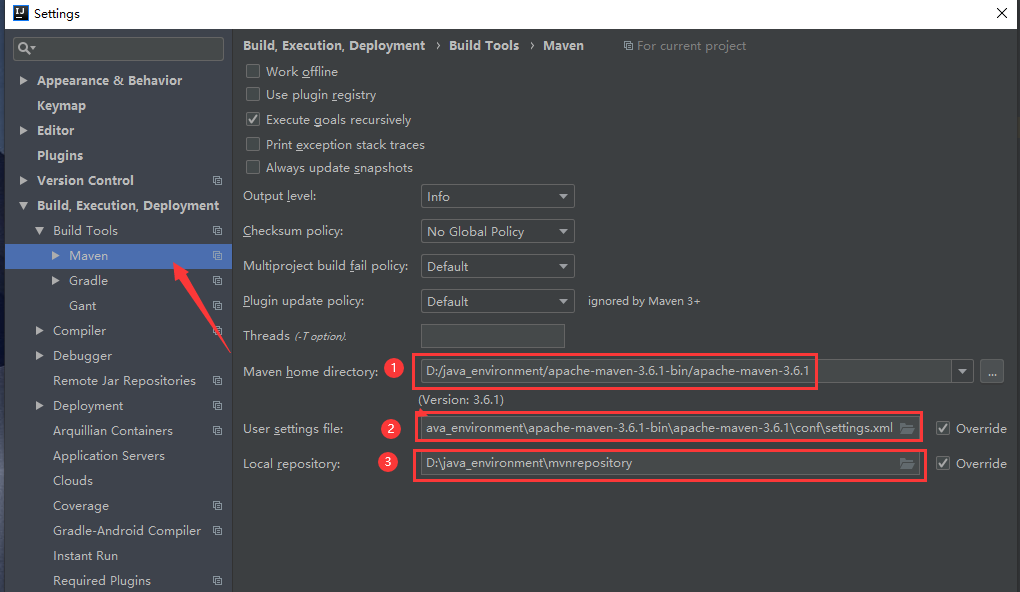
检查①②③处配置,具体的位置是根据你的maven安装位置和配置。
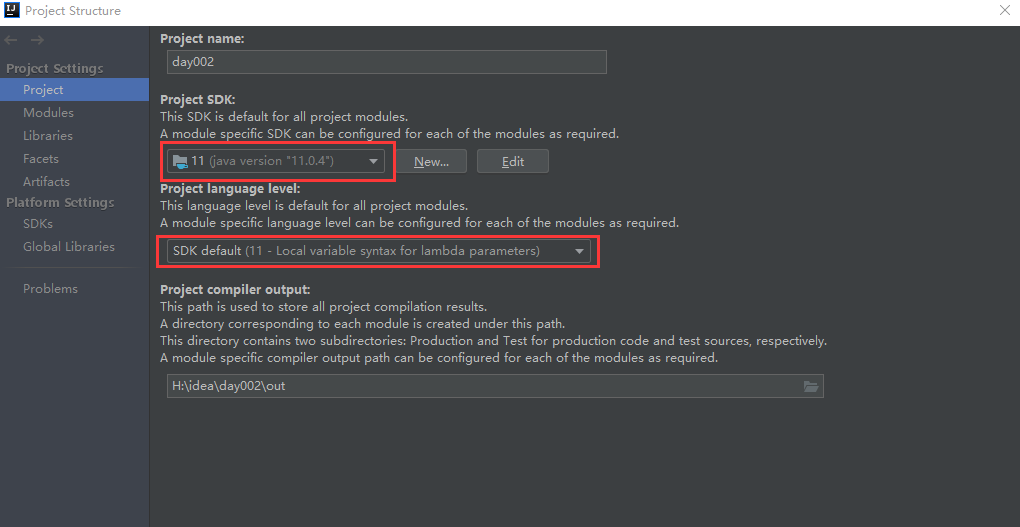
 在setting点击“Project Structure”,检查java相关配置。
红色两处要对应,比如我使用的是java11,SDK也要选择版本11。
3、新建父maven模块
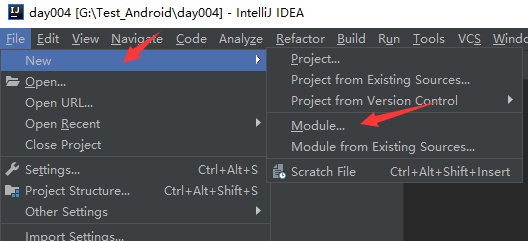
新建Module。
 直接下一步。
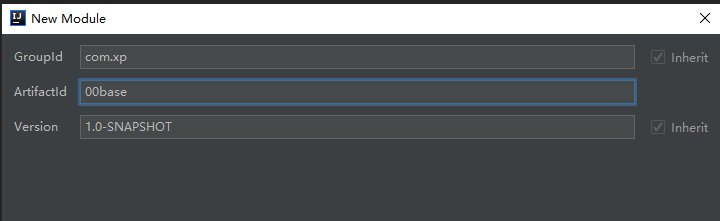
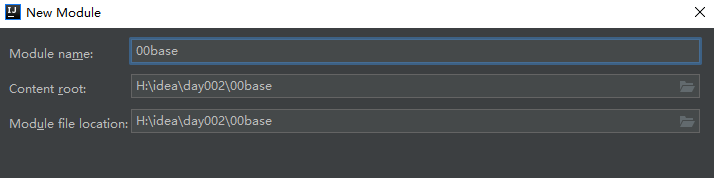
 例如我取了个名“00base”。
下一步。
完成后,出现如下界面,目前打开的是文件是“00base”,先点击右下角自动使能导入。
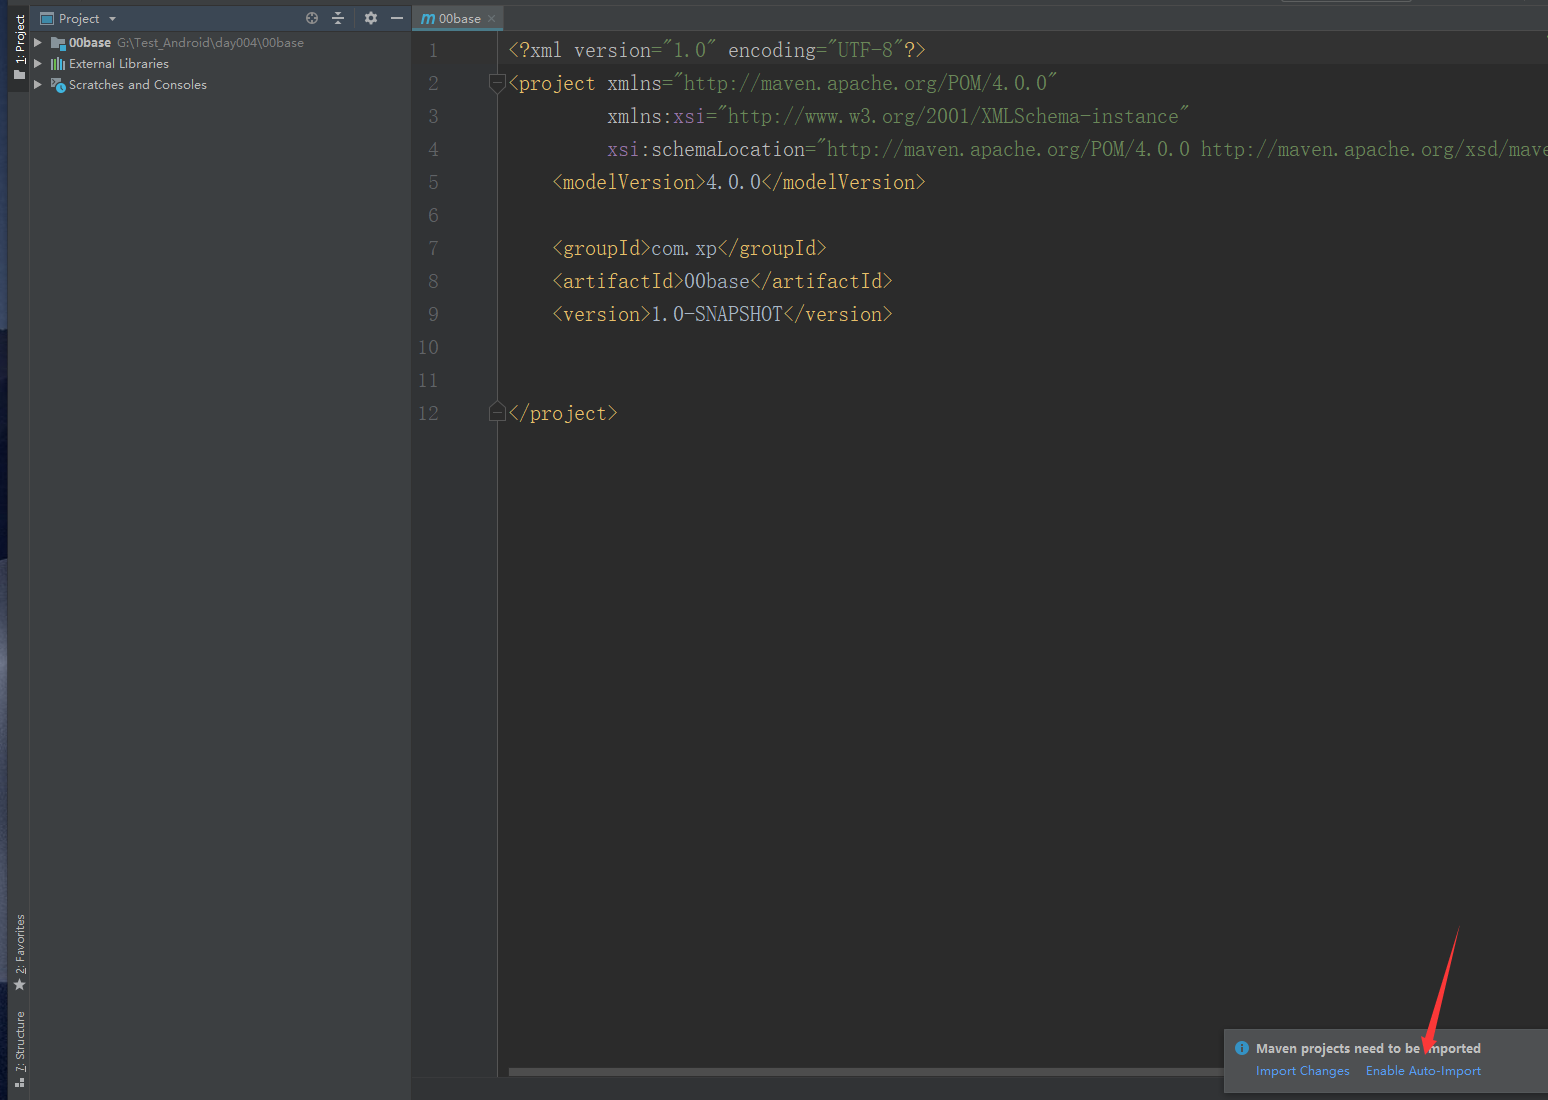
添加以下程序,注意第4、5行,要跟java的版本对应。
   <packaging>pom</packaging>
    <properties>
        <project.build.sourceEncoding>UTF-8</project.build.sourceEncoding>
        <maven.compiler.source>11</maven.compiler.source>
        <maven.compiler.target>11</maven.compiler.target>
    </properties>
    <dependencies>
        <dependency>
            <groupId>junit</groupId>
            <artifactId>junit</artifactId>
            <version>4.11</version>

        </dependency>
        <dependency>
            <groupId>org.mybatis</groupId>
            <artifactId>mybatis</artifactId>
            <version>3.4.6</version>
        </dependency>
        <dependency>
            <groupId>mysql</groupId>
            <artifactId>mysql-connector-java</artifactId>
            <version>5.1.46</version>
        </dependency>
        <dependency>
            <groupId>log4j</groupId>
            <artifactId>log4j</artifactId>
            <version>1.2.17</version>
        </dependency>

    </dependencies>
    <build>
        <resources>
            <resource>
                <directory>src/main/java</directory>
                <includes>
                    <include>**/*.xml</include>
                </includes>
            </resource>
        </resources>
    </build>
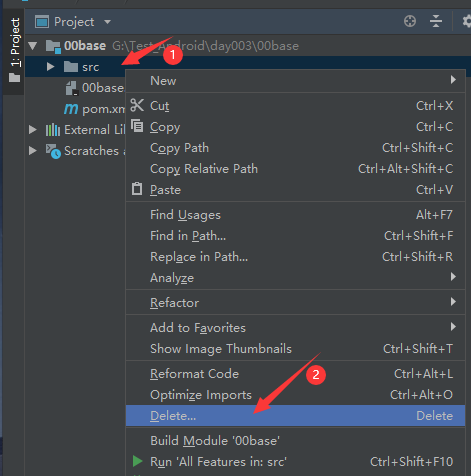
删除00base下的src文件夹。
4、新建子maven模块
选中00base,右键新建->模块。注:一定要选中00base再右键.
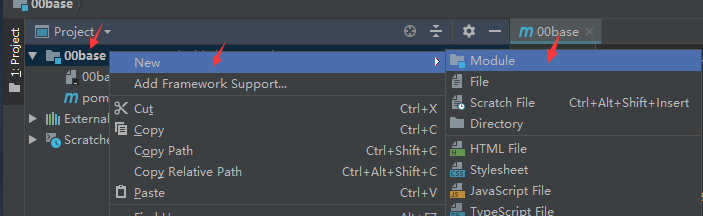
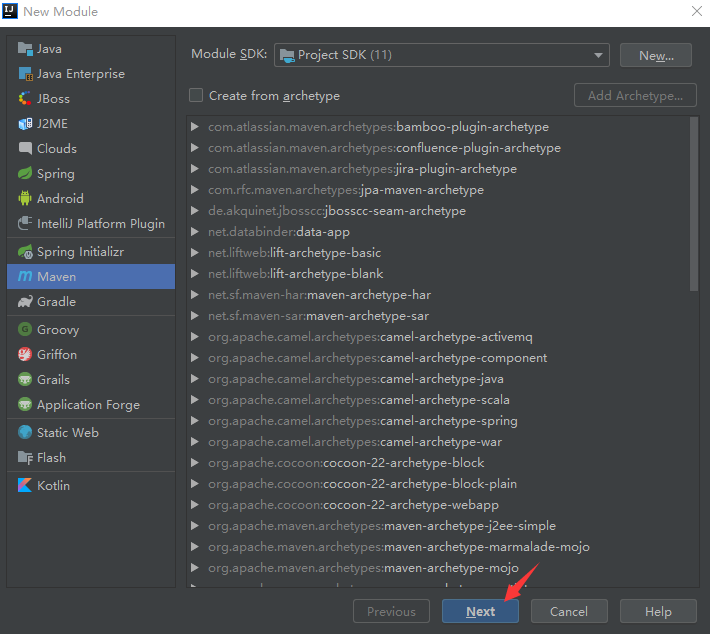
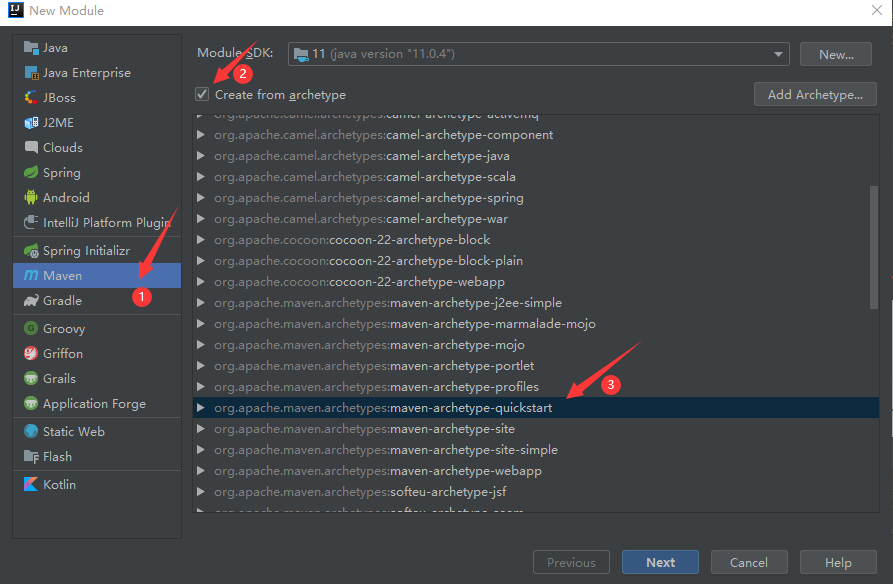
根据下图三个箭头所指进行配置。
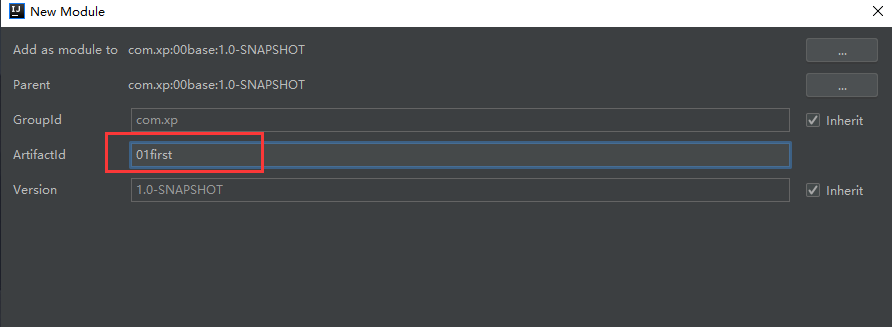
 填入01first。
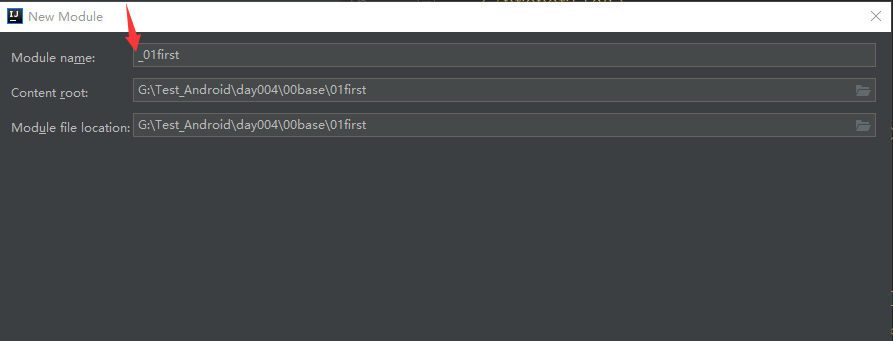
 去掉自动生成的下划线。当然不去掉问题也不大。
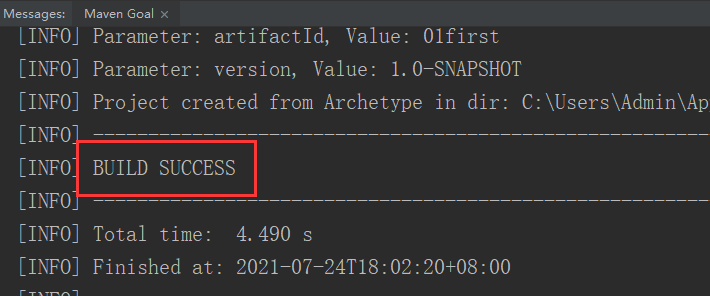
 最后提示框出现BUILD SUCCESS。
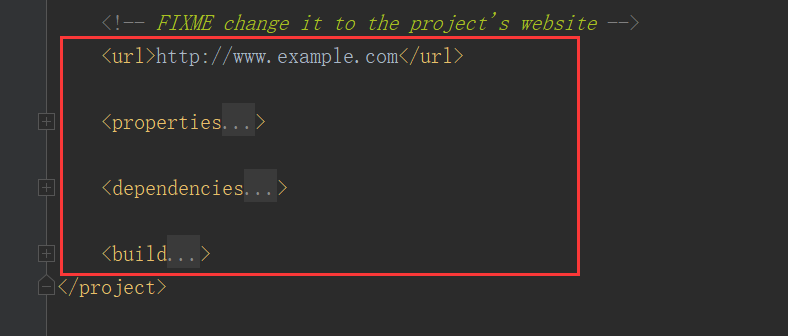
同时会弹出01first的页面,删掉红框里面的内容,因为在父maven模块中配置过了。
5、创建实体类
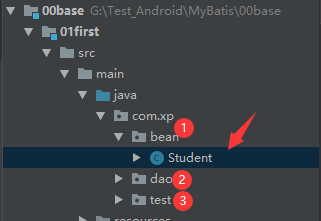
新建包com.xp,在这个包下新建bean,dao ,test三个包。dao ,test两个以后会用到,先在bean包下新建Student类。

package com.xp.bean;

public class Student {
    private int id;
    private String name;
    private int age;
    private double score;

    public Student() {

    }

    public Student(String name, int age, double score) {
        this.name = name;
        this.age = age;
        this.score = score;
    }

    public int getId() {
        return id;
    }

    public void setId(int id) {
        this.id = id;
    }

    public String getName() {
        return name;
    }

    public void setName(String name) {
        this.name = name;
    }

    public int getAge() {
        return age;
    }

    public void setAge(int age) {
        this.age = age;
    }

    public double getScore() {
        return score;
    }

    public void setScore(double score) {
        this.score = score;
    }
}
6、创建数据库
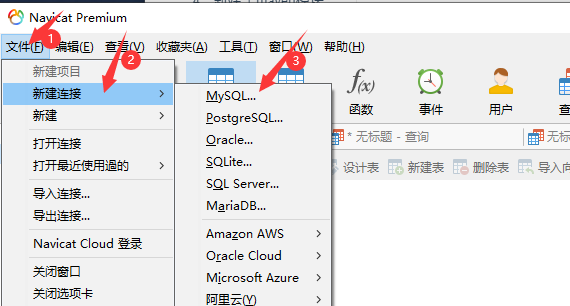
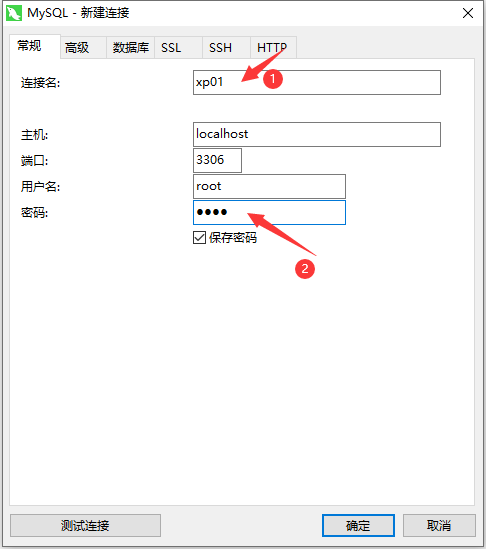
打开Navicat Premium软件,新建MySQL.
连接名任意取,例如xp01,设置一个密码,不要忘了,后面还要用。
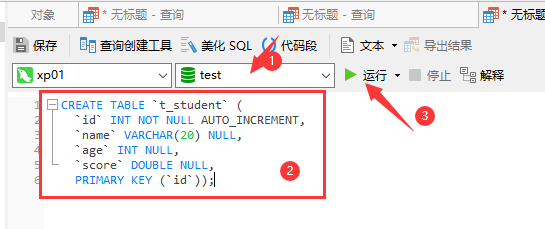
选中新建的xp01,点击新建查询。

在①处输入test,注意,在配置mybatis.xml文件中还会用到。在②处输入SQL语句,点击运行。
CREATE TABLE `t_student` (
  `id` INT NOT NULL AUTO_INCREMENT,
  `name` VARCHAR(20) NULL,
  `age` INT NULL,
  `score` DOUBLE NULL,
  PRIMARY KEY (`id`));
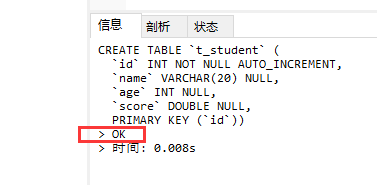
新建成功后提示OK。
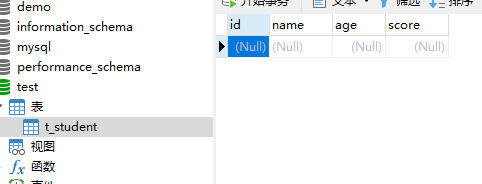
同时也可以在test下看到t_student,到此为止数据库配置完成。
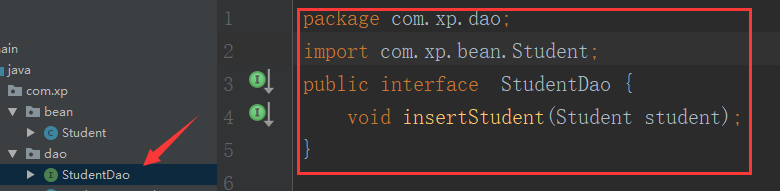
7、创建dao接口
dao接口用于跟数据库打交道。在dao包下新建接口StudentDao,接口中添加一个方法insertStudent,该方法需要传入一个Student类型的参数。
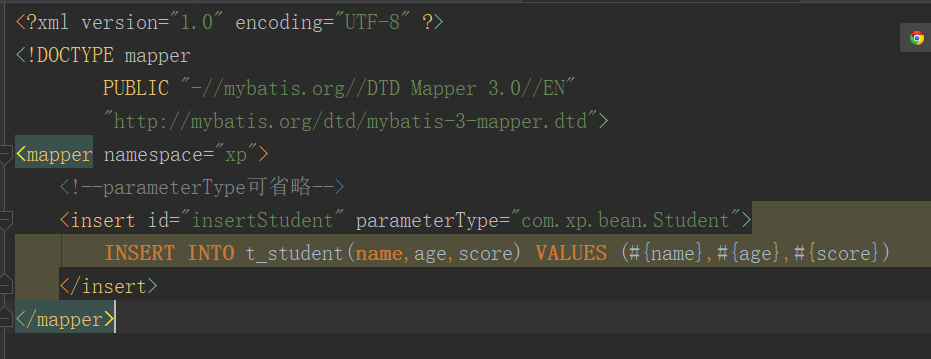
8、添加映射文件
映射主要用于java和数据库的联系,该文件里面主要编写SQL语句。在dao包下新建StudentMapper.xml文件。

<?xml version="1.0" encoding="UTF-8" ?>
<!DOCTYPE mapper
        PUBLIC "-//mybatis.org//DTD Mapper 3.0//EN"
        "http://mybatis.org/dtd/mybatis-3-mapper.dtd">
<mapper namespace="xp">
    <!--parameterType可省略-->
    <insert id="insertStudent" parameterType="com.xp.bean.Student">
        INSERT INTO t_student(name,age,score) VALUES (#{name},#{age},#{score})
    </insert>
</mapper>
9、添加mybatis的主配置文件
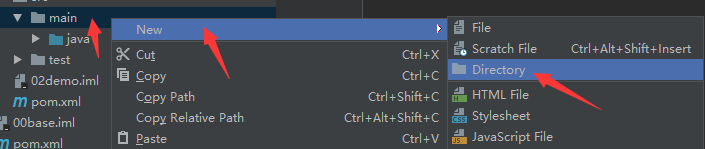
先在主函数下新建resources文件夹。
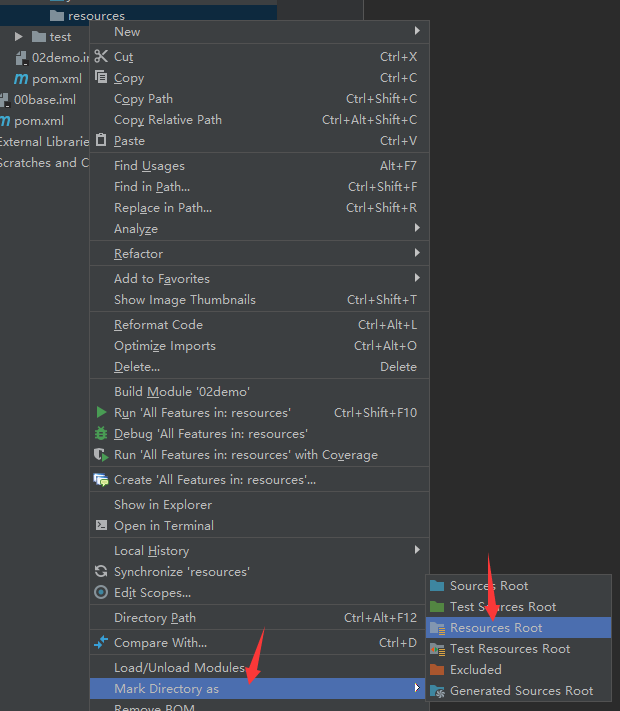
将resources文件夹标志为Resources Root。
在resources文件夹中新建mybatis.xml文件。
复制以下内容到mybatis.xml文件,需要注意的是第11/12/13行,在第11行中有个test,要跟数据库中新建的表明对应起来。第12/13行就是创建Mysql用的用户名和密码。
<?xml version="1.0" encoding="UTF-8" ?>
<!DOCTYPE configuration
        PUBLIC "-//mybatis.org//DTD Config 3.0//EN"
        "http://mybatis.org/dtd/mybatis-3-config.dtd">
<configuration>
    <environments default="development">
        <environment id="development">
            <transactionManager type="JDBC"/>
            <dataSource type="POOLED">
                <property name="driver" value="com.mysql.jdbc.Driver"/>
                <property name="url" value="jdbc:mysql://127.0.0.1:3306/test?useSSL=false"/>
                <property name="username" value="root"/>
                <property name="password" value="1234"/>
            </dataSource>
        </environment>
    </environments>
    <mappers>
        <!--注册映射文件-->
        <mapper resource="com/xp/dao/StudentMapper.xml"/>
    </mappers>
</configuration>
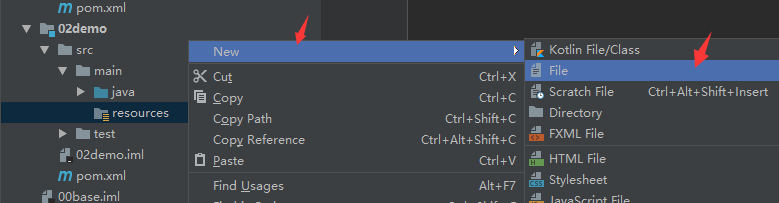
10、添加日志
添加日志主要是为了调试方便,按下图操作。
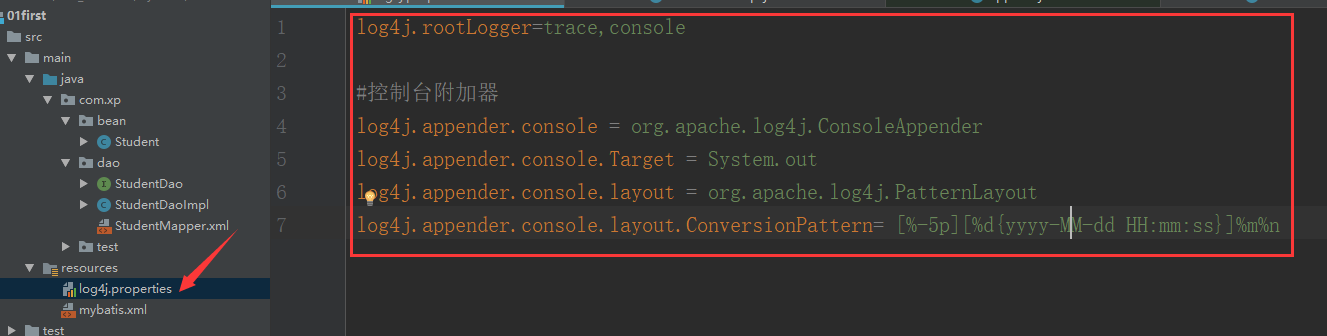
log4j.rootLogger=trace,console

#控制台附加器
log4j.appender.console = org.apache.log4j.ConsoleAppender
log4j.appender.console.Target = System.out
log4j.appender.console.layout = org.apache.log4j.PatternLayout
log4j.appender.console.layout.ConversionPattern= [%-5p][%d{yyyy-MM-dd HH:mm:ss}]%m%n
11、创建接口的实现类
在到包下新建StudentDaoImpl类,完成以下代码。

第13行的参数注意下,第一个参数:"insertStudent"要跟映射文件中的第7行对应起来。第二个参数:传Student类型对象。
public class StudentDaoImpl implements StudentDao {
    public void insertStudent(Student student) {

        try {

            InputStream input =  Resources.getResourceAsStream("mybatis.xml");

            SqlSessionFactory sessionFactory = new SqlSessionFactoryBuilder().build(input);

            //创建SqlSession对象
            SqlSession sqlSession = sessionFactory.openSession();
            //新增数据操作
            sqlSession.insert("insertStudent", student);
            //提交SqlSession
            sqlSession.commit();
        } catch (IOException e) {
            e.printStackTrace();
        }
    }
}
12、测试连接
所有工作完成后使用Mysql对数据库中的数据进行插入。在test包中新建一个StudentTest测试类。
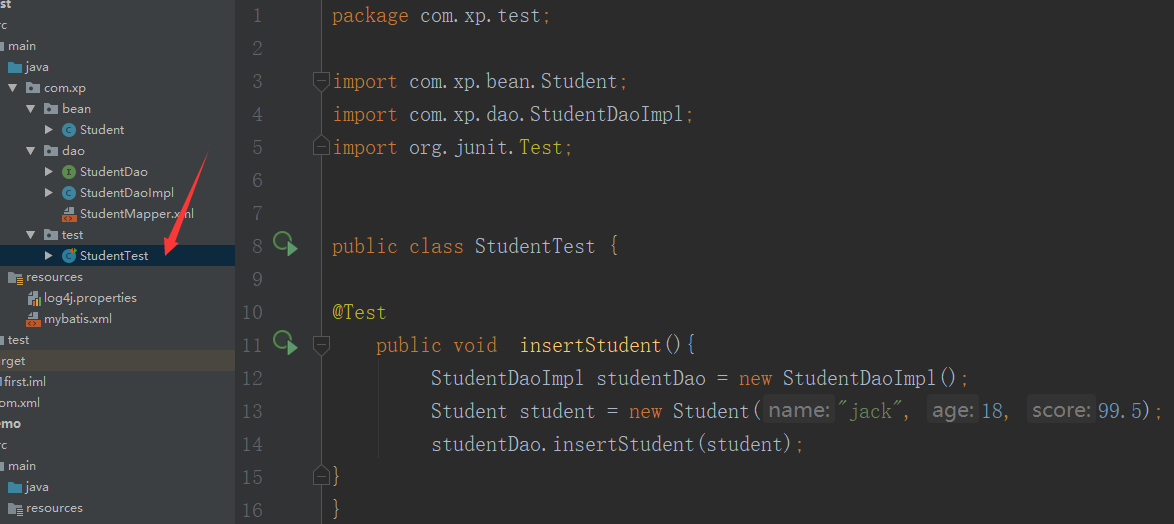
public class StudentTest {

@Test
    public void  insertStudent(){
         StudentDaoImpl studentDao = new StudentDaoImpl();
         Student student = new Student("jack", 18, 99.5);
         studentDao.insertStudent(student);
}
}
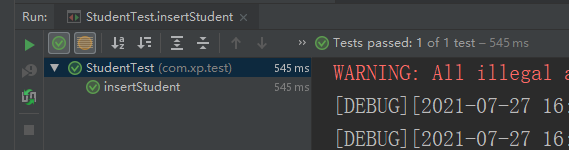
运行,左侧出现绿色图标表示操作成功。
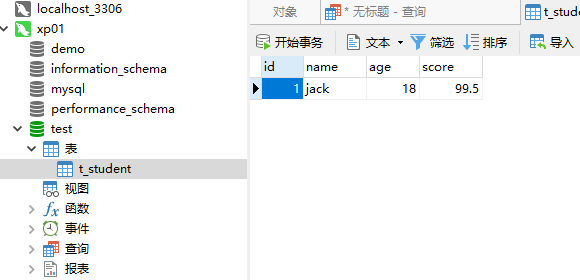
 刷新下数据库,数据显示!


 718
718

 被折叠的 条评论
为什么被折叠?
被折叠的 条评论
为什么被折叠?
 到【灌水乐园】发言


