


纪事本 乱码
从高层次来看 ,不同的微服务策略有很多共同点。 他们认同同样的理想。 当涉及到如何实际实施的细节时,它们可能会有所不同。
纪事世界中的微服务围绕以下方面进行设计:
- 简单-简单,快速,灵活且易于维护。
- 透明度-您无法控制自己不了解的内容。
- 可复制性-这必须在您的设计中以确保质量解决方案。
简单是什么意思?
微服务设计的关键部分是如何在服务/组件之间传递消息。 最简单的消息可以称为异步方法调用 。
异步方法调用是这样的:
- 什么也不会返回
- 不会改变其论点;
- 不会引发任何异常(尽管基础传输可以)。
使用这种方法的原因是,最简单的运输就是根本没有运输。 一个组件调用另一个组件。 这不仅快速(而且内联可能根本不需要任何时间),而且设置,调试和配置文件都很简单。 对于大多数单元测试,您不需要真正的传输,因此使测试变得比需要的复杂没有任何优势。
让我们来看一个例子。
假设我们有一个服务/组件正在对市场数据进行增量更新。 在最简单的情况下,这可能是只有一侧的市场更新,即买入或卖出。 该组件可以将其转变为结合了买卖价格和数量的完整市场更新。
在此示例中,我们只有一种消息类型开始,但是我们可以添加更多消息类型。 我建议您为每个消息创建一个不同的消息名称/方法,而不是重载方法。
我们的入站数据结构
public class SidedPrice extends AbstractMarshallable {
    final String symbol;
    final long timestamp;
    final Side side;
    final double price, quantity;

    public SidedPrice(String symbol, long timestamp, Side side, double price, double quantity) {
        this.symbol = symbol;
        this.timestamp = timestamp;
        this.side = side;
        this.price = price;
        this.quantity = quantity;
    }
}
我们的出站数据结构
public class TopOfBookPrice extends AbstractMarshallable {
    final String symbol;
    final long timestamp;
    final double buyPrice, buyQuantity;
    final double sellPrice, sellQuantity;

    public TopOfBookPrice(String symbol, long timestamp, double buyPrice, double buyQuantity, double sellPrice, double sellQuantity) {
        this.symbol = symbol;
        this.timestamp = timestamp;
        this.buyPrice = buyPrice;
        this.buyQuantity = buyQuantity;
        this.sellPrice = sellPrice;
        this.sellQuantity = sellQuantity;
    }

    // more methods (1)
}有关完整的代码TopOfBookPrice.java
附带价格的组件可以有一个接口;
第一个组件的入站接口
public interface SidedMarketDataListener {
    void onSidedPrice(SidedPrice sidedPrice);
}
它的输出也只有一种方法;
第一个组件的出站接口
public interface MarketDataListener {
    void onTopOfBookPrice(TopOfBookPrice price);
}
我们的微服务是什么样的?
在较高的层次上,组合器非常简单。
public class SidedMarketDataCombiner implements SidedMarketDataListener {
    final MarketDataListener mdListener;
    final Map<String, TopOfBookPrice> priceMap = new TreeMap<>();

    public SidedMarketDataCombiner(MarketDataListener mdListener) {
        this.mdListener = mdListener;
    }

    public void onSidedPrice(SidedPrice sidedPrice) {
        TopOfBookPrice price = priceMap.computeIfAbsent(sidedPrice.symbol, TopOfBookPrice::new);
        if (price.combine(sidedPrice))
            mdListener.onTopOfBookPrice(price);
    }
}
它实现了我们的输入接口,并将输出接口作为侦听器。
AbstractMarshallable提供了什么?
AbstractMarshallable类是一个便利类,它实现toString() , equals(Object)和hashCode() 。 它还支持Marshallable的writeMarshallable(WireOut)和readMarshallable(WireIn) 。
默认实现使用所有非静态非瞬态字段来打印,比较或构建hashCode。
生成的toString()始终可以使用
Marshallable.fromString(CharSequence)进行反序列化 。
让我们看几个例子。
SidedPrice sp = new SidedPrice("Symbol", 123456789000L, Side.Buy, 1.2345, 1_000_000);
assertEquals("!SidedPrice {\n" +
        "  symbol: Symbol,\n" +
        "  timestamp: 123456789000,\n" +
        "  side: Buy,\n" +
        "  price: 1.2345,\n" +
        "  quantity: 1000000.0\n" +
        "}\n", sp.toString());

// from string
SidedPrice sp2 = Marshallable.fromString(sp.toString());
assertEquals(sp2, sp);
assertEquals(sp2.hashCode(), sp.hashCode());
如您所见, toString()以简洁的YAML格式编写,对人类和代码均可读。
TopOfBookPrice tobp = new TopOfBookPrice("Symbol", 123456789000L, 1.2345, 1_000_000, 1.235, 2_000_000);
assertEquals("!TopOfBookPrice {\n" +
        "  symbol: Symbol,\n" +
        "  timestamp: 123456789000,\n" +
        "  buyPrice: 1.2345,\n" +
        "  buyQuantity: 1000000.0,\n" +
        "  sellPrice: 1.235,\n" +
        "  sellQuantity: 2000000.0\n" +
        "}\n", tobp.toString());

// from string
TopOfBookPrice topb2 = Marshallable.fromString(tobp.toString());
assertEquals(topb2, tobp);
assertEquals(topb2.hashCode(), tobp.hashCode());
}
使用这种格式的优点之一是,即使在复杂的对象中,它也使查找失败测试的原因变得更加容易。
即使进行了琐碎的测试,问题也不明显
TopOfBookPrice tobp = new TopOfBookPrice("Symbol", 123456789000L, 1.2345, 1_000_000, 1.235, 2_000_000);
TopOfBookPrice tobp2 = new TopOfBookPrice("Symbol", 123456789000L, 1.2345, 1_000_000, 1.236, 2_000_000);

assertEquals(tobp, tobp2);但是,当您在IDE中运行此测试时,会出现一个比较窗口。
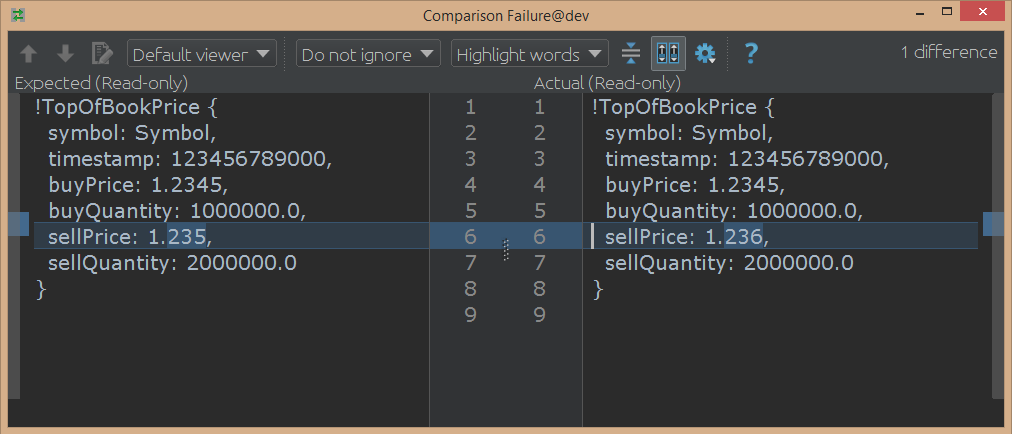
图1. IDE中的比较窗口
如果您有一个较大的嵌套/复杂对象,而assertEquals失败了,那么它实际上可以为您节省大量时间来查找差异。
模拟我们的组件
我们可以使用EasyMock之类的工具来模拟界面。 我发现EasyMock在处理事件驱动的接口时更简单。 它不如PowerMock或Mockito强大,但是如果您使事情简单,则可能不需要这些功能。
// what we expect to happen
SidedPrice sp = new SidedPrice("Symbol", 123456789000L, Side.Buy, 1.2345, 1_000_000);
SidedMarketDataListener listener = createMock(SidedMarketDataListener.class);
listener.onSidedPrice(sp);
replay(listener);

// what happens
listener.onSidedPrice(sp);

// verify we got everything we expected.
verify(listener);
我们还可以用相同的方法模拟组件的预期输出。
测试我们的组件
通过模拟输出接口并为我们的组件调用输入接口,我们可以检查其行为是否符合预期。
MarketDataListener listener = createMock(MarketDataListener.class);
listener.onTopOfBookPrice(new TopOfBookPrice("EURUSD", 123456789000L, 1.1167, 1_000_000, Double.NaN, 0)); (1)
listener.onTopOfBookPrice(new TopOfBookPrice("EURUSD", 123456789100L, 1.1167, 1_000_000, 1.1172, 2_000_000)); (2)
replay(listener);

SidedMarketDataListener combiner = new SidedMarketDataCombiner(listener);
combiner.onSidedPrice(new SidedPrice("EURUSD", 123456789000L, Side.Buy, 1.1167, 1e6)); (1)
combiner.onSidedPrice(new SidedPrice("EURUSD", 123456789100L, Side.Sell, 1.1172, 2e6)); (2)

verify(listener);
Setting the buy price
Setting the sell price测试一系列组件
让我们添加一个OrderManager作为下游组件。 该订单经理将同时接收市场数据更新和订单提示,然后将生成订单。
// what we expect to happen
OrderListener listener = createMock(OrderListener.class);
listener.onOrder(new Order("EURUSD", Side.Buy, 1.1167, 1_000_000));
replay(listener);

// build our scenario
OrderManager orderManager = new OrderManager(listener); (2)
SidedMarketDataCombiner combiner = new SidedMarketDataCombiner(orderManager); (1)

// events in
orderManager.onOrderIdea(new OrderIdea("EURUSD", Side.Buy, 1.1180, 2e6)); // not expected to trigger

combiner.onSidedPrice(new SidedPrice("EURUSD", 123456789000L, Side.Sell, 1.1172, 2e6));
combiner.onSidedPrice(new SidedPrice("EURUSD", 123456789100L, Side.Buy, 1.1160, 2e6));

combiner.onSidedPrice(new SidedPrice("EURUSD", 123456789100L, Side.Buy, 1.1167, 2e6));

orderManager.onOrderIdea(new OrderIdea("EURUSD", Side.Buy, 1.1165, 1e6)); // expected to trigger

verify(listener);
The first component combines sided prices
The second component listens to order ideas and top of book market data调试我们的组件
您可以看到一个组件只是调用了另一个。 在调试此单线程代码时,来自第一个组件的每个事件都是对第二个组件的调用。 完成后,将返回第一个测试。
当任何单个事件触发错误时,您都可以在堆栈跟踪中看到哪个事件导致了问题。 但是,如果您期待不会发生的事件,那么除非您的测试很简单(或者您使用verify() , reset()和replay()进行一系列简单的测试verify() ,否则这很棘手。
在IDE中几乎不需要任何时间即可启动测试和调试。 您可以在一秒钟之内运行数百个这样的测试。
示例来源
我们如何将它们创建为服务?
我们已经展示了测试和调试组件非常容易。 在第二部分中,我们如何将它们转变为服务 。
翻译自: https://www.javacodegeeks.com/2017/02/microservices-chronicle-world-part-1.html
纪事本 乱码


 266
266

 被折叠的 条评论
为什么被折叠?
被折叠的 条评论
为什么被折叠?
 到【灌水乐园】发言


