


一、简介
Android常用布局分别是
1、线性布局LinearLayout
2、相对布局RelativeLayout
3、绝对布局AbsoluteLayout
4、帧布局FrameLayout
5、表格布局TableLayout
6、网格布局GridLayout
7、约束布局ConstraintLayout
二、详解
2.1. LinearLayout (线性布局)
线性布局是一种非常实用的布局。线性布局具有水平方向与垂直方向的两种布局方式。分别通过属性 android:orientation=“vertical” 和 android:orientation=“horizontal” 来设置(默认水平方向)。
android:gravity:内部控件对齐方式,常用属性值有center、center_vertical、center_horizontal、top、bottom、left、right等。
这里要与android:layout_gravity区分开,layout_gravity是用来设置自身相对于父元素的布局。
android:layout_weight:权重,用来分配当前控件在剩余空间的大小。
<?xml version="1.0" encoding="utf-8"?>
    <LinearLayout
        android:layout_width="match_parent"
        android:layout_height="wrap_content"
        android:orientation="horizontal" >
        <Button
            android:layout_width="match_parent"
            android:layout_height="wrap_content"
            android:layout_weight="1"
            android:text="4" />
        <Button
            android:layout_width="match_parent"
            android:layout_height="wrap_content"
            android:layout_weight="1"
            android:text="5" />
        <Button
            android:layout_width="match_parent"
            android:layout_height="wrap_content"
            android:layout_weight="1"
            android:text="6" />
        <Button
            android:layout_width="match_parent"
            android:layout_height="wrap_content"
            android:layout_weight="1"
            android:text="+" />
    </LinearLayout>
2.2 RelativeLayout (相对布局)
RelativeLayout 继承于 android.widget.ViewGroup,其按照子元素之间的位置关系完成布局的,是最灵活也是最常用的一种布局方式。
<?xml version="1.0" encoding="utf-8"?>
<RelativeLayout xmlns:android="http://schemas.android.com/apk/res/android"
    android:layout_width="fill_parent"
    android:layout_height="fill_parent" >
    <Button android:id="@+id/btn1"
        android:layout_width="wrap_content"
        android:layout_height="wrap_content"
        android:layout_centerInParent="true"
        android:layout_centerHorizontal="true"
        android:text="Button1"/>
    <Button android:id="@+id/btn2"
        android:layout_width="wrap_content"
        android:layout_height="wrap_content"
        android:layout_toLeftOf="@id/btn1"
        android:layout_above="@id/btn1"
        android:text="Button2"/>
    <Button android:id="@+id/btn3"
        android:layout_width="wrap_content"
        android:layout_height="wrap_content"
        android:layout_toRightOf="@id/btn1"
        android:layout_above="@id/btn1"
        android:text="Button3"/>
    <Button android:id="@+id/btn4"
        android:layout_width="wrap_content"
        android:layout_height="wrap_content"
        android:layout_toRightOf="@id/btn2"
        android:layout_toLeftOf="@id/btn3"
        android:layout_above="@id/btn2"
        android:text="Button4"/>
</RelativeLayout>
2.3. AbsoluteLayout (绝对布局)
采用坐标轴的方式定位控件,通过设置android:layout_x 和 android:layout_y属性,将子元素的坐标位置固定下来,实际应用中,这种布局用的比较少,不利于适配各种屏幕机型。
2.4 TableLayout (表格布局)
表格布局继承自LinearLayout,通过TableRow设置行,列数由TableRow中的子控件决定,直接在TableLayout中添加子控件会占据整个一行。后面我们更多用GridLayout代替TableLayout。
<?xml version="1.0" encoding="utf-8"?>
<TableLayout xmlns:android="http://schemas.android.com/apk/res/android"
    android:layout_width="match_parent"
    android:layout_height="match_parent"
    android:stretchColumns="1"
    android:collapseColumns="2"
    >

    <TableRow
        android:layout_width="match_parent"
        android:layout_height="match_parent">
        <Button/>
        <Button/>

    </TableRow>
    <TableRow
        android:layout_width="match_parent"
        android:layout_height="match_parent">
        <Button/>
        <Button/>
        <Button/>
        <Button/>
        <Button/>
    </TableRow>
    <TableRow
        android:layout_width="match_parent"
        android:layout_height="match_parent">
        <Button/>
        <Button/>
        <Button/>
        <Button/>
    </TableRow>
</TableLayout>
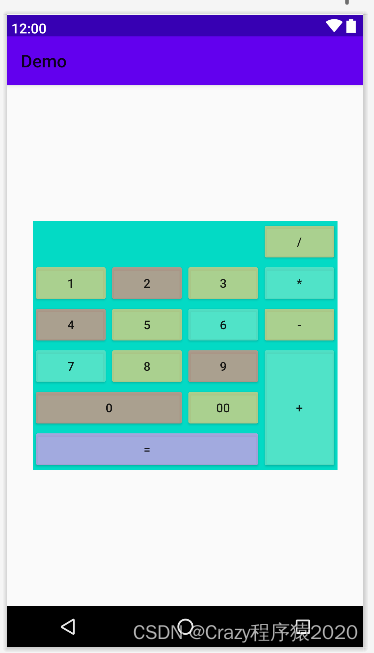
2.5 GridLayout(网格布局)
作为android 4.0 后新增的一个布局,与前面介绍过的TableLayout(表格布局)其实有点大同小异;可以很方便的设置N行N列。
<?xml version="1.0" encoding="utf-8"?>
<GridLayout xmlns:android="http://schemas.android.com/apk/res/android"
    android:layout_width="wrap_content"
    android:layout_height="wrap_content"
    android:layout_gravity="center"
    android:columnCount="4"
    android:orientation="horizontal"
    android:background="#FF03DAC5"
    >
    <Button android:text="/"
        android:layout_column="3"
        android:backgroundTint="#BEE3CD7D"/>
    <Button android:text="1"
        android:backgroundTint="#BEE3CD7D"/>
    <Button android:text="2"
        android:backgroundTint="#BEE38C7D"/>
    <Button android:text="3"
        android:backgroundTint="#BEE3CD7D"/>
    <Button android:text="*"
        android:backgroundTint="#BE6AE6C9"/>
    <Button android:text="4"
        android:backgroundTint="#BEE38C7D"/>
    <Button android:text="5"
        android:backgroundTint="#BEE3CD7D"/>
    <Button android:text="6"
        android:backgroundTint="#BE6AE6C9"/>
    <Button android:text="-"
        android:backgroundTint="#BEE3CD7D"/>
    <Button android:text="7"
        android:backgroundTint="#BE6AE6C9"/>
    <Button android:text="8"
        android:backgroundTint="#BEE3CD7D"/>
    <Button android:text="9"
        android:backgroundTint="#BEE38C7D"/>
    <Button
        android:layout_gravity="fill"
        android:layout_rowSpan="3"
        android:backgroundTint="#BE6AE6C9"
        android:text="+"
        />
    <Button android:text="0"
        android:layout_columnSpan="2"
        android:layout_gravity="fill"
        android:backgroundTint="#BEE38C7D"/>
    <Button android:text="00"
        android:backgroundTint="#BEE3CD7D"/>
    <Button android:text="="
        android:layout_columnSpan="3"
        android:layout_gravity="fill"
        android:backgroundTint="#BED999E8"/>
</GridLayout>
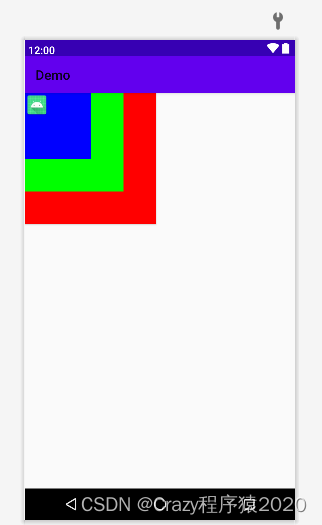
2.6. FrameLayout (帧布局)
帧布局用于在屏幕上创建一块空白区域,添加到该区域中的每个子控件占一帧,这些帧会一个一个叠加在一起,后加入的控件会叠加在上一个控件上层。因此也可以将FrameLayout称为堆栈布局,或框架布局。
<?xml version="1.0" encoding="utf-8"?>
<FrameLayout xmlns:android="http://schemas.android.com/apk/res/android"
    android:layout_width="match_parent"
    android:layout_height="match_parent"
    android:foreground="@mipmap/pic1"
    android:foregroundGravity="left"
    >
   <Button
        android:layout_width="200dp"
        android:layout_height="200dp"
        android:background="#f00"
        />
    <Button
        android:layout_width="150dp"
        android:layout_height="150dp"
        android:background="#0f0"
        />

    <Button
        android:layout_width="100dp"
        android:layout_height="100dp"
        android:background="#00f" />
</FrameLayout>
2.7. ConstraintLayout (约束布局)
ConstraintLayout是Android Studio 2.2中主要的新增功能之一;
ConstraintLayout非常适合使用可视化的方式来编写界面;
ConstraintLayout 可以有效地解决布局嵌套过多的问题。
目前,Android Studio 是 2.2或以上版本默认布局文件首选就是 ConstraintLayout。
基本使用请参考:Android新特性介绍,ConstraintLayout完全解析


 680
680


 被折叠的 条评论
为什么被折叠?
被折叠的 条评论
为什么被折叠?
 到【灌水乐园】发言


