在Web开发中,会涉及到静态资源的访问支持、视图解析器的配置、转换器和格式化器的定制、文件上传下载等功能,甚至还需要考虑到与Web服务器关联的Servlet相关组件的定制,Spring Boot框架支持整合一些常用Web框架从而实现Web开发,并默认支持Web开发中的一些通用功能。
SpringMVC整合支持
Spring MVC 自动配置介绍
在Spring Boot项目中,一旦引入了Web依赖启动器spring-boot-starter-web,那么Spring Boot整合Spring MVC框架默认实现的一些XxxAutoConfiguration自动配置类就会自动生效,几乎可以在无任何额外配置的情况下进行Web开发。
Spring Boot整合Spring MVC 的自动化配置功能特性
- 内置了两个视图解析器:ContentNegotiatingViewResolver和BeanNameViewResolver;
- 支持静态资源以及WebJars;
- 自动注册了转换器和格式化器;
- 支持Http消息转换器;
- 自动注册了消息代码解析器;
- 支持静态项目首页index.html;
- 支持定制应用图标favicon.ico;
- 自动初始化Web数据绑定器ConfigurableWebBindingInitializer。
Spring MVC 功能拓展实现案例
下载并导入基本项目(从上一章而来的)
功能一:注册视图控制器
创建一个实现WebMvcConfigurer接口的配置类MyMVCconfig,用于对MVC框架功能扩展
@Configuration
public class MyMVCconfig implements WebMvcConfigurer {

    @Override
    public void addViewControllers(ViewControllerRegistry registry) {

        //将/toLoginPage和/login.html请求路径都映射到login.html页面

        registry.addViewController("/toLoginPage").setViewName("login");

        registry.addViewController("/login.html").setViewName("login");

    }

}
注释掉之前创建的用户登录控制类LoginController,启动项目,在浏览器上分别访问http://localhost:8080/toLoginPage和http://localhost:8080/login.html
总结:只适合较为简单的无参数get请求跳转,对于有参数或者需要业务处理的跳转需求,最好采用传统方式。
功能二:注册自定义拦截器MyInterceptor
实现HandlerInterceptor 接口,在该类中编写如下方法
@Component
public class MyInterceptor implements HandlerInterceptor {

    @Override
    public boolean preHandle(HttpServletRequest request, HttpServletResponse response, Object handler)
            throws Exception {
        // 获取请求路径
        String requestURI = request.getRequestURI();
        // 获取登录用户
        Object loginUser = request.getSession().getAttribute("loginUser");
        // 如果请求路径是“/admin”开头的,并且用户没有登录,那么将请求重定向到登录页面
        if (requestURI.startsWith("/admin") && loginUser == null) {
            response.sendRedirect("/toLoginPage");
            return false;
        }
        return true;
    }

    @Override
    public void postHandle(HttpServletRequest request, HttpServletResponse response, Object handler,

            ModelAndView modelAndView) throws Exception {
        // 向request域中存放当前年份用于页面动态显示
        request.setAttribute("currentYear", Calendar.getInstance().get(Calendar.YEAR));
    }

}
在自定义配置类MyMVCconfig中,重写addInterceptors()方法注册自定义的拦截器
@Autowired
    private MyInterceptor myInterceptor;
    @Override
    public void addInterceptors(InterceptorRegistry registry) {
    registry.addInterceptor(myInterceptor)
                 .addPathPatterns("/**")
                                 .excludePathPatterns("/login.html");
    }
效果测试
重启项目,启动成功后,在浏览器上访问http://localhost:8080/admin
SpringBoot整合javaweb三大件
目的:注册自定义的Servlet、Filter、Listener组件到springboot内嵌的Servlet容器,让它们发挥自己的作用
使用组件注册方式整合Servlet
1.创建com.itheima.servlet.component包及一个自定义Servlet类MyServlet,使用@Component注解将MyServlet类作为组件注入Spring容器。MyServlet类继承自HttpServlet,通过HttpServletResponse对象向页面输出“hello MyServlet”。
@Component
public class MyServlet extends HttpServlet {

    @Override
    protected void doGet(HttpServletRequest req, HttpServletResponse resp)
            throws ServletException, IOException {
        this.doPost(req, resp);
    }

    @Override
    protected void doPost(HttpServletRequest req, HttpServletResponse resp)
            throws ServletException, IOException {
        resp.getWriter().write("hello MyServlet");

    }
}
2.在com.itheima.config下创建Servlet组件配置类ServletConfig,来注册Servlet组件
@Configuration
public class ServletConfig {
    // 注册servlet组件
    @Bean
    public ServletRegistrationBean getServlet(MyServlet myServlet) {
        ServletRegistrationBean registrationBean =
                new ServletRegistrationBean(myServlet, "/myServlet");
        return registrationBean;
    }
}
3.重启项目,启动成功后,在浏览器上访问http://localhost:8080/myServlet
使用组件注册方式整合Filter
1.在com.itheima.servletComponent包下创建一个自定义Filter类MyFilter,使用@Component注解将当前MyFilter类作为组件注入到Spring容器中。MyFilter类实现Filter接口,并重写了init()、doFilter()和destroy()方法,在doFilter()方法中向控制台打印了“hello MyFilter”字符串。
@Component
public class MyFilter implements Filter {

	@Override
	public void doFilter(ServletRequest request, ServletResponse response, FilterChain chain)

			throws IOException, ServletException {

		System.out.println("hello my filter!");
		chain.doFilter(request, response);

	}

}
2.向Servlet组件配置类注册自定义Filter类
@Bean
public FilterRegistrationBean getFilter(MyFilter filter){

	FilterRegistrationBean registrationBean = new FilterRegistrationBean(filter);
	//过滤出请求路径"/toLoginPage","/myFilter",对它们特殊处理,也就是执行Filter中的方法。
	registrationBean.setUrlPatterns(Arrays.asList("/toLoginPage","/myFilter"));

	return registrationBean;
} 3、项目启动成功后,在浏览器上访问http://localhost:8080/myFilter,查看控制台打印效果

使用组件注册方式整合Listener
1.创建一个类MyListener
@Component
public class MyListener implements ServletContextListener {


    @Override
    public void contextInitialized(ServletContextEvent servletContextEvent) {

        System.out.println("contextInitialized ...");

    }

    @Override
    public void contextDestroyed(ServletContextEvent servletContextEvent) {

        System.out.println("contextDestroyed ...");

    }

}
2.向Servlet组件配置类注册自定义Listener类
@Bean
public ServletListenerRegistrationBean getServletListener(MyListener myListener){

	ServletListenerRegistrationBean registrationBean =
			new ServletListenerRegistrationBean(myListener);

	return registrationBean;

}
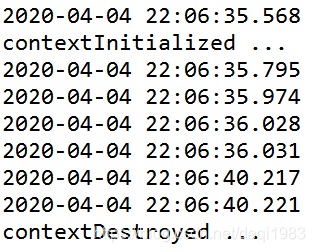
3.项目启动成功后查看控制台打印效果
contextInitialized ...
4、正常关闭(保证是正常启动的)
步骤:
①`pom.xml`添加依赖:
<dependency>
<groupId>org.springframework.boot</groupId>
<artifactId>spring-boot-starter-actuator</artifactId>
</dependency>
②配置文件`application.properties`:
#开启所有的端点
management.endpoints.web.exposure.include=*
#启用shutdown
management.endpoint.shutdown.enabled=true
③执行关闭请求(POST):
在开发者工具的console输入如下代码,然后按回车:
fetch(new Request('http://localhost:8081/actuator/shutdown',{method:'POST'})).then((resp)=>{console.log(resp)})结果:

路径扫描整合javaweb三大组件
1.三大组件上添加对应注解,同时注释掉@Component
在对应组件上分别使用@WebServlet(“/annotationServlet”)注解来映射“/annotationServlet”请求的Servlet类,使用@WebFilter(value = {“/antionLogin”,“/antionMyFilter”})注解来映射“/antionLogin”和“/antionMyFilter”请求的Filter类,使用@WebListener注解来标注Listener类。
@WebServlet("/annotationServlet")
public class MyServlet extends HttpServlet {
@WebFilter(value = {"/antionLogin","/antionMyFilter"})
public class MyFilter implements Filter {@WebListener
public class MyListener implements ServletContextListener {2.注释掉配置类
//@Configuration
public class ServletConfig {
3.主程序启动类上添加@ServletComponentScan注解
开启基于注解方式的Servlet组件扫描支持
@ServletComponentScan
@SpringBootApplication
public class MyChapter05Application
4.测试
http://localhost:8080/annotationServlet
http://localhost:8080/antionLogin
http://localhost:8080/antionMyFilter
文件上传
1.编写文件上传的表单页面

<!DOCTYPE html>
<html lang="en" xmlns:th="http://www.thymeleaf.org">
<head>
    <meta charset="UTF-8">
    <meta http-equiv="Content-Type" content="text/html; charset=UTF-8">
    <title>动态添加文件上传列表</title>
    <link th:href="@{/login/css/bootstrap.min.css}" rel="stylesheet">
    <script th:src="@{/login/js/jquery.min.js}"></script>
</head>
<body>
    <div th:if="${uploadStatus}" style="color: red" th:text="${uploadStatus}">上传成功</div>
    <form th:action="@{/uploadFile}" method="post" enctype="multipart/form-data">
    上传文件:  <input type="button" value="添加文件" onclick="add()"/>
        <div id="file" style="margin-top: 10px;" th:value="文件上传区域"></div>
        <input id="submit" type="submit" value="上传"
           style="display: none;margin-top: 10px;"/>
    </form>

    <script type="text/javascript">

        // 动态添加上传按钮
        function add(){

            var innerdiv = "<div>";
            innerdiv += "<input type='file' name='fileUpload' required='required'>" +
"<input type='button' value='删除' onclick='remove(this)'>";
            innerdiv +="</div>";
            $("#file").append(innerdiv);
            // 打开上传按钮
            $("#submit").css("display","block");

    }

        // 删除当前行<div>
        function remove(obj) {

            $(obj).parent().remove();
            if($("#file div").length ==0){
                $("#submit").css("display","none");
            }
        }
    </script>
</body>
</html>
2.引入jQuery

3.在全局配置文件中添加文件上传的相关配置
# 单个上传文件大小限制(默认1MB)
spring.servlet.multipart.max-file-size=10MB
# 总上传文件大小限制(默认10MB)
spring.servlet.multipart.max-request-size=50MB
4.进行文件上传处理实现文件上传功能

//toUpload()方法处理路径为“/toUpload”的GET请求,向文件上传页面//upload.html跳转;
@GetMapping("/toUpload")
public String toUpload(){

    return "upload";

}
/*uploadFile()方法处理路径为“/uploadFile”的POST请求,对上传文件进行处理。文件上传处理过程中,对文件名进行重命名并存放在“F:/file/”目录下,并封装了返回结果。其中,处理上传文件的请求方法中,使用了“MultipartFile[] fileUpload”参数处理单个或多个上传文件(也可以使用单列集合参数),fileUpload参数名必须与upload.html页面中上传文件<input>框中的name属性值一致。*/
    @PostMapping("/uploadFile")
    public String uploadFile(MultipartFile[] fileUpload, Model model) {

        // 默认文件上传成功,并返回状态信息
        model.addAttribute("uploadStatus", "上传成功!");
        for (MultipartFile file : fileUpload) {
            // 获取文件名以及后缀名
            String fileName = file.getOriginalFilename();
            // 重新生成文件名(根据具体情况生成对应文件名)
            fileName = UUID.randomUUID()+"_"+fileName;
            // 指定上传文件本地存储目录,不存在需要提前创建
            String dirPath = "F:/file/";
            File filePath = new File(dirPath);
            if(!filePath.exists()){
                filePath.mkdirs();
            }

            try {

                file.transferTo(new File(dirPath+fileName));

            } catch (Exception e) {

                e.printStackTrace();
                // 上传失败,返回失败信息
                model.addAttribute("uploadStatus","上传失败: "+e.getMessage());

            }

        }

        // 携带上传状态信息回调到文件上传页面
        return "upload";

}5.效果测试
在浏览器上访问http://localhost:8080/toUpload

如果不能正常解析模板页面,那么
a.添加NekoHTML依赖(一个简单地HTML扫描器和标签补偿器)
<dependency>
<groupId>net.sourceforge.nekohtml</groupId>
<artifactId>nekohtml</artifactId>
<version>1.9.22</version>
</dependency>
b.在全局配置文件上添加如下配置
#thymeleaf对html的标签约束非常严格,所有的标签必须有开有闭,比如#<br></br>或者<br/>是可以的,但是<br>会报错,配置#spring.thymeleaf.mode=LEGACYHTML5 目的就是为了解决这个问题,可以使页面#松校验。
spring.thymeleaf.mode=LEGACYHTML5
点击【添加文件】,添加几个文件


验证文件上传处理效果,查看定制的上传文件存储目录“F:/file/”
图片回显
spring boot实现图片上传到后台的功能(浏览器可直接访问)_java_脚本之家
文件下载
1.添加文件下载工具依赖
Commons IO is a library of utilities to assist with developing IO functionality.
<dependency>
    <groupId>commons-io</groupId>
    <artifactId>commons-io</artifactId>
    <version>2.6</version>
</dependency>
2.定制文件下载页面

<!DOCTYPE html>
<html lang="en" xmlns:th="http://www.thymeleaf.org">
<head>
<meta charset="UTF-8">
<title>文件下载</title>
</head>
<body>
<div style="margin-bottom: 10px">文件下载列表:</div>
<table>
<tr>
<td>bloglogo.jpg</td>
<td><a th:href="@{/download(filename='bloglogo.jpg')}">下载文件</a></td>
</tr>
<tr>
<td>Spring Boot应用级开发教程.pdf</td>
<td><a th:href="@{/download(filename='Spring Boot应用级开发教程.pdf')}">
            下载文件</a></td>
</tr>
</table>
</body>
</html>
3.编写文件下载处理办法
FileController中添加跳转到下载页面的方法
@GetMapping("/toDownload")
public String toDownload(){
    return "download";
}
/**在fileDownload(String filename)方法中,设定了被下载文件的路径为“F:/file/”、文件下载的打开方式和返回形式;
在获取下载结果时,使用了commons-io的FileUtils的readFileToByteArray()方法快速下载文件,并以ResponseEntity<byte[]>类型数据返回。*/
    // 文件下载管理
    @GetMapping("/download")
    public ResponseEntity<byte[]> fileDownload(String filename){

        // 指定要下载的文件根路径
        String dirPath = "F:/file/";
        // 创建该文件对象
        File file = new File(dirPath + File.separator + filename);
        // 设置响应头
        HttpHeaders headers = new HttpHeaders();
        // 通知浏览器以下载方式打开
        headers.setContentDispositionFormData("attachment",filename);
        // 定义以流的形式下载返回文件数据
        headers.setContentType(MediaType.APPLICATION_OCTET_STREAM);
        try {

            return new ResponseEntity<>(FileUtils.readFileToByteArray(file), headers, HttpStatus.OK);

        } catch (Exception e) {

            e.printStackTrace();

            return new ResponseEntity<byte[]>(e.getMessage().getBytes(),HttpStatus.EXPECTATION_FAILED);

        }

}4.效果测试
在浏览器上访问http://localhost:8080/toDownload
问题:下载后的文件中文名称统一变成了“_”
中文名文件下载改进
注释在FileController类的fileDownload()方法,
添加有中文处理方法的fileDownload(),中文处理方法getFilename(HttpServletRequest request,String filename)用来根据不同浏览器对下载的中文名进行转码。
其中,通过HttpServletRequest中的“User-Agent”用于获取用户下载文件的浏览器内核信息(不同版本的IE浏览器内核可能不同,需要特别查看),
如果内核信息是IE则转码为UTF-8,其他浏览器转码为ISO-8859-1即可。
注释之前写的fileDownload,添加如下的fileDownload
    // 中文文件名下载管理
    @GetMapping("/download")
    public ResponseEntity<byte[]> fileDownload(HttpServletRequest request,
                                               String filename) throws Exception{

        // 指定要下载的文件根路径
        String dirPath = "F:/file/";
        // 创建该文件对象
        File file = new File(dirPath + File.separator + filename);
        // 设置响应头
        HttpHeaders headers = new HttpHeaders();
        // 通知浏览器以下载方式打开(下载前对文件名进行转码)
        filename=getFilename(request,filename);
        headers.setContentDispositionFormData("attachment",filename);
        // 定义以流的形式下载返回文件数据
        headers.setContentType(MediaType.APPLICATION_OCTET_STREAM);
        try {

            return new ResponseEntity<>(FileUtils.readFileToByteArray(file), headers, HttpStatus.OK);

        } catch (Exception e) {

            e.printStackTrace();

            return new ResponseEntity<byte[]>(e.getMessage().getBytes(),HttpStatus.EXPECTATION_FAILED);

        }

    }

     // 根据浏览器的不同进行编码设置,返回编码后的文件名
    private String getFilename(HttpServletRequest request, String filename)
            throws Exception {

        // IE不同版本User-Agent中出现的关键词
        String[] IEBrowserKeyWords = {"MSIE", "Trident", "Edge"};
        // 获取请求头代理信息
        String userAgent = request.getHeader("User-Agent");
        for (String keyWord : IEBrowserKeyWords) {
            if (userAgent.contains(keyWord)) {
                //IE内核浏览器,统一为UTF-8编码显示,并对转换的+进行更正
                return URLEncoder.encode(filename, "UTF-8").replace("+","");
            }

        }

        //火狐等其它浏览器统一为ISO-8859-1编码显示
        return new String(filename.getBytes("UTF-8"), "ISO-8859-1");

    }
Jar包方式打包部署
1.Pom中确认存在Maven打包插件和打包方式为jar
<packaging>jar</packaging> 可省略,默认就是这个方式打包
<build>
    <plugins>
        <plugin>
            <groupId>org.springframework.boot</groupId>
            <artifactId>spring-boot-maven-plugin</artifactId>
        </plugin>
    </plugins>
</build>
或者有的pom默认生成是下面这样,只要把<skip>设置成false都可以
           <plugin>
                <groupId>org.springframework.boot</groupId>
                <artifactId>spring-boot-maven-plugin</artifactId>
                <version>${spring-boot.version}</version>
                <configuration>
                    <mainClass>cn.oesoft.Sb5WebFunctionsApplication</mainClass>
                    <skip>false</skip>
                </configuration>
                <executions>
                    <execution>
                        <id>repackage</id>
                        <goals>
                            <goal>repackage</goal>
                        </goals>
                    </execution>
                </executions>
            </plugin>
2.使用eclipse进行打包
用package命令即可


出现如下结果,说明打包成功

3.Jar包目录结构展示说明

4.Jar包方式部署

5.问题
Failed to execute goal org.apache.maven.plugins:maven-compiler-plugin:3.8.1:compile (default-compile) on project ruanjian0105: Compilation failure
[ERROR] No compiler is provided in this environment. Perhaps you are running on a JRE rather than a JDK?
设置jre为jdk的位置,如下

如果还是不行,查看是否真的改过来了,如果没有,点击RestoreDefault

War包方式打包部署
1.声明打包方式为War包
<packaging>war</packaging>2.声明使用外部的Tomcat服务器
<dependency>
    <groupId>org.springframework.boot</groupId>
    <artifactId>spring-boot-starter-tomcat</artifactId>
    <scope>provided</scope>
</dependency>3.提供Spring Boot启动的Servlet初始化器
主程序启动类继承SpringBootServletInitializer类并实现configure()方法,在configure()方法中,sources(Chapter05Application.class)方法的首个参数必须是项目主程序启动类。
需要说明的是,为Spring Boot提供启动的Servlet初始化器SpringBootServletInitializer的典型的做法就是让主程序启动类继承SpringBootServletInitializer类并实现configure()方法;除此之外,还可以在项目中单独提供一个继承SpringBootServletInitializer的子类,并实现configure()方法。
public class MyChapter05Application extends SpringBootServletInitializer {

    public static void main(String[] args) {
        SpringApplication.run(MyChapter05Application.class, args);

    }

    @Override
    protected SpringApplicationBuilder configure(SpringApplicationBuilder builder) {
        return builder.sources(MyChapter05Application.class);

    }

}4.使用eclipse进行打包
package命令即可,假如遇到failOnMissingWebXml,pom中添加如下插件
        <plugin>
            <groupId>org.apache.maven.plugins</groupId>
            <artifactId>maven-war-plugin</artifactId>
            <configuration>
                <failOnMissingWebXml>false</failOnMissingWebXml>
            </configuration>
        </plugin>
5.War包目录结构

6.以war方式打包失败[webxml attribute is required]解决方案
7.War包方式部署
将打包好的War包拷贝到Tomcat安装目录下的webapps目录中,执行Tomcat安装目录下bin目录中的startup.bat命令启动War包项目


8.测试
使用外部Tomcat部署的项目进行访问时,必须加上项目名称(打成war包后的项目全名)
http://localhost:8080/MyChapter05-0.0.1-SNAPSHOT/toLoginPage
9.修改tomcat端口号

作业:
文件下载


 2783
2783

 被折叠的 条评论
为什么被折叠?


