


先自己开发代码来实现spring与web环境继承,再使用spring提供的工具实现集成。
一、搭建基本三层架构
1、创建javaee项目
2、添加spring核心依赖
        <dependency>
            <groupId>org.springframework</groupId>
            <artifactId>spring-context</artifactId>
            <version>5.0.5.RELEASE</version>
        </dependency>
3、创建userdao、userservice、userservlet
项目结构如下:
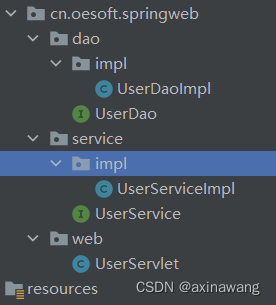
具体代码如下:
public class UserDaoImpl implements UserDao {
    public void save() {
        System.out.println("save running....");
    }
}
public class UserServiceImpl implements UserService {
private UserDao userDao;
public void setUserDao(UserDao userDao) {
this.userDao = userDao;
}
public void save() {
userDao.save();
}
}
@WebServlet("/userServlet")
public class UserServlet extends HttpServlet {
    @Override
    protected void doGet(HttpServletRequest req, HttpServletResponse resp) throws ServletException, IOException {
        ApplicationContext app = new ClassPathXmlApplicationContext("applicationContext.xml");
        UserService userService = app.getBean(UserService.class);
        userService.save();
    }
}
4、创建applicationContext.xml,配置bean
<?xml version="1.0" encoding="UTF-8"?>
<beans xmlns="http://www.springframework.org/schema/beans"
       xmlns:xsi="http://www.w3.org/2001/XMLSchema-instance"
       xmlns:context="http://www.springframework.org/schema/context"
       xsi:schemaLocation="http://www.springframework.org/schema/beans http://www.springframework.org/schema/beans/spring-beans.xsd
                        http://www.springframework.org/schema/context http://www.springframework.org/schema/context/spring-context.xsd">

    <!--配置Dao-->
    <bean id="userDao" class="cn.oesoft.springweb.dao.impl.UserDaoImpl"></bean>

    <!--配置service-->
    <bean id="userService" class="cn.oesoft.springweb.service.impl.UserServiceImpl">
        <property name="userDao" ref="userDao"/>
    </bean>
</beans>
5、测试
http://localhost:8080/spring_web/userServlet
6、源代码spring_web_base
7、结论
应用上下文对象是通过new ClasspathXmlApplicationContext(spring配置文件) 方式获取的,但是每次从容器中获得Bean时都要编写new ClasspathXmlApplicationContext(spring配置文件) ,这样的弊端是配置文件加载多次,应用上下文对象创建多次。
二、自定义ContextLoaderListener
在Web项目中,可以使用ServletContextListener监听Web应用的启动,我们可以在Web应用启动时,就加载Spring的配置文件,创建应用上下文对象ApplicationContext,在将其存储到最大的域servletContext域中,这样就可以在任意位置从域中获得应用上下文ApplicationContext对象了。
1、创建listener包、ContextLoaderListener类
@WebListener
public class ContextLoaderListener implements ServletContextListener {
public void contextInitialized(ServletContextEvent servletContextEvent) {
ServletContext servletContext = servletContextEvent.getServletContext();
ApplicationContext app = new ClassPathXmlApplicationContext("applicationContext.xml");
//将Spring的应用上下文对象存储到ServletContext域中
servletContext.setAttribute("app",app);
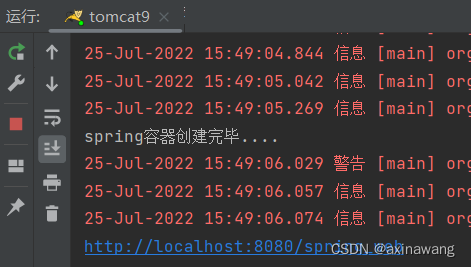
System.out.println("spring容器创建完毕....");
}
public void contextDestroyed(ServletContextEvent servletContextEvent) {
}
}2、修改UserServlet,从web应用上下文中获取spring上下文
protected void doGet(HttpServletRequest req, HttpServletResponse resp) throws ServletException, IOException {
        ServletContext servletContext = this.getServletContext();
        ApplicationContext app = (ApplicationContext) servletContext.getAttribute("app");
        UserService userService = app.getBean(UserService.class);
        userService.save();
    }
3、 http://localhost:8080/spring_web/userServlet

三、优化代码
1、把spring配置文件名称放入web.xml
    <!--全局初始化参数-->
    <context-param>
        <param-name>contextConfigLocation</param-name>
        <param-value>classpath:applicationContext.xml</param-value>
    </context-param>
2、修改web应用监听器
web应用初始化后,获取spring配置文件
 public void contextInitialized(ServletContextEvent servletContextEvent) {
        ServletContext servletContext = servletContextEvent.getServletContext();
        //读取web.xml中的全局参数
        String contextConfigLocation = servletContext.getInitParameter("contextConfigLocation");
        ApplicationContext app = new ClassPathXmlApplicationContext(contextConfigLocation);
        //将Spring的应用上下文对象存储到ServletContext域中
        servletContext.setAttribute("app",app);
        System.out.println("spring容器创建完毕....");
    }
3、重启tomcat,查看是否能创建spring容器
4、创建工具类来获取spring容器
创建WebApplicationContextUtils.java
public class WebApplicationContextUtils {

    public static ApplicationContext getWebApplicationContext(ServletContext servletContext){
        return (ApplicationContext) servletContext.getAttribute("app");
    }

}
5、UserServlet通过工具类获取spring容器
protected void doGet(HttpServletRequest req, HttpServletResponse resp) throws ServletException, IOException {
        ServletContext servletContext = this.getServletContext();
        ApplicationContext app = WebApplicationContextUtils.getWebApplicationContext(servletContext);
        UserService userService = app.getBean(UserService.class);
        userService.save();
    }
6、源代码 spring_web_my_tool
四、Spring提供获取应用上下文的工具
上面的功能不用手动实现,Spring提供了一个监听器ContextLoaderListener就是对上述功能的封装,该监听器内部加载Spring配置文件,创建应用上下文对象,并存储到ServletContext域中,提供了一个客户端工具WebApplicationContextUtils供使用者获得应用上下文对象。
所以我们需要做的只有两件事:
① 在web.xml中配置ContextLoaderListener监听器(导入spring-web坐标)
② 使用WebApplicationContextUtils获得应用上下文对象ApplicationContext
1、导入Spring集成web的坐标
<dependency>
    <groupId>org.springframework</groupId>
    <artifactId>spring-web</artifactId>
    <version>5.0.5.RELEASE</version>
</dependency>
2、配置ContextLoaderListener监听器
<!--Spring的监听器-->
<listener>
    <listener-class>
        org.springframework.web.context.ContextLoaderListener
    </listener-class>
</listener>
3、通过工具获得应用上下文对象
WebApplicationContext app = WebApplicationContextUtils.getWebApplicationContext(servletContext);
UserService userService = app.getBean(UserService.class);
4、测试的时候注释掉自己开发的监听器
5、源代码spring_web
五、 知识要点
Spring集成web环境步骤
① 配置ContextLoaderListener监听器
② 使用WebApplicationContextUtils获得应用上下文


 807
807


 被折叠的 条评论
为什么被折叠?
被折叠的 条评论
为什么被折叠?
 到【灌水乐园】发言


