ElementUI 自定义MessageBox 弹框

JS 代码

let createElement = this.$createElement;
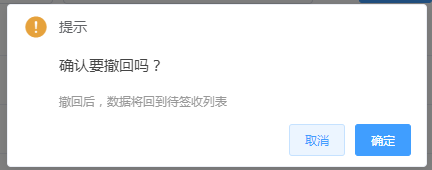
this.$msgbox({
  message: createElement('div', null, [
    createElement('p', null, '提示'),
    createElement('p', {class: 'warning-text'}, '确认要撤回吗?'),
    createElement('i', {style: 'color: #999; font-size:12px'}, '撤回后,数据将回到上一级菜单')
  ]),
  showCancelButton: true,
  iconClass: 'withdraw-warning el-icon-warning', // 会覆盖 type 字段
  confirmButtonText: '确定',
  cancelButtonText: '取消',
  beforeClose: (action, instance, done) => {
    if (action === 'confirm') {
      console.log('撤回了')
    } 
    done(); // 用于关闭 MessageBox 实例
  }
}).then(action => {
  this.$message({
    type: 'success',
    message: '撤回成功'
  });
})
.catch(cancel => {
  this.$message({
    type: 'info',
    message: '已取消撤回'
  });
})

CSS 代码

.warning-text {
  margin: 15px 0;
  color: #444;
  font-size: 15px;
}

.withdraw-warning {
  top: 22px!important;
}

效果
在这里插入图片描述

  • 0
    点赞
  • 6
    收藏
    觉得还不错? 一键收藏
  • 0
    评论
ElementUIMessageBox 弹框中,可以通过传入一个 Vue 组件作为参数来自定义弹框的内容。如果你想要在自定义组件中生成多个复选框,可以使用 v-for 指令来实现循环生成。 以下是一个示例代码,演示了如何在自定义组件中循环生成多个复选框: ``` <template> <div> <p>{{ message }}</p> <el-checkbox-group v-model="checkedList"> <el-checkbox v-for="item in options" :key="item.value" :label="item.value">{{ item.label }}</el-checkbox> </el-checkbox-group> <div> <el-button @click="handleConfirm">确定</el-button> <el-button @click="handleCancel">取消</el-button> </div> </div> </template> <script> export default { props: { message: { type: String, default: '' }, options: { type: Array, default: () => [] } }, data() { return { checkedList: [] } }, methods: { handleConfirm() { this.$emit('confirm', this.checkedList) }, handleCancel() { this.$emit('cancel') } } } </script> ``` 在这个组件中,我们使用了一个 el-checkbox-group 组件来实现多选框,使用 v-model 指令来绑定选中的值。然后使用 v-for 指令循环生成多个 el-checkbox 组件。 然后在调用 MessageBox 时,将这个组件作为参数传入,并传入 options 数组来提供选项列表: ``` <template> <div> <el-button @click="showDialog">显示自定义弹框</el-button> </div> </template> <script> import MyMessageBox from '@/components/MyMessageBox' export default { components: { MyMessageBox }, data() { return { options: [ { label: '选项1', value: 'option1' }, { label: '选项2', value: 'option2' }, { label: '选项3', value: 'option3' } ] } }, methods: { showDialog() { const h = this.$createElement const messageBox = this.$msgbox({ title: '自定义弹框', message: h(MyMessageBox, { props: { message: '请选择一个或多个选项:', options: this.options }, on: { confirm: (checkedList) => { messageBox.close() console.log(checkedList) }, cancel: () => { messageBox.close() } } }), showCancelButton: true, showConfirmButton: true, cancelButtonText: '取消', confirmButtonText: '确定' }) } } } </script> ``` 这样就可以在自定义组件中循环生成多个复选框了。注意,这里我们在 MyMessageBox 组件中添加了一个 options 属性,用于传递选项列表。在调用 MessageBox 时,我们也需要传入这个 options 属性。

“相关推荐”对你有帮助么?

  • 非常没帮助
  • 没帮助
  • 一般
  • 有帮助
  • 非常有帮助
提交
评论
添加红包

请填写红包祝福语或标题

红包个数最小为10个

红包金额最低5元

当前余额3.43前往充值 >
需支付:10.00
成就一亿技术人!
领取后你会自动成为博主和红包主的粉丝 规则
hope_wisdom
发出的红包
实付
使用余额支付
点击重新获取
扫码支付
钱包余额 0

抵扣说明:

1.余额是钱包充值的虚拟货币,按照1:1的比例进行支付金额的抵扣。
2.余额无法直接购买下载,可以购买VIP、付费专栏及课程。

余额充值