


此文章是研究preference好久之后,凭感觉写的。如果有问题,请留言,或网上参考其他文章。
自定义Preference ,这里以CheckBoxPreference为例
转载请标明出处 。
public class UsbStoragePreferenceRadio extends CheckBoxPreference{

	private View.OnClickListener storageClickListenter ;
	private Button storageBtn;
	private String openOrClose;
	private int showOrGone;
	private Context mcontext;


	public UsbStoragePreferenceRadio(Context context, AttributeSet attrs) {
		this(context, attrs,0);
		// TODO Auto-generated constructor stub
	}

	public UsbStoragePreferenceRadio(Context context, AttributeSet attrs,
			int defStyle) {
		super(context, attrs, defStyle);
		// TODO Auto-generated constructor stub
		setLayoutResource(R.layout.usb_preference_widget_storage);
		mcontext = context;

	}

	@Override
	protected void onBindView(View view) {
		// TODO Auto-generated method stub
		super.onBindView(view);
		storageBtn = (Button) view.findViewById(R.id.usb_storage_btn);
		storageBtn.setOnClickListener(storageClickListenter);
		upBtn();
	}
	 public void setstorageClickListenter(View.OnClickListener mOkListener) {
	      this.storageClickListenter = mOkListener;
	 }

	 public void storageBtnGone(){
		 this.showOrGone = View.GONE;
	 }
	 public void storageBtnVisible(){
		 this.showOrGone = View.VISIBLE;
	 }
	 public void storageBtnOpen(){
		 this.openOrClose =  mcontext.getResources().getString(R.string.turn_on);
	 }
	 public void storageBtnClosed(){
		 this.openOrClose =  mcontext.getResources().getString(R.string.turn_off);
	 }
	 private void upBtn(){
		  storageBtn.setVisibility(showOrGone);
		  storageBtn.setText(openOrClose);
	 }
}
说明:1、在重载的构造方法里载入布局:
setLayoutResource(R.layout.usb_preference_widget_storage); super.onBindView(view);
storageBtn = (Button) view.findViewById(R.id.us_btn);
storageBtn.setOnClickListener(storageClickListenter);
假如在使用这个自定义控件时
UsbStoragePreferenceRadio 有个对象叫test,设置他的button 事件。

        test.setstorageClickListenter(new View.OnClickListener() {

            @Override
            public void onClick(View v) {

                   //这里写你点击按钮要做的操作
                }
            }
        });
布局xml:
<?xml version="1.0" encoding="utf-8"?>

<LinearLayout xmlns:android="http://schemas.android.com/apk/res/android"
	android:layout_width="match_parent"
    android:layout_height="wrap_content"
    android:orientation="vertical"
    android:minHeight="?android:attr/listPreferredItemHeight"
	android:gravity="center_vertical"
    android:paddingStart="@*android:dimen/preference_item_padding_side"
    android:paddingEnd="?android:attr/scrollbarSize"
    android:background="?android:attr/selectableItemBackground"
        >
		<LinearLayout
		    android:layout_width="match_parent"
		    android:layout_height="wrap_content"
			 >


		    <RelativeLayout
		        android:layout_width="wrap_content"
		        android:layout_height="wrap_content"
		        android:layout_weight="1"
		        android:paddingTop="6dip"
		        android:paddingBottom="6dip"
		       >

			        <TextView
			           <span style="color:#FF0000;"> android:id="@+android:id/title"</span>
			            android:layout_width="wrap_content"
			            android:layout_height="wrap_content"
			            android:singleLine="true"
			            android:textAppearance="?android:attr/textAppearanceMedium"
			            android:ellipsize="marquee"
			            android:fadingEdge="horizontal" />

			        <TextView
			          <span style="background-color: rgb(255, 255, 255);"> <span style="color:#CC0000;"> android:id="@android:id/summary"</span></span>
			            android:layout_width="wrap_content"
			            android:layout_height="wrap_content"
			            android:layout_below="@android:id/title"
			            android:layout_alignStart="@android:id/title"
			            android:textAppearance="?android:attr/textAppearanceSmall"
			            android:textColor="?android:attr/textColorSecondary"
			            android:maxLines="4" />
		    </RelativeLayout>

		    <!-- Preference should place its actual preference widget here. -->


		    <LinearLayout <span style="color:#FF0000;">android:id="@+android:id/widget_frame"</span>
		        android:layout_width="wrap_content"
		        android:layout_height="match_parent"
		         android:gravity="center_vertical"
 			android:paddingRight="7dip"
		         android:orientation="vertical" />
	   </LinearLayout>
	  <Button
		 android:id="@+id/us_btn"
 		android:layout_width="wrap_content"
		 android:layout_height="wrap_content"
		 android:layout_gravity="center"
 		android:focusable="false"
 		android:text="@string/usb_storage_turn_on"
 		android:visibility="gone"
 		/>
</LinearLayout>
<PreferenceScreen xmlns:android="http://schemas.android.com/apk/res/android"
        >

     <com.android.settings.widget.UsbStoragePreferenceRadio
        android:key="usb_sdcard"
        android:title="@string/usb_sdcard_title"
        android:summary="@string/usb_sdcard_summary"
		android:layout="@layout/preference"
		android:widgetLayout="@layout/usb_preference_widget_radiobtn"
        />
</PreferenceScreen>
说明:android:layout 这个属性是控件的布局(你写上其实没什么作用,这里写上就是为了说明一下),会在重载的构造方法里载入布局:setLayoutResource(R.layout.usb_preference_widget_storage);处覆盖掉这个属性。
android:widgetLayout 这个属性,就是显示的单选的那个状态小框。 我这里用自己的布局。因为当时测试时发现系统的是多选框,我这里弄成了圆形的单选框。
<strong>usb_preference_widget_radiobtn 的XML</strong><?xml version="1.0" encoding="utf-8"?>
<RadioButton xmlns:android="http://schemas.android.com/apk/res/android"
<span style="color:#FF0000;">android:id="@+android:id/checkbox" </span>
android:layout_width="wrap_content"
android:layout_height="wrap_content"
android:layout_gravity="center"
android:focusable="false"
android:clickable="false" />
说明:在xml里面的布局里标红的id用的是系统的id。
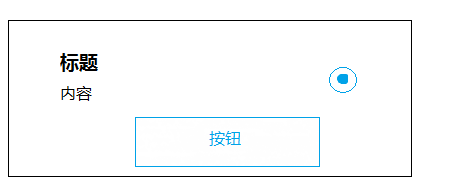
效果图如下:
以下附上系统默认的preference 布局xml, 你可以跟文章自定义的XML 比较一下。就明白了
<?xml version="1.0" encoding="utf-8"?>
<!-- Copyright (C) 2006 The Android Open Source Project

     Licensed under the Apache License, Version 2.0 (the "License");
     you may not use this file except in compliance with the License.
     You may obtain a copy of the License at

          http://www.apache.org/licenses/LICENSE-2.0

     Unless required by applicable law or agreed to in writing, software
     distributed under the License is distributed on an "AS IS" BASIS,
     WITHOUT WARRANTIES OR CONDITIONS OF ANY KIND, either express or implied.
     See the License for the specific language governing permissions and
     limitations under the License.
-->

<!-- Layout for a Preference in a PreferenceActivity. The
     Preference is able to place a specific widget for its particular
     type in the "widget_frame" layout. -->
<LinearLayout xmlns:android="http://schemas.android.com/apk/res/android"
    android:layout_width="match_parent"
    android:layout_height="wrap_content"
    android:minHeight="?android:attr/listPreferredItemHeight"
    android:gravity="center_vertical"
    android:paddingEnd="?android:attr/scrollbarSize"
    android:background="?android:attr/selectableItemBackground" >

    <ImageView
        <span style="color:#FF0000;">android:id="@+android:id/icon"</span>
        android:layout_width="wrap_content"
        android:layout_height="wrap_content"
        android:layout_gravity="center"
        />

    <RelativeLayout
        android:layout_width="wrap_content"
        android:layout_height="wrap_content"
        android:layout_marginStart="15dip"
        android:layout_marginEnd="6dip"
        android:layout_marginTop="6dip"
        android:layout_marginBottom="6dip"
        android:layout_weight="1">

        <TextView <span style="color:#FF0000;">android:id="@+android:id/title"</span>
            android:layout_width="wrap_content"
            android:layout_height="wrap_content"
            android:singleLine="true"
            android:textAppearance="?android:attr/textAppearanceLarge"
            android:ellipsize="marquee"
            android:fadingEdge="horizontal" />

        <TextView <span style="color:#FF0000;">android:id="@+android:id/summary"</span>
            android:layout_width="wrap_content"
            android:layout_height="wrap_content"
            android:layout_below="@android:id/title"
            android:layout_alignStart="@android:id/title"
            android:textAppearance="?android:attr/textAppearanceSmall"
            android:textColor="?android:attr/textColorSecondary"
            android:maxLines="4" />

    </RelativeLayout>

    <!-- Preference should place its actual preference widget here. -->
    <LinearLayout <span style="color:#FF0000;">android:id="@+android:id/widget_frame"</span>
        android:layout_width="wrap_content"
        android:layout_height="match_parent"
        android:gravity="center_vertical"
        android:orientation="vertical" />

</LinearLayout>


 2651
2651


 被折叠的 条评论
为什么被折叠?
被折叠的 条评论
为什么被折叠?
 到【灌水乐园】发言


