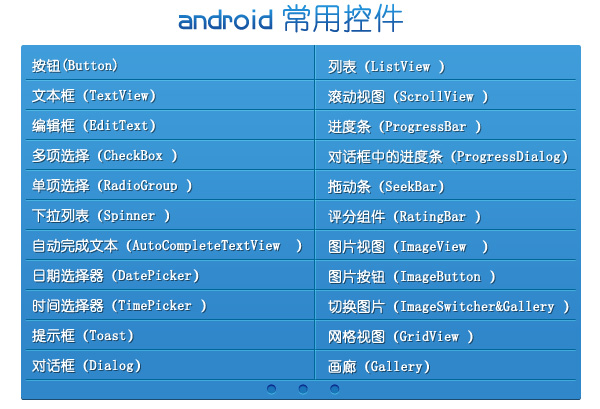
Android 中提供了丰富多彩的控件,开发人员只需简单的几句调用或者参数设置的语句就可以用其构建完整的用户界面。
Android 中常用控件有很多,下表是我为大家总结的部分控件,大家可以先看看,从他们的名字中就可以大概知道他们的用途和样式。

Android 中控件的使用方法一般有两种,一种是在XML文件中配置,另一种是在Java代码中直接调用。下面我们详细地介绍每个控件的作用和使用方法。
=================================================================
按钮(Button)
按钮是用的最多的控件,软件的交互很大一部分要通过按钮完成,点击按钮触发事件,所以在放上按钮后要对按钮设置setOnClickListener事件监听。
布局文件中的配置:
<pre style="line-height: 23px; ">
    <font face="Tahoma" size="2" color="#696969">
        <Button
            android:id="@+id/button1"
            android:layout_width="fill_parent"
            android:layout_height="wrap_content"/>
    </font>
</pre>
复制代码
Java代码中的使用:
Button button1 = (Button)findViewById(R.id. button1);
//为 button1  设置监听事件
button1.setOnClickListener(new Button.OnClickListener(){
复制代码
文本框(TextView)
文本框(TextView)就是一个用来显示文本标签的控件,使用比较简单,但是要注意一点,Android推荐大家将文本框的内容,也就是 android:text 属性中的值,用string索引的方式来存贮,我也推荐大家这样做,这样方便应用文字内容的修改以及应用多语言版本的开发,具体用法是在 res/values/strings.xml 中新建一条string标签将文字内容写在这里,然后在布局文件中 TextView 控件中用 android:text =”@string/name” 来引用,name是strings.xml 中string标签 的name,其他控件上的文字内容都可以这样处理。
布局文件中的配置:
<TextView
    android:id="@+id/textView1"
    android:layout_width="fill_parent"
    android:layout_height="wrap_content"
    android:text="@string/text"
/>
复制代码
Java代码中的使用:
TextView textView1 = (TextView)findViewById(R.id.textView1);
//这里是在代码中设置
TextView 的内容,如果在布局文件中配置好了就不需要这步
textView1.setText(R.string.text );
复制代码
编辑框(EditText)
编辑框(EditText)也是能够经常使用到的控件,尤其是在表单中,需要用户输入信息的地方都得用EditText实现,比如登陆、注册界面,用户输入后可以提交给服务器。使用方法如下…
布局文件中的配置:
EditText editText1 = (EditText)findViewById(R.id.editText1);复制代码
单项选择(RadioGroup、RadioButton)
大家一定不会对考试中经常出现的单项选择感到陌生, Android平台提供了单项选择组件,可以通过RadioGroup、RadioButton组合起来完成一个单项选择效果。
布局文件中的配置:
<RadioGroup
   android:id="@+id/radioGroup1"
   android:layout_width="wrap_content"
   android:layout_height="wrap_content"
   android:orientation="vertical"
    >
<!--选项1-->
    <RadioButton
   android:id="@+id/radioButton1"
   android:layout_width="wrap_content"
   android:layout_height="wrap_content"
   android:text="@string/female"
              />
<!--选项2-->
    <RadioButton
   android:id="@+id/radioButton2"
   android:layout_width="wrap_content"
   android:layout_height="wrap_content"
   android:text="@string/male"
              />
</RadioGroup>
复制代码
Java代码中的使用:
//定义选项组和选项
RadioGroup radioGroup1 = (RadioGroup)findViewById(R.id.radioGroup1);
RadioButton radioButton1 = (RadioButton)findViewById(R.id.femaleButton);
RadioButton radioButton2 = (RadioButton)findViewById(R.id. radioButton2);

//设置监听器
radioGroup1.setOnCheckedChangeListener(new RadioGroup.OnCheckedChangeListener() {
@Override
//监听事件
public void onCheckedChanged(RadioGroup group, int checkedId) {
          //选项1被选中
            if(radioButton1.getId() == checkedId){
                     System.out.println("radioButton1");
              }
         //选项2被选中
            else if(radioButton2.getId() == checkedId)
             {
                      System.out.println("radioButton2");
               }
       }
});
复制代码
多项选择(CheckBox)
同单项选择一样同样是选择题(- -!),多选与单选的区别就是它可以让用户选择一个以上的选项。
布局文件中的配置:
<CheckBox
   android:id="@+id/checkBox1"
   android:layout_width="wrap_content"
   android:layout_height="wrap_content"
   android:text="@string/checkBox1"
          />
<!--多选项2-->
<CheckBox
   android:id="@+id/checkBox2"
   android:layout_width="wrap_content"
   android:layout_height="wrap_content"
   android:text="@string/checkBox2"
          />
复制代码
Java代码中的使用:
CheckBox checkBox1 = (CheckBox)findViewById(R.id.checkBox1);
CheckBox checkBox2 = (CheckBox)findViewById(R.id.checkBox2);
//为第一个多选项设置监听
checkBox1.setOnCheckedChangeListener(new CompoundButton.OnCheckedChangeListener() {
        @Override
        public void onCheckedChanged(CompoundButton buttonView, boolean isChecked) {
               if(isChecked)
              {
                        System.out.println("checkBox1 is checked");
               }
              else
               {
                        System.out.println("checkBox1 is unchecked");
                }
         }
});
//为第二个多选项设置监听
checkBox2.setOnCheckedChangeListener(new CompoundButton.OnCheckedChangeListener() {
@Override
public void onCheckedChanged(CompoundButton buttonView, boolean isChecked) {
               if(isChecked)
              {
                        System.out.println("checkBox2 is checked");
               }
              else
               {
                        System.out.println("checkBox2 is unchecked");
                }
         }
});
复制代码
下拉列表(Spinner)
在一些网站和应用中都会有填用户信息的选项,比如城市,一般都是采取下拉列表来让用户从众多城市中取挑选自己所在的城市,这样做可以有效降低用户的输入成本,在手机这种设备上尤其重要。下面我们就来看看下拉列表的使用。
布局文件中的配置:
<Spinner
   android:id="@+id/Spinner1"
   android:layout_width="wrap_content"
   android:layout_height="wrap_content" />
复制代码
Java代码中的使用:
 static final String[] myLove = {"萝莉","御姐","女王","御妹","女仆"};
        Spinner mySpinner =(Spinner)findViewById(R.id.Spinner1);
        //将可选内容与ArrayAdapater连接
                ArrayAdapter<string> adapter = new ArrayAdapter<string>(this,android.R.layout.simple_spinner_item);

                //设置下拉列表的样式
                adapter.setDropDownViewResource(android.R.layout.simple_spinner_dropdown_item);

                //将adapter添加到mySpinner中
                mySpinner.setAdapter(adapter);

                //添加Spinner事件监听
                mySpinner.setOnItemSelectedListener(new Spinner.OnItemSelectedListener() {

                        public void onItemSelected(AdapterView<?> arg0, View arg1,
              int arg2, long arg3)
 {
 //设置显示当前选择的项
   arg0.setVisibility(View.VISIBLE);
   }
public void onNothingSelected(AdapterView<?> arg0) {
   //没有选择时. }
                });
复制代码
自动完成文本框(AutoCompleteTextView)
当我们使用搜索引擎如 百度 、谷歌等的时候,输入1个以上字符后搜索引擎都会给予自动完成的选项,Android当然也提供了这种自动完成文本框(AutoCompleteTextView),使用自动完成文本框可以降低用户的输入成本,提升用户体验,增加应用的友好性,下面我们就来应用一下。
布局文件中的配置:
<!-- 定义一个自动完成文本框,指定输入一个字符后进行提示 -->
<!-- android:dropDownHorizontalOffse 设置下拉列表的水平偏移  -->
<AutoCompleteTextView
    android:id="@+id/auto"
    android:layout_width="fill_parent"
    android:layout_height="wrap_content"
    android:completionHint="请输入您喜欢的歌曲"
    android:dropDownHorizontalOffset="20dp"
    android:completionThreshold="1"  /> <!-- 指明当输入多少个字的时候给出响应的提示 -->
复制代码
Java代码中的使用:
public class AutoCompleteTextViewTest extends Activity
{
       //定义字符串数组,作为提示的文本
      String[] autoString = new String[]{
         "孙燕姿-hey jude",
         "孙燕姿-the moment",
         "孙燕姿-tonight I feel close to you",
         "孙燕姿-leave me alone"
       };
     @Override
     public void onCreate(Bundle savedInstanceState)
    {
         super.onCreate(savedInstanceState);
         setContentView(R.layout.main);
         //创建一个ArrayAdapter,封装数组
         ArrayAdapter<String> myAdapter = new ArrayAdapter<String>(
           this,
android.R.layout.simple_dropdown_item_1line,  autoString  );
         AutoCompleteTextView autoText = (AutoCompleteTextView)
findViewById(R.id.auto);
        //设置Adapter
        autoText.setAdapter(
myAdapter );
     }
}
复制代码
日期选择器(DatePicker)和 时间选择器(TimePicker)
日期和时间用到的也比较多,经常能一起见到,我们把它们放到一起说。
布局文件中的配置:
<DatePicker android:id="@+id/datepicker"
    android:layout_width="wrap_content"
    android:layout_height="wrap_content"
    android:layout_gravity="center_horizontal"
/>
<!--时间控件-->
<TimePicker
    android:id="@+id/timepicker"
    android:layout_width="wrap_content"
    android:layout_height="wrap_content"
    android:layout_gravity="center_horizontal"
/>
复制代码
Java代码中的使用:
public class TimeExampleActivity extends Activity {
//定义变量
     private int year;
     private int month;
     private int day;
     private int hour;
     private int minute;
     /** Called when the activity is first created. */
     @Override
     public void onCreate(Bundle savedInstanceState) {
        super.onCreate(savedInstanceState);
复制代码
提示框(Toast)
Android中的Toast是一种简易的消息提示框,toast提示框不能被用户点击,toast会根据用户设置的显示时间后自动消失。
Java代码中的使用:
Toast.makeText(RadioTest.this, "Hello", Toast.LENGTH_SHORT).show();


 6535
6535

 被折叠的 条评论
为什么被折叠?


