


一、关于 Vue.extend( options )
官网解释: 使用基础 Vue 构造器 Vue.extend,创建一个“子类”。参数是一个包含组件选项的对象。
需要注意 - 在Vue.extend()中 data 选项必须是函数。
一般,我们会用 Vue.extend 接收一个组件对象来创建一个构造器,再利用创建的构造器 new 一个实例,并将这个实例挂载到一个元素上。
官网示例:
<div id="mount-point"></div>;
// 创建构造器
var Profile = Vue.extend({
  template: "<p>{{firstName}} {{lastName}} aka {{alias}}</p>",
  data: function () {
    return {
      firstName: "Walter",
      lastName: "White",
      alias: "Heisenberg"
    };
  }
});
// 创建 Profile 实例,并挂载到一个元素上。
new Profile().$mount("#mount-point");
二、Vue.extend( options )的实际运用
github 地址: https://github.com/ddx2019/modal
tips: demo 中用 element-ui,是为了用它的 Progress 组件…
  "element-ui": "^2.13.2",
   "mitt": "^3.0.0",
   "vue": "^2.6.11"
需求
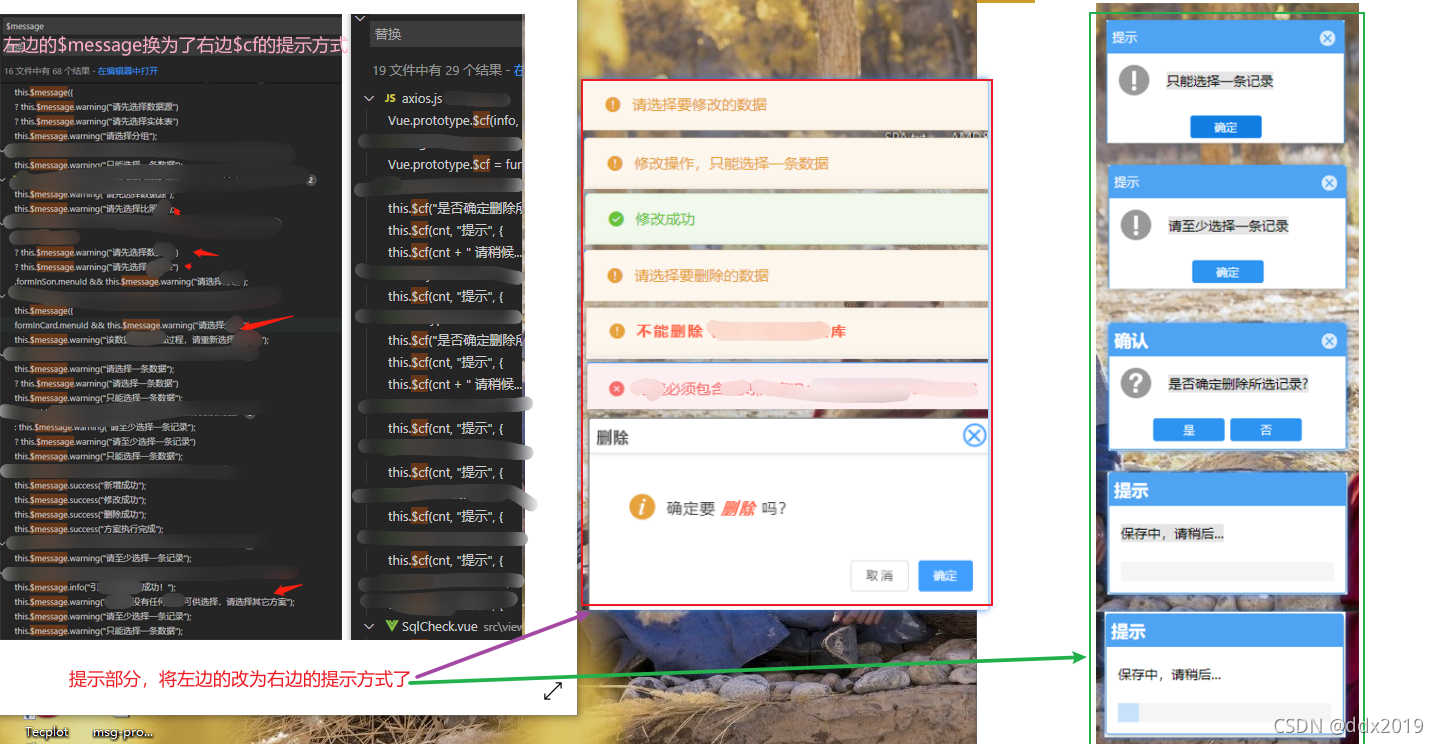
需求: 将原项目中所有用 Element 的 Message 消息提示组件的地方,改为类似element-ui的MessageBox组件的样式:
封装原因:
原来都是用的 Elemnet 的 Message 组件,但当前需要改成最右边的样式,因需要拖动功能以及如添加功能请求后台时,显示“保存中…”的情况需要一个进度条加载效果,element的MessageBox组件无法满足需求,故封装了自己封装了一个
一) 封装 Modal.vue 组件
src/components/Modal.vue 文件:
<template>
  <div class="modal-wrap" v-if="visible" v-modalDrag>
    <div class="modal">
      <div class="modal-header">
        <div class="modal-title">
          {{ title }}
        </div>
        <div
          v-if="cfOptions.showClose"
          @click="cancel"
          class="modal-close"
        ></div>
      </div>

      <div class="modal-body">
        <div class="icon-container " v-if="!cfOptions.useHTMLStr">
          <svg-icon
            v-if="cfOptions.iconName"
            :icon-name="cfOptions.iconName"
            icon-class="icon_style"
          ></svg-icon>
          <span class="info" :title="msg">{{ ctx }}</span>
        </div>
        <div v-else v-html="msg"></div>
      </div>

      <div v-if="cfOptions.isCustomFooter" class="modal-footer">
        <!-- 请求后台后的提示,如 保存中... -->
        <span class="msg-progress">
          <el-progress
            :text-inside="true"
            :percentage="cfOptions.percentage"
            :stroke-width="18"
            stroke-linecap="square"
          ></el-progress>
        </span>
      </div>

      <div v-else class="modal-footer">
        <button @click="confirm" class="footer-btn">
          {{ cfOptions.cfBtnText }}
        </button>
        <button
          v-if="cfOptions.showCancelBtn"
          @click="cancel"
          class="footer-btn"
        >
          {{ cfOptions.cancelBtnText }}
        </button>
      </div>
    </div>
  </div>
</template>

<script>
import eventBus from "@/plugins/mitt.js";
export default {
  data() {
    return {
      msg: "",
      /**
       *  显示与隐藏
       */
      visible: true,

      /**
       * 定时器实例
       */
      timer: null,
      /**
       * 定时器默认值
       *
       */
      time: 2000,

      /**
       *  是否开启自动关闭
       */
      close: false,

      title: "提示",

      cfOptions: {
        cfBtnText: "确定",
        cancelBtnText: "取消",
        showClose: true, //是否显示close图标
        useHTMLStr: false, //使用html片段
        showCancelBtn: true, //是否显示取消按钮
        isCustomFooter: false, //是否使用自定义footer
        percentage: 0,
        autoClose: false, //是否自动关闭
        iconName: "" //图标名
      }
    };
  },
  computed: {
    ctx() {
      return this.msg.length > 10
        ? this.msg.substring(0, 10) + "..."
        : this.msg;
    }
  },
  watch: {
    "cfOptions.percentage"(newVal) {
      if (newVal !== 100) return;
      this.handleAutoClose(300);
    },
    "cfOptions.autoClose"(newVal) {
      if (!newVal) return;
      this.handleAutoClose(1200);
    }
  },
  methods: {
    confirm() {
      eventBus.emit("confirm", "cf");
      this.visible = false;
    },
    cancel() {
      eventBus.emit("cancel", "close");
      this.visible = false;
    },
    handleAutoClose(time) {
      setTimeout(() => {
        this.visible = false;
      }, time);
    }
  }
};
</script>

<style lang="scss">
.modal-wrap {
  position: fixed;
  top: 0;
  right: 0;
  bottom: 0;
  left: 0;
  overflow: auto;
  margin: 0;
  background: rgba(0.2, 0.2, 0.3, 0.5);
}

.modal {
  width: 250px;
  position: relative;
  margin: 0 auto;
  margin-top: 100px;
  background: #ffffff;
  border-radius: 2px;
  box-shadow: 0 1px 3px rgb(0 0 0 / 30%);
  box-sizing: border-box;

  &-header {
    border-color: #4ea4f3;
    background-color: #4ea4f3;
    position: relative;
  }

  &-title {
    color: #fff;
    letter-spacing: 1px;
    font-family: arial, helvetica, verdana, sans-serif;
    text-align: left;
    padding: 10px 0 10px 6px;
    font-size: 15px;
  }

  &-close {
    position: absolute;
    top: 9px;
    right: 10px;
    width: 18px;
    height: 18px;
    border-radius: 100%;
    border: 1px solid red;
    border: 1px solid #d7e9fa;
    background: #d7e9fa;
    cursor: pointer;

    &::after {
      content: "x";
      position: absolute;
      right: -4px;
      top: -3px;
      width: 17px;
      height: 17px;
      border-radius: 25px;
      color: #41a3ff;
    }
  }

  &-body {
    padding: 15px;
  }

  &-footer {
    display: inline-block;
    width: 100%;
    text-align: center;
    padding: 12px 0;

    .footer-btn {
      border-radius: 4px;
      width: 75px;
      padding: 4px 5px;
      background-color: #2e94f1;
      font-size: 13px;
      outline: none;
      border: 1px solid #dcdfe6;
      color: #fff;
      cursor: pointer;
      margin-right: 8px;

      & :last-child {
        margin-right: 0;
      }

      &:hover {
        background: #0b82f1;
      }
    }
  }

  .hidden {
    display: none;
  }

  .msg-progress {
    // 重写el-progress样式
    .el-progress-bar__outer {
      border-radius: 0;
      width: 90%;
      margin: auto;
    }
    .el-progress-bar__inner {
      border-radius: 0;
      background: #b8d4f3;
    }
    .el-progress-bar__innerText {
      color: #b0d1f5;
    }
  }
}
.icon-container {
  span {
    display: inline-block;
    vertical-align: middle;
  }
  .icon_style {
    width: 35px;
    height: 35px;
    color: #bbb;
  }

  .info {
    color: #333;
    margin-left: 6px;
    font-size: 15px;
    font-weight: 500;
    letter-spacing: 1px;
  }
}
</style>
二)新建 msgModal.js 文件,并更改其内容:
src/utils/msgModal.js文件:
import Modal from "@/components/Modal.vue";
import Vue from "vue";
import eventBus from "@/plugins/mitt.js";
let msgModal = Vue.extend(Modal);

msgModal.install = function (Vue) {
  Vue.prototype.$cf = function (...args) {
    let instanceModal = new msgModal({ el: document.createElement("div") });

    document.querySelector("body").appendChild(instanceModal.$el);

    instanceModal.footer = true;
    instanceModal.visible = true;
    instanceModal.close = false;
    let cfObj = null;

    [instanceModal.msg, instanceModal.title, cfObj] = args;

    if (cfObj) {
      for (let key in cfObj) {
        instanceModal.cfOptions[key] = cfObj[key];
      }

      // 让progress有一个加载的过渡效果
      instanceModal.cfOptions.percentage = 30;
      setTimeout(() => {
        instanceModal.cfOptions.percentage = cfObj.percentage;
      }, 200);
    }

    return new Promise((resolve, reject) => {
      eventBus.on("confirm", data => {
        resolve(data);
      });

      eventBus.on("cancel", reason => {
        reject(reason);
      });
    });
  };
};

export default msgModal;
三)自定义拽指令 v-modalDrag,实现拖动功能
src/utils/directive.js文件:
import Vue from "vue";

//   自定义拖拽指令 v-modalDrag
Vue.directive("modalDrag", {
  bind(el) {
    const dialogHeaderEl = el.querySelector(".modal-header");
    const dragDom = el.querySelector(".modal");
    handler(dialogHeaderEl, dragDom);
  }
});

function handler(dialogHeaderEl, dragDom) {
  // dialogHeaderEl.style.cssText += ";cursor:move;";
  dragDom.style.cssText += ";cursor:move;top:0px;";
  // 获取原有属性 ;ie: dom元素.currentStyle  ; 火狐谷歌 :window.getComputedStyle(dom元素,null);
  const sty = (() => {
    if (window.document.currentStyle) {
      return (dom, attr) => dom.currentStyle[attr];
    } else {
      return (dom, attr) => getComputedStyle(dom, false)[attr];
    }
  })();

  dragDom.onmousedown = e => {
    // 鼠标按下,计算当前元素距可视区域 的距离
    const disX = e.clientX - dialogHeaderEl.offsetLeft;
    const disY = e.clientY - dialogHeaderEl.offsetTop;

    const screenWidth = document.body.clientWidth; // body当前高度
    const screenHeight = document.documentElement.clientHeight; // 可见区域高度  (应是body的高度,但某些情况下无法获取)

    const dragDomWidth = dragDom.offsetWidth; // 对话框的宽度
    const dragDomHeight = dragDom.offsetHeight; // 对话框的高度

    const minDragDomLeft = dragDom.offsetLeft;
    const maxDragDomLeft = screenWidth - dragDom.offsetLeft - dragDomWidth;

    const minDragDomTop = dragDom.offsetTop;
    const maxDragDomTop = screenHeight - dragDom.offsetTop - dragDomHeight;

    // 获取到的值带px ,正则匹配替换
    let styL = sty(dragDom, "left");
    let styT = sty(dragDom, "top");

    // 注意:ie中,第一次获取的值为组件自带50%,移动之后赋值为px

    if (styL.includes("%")) {
      styL = +document.body.clientWidth * (+styL.replace(/%/g, "") / 100);
      styT = +document.body.clientHeight + +styT.replace(/%/g, "") / 100;
    } else {
      styL = +styL.replace(/\px/g, "");
      styT = +styT.replace(/\px/g, "");
    }
    document.onmousemove = function (e) {
      // 通过事件委托,计算移动的距离
      let left = e.clientX - disX;
      let top = e.clientY - disY;

      // 边界处理

      if (-left > minDragDomLeft) {
        left = -minDragDomLeft;
      } else if (left > maxDragDomLeft) {
        left = maxDragDomLeft;
      }

      if (-top > minDragDomTop) {
        top = -minDragDomTop;
      } else if (top > maxDragDomTop) {
        top = maxDragDomTop;
      }

      // 移动当前元素
      dragDom.style.cssText += `;left:${left + styL}px;top:${top + styT}px`;
    };

    document.onmouseup = function () {
      document.onmousemove = null;
      document.onmouseup = null;
    };
  };
}
四)在 main.js 中引入需要用到的内容
import Vue from "vue";
import App from "./App.vue";
import "@/plugins/element.js";
import "./icons"; //即import "@/icons/index.js";
import msgModal from "./utils/msgModal";
import "@/utils/directive.js";

Vue.config.productionTip = false;

Vue.use(msgModal);

new Vue({
  render: h => h(App)
}).$mount("#app");
五) 测试并使用
1.在组件中使用示例
App.vue 文件
<template>
  <div id="app">
    <!-- 例:当keywords为"中文英文"的时候,会显示弹框提示 -->
    <input type="text" v-model="keywords" />
    <button @click="getLists">点击获取数据</button>
    <ul>
      <li v-for="(item, index) in entries" :key="index">
        {{ item.entry }}-------{{ item.explain }}
      </li>
    </ul>
    <br />
    <br />
    <button @click="modal">点击测试-1</button>
    <br />
    <br />
    <button @click="handleOnlyOrless">点击测试-2</button>
    <br />
    <br />
    <button @click="handleDel">点击测试-3</button>
  </div>
</template>

<script>
import axios from "@/plugins/axios.js";
import eventBus from "@/plugins/mitt.js";
export default {
  name: "App",
  data() {
    return {
      keywords: "中文",
      entries: []
    };
  },
  mounted() {
    // listen to an event
    eventBus.on("foo", e => console.log("foo", e));
    // fire an event
    eventBus.emit("foo", { a: "b" });
    // clearing all events
    eventBus.all.clear();
  },
  methods: {
    modal() {
      const content = `<strong style="color:red">你好这是文字----内容</strong>`;
      this.$cf(content, "提示", {
        cfBtnText: "是",
        cancelBtnText: "否",
        useHTMLStr: true,
        showCancelBtn: true
      })
        .then(data => {
          this.getData(data);
        })
        .catch(() => {
          console.log("取消");
        });
    },
    getData(data) {
      console.log("确定", data);
      this.$cf("保存中,请稍候...", "提示", {
        showClose: false,
        isCustomFooter: true,
        percentage: 100
      });
    },
    handleOnlyOrless() {
      const radom = Math.floor(Math.random() * 10 + 1); //生成[1,10]的随机整数
      const cnt = radom > 5 ? "最多只能选择5条数据" : "数据显示";
      this.$cf(cnt, "提示", {
        showCancelBtn: false,
        iconName: "help"
      }).catch(err => {
        console.log("err", err);
      });
    },
    handleDel() {
      this.$cf("是否确定删除该条数据?", "确认", {
        cfBtnText: "是",
        cancelBtnText: "否",
        iconName: "help"
      })
        .then(data => {
          this.$cf("正在删除,请稍候...", "提示", {
            showClose: false,
            isCustomFooter: true,
            percentage: 100
          });
          console.log("data", data);
        })
        .catch(err => {
          console.log("err", err);
        });
    },
    getLists() {
      axios({
        url: "/suggest",
        method: "post",
        data: {
          // num: 2, //显示几条数据
          q: this.keywords, //查询的关键字
          doctype: "json" //显示的格式
        }
      })
        .then(res => {
          this.entries = res.data.data.entries;
          console.log("result:", res);
        })
        .catch(err => {
          console.log("err", err);
        });
    }
  }
};
</script>

<style>
#app {
  font-family: Avenir, Helvetica, Arial, sans-serif;
  -webkit-font-smoothing: antialiased;
  -moz-osx-font-smoothing: grayscale;
  color: #2c3e50;
  margin-top: 60px;
}
</style>
2.在封装的 axios.js 文件中使用示例
src/plugins/axios.js文件:(这里只是一个示例:需要根据具体情况确定使用的地方)
import axios from "axios";
import qs from "qs";
import Vue from "vue";

const options = {
  timeout: 3000,
  withCredentials: true,
  baseURL: "/api"
};

const _axios = axios.create(options);
_axios.interceptors.request.use(
  config => {
    if (config.method === "post" && !(config.data instanceof FormData)) {
      config.headers = {
        "Content-Type": "application/x-www-form-urlencoded"
      };
      config.data = qs.stringify(config.data, { allowDots: true });
    }
    return config;
  },
  error => {
    return Promise.reject(error);
  }
);
_axios.interceptors.response.use(
  res => {
    const { code, result, msg } = res.data;
    if (code === 0) return res;

    // 数据不满足约束条件的情况
    let info = msg;
    if (res.data.code === 2000) {
      // 这里的result中会有发生错误的具体原因,需提示用户
      for (let key in result) {
        info += result[key];
      }
    }
    Vue.prototype.$cf(info, "提示", {
      showCancelBtn: false,
      iconName: "warning"
    });
    return res;
  },
  err => {
    return Promise.reject(err);
  }
);
export default _axios;
vue2中,element 的按需引入
- 运行命令安装 element-ui :
yarn add element-ui - 安装按需引入 element-ui 需要用到的插件:
yarn add babel-plugin-component -D - 修改 babel.config.js 文件中的配置:
module.exports = {
  plugins: [
    [
      "component",
      {
        libraryName: "element-ui",
        styleLibraryName: "theme-chalk"
      }
    ]
  ]
};
- 在 src 下新建 plugins 目录,并在 plugins 下新建 element.js 文件:
src/plugins/element.js文件内容,例:
import Vue from "vue";
import { Progress } from "element-ui";
Vue.use(Progress);
- 在 main.js 中引入刚刚新建的 element.js 文件即可
import Vue from "vue";
import App from "./App.vue";
import "@/plugins/element.js";
Vue.config.productionTip = false;
Vue.use(msgModal);
new Vue({
  render: h => h(App)
}).$mount("#app");
demo 见:https://github.com/ddx2019/modal
mitt 插件在 vue 中的使用
- 使用命令安装 mitt:
yarn add mitt - 在组件中引入并测试使用:
import mitt from "mitt"; //using ES6 modules
const emitter = new mitt();
export default {
  mounted() {
    // listen to an event
    emitter.on("foo", e => console.log("foo", e));
    // fire an event
    emitter.emit("foo", { a: "b" });
    // clearing all events
    emitter.all.clear();
  }
};
更多使用,参考:https://github.com/developit/mitt
其他
注意:
demo 中的 sass,svg 图标等信息:
- svg 图标的使用,见:https://blog.csdn.net/ddx2019/article/details/109048187
- sass 在 vue 中的使用 (注意使用 dart-sass,注意 sass-loader 的版本,报错解决,见:https://blog.csdn.net/ddx2019/article/details/115352155)


 360
360


 被折叠的 条评论
为什么被折叠?
被折叠的 条评论
为什么被折叠?
 到【灌水乐园】发言


