


文章目录
Launcher3图标布局原理解析
Launcher3是Android原生的系统APP,相当于PC的桌面,管理各个应用/小部件/文件夹。本文基于Android13重点讲解图标的布局流程和数据保存方法。
基本介绍
Launcher启动的三种场景
- 开机后启动:开机时,
android AMS服务拉起Launcher - HOME键启动:短按HOME键,
android WMS中的PhoneWindowManager会拉起Launcher - 被kill后自启动:因为异常被kill崩溃后,
android AMS再次拉起Launcher
视图概览
类定义概览
-
Launcher主
Acitivty,继承Activity,是桌面的主界面,因此可知,桌面其实就是一个activity,只是和平常的应用不同,他用来显示图标、Widget和文件夹等; -
LauncherModel逻辑控制器,继承BroadcastReceiver,由此可知他是一个广播接收器,用来接收广播,另外,LauncherModel还主要加载数据;
-
LauncherProvider数据控制器,继承ContentProvider,主要是处理数据库操作;
-
LauncherAppState内存变量管理器,单例模式的全局管理类,主要是初始化一些对象,注册广播等.
-
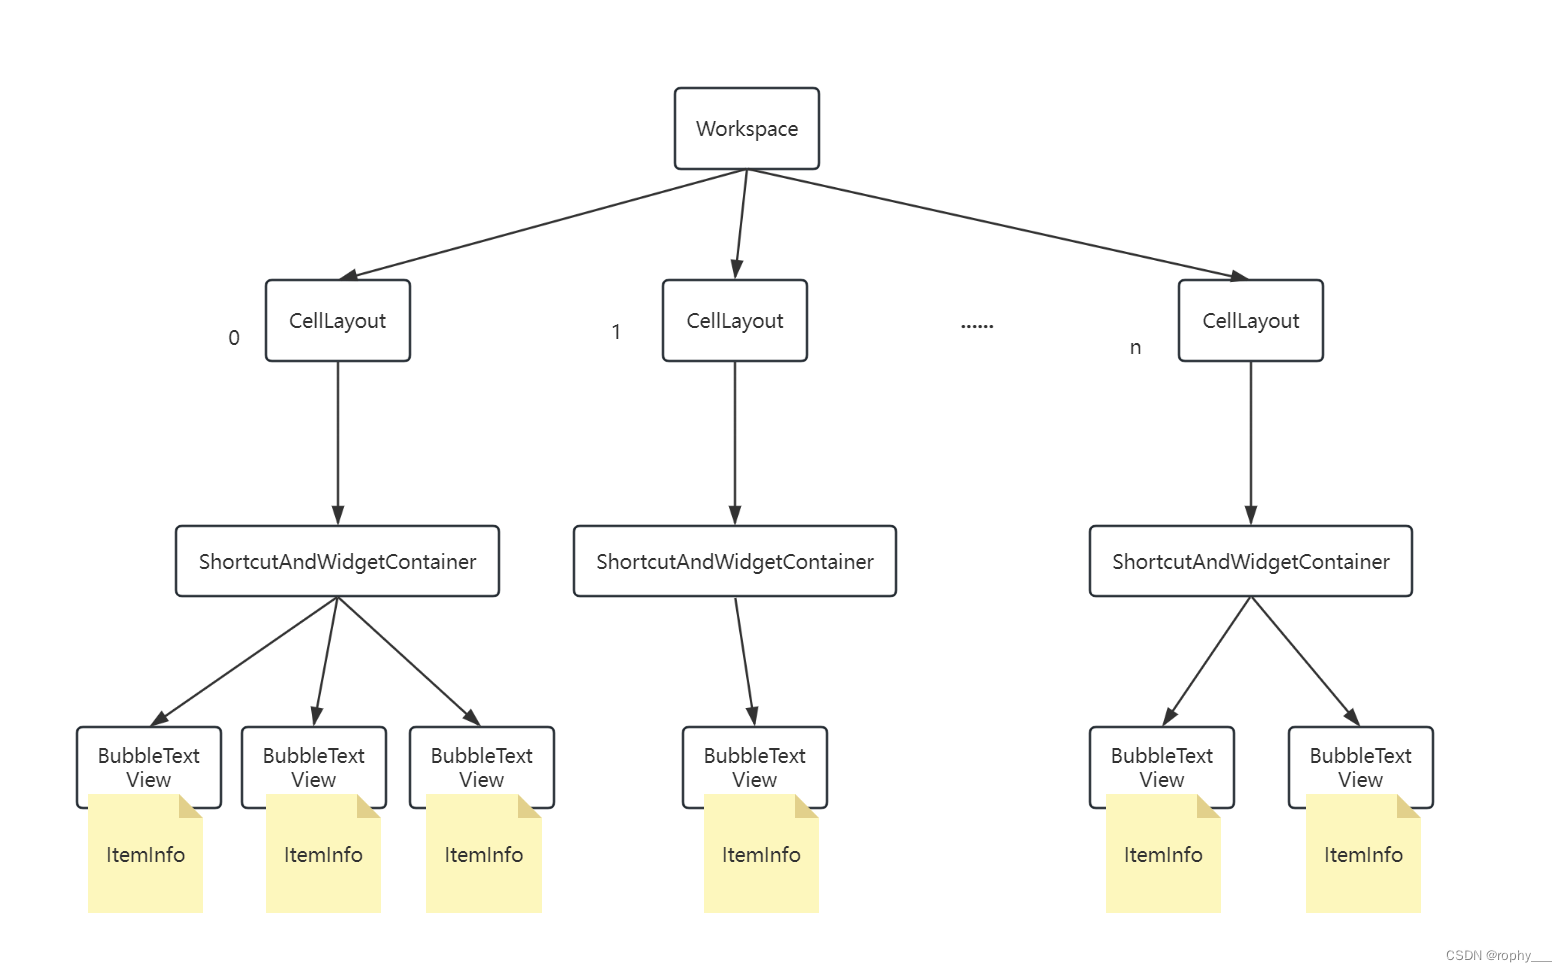
Workspace主屏幕对应的布局,是直接添加到
Launcher.xml中的布局对象 -
CellLayout主屏幕中的每一页,其父布局就是
Workspace,左右滑动屏幕,就是每一个CellLayout的变化过程,这个类中有很多处理拖拽相关方法。 -
ShortcutAndWidgetContainer装载图标的容器(布局),其父布局是
CellLayout -
BubbleTextViewLauncher所有图标文字显示的父类,包括文字的大小,文字刷新的的父类
-
InvariantDeviceProfileLauncher的默认配置加载类,通过
InvariantDeviceProfile方法可以看出,CellLayout显示的应用行数和列数可以通过findClosestDeviceProfiles查询XML配置来读取配参。 -
DeviceProfile
是InvarianDeviceProfile筛选的一个单元类,通过特定的平方根算法,计算出最适合设备的DeviceProfile。 -
BaseIconFactoryLauncher图标的工厂类,控制图标UI展示(图标白边控制)Android8,9,10可能在其他类,可以全局搜索normalizeAndWrapToAdaptiveIcon方法 -
xxxxCompat兼容包,带有这个后缀的都是做兼容处理的类.
-
IconCacheLauncher的应用图标缓存机制
-
ClippedFolderIconLayoutRule文件夹图标内部显示小图标缩略图的计算类,常见4宫格9宫格显示的实现类。
-
FolderGridOrganizer展开文件夹显示的计算逻辑类,文件夹图标呈现是网格状,此类主要给文件夹各应用图标制定显示规则
-
LoaderTask加载各个模块Task的显示类,如
workspace工作区icon、all工作区icon初始化工作。 -
PackageUpdatedTaskPMS安装应用后更新
Launcher3图标及逻辑的实现类。… …
Launcher初始化
- AndroidManifest.xml
<activity
            android:name="com.android.launcher3.Launcher"
            android:launchMode="singleTask"
            ...
            <intent-filter>
            	// 主函数
                <action android:name="android.intent.action.MAIN" />
                // 代表是home桌面应用
                <category android:name="android.intent.category.HOME" />
            </intent-filter>
            ...
        </activity>
- Launcher.java
		// 获取LauncherAppState单例实例
		LauncherAppState app = LauncherAppState.getInstance(this);
        mOldConfig = new Configuration(getResources().getConfiguration());

        // 获取LauncherModel单例实例
        mModel = app.getModel();

        // 获取InvariantDeviceProfile单例实例
        InvariantDeviceProfile idp = app.getInvariantDeviceProfile();
        // 拿到InvariantDeviceProfile实例去初始化
        initDeviceProfile(idp);
        // 拖拽控制器
        mDragController = new LauncherDragController(this);
加载默认布局依托于InvariantDeviceProfile, 最终会调用initDeviceProfile(idp);
选择默认布局
    protected void initDeviceProfile(InvariantDeviceProfile idp) {
        // Load configuration-specific DeviceProfile
        mDeviceProfile = idp.getDeviceProfile(this);
        // 多个显示屏
        if (isInMultiWindowMode()) {
            mDeviceProfile = mDeviceProfile.getMultiWindowProfile(
                    this, getMultiWindowDisplaySize());
        }

        onDeviceProfileInitiated();
        mModelWriter = mModel.getWriter(getDeviceProfile().isVerticalBarLayout(), true, this);
    }
调用InvariantDeviceProfile的getDeviceProfile, 这个方法是核心实现之一。
此时, InvariantDeviceProfile单例已经被实例化!
public DeviceProfile getDeviceProfile(Context context) {
        Resources res = context.getResources();
        Configuration config = context.getResources().getConfiguration();

		// 获取系统配置 screenWidth  screenHeight rotation
        float screenWidth = config.screenWidthDp * res.getDisplayMetrics().density;
        float screenHeight = config.screenHeightDp * res.getDisplayMetrics().density;
        int rotation = WindowManagerProxy.INSTANCE.get(context).getRotation(context);

        ...
        // 根据系统配置信息, 获取最匹配的DeviceProfile
        return getBestMatch(screenWidth, screenHeight, rotation);
}
接下来看看getBestMatch(screenWidth, screenHeight, rotation)这个方法
    /**
     * Returns the device profile matching the provided screen configuration
     */
    public DeviceProfile getBestMatch(float screenWidth, float screenHeight, int rotation) {
        // 默认是支持列表的第0个DeviceProfile
        DeviceProfile bestMatch = supportedProfiles.get(0);
        float minDiff = Float.MAX_VALUE;

		// 查询支持列表 supportedProfiles
		// 决策是否匹配的方法是:
		// 通过DeviceProfile support list的x/y和屏幕的x/y分别做绝对值,绝对值越小,越认为是匹配的
		// 如果相等,就根据rotationHint参数查看是否一致
        for (DeviceProfile profile : supportedProfiles) {
            profile.dump("Lucas-DeviceProfile", new PrintWriter(System.out, true));
            float diff = Math.abs(profile.widthPx - screenWidth)
                    + Math.abs(profile.heightPx - screenHeight);
            if (diff < minDiff) {
                minDiff = diff;
                bestMatch = profile;
            } else if (diff == minDiff && profile.rotationHint == rotation) {
                bestMatch = profile;
            }
        }
        return bestMatch;
    }
那么supportedProfiles是怎么来的呢?
正如前面所言: InvariantDeviceProfile单例已经被实例化!
必然会进入InvariantDeviceProfile实例化的流程(进入构造函数)!
private InvariantDeviceProfile(Context context) {
        String gridName = getCurrentGridName(context);
        // 初始化网格initGrid
        String newGridName = initGrid(context, gridName);
        if (!newGridName.equals(gridName)) {
            Utilities.getPrefs(context).edit().putString(KEY_IDP_GRID_NAME, newGridName).apply();
        }
        //... ...
    }
紧接着看initGrid方法
 private void initGrid(Context context, Info displayInfo, DisplayOption displayOption,
            @DeviceType int deviceType) {
            //... ...
            final List<DeviceProfile> localSupportedProfiles = new ArrayList<>();
     		// 通过DisplayController.Info获取到支持的supportedBounds,然后轮询
            for (WindowBounds bounds : displayInfo.supportedBounds) {
                Log.d("Lucas-"+TAG, "supported Bounds = " + bounds.toString());
                // 利用构建者模式, 将DeviceProfile对象根据bounds信息进行实例化。
                // 注意传入的参数InvariantDeviceProfile为 this, 也就是InvariantDeviceProfile单例本身
                localSupportedProfiles.add(new DeviceProfile.Builder(context, this, displayInfo)
                        .setUseTwoPanels(deviceType == TYPE_MULTI_DISPLAY)
                        .setWindowBounds(bounds)
                        .build());
            }
            // 将支持列表localSupportedProfiles固定住,成为只读的常量supportedProfiles
        	supportedProfiles = Collections.unmodifiableList(localSupportedProfiles);
supportedProfiles就是根据displayInfo支持的supportedBounds列表来获取的,而displayInfo的获取又是从WMS中获取,在本文中不过于深究。
而在我们设备上supportedBounds如下:
# adb shell dumpsys activity com.android.launcher3/com.android.searchlauncher.SearchLauncher |  grep  supportedBounds
supportedBounds={
WindowBounds{bounds=Rect(0, 0 - 720, 1280), insets=Rect(0, 48 - 0, 96), availableSize=Point(720, 1136)}, WindowBounds{bounds=Rect(0, 0 - 1280, 720), insets=Rect(0, 48 - 96, 0), availableSize=Point(1184, 672)}, WindowBounds{bounds=Rect(0, 0 - 1280, 720), insets=Rect(96, 48 - 0, 0), availableSize=Point(1184, 672)}
}
而DeviceProfile的具体信息是如何构建出来的呢?包含哪些呢?
可以将DeviceProfile理解为构建者模型类(model),参数属性自给自足。
public class DeviceProfile {

    /** TODO: Once we fully migrate to staged split, remove "isMultiWindowMode" */
    DeviceProfile(Context context, InvariantDeviceProfile inv, Info info, WindowBounds windowBounds,
            boolean isMultiWindowMode, boolean transposeLayoutWithOrientation,
            boolean useTwoPanels, boolean isGestureMode) {
    ... ...
    }

    public static class Builder {
        private Context mContext;
        private InvariantDeviceProfile mInv;
        private Info mInfo;

        public Builder(Context context, InvariantDeviceProfile inv, Info info) {
            mContext = context;
            mInv = inv;
            mInfo = info;
        }

        public Builder setWindowBounds(WindowBounds bounds) {
            mWindowBounds = bounds;
            return this;
        }
   }
而InvariantDeviceProfile是DeviceProfile的初始的实例,也是唯一的/被固定的类。
public InvariantDeviceProfile(Context context, Display display) {
        // Ensure that the main device profile is initialized
        INSTANCE.get(context);
        String gridName = getCurrentGridName(context);

        // Get the display info based on default display and interpolate it to existing display
        Info defaultInfo = DisplayController.INSTANCE.get(context).getInfo();
        @DeviceType int defaultDeviceType = getDeviceType(defaultInfo);
        Log.d("Lucas-InvariantDeviceProfile", " gridName = " + gridName + ", defaultDeviceType=" + defaultDeviceType);
        // 默认显示屏的defaultDeviceType
        // 非常重要的方法:invDistWeightedInterpolate
        DisplayOption defaultDisplayOption = invDistWeightedInterpolate(
                defaultInfo,
                getPredefinedDeviceProfiles(context, gridName, defaultDeviceType,
                        /*allowDisabledGrid=*/false),
                defaultDeviceType);

        Info myInfo = new Info(context, display);
		// ....
}
这个过程有很多判断显示屏相关的判断,在此不做过多研究。
不管哪个屏,最终都要调用invDistWeightedInterpolate
``invDistWeightedInterpolate`是非常重要的方法,字面意思理解就是:
inv         Dist    Weighted   Interpolate
Invariant   平方根      加权      插值
根据平方根的加权算法筛选出特定的InvariantDeviceProfile来,并返回DisplayOption。
    private static DisplayOption invDistWeightedInterpolate(
            Info displayInfo, ArrayList<DisplayOption> points, @DeviceType int deviceType) {
		//... ...
		// 根据supportedBounds计算出最小的长和宽
        for (WindowBounds bounds : displayInfo.supportedBounds) {

        }
        float width = dpiFromPx(minWidthPx, displayInfo.getDensityDpi());
        float height = dpiFromPx(minHeightPx, displayInfo.getDensityDpi());

        // Sort the profiles based on the closeness to the device size
        // 根据平方根计算,挑选出最接近屏幕比例的points配置,依次排序
        Collections.sort(points, (a, b) ->
                Float.compare(dist(width, height, a.minWidthDps, a.minHeightDps),
                        dist(width, height, b.minWidthDps, b.minHeightDps)));

		// 获取多余面积最小的DisplayOption,也就是closestPoint
        DisplayOption closestPoint = points.get(0);
        GridOption closestOption = closestPoint.grid;
        float weights = 0;

        if (dist(width, height, closestPoint.minWidthDps, closestPoint.minHeightDps) == 0) {
            return closestPoint;
        }

        //... ...

        return out;
    }
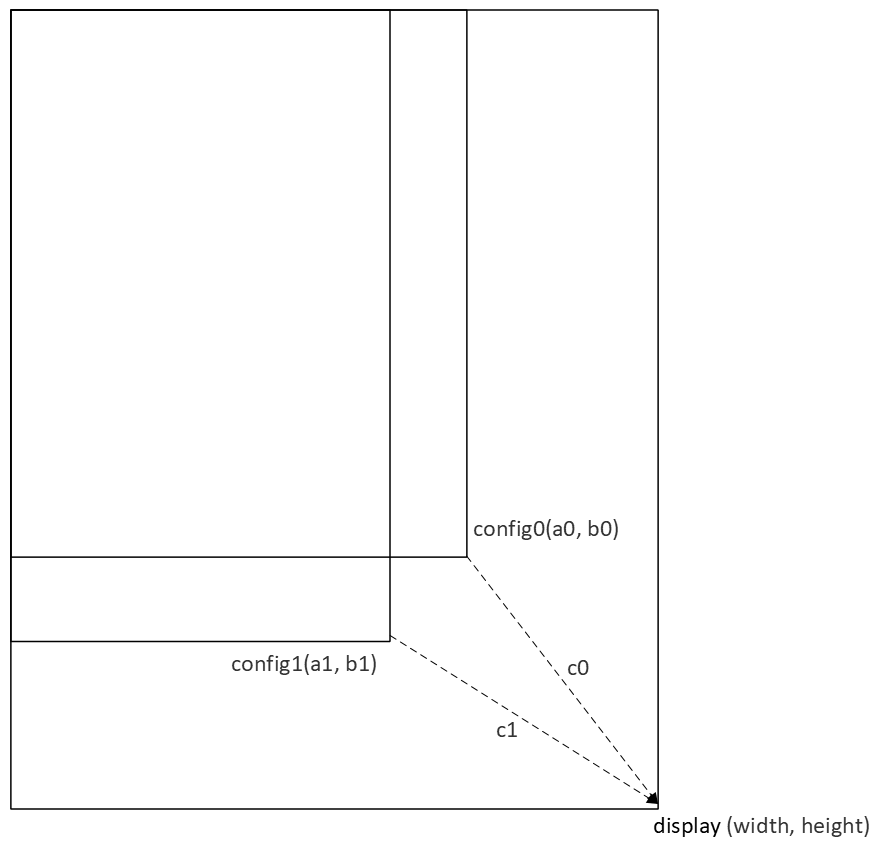
dist函数是啥功能?
private static float dist(float x0, float y0, float x1, float y1) {
	return (float) Math.hypot(x1 - x0, y1 - y0);
}

Math.hypot是平方和开根号的含义,其实就是勾股定理,比如:
Math.hypot(3,4)=5.0

所以,dist含义就是求a点和b点之间的距离。
屏幕长和宽 与 profile中的长和宽 进行减法,并取长和宽的斜边,将这个斜边最小的profile组合挑选出来。
其实可以理解为想要挑选:最接近屏幕比例/ 多余面积最小/ 可以铺满屏幕的组合。
而points的输入又是啥?
 DisplayOption defaultDisplayOption = invDistWeightedInterpolate(
                defaultInfo,
                getPredefinedDeviceProfiles(context, gridName, defaultDeviceType,
                        /*allowDisabledGrid=*/false),
                defaultDeviceType);
也就是getPredefinedDeviceProfiles就是读取写死在配置文件的数据
private static ArrayList<DisplayOption> getPredefinedDeviceProfiles(Context context,
            String gridName, @DeviceType int deviceType, boolean allowDisabledGrid) {
        ArrayList<DisplayOption> profiles = new ArrayList<>();
        // 读取device_profiles.xml
        try (XmlResourceParser parser = context.getResources().getXml(R.xml.device_profiles)) {
            final int depth = parser.getDepth();
            int type;
            while (((type = parser.next()) != XmlPullParser.END_TAG ||
                    parser.getDepth() > depth) && type != XmlPullParser.END_DOCUMENT) {
                // 读取"grid-option"这个tag的信息
                if ((type == XmlPullParser.START_TAG)
                        && GridOption.TAG_NAME.equals(parser.getName())) {
							// 再解析出“display-option”这个tag的信息
                            if ((type == XmlPullParser.START_TAG) && "display-option".equals(
                                    parser.getName())) {
                                profiles.add(new DisplayOption(gridOption, context,
                                        Xml.asAttributeSet(parser)));
            }
        } catch (IOException | XmlPullParserException e) {
            throw new RuntimeException(e);
        }
读取device_profiles.xml配置文件中的tag name为“display-option”
发现最合适的display-option在这个grid-option下面,于是决定用name="4_by_4"这个配置。
 <grid-option
        launcher:name="4_by_4"
        launcher:numRows="4"
        launcher:numColumns="4"
        launcher:numFolderRows="3"
        launcher:numFolderColumns="4"
        launcher:numHotseatIcons="4"
        launcher:dbFile="launcher_4_by_4.db"
        launcher:defaultLayoutId="@xml/default_workspace_4x4"
        launcher:defaultLayoutIdWlan="@xml/default_workspace_4x4_wlan"
        launcher:deviceCategory="phone|multi_display" >
        <display-option
            launcher:name="Short Stubby"
            launcher:minWidthDps="275"
            launcher:minHeightDps="420"
            launcher:iconImageSize="48"
            launcher:iconTextSize="13.0"
            launcher:allAppsBorderSpace="16"
            launcher:allAppsCellHeight="104"
            launcher:canBeDefault="true" />

        <display-option
            launcher:name="Stubby"
            launcher:minWidthDps="255"
            launcher:minHeightDps="450"
            launcher:iconImageSize="48"
            launcher:iconTextSize="13.0"
            launcher:allAppsBorderSpace="16"
            launcher:allAppsCellHeight="104"
            launcher:canBeDefault="true" />

        <display-option
            launcher:name="Nexus S"
            launcher:minWidthDps="296"
            launcher:minHeightDps="491.33"
            launcher:iconImageSize="48"
            launcher:iconTextSize="13.0"
            launcher:allAppsBorderSpace="16"
            launcher:allAppsCellHeight="104"
            launcher:canBeDefault="true" />

        <display-option
            launcher:name="Nexus 4"
            launcher:minWidthDps="359"
            launcher:minHeightDps="567"
            launcher:iconImageSize="54"
            launcher:iconTextSize="13.0"
            launcher:allAppsBorderSpace="16"
            launcher:allAppsCellHeight="104"
            launcher:canBeDefault="true" />

        <display-option
            launcher:name="Nexus 5"
            launcher:minWidthDps="335"
            launcher:minHeightDps="567"
            launcher:iconImageSize="54"
            launcher:iconTextSize="13.0"
            launcher:allAppsBorderSpace="16"
            launcher:allAppsCellHeight="104"
            launcher:canBeDefault="true" />

    </grid-option>
可以理解为:
grid-option: 图标选择app的摆放个数,比如 4*4 表示横竖各4个appdisplay-option: 固定app摆放个数之后,设定一些默认的图标显示参数,比如图标之间的间距/图标文本字体大小/图标和文字之间间距
总结:
- 先获取屏幕的
(width, height) - 从
device_profiles.xml解析出invDistWeightedInterpolate输入的points(minWidthDps, minHeightDps) - 从xml配置中,找出可以将屏幕填充最为饱满的
display-option - 根据平方根加权算法,挑选出使用最优解的
grid-option和display-option的布局部署
查看了一下我设备中的配置打印如下:
06-25 04:52:42.875 D/Lucas-InvariantDeviceProfile-initGrid( 3641):  gridName = 4_by_4
06-25 04:52:42.888 D/Lucas-InvariantDeviceProfile-initGrid( 3641):  allOptions[0]=Short Stubby
06-25 04:52:42.888 D/Lucas-InvariantDeviceProfile-initGrid( 3641):  allOptions[1]=Stubby
06-25 04:52:42.888 D/Lucas-InvariantDeviceProfile-initGrid( 3641):  allOptions[2]=Nexus S
06-25 04:52:42.888 D/Lucas-InvariantDeviceProfile-initGrid( 3641):  allOptions[3]=Nexus 4
06-25 04:52:42.888 D/Lucas-InvariantDeviceProfile-initGrid( 3641):  allOptions[4]=Nexus 5
06-25 04:52:42.889 D/Lucas-InvariantDeviceProfile-invDistWeightedInterpolate( 3641):  closestPoint = Nexus 5
最终选择了
grid-option: "4_by_4"
diplay-opion: "Nexus 5"
defaultLayoutId:"@xml/default_workspace_4x4"
xml源代码如下:
    <grid-option
        launcher:name="4_by_4"
        launcher:numRows="4"
        launcher:numColumns="4"
        launcher:numFolderRows="3"
        launcher:numFolderColumns="4"
        launcher:numHotseatIcons="4"
        launcher:dbFile="launcher_4_by_4.db"
        launcher:defaultLayoutId="@xml/default_workspace_4x4"
        launcher:deviceCategory="phone|multi_display" >

    <display-option
            launcher:name="Nexus 5"
            launcher:minWidthDps="335"
            launcher:minHeightDps="567"
            launcher:iconImageSize="54"
            launcher:iconTextSize="13.0"
            launcher:allAppsBorderSpace="16"
            launcher:allAppsCellHeight="104"
            launcher:canBeDefault="true" />
记住这个defaultLayoutId = default_workspace_4x4, 后面会用到。
加载插件化布局
以上说的是Launcher3默认布局方式,代码是写死在了device_profiles.xml和default_workspace_4x4.xml中的。
谷歌设计的时候,还提供了额外几种方法:
- 从
provider配置app限制列表 - 从
google play下载系统应用配置(可以认为就是第三方应用) - 从系统镜像中查找系统应用的配置
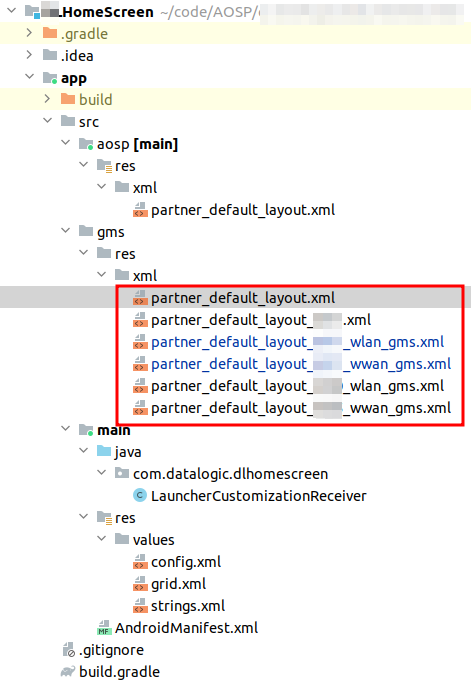
我们接下来要说的就是第三种方法,可以在我们源码中找到样式代码。
vendor/partner_gms/apps/GmsSampleIntegration/
写这个插件化的应用,可以简单认为需要满足3个条件:
AndroidManifest.xml配置actions- 定义广播
Receiver类,空实现 - 配置
partner_default_layout.xml资源文件
接下来讲解一下这种方式的原理:
Launcher.java
    protected void onCreate(Bundle savedInstanceState) {
        //...
        LauncherAppState app = LauncherAppState.getInstance(this);
                    mOldConfig = new Configuration(getResources().getConfiguration());
                    mModel = app.getModel();
        //LauncherModel调用addCallbacksAndLoad去加载默认布局
        if (!mModel.addCallbacksAndLoad(this)) {
            if (!internalStateHandled) {
                Log.d(BAD_STATE, "Launcher onCreate not binding sync, prevent drawing");
                // If we are not binding synchronously, pause drawing until initial bind complete,
                // so that the system could continue to show the device loading prompt
                mOnInitialBindListener = Boolean.FALSE::booleanValue;
            }
        }
    }
LauncherAppState.java
    public LauncherAppState(Context context, @Nullable String iconCacheFileName) {
        mContext = context;
		//...
        mModel = new LauncherModel(context, this, mIconCache, new AppFilter(mContext),
                iconCacheFileName != null);
        //...
    }
LauncherModel.java
addCallbacksAndLoad
    public boolean addCallbacksAndLoad(Callbacks callbacks) {
        synchronized (mLock) {
            addCallbacks(callbacks);
            return startLoader(new Callbacks[] { callbacks });
        }
    }
startLoader.java
    /**
     * Starts the loader. Tries to bind {@params synchronousBindPage} synchronously if possible.
     * @return true if the page could be bound synchronously.
     */
private boolean startLoader(Callbacks[] newCallbacks) {
                    mLoaderTask = new LoaderTask(
                            mApp, mBgAllAppsList, mBgDataModel, mModelDelegate, loaderResults);
                    // Always post the loader task, instead of running directly
                    // (even on same thread) so that we exit any nested synchronized blocks
                    MODEL_EXECUTOR.post(mLoaderTask);

    }
LoaderTask.java
LoaderTask是一个实现Runnable的类,可以执行频繁IO操作。
    public void run() {
     	try {
                loadWorkspace(allShortcuts, memoryLogger);
            } finally {
                Trace.endSection();
            }
    }
loadWorkspace
    protected void loadWorkspace(
            List<ShortcutInfo> allDeepShortcuts,
            Uri contentUri,
            String selection,
            @Nullable LoaderMemoryLogger logger) {
//...
        Log.d(TAG, "loadWorkspace: loading default favorites");
        LauncherSettings.Settings.call(contentResolver,
        LauncherSettings.Settings.METHOD_LOAD_DEFAULT_FAVORITES);
//...
通过发送数据库操作的指令来加载默认的配置。
METHOD_LOAD_DEFAULT_FAVORITES是LauncherProvider.java接受的数据库操作指令
            case LauncherSettings.Settings.METHOD_LOAD_DEFAULT_FAVORITES: {
                loadDefaultFavoritesIfNecessary();
                return null;
            }
最终调用loadDefaultFavoritesIfNecessary方法。
接下来重点来了!
 /**
     * Loads the default workspace based on the following priority scheme:
     *   1) From the app restrictions
     *   2) From a package provided by play store
     *   3) From a partner configuration APK, already in the system image
     *   4) The default configuration for the particular device
     */
    synchronized private void loadDefaultFavoritesIfNecessary() {
        SharedPreferences sp = Utilities.getPrefs(getContext());
        //是否第一次加载数据库
        if (sp.getBoolean(mOpenHelper.getKey(EMPTY_DATABASE_CREATED), false)) {
            Log.d(TAG, "loading default workspace");

            AppWidgetHost widgetHost = mOpenHelper.newLauncherWidgetHost();
            // 1) From the app restrictions
            // Creates workspace loader from an XML resource listed in the app restrictions.
            // 可以通过获取authority = Settings.Secure.getString(ctx.getContentResolver(),"launcher3.layout.provider");
            // 通过这个provider的名字去获取app restrictions list
            AutoInstallsLayout loader = createWorkspaceLoaderFromAppRestriction(widgetHost);

            // 2) From a package provided by play store
            if (loader == null) {
                /** Marker action used to discover a package which defines launcher customization */
                // static final String ACTION_LAUNCHER_CUSTOMIZATION ="android.autoinstalls.config.action.PLAY_AUTO_INSTALL";
                loader = AutoInstallsLayout.get(getContext(),widgetHost, mOpenHelper);
            }

            // 3) From a partner configuration APK, already in the system image
            if (loader == null) {
                    /** Marker action used to discover partner */
                    // private static final String ACTION_PARTNER_CUSTOMIZATION = "com.android.launcher3.action.PARTNER_CUSTOMIZATION";
                final Partner partner = Partner.get(getContext().getPackageManager());
                if (partner != null && partner.hasDefaultLayout()) {
                    final Resources partnerRes = partner.getResources();
                    /*int workspaceResId = partnerRes.getIdentifier(Partner.RES_DEFAULT_LAYOUT,
                            "xml", partner.getPackageName());*/
                    // @MY CUSTOMIZATION
                    final int workspaceResId = getLayoutResId(getContext());
                    // @MY CUSTOMIZATION
                    if (workspaceResId != 0) {
                        loader = new DefaultLayoutParser(getContext(), widgetHost,
                                mOpenHelper, partnerRes, workspaceResId);
                    }
                }
            }

            // 4) The default configuration for the particular device
            final boolean usingExternallyProvidedLayout = loader != null;
            if (loader == null) {
                loader = getDefaultLayoutParser(widgetHost);
            }

            // There might be some partially restored DB items, due to buggy restore logic in
            // previous versions of launcher.
            mOpenHelper.createEmptyDB(mOpenHelper.getWritableDatabase());
            // Populate favorites table with initial favorites
            if ((mOpenHelper.loadFavorites(mOpenHelper.getWritableDatabase(), loader) <= 0)
                    && usingExternallyProvidedLayout) {
                // Unable to load external layout. Cleanup and load the internal layout.
                mOpenHelper.createEmptyDB(mOpenHelper.getWritableDatabase());
                mOpenHelper.loadFavorites(mOpenHelper.getWritableDatabase(),
                        getDefaultLayoutParser(widgetHost));
            }
            clearFlagEmptyDbCreated();
        }
    }
本质上就是查找系统应用中包含"com.android.launcher3.action.PARTNER_CUSTOMIZATION"这个actions的apk。
然后获取他的布局和资源,用于Launcher3去做自己的布局。
接下来重点讲解方法3和方法4。
方法4:The default configuration for the particular device
private DefaultLayoutParser getDefaultLayoutParser(AppWidgetHost widgetHost) {
    InvariantDeviceProfile idp = LauncherAppState.getIDP(getContext());
    // 是否测试状态,否则返回idp.defaultLayoutId
    int defaultLayout = mUseTestWorkspaceLayout
            ? TEST_WORKSPACE_LAYOUT_RES_XML : idp.defaultLayoutId;

    if (getContext().getSystemService(UserManager.class).isDemoUser()
            && idp.demoModeLayoutId != 0) {
        defaultLayout = idp.demoModeLayoutId;
    }

    //这里的defaultLayout恰恰好是上一章节获取到的defaultLayout, 也就是default_workspace_4x4
    return new DefaultLayoutParser(getContext(), widgetHost,
            mOpenHelper, getContext().getResources(), defaultLayout);
}
也就是我们资源配置里面的:
Launcher3/res/xml/default_workspace_4x4.xml
方法3:From a partner configuration APK, already in the system image
if (loader == null) {
    			//系统查找带有ACTION_PARTNER_CUSTOMIZATION这个的系统apk
                final Partner partner = Partner.get(getContext().getPackageManager());
    			// 找到了partner, 并且含有partner_default_layout.xml的资源文件
                if (partner != null && partner.hasDefaultLayout()) {
                    final Resources partnerRes = partner.getResources();
                    /*int workspaceResId = partnerRes.getIdentifier(Partner.RES_DEFAULT_LAYOUT,
                            "xml", partner.getPackageName());*/

                    // 原生行为: 找到partner_default_layout.xml并使用
					// MY CUSTOMIZATION:通过getLayoutResId获取最终初始加载的xml文件
                    // @MY CUSTOMIZATION
                    final int workspaceResId = getLayoutResId(getContext());
                    // @MY CUSTOMIZATION
                    if (workspaceResId != 0) {
                        loader = new DefaultLayoutParser(getContext(), widgetHost,
                                mOpenHelper, partnerRes, workspaceResId);
                    }
                }
            }
方法4优先级肯定低于方法3。所以有方法3的情况下,就不会走方法4。
    /**
     * Find and return partner details, or {@code null} if none exists.
     */
    public static synchronized Partner get(PackageManager pm) {
        Pair<String, Resources> apkInfo = findSystemApk(ACTION_PARTNER_CUSTOMIZATION, pm);
        return apkInfo != null ? new Partner(apkInfo.first, apkInfo.second) : null;
    }
    public static final String RES_DEFAULT_LAYOUT = "partner_default_layout";
    public boolean hasDefaultLayout() {
        int defaultLayout = getResources().getIdentifier(Partner.RES_DEFAULT_LAYOUT,
                "xml", getPackageName());
        return defaultLayout != 0;
    }
自行定制的获取xml的方法
// @MY CUSTOMIZATION
    public static int getLayoutResId(Context ctx) {
        final Partner partner = Partner.get(ctx.getPackageManager());
        if (partner == null) {
            return 0;
        }
		// ...
        final String device = android.os.Build.DEVICE; // `ro.product.device`
        if (!TextUtils.isEmpty(device)) {

        }
		// ...
        final String resourceName = Partner.RES_DEFAULT_LAYOUT;
        final Resources partnerRes = partner.getResources();
        int workspaceResId = partnerRes.getIdentifier(resourceName,
                "xml", partner.getPackageName());
        if (workspaceResId != 0) {
            Log.d(TAG, "layout w/ name `" + resourceName + "` found w/ id #" + workspaceResId);
            return workspaceResId;
        }

        return 0;
    }
    // @MY CUSTOMIZATION
可以自行设计xml资源文件匹配名字,过滤的优先级,比如
- 获取到SKU
- 获取到设备名
- 获取Android版本
- 如果以上都没有,就获取默认的文件名:
partner_default_layout.xml
创建Launcher图标布局的初始数据库:
            // There might be some partially restored DB items, due to buggy restore logic in
            // previous versions of launcher.
            mOpenHelper.createEmptyDB(mOpenHelper.getWritableDatabase());
            // Populate favorites table with initial favorites
            if ((mOpenHelper.loadFavorites(mOpenHelper.getWritableDatabase(), loader) <= 0)
                    && usingExternallyProvidedLayout) {
                // Unable to load external layout. Cleanup and load the internal layout.
                mOpenHelper.createEmptyDB(mOpenHelper.getWritableDatabase());
                mOpenHelper.loadFavorites(mOpenHelper.getWritableDatabase(),
                        getDefaultLayoutParser(widgetHost));
            }
            clearFlagEmptyDbCreated();
mOpenHelper.loadFavorites
—> mOpenHelper.loadLayout
        @Thunk int loadFavorites(SQLiteDatabase db, AutoInstallsLayout loader) {
            // TODO: Use multiple loaders with fall-back and transaction.
            int count = loader.loadLayout(db, new IntArray());

            // Ensure that the max ids are initialized
            // 获取数据库最大的数据量
            mMaxItemId = initializeMaxItemId(db);
            return count;
        }
本质上是调用了AutoInstallsLayout.java的loadLayout方法
    /**
     * Loads the layout in the db and returns the number of entries added on the desktop.
     */
    public int loadLayout(SQLiteDatabase db, IntArray screenIds) {
        mDb = db;
        try {
            return parseLayout(mInitialLayoutSupplier.get(), screenIds);
        } catch (Exception e) {
            Log.e(TAG, "Error parsing layout: ", e);
            return -1;
        }
    }
parseLayout就是遍历xml配置里面的所有项目:
/**
     * Parses the layout and returns the number of elements added on the homescreen.
     */
    protected int parseLayout(XmlPullParser parser, IntArray screenIds)
            throws XmlPullParserException, IOException {
        Log.e("Lucas-"+TAG, "start parseLayout ... mRootTag=" + mRootTag);
        beginDocument(parser, mRootTag);
        final int depth = parser.getDepth();
        int type;
        // Lucas: get the default ElementsMap
        ArrayMap<String, TagParser> tagParserMap = getLayoutElementsMap();
        int count = 0;

        while (((type = parser.next()) != XmlPullParser.END_TAG ||
                parser.getDepth() > depth) && type != XmlPullParser.END_DOCUMENT) {
            if (type != XmlPullParser.START_TAG) {
                continue;
            }
            count += parseAndAddNode(parser, tagParserMap, screenIds);
        }
        return count;
    }
- parser就是xml文件配置项
tagParserMap就是xml文件配置map映射关系screenIds是一个IntArray数组,用于存储第几个screen
tagParserMap来源于这个方法,对面这里的TAG,查找对应的Parser类
    protected ArrayMap<String, TagParser> getLayoutElementsMap() {
        ArrayMap<String, TagParser> parsers = new ArrayMap<>();
        parsers.put(TAG_APP_ICON, new AppShortcutParser());
        parsers.put(TAG_AUTO_INSTALL, new AutoInstallParser());
        parsers.put(TAG_FOLDER, new FolderParser());
        parsers.put(TAG_APPWIDGET, new PendingWidgetParser());
        parsers.put(TAG_SEARCH_WIDGET, new SearchWidgetParser());
        parsers.put(TAG_SHORTCUT, new ShortcutParser(mSourceRes));
        return parsers;
    }
接着调用的是parseAndAddNode,用于解析xml的元素,并布局图标内容
/**
     * Parses the current node and returns the number of elements added.
     */
    protected int parseAndAddNode(
            XmlPullParser parser, ArrayMap<String, TagParser> tagParserMap, IntArray screenIds)
            throws XmlPullParserException, IOException {
        Log.e("Lucas-"+TAG, "start parseAndAddNode ... ");

        // 如果是“include”的标签名,则会递归调用parseLayout
        if (TAG_INCLUDE.equals(parser.getName())) {
            final int resId = getAttributeResourceValue(parser, ATTR_WORKSPACE, 0);
            if (resId != 0) {
                // recursively load some more favorites, why not?
                return parseLayout(mSourceRes.getXml(resId), screenIds);
            } else {
                return 0;
            }
        }

        mValues.clear();
        parseContainerAndScreen(parser, mTemp);
        final int container = mTemp[0];
        final int screenId = mTemp[1];

        // default key set
        mValues.put(Favorites.CONTAINER, container);
        mValues.put(Favorites.SCREEN, screenId);

        mValues.put(Favorites.CELLX,
                convertToDistanceFromEnd(getAttributeValue(parser, ATTR_X), mColumnCount));
        mValues.put(Favorites.CELLY,
                convertToDistanceFromEnd(getAttributeValue(parser, ATTR_Y), mRowCount));

        //获取对应的TagParser
        Log.d(TAG, "Lucas-parser.getName(): " + parser.getName());
        TagParser tagParser = tagParserMap.get(parser.getName());

        if (tagParser == null) {
            if (LOGD) Log.d(TAG, "Ignoring unknown element tag: " + parser.getName());
            return 0;
        }
        // 调用对应类型的TagParser.parseAndAdd
        int newElementId = tagParser.parseAndAdd(parser);
        if (newElementId >= 0) {
            // Keep track of the set of screens which need to be added to the db.
            if (!screenIds.contains(screenId) &&
                    container == Favorites.CONTAINER_DESKTOP) {
                screenIds.add(screenId);
            }
            return 1;
        }
        return 0;
    }
TagParser有以下类型
/**
* App shortcuts: required attributes packageName and className
*/
AppShortcutParser

/**
* AutoInstall: required attributes packageName and className
*/
AutoInstallParser

/**
* Folder
*/
FolderParser

/**
* AppWidget parser: Required attributes packageName, className, spanX and spanY.
* Options child nodes: <extra key=... value=... />
* It adds a pending widget which allows the widget to come later. If there are extras, those
* are passed to widget options during bind.
* The config activity for the widget (if present) is not shown, so any optional configurations
* should be passed as extras and the widget should support reading these widget options.
*/
PendingWidgetParser

/**
* Search bar
*/
SearchWidgetParser

/**
* Parses a web shortcut. Required attributes url, icon, title
*/
ShortcutParser
解析布局和保存数据库
遍历的每一个元素,都会调用其parseAndAdd方法,
    protected interface TagParser {
        /**
         * Parses the tag and adds to the db
         * @return the id of the row added or -1;
         */
        // parseAndAdd不仅会解析xml元素,还会将元素插入到db数据库中
        int parseAndAdd(XmlPullParser parser)
                throws XmlPullParserException, IOException;
    }
从本地抓取的日志可以看出调用了9下parseAndAddNode, 也就是有这样9个元素,
从HomeScreen中partner_default_layout_xxxx_wlan_gms.xml证实,确实有9个元素(folder只能算是1个元素)。
也就是说获取一个元素,就会执行一下parseAndAddNode。
而每次解析xml,是怎么保存到数据库中的呢?
接下来以AppShortcutParser和FolderParser为例:
AppShortcutParser
protected class AppShortcutParser implements TagParser {

        @Override
        public int parseAndAdd(XmlPullParser parser) {
            final String packageName = getAttributeValue(parser, ATTR_PACKAGE_NAME);
            final String className = getAttributeValue(parser, ATTR_CLASS_NAME);

            if (!TextUtils.isEmpty(packageName) && !TextUtils.isEmpty(className)) {
                ActivityInfo info;
                try {
                    ComponentName cn;
                    try {
                        cn = new ComponentName(packageName, className);
                        info = mPackageManager.getActivityInfo(cn, 0);
                    } catch (PackageManager.NameNotFoundException nnfe) {
                        String[] packages = mPackageManager.currentToCanonicalPackageNames(
                                new String[]{packageName});
                        cn = new ComponentName(packages[0], className);
                        info = mPackageManager.getActivityInfo(cn, 0);
                    }
                    final Intent intent = new Intent(Intent.ACTION_MAIN, null)
                            .addCategory(Intent.CATEGORY_LAUNCHER)
                            .setComponent(cn)
                            .setFlags(Intent.FLAG_ACTIVITY_NEW_TASK
                                    | Intent.FLAG_ACTIVITY_RESET_TASK_IF_NEEDED);
                    //将intent传入并保存数据库,用于启动activity的时候传值
                    return addShortcut(info.loadLabel(mPackageManager).toString(),
                            intent, Favorites.ITEM_TYPE_APPLICATION);
                } catch (PackageManager.NameNotFoundException e) {
                    Log.e(TAG, "Favorite not found: " + packageName + "/" + className);
                }
                return -1;
            } else {
                return invalidPackageOrClass(parser);
            }
        }

    protected int addShortcut(String title, Intent intent, int type) {
        int id = mCallback.generateNewItemId();
        mValues.put(Favorites.INTENT, intent.toUri(0));
        mValues.put(Favorites.TITLE, title);
        mValues.put(Favorites.ITEM_TYPE, type);
        mValues.put(Favorites.SPANX, 1);
        mValues.put(Favorites.SPANY, 1);
        mValues.put(Favorites._ID, id);
        if (mCallback.insertAndCheck(mDb, mValues) < 0) {
            return -1;
        } else {
            return id;
        }
    }
会回调DatabaseHelper实现了LayoutParserCallback的insertAndCheck方法
    @Override
    public int insertAndCheck(SQLiteDatabase db, ContentValues values) {
            return dbInsertAndCheck(this, db, Favorites.TABLE_NAME, null, values);
    }

    @Thunk static int dbInsertAndCheck(DatabaseHelper helper,
            SQLiteDatabase db, String table, String nullColumnHack, ContentValues values) {
        if (values == null) {
            throw new RuntimeException("Error: attempting to insert null values");
        }
        if (!values.containsKey(LauncherSettings.Favorites._ID)) {
            throw new RuntimeException("Error: attempting to add item without specifying an id");
        }
        helper.checkId(values);
        return (int) db.insert(table, nullColumnHack, values);
    }
db.insert(table, nullColumnHack, values)就是将数据写入db数据库。
同理,FolderParser也大差不差:
protected class FolderParser implements TagParser {
        private final ArrayMap<String, TagParser> mFolderElements;

        // 调用getFolderElementsMap获取folder的TagParser map
        public FolderParser() {
            this(getFolderElementsMap());
        }

        public FolderParser(ArrayMap<String, TagParser> elements) {
            mFolderElements = elements;
        }

        @Override
        public int parseAndAdd(XmlPullParser parser)
                throws XmlPullParserException, IOException {
            final String title;
            final int titleResId = getAttributeResourceValue(parser, ATTR_TITLE, 0);
            if (titleResId != 0) {
                title = mSourceRes.getString(titleResId);
            } else {
                String titleText = getAttributeValue(parser, ATTR_TITLE_TEXT);
                title = TextUtils.isEmpty(titleText) ? "" : titleText;
            }

            mValues.put(Favorites.TITLE, title);
            mValues.put(Favorites.ITEM_TYPE, Favorites.ITEM_TYPE_FOLDER);
            mValues.put(Favorites.SPANX, 1);
            mValues.put(Favorites.SPANY, 1);
            mValues.put(Favorites._ID, mCallback.generateNewItemId());
            // 在这里写入mValues键值对的数据(文件夹)
            int folderId = mCallback.insertAndCheck(mDb, mValues);
            if (folderId < 0) {
                if (LOGD) Log.e(TAG, "Unable to add folder");
                return -1;
            }

            final ContentValues myValues = new ContentValues(mValues);
            IntArray folderItems = new IntArray();

            int type;
            int folderDepth = parser.getDepth();
            int rank = 0;
             // 针对与文件夹中的每一个项目, 遍历轮询写入folder
            while ((type = parser.next()) != XmlPullParser.END_TAG ||
                    parser.getDepth() > folderDepth) {
                if (type != XmlPullParser.START_TAG) {
                    continue;
                }
                mValues.clear();
                mValues.put(Favorites.CONTAINER, folderId);
                mValues.put(Favorites.RANK, rank);
                // 获取文件元素属于哪个TagParser
                TagParser tagParser = mFolderElements.get(parser.getName());
                if (tagParser != null) {
                    // 再次调用对应TagParser的parseAndAdd方法
                    final int id = tagParser.parseAndAdd(parser);
                    if (id >= 0) {
                        folderItems.add(id);
                        rank++;
                    }
                } else {
                    throw new RuntimeException("Invalid folder item " + parser.getName());
                }
            }

            int addedId = folderId;

            // 如果某个文件夹元素小于2(0,1个), 就会解散该文件夹
            // We can only have folders with >= 2 items, so we need to remove the
            // folder and clean up if less than 2 items were included, or some
            // failed to add, and less than 2 were actually added
            if (folderItems.size() < 2) {
                // Delete the folder
                Uri uri = Favorites.getContentUri(folderId);
                SqlArguments args = new SqlArguments(uri, null, null);
                mDb.delete(args.table, args.where, args.args);
                addedId = -1;

                // 如果某个文件夹元素等于1, 就会将该app图标放在文件夹所在的位置
                // If we have a single item, promote it to where the folder
                // would have been.
                if (folderItems.size() == 1) {
                    final ContentValues childValues = new ContentValues();
                    copyInteger(myValues, childValues, Favorites.CONTAINER);
                    copyInteger(myValues, childValues, Favorites.SCREEN);
                    copyInteger(myValues, childValues, Favorites.CELLX);
                    copyInteger(myValues, childValues, Favorites.CELLY);

                    addedId = folderItems.get(0);
                    mDb.update(Favorites.TABLE_NAME, childValues,
                            Favorites._ID + "=" + addedId, null);
                }
            }
            return addedId;
        }
    }

    // 仅仅支持AppShortcutParser AutoInstallParser ShortcutParser
    protected ArrayMap<String, TagParser> getFolderElementsMap() {
        ArrayMap<String, TagParser> parsers = new ArrayMap<>();
        parsers.put(TAG_APP_ICON, new AppShortcutParser());
        parsers.put(TAG_AUTO_INSTALL, new AutoInstallParser());
        parsers.put(TAG_SHORTCUT, new ShortcutParser(mSourceRes));
        return parsers;
    }
首次加载完数据,我们取出db数据库
adb pull /data/data/com.android.launcher3/databases/launcher_4_by_4.db ./
内容如下:
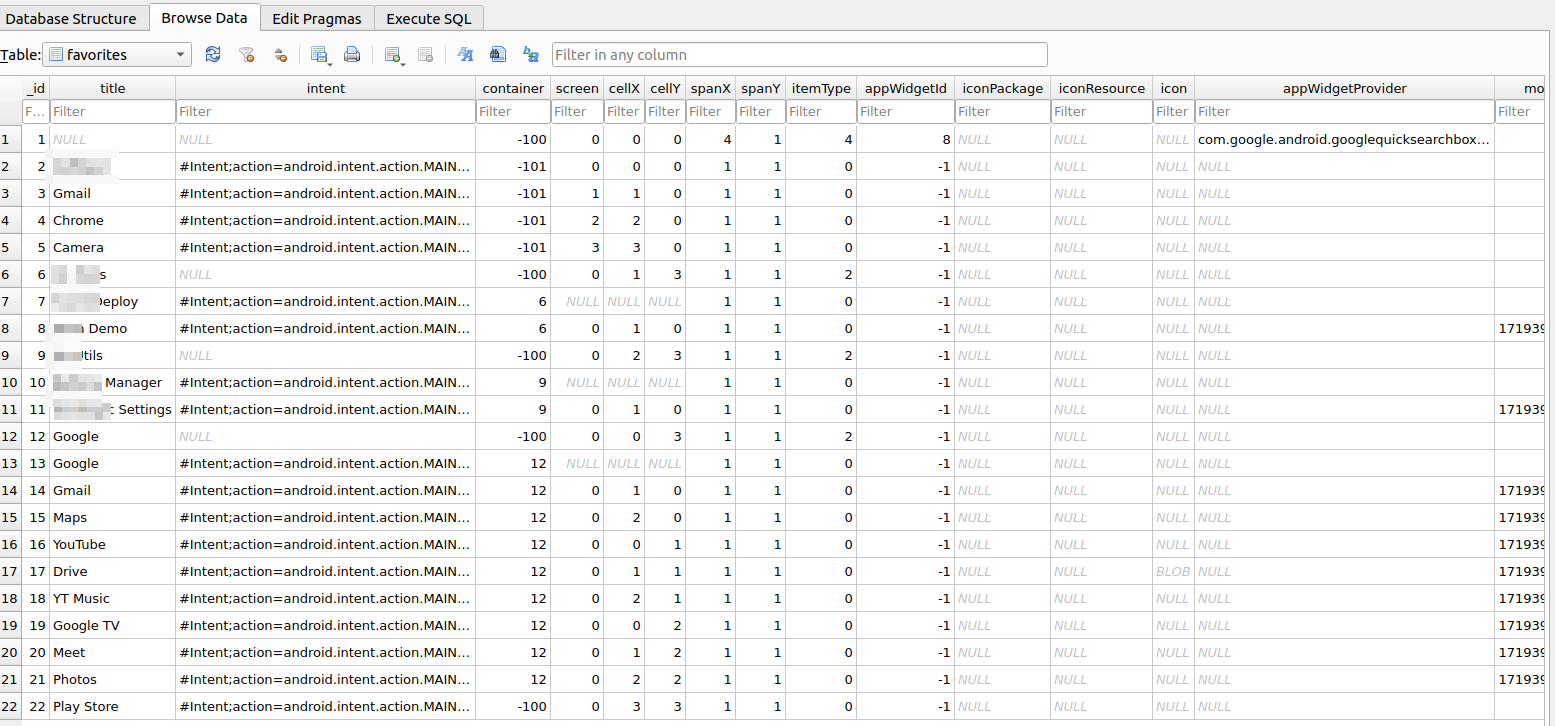
说明我们的数据精准的保存到了文件中。
screen代表第几页屏幕
container=-101,则代表是hotseat
container=-100,则代表是desktop
container=正数,则代表App shortcut
/**
         * The icon is a resource identified by a package name and an integer id.
         */
        public static final int CONTAINER_DESKTOP = -100;
        public static final int CONTAINER_HOTSEAT = -101;
        public static final int CONTAINER_PREDICTION = -102;
        public static final int CONTAINER_WIDGETS_PREDICTION = -111;
        public static final int CONTAINER_HOTSEAT_PREDICTION = -103;
定制布局实现
不管是默认写死xml布局还是插件化定制布局HomeScreen方式,都是局限于首次加载的布局定义。
MY定制的意图,不仅是首次需要加载布局,如果后面安装新的应用,也会先去查询HomeScreen的布局;
-
如果布局中没有app,则添加进去默认布局。
-
如果用户已经移动其他app到该位置,则不会添加。
PackageUpdatedTask.java
识别到新应用安装时,进入此流程
@Override
    public void execute(LauncherAppState app, BgDataModel dataModel, AllAppsList appsList) {

     switch (mOp) {
             // 检测到新应用安装
            case OP_ADD: {
                Log.d("Lucas-"+TAG, "OP_ADD: mAllAppsList=" + Arrays.toString(packages));
                for (int i = 0; i < N; i++) {
                	// @MY CUSTOMIZATION
                    // Check if the app was on the default workspace and add it if found and the space is available.
                    Log.d("Lucas-"+TAG, "start MY CUSTOMIZATION process ...");
                    try {
                        final int workspaceResId = LauncherProvider.getLayoutResId(context);
                        final Partner partner = Partner.get(context.getPackageManager());
                        final Resources partnerRes = partner.getResources();
                        // 添加到主流程
                        if (addIfFoundInLayout(partnerRes.getXml(workspaceResId), packages[i], context, dataModel)) {
                            app.getModel().forceReload();
                        }
                    } catch (Exception e) {
                        Log.e("Lucas-"+TAG, "exception", e);
                    }
                    // @MY CUSTOMIZATION
                }
     }
查找是否存在配置,并添加
// @MY CUSTOMIZATION
    private boolean addIfFoundInLayout(XmlPullParser parser, String packageName, Context context, BgDataModel dataModel)
        throws XmlPullParserException, IOException {
        Log.d("Lucas-"+TAG, "addIfFoundInLayout: packageName=" + packageName);
        beginDocument(parser, "favorites");
        final int depth = parser.getDepth();
        int type;

        while (((type = parser.next()) != XmlPullParser.END_TAG ||
                parser.getDepth() > depth) && type != XmlPullParser.END_DOCUMENT) {
            if (type != XmlPullParser.START_TAG) {
                continue;
            }
            // 解析并添加
            if (parseAndAddIfFound(parser, packageName, context, dataModel)) {
                return true;
            }
        }

        return false;
    }

    private boolean parseAndAddIfFound(XmlPullParser parser, String packageName, Context context, BgDataModel dataModel)
        throws XmlPullParserException, IOException {
        Log.d("Lucas-"+TAG, "parseAndAddIfFound: packageName=" + packageName);
        int screenId = Integer.parseInt(getAttributeValue(parser, "screen"));
        int cellX = Integer.parseInt(convertToDistanceFromEnd(getAttributeValue(parser, "x"),
                LauncherAppState.getIDP(context).numColumns));
        int cellY = Integer.parseInt(convertToDistanceFromEnd(getAttributeValue(parser, "y"),
                LauncherAppState.getIDP(context).numRows));

        if (parser.getName().equals("favorite")) {
            String testPackageName = getAttributeValue(parser, "packageName");
            if (testPackageName.equals(packageName)) {
                String className = getAttributeValue(parser, "className");
                String strContainer = getAttributeValue(parser, "container");
                int container = strContainer != null ? Integer.parseInt(strContainer) : Favorites.CONTAINER_DESKTOP;

                // 真正意义上的添加item到桌面
                addItem(context, screenId, container, cellX, cellY, packageName, className, 0, mUser);
                return true;
            }
        } else if (parser.getName().equals("folder")) {
            int type;
            final int folderDepth = parser.getDepth();
            int rank = -1;
            while ((type = parser.next()) != XmlPullParser.END_TAG ||
                    parser.getDepth() > folderDepth) {
                if (type != XmlPullParser.START_TAG) {
                    continue;
                }

                if (parser.getName().equals("favorite")) {
                    String testPackageName = getAttributeValue(parser, "packageName");
                    if (testPackageName.equals(packageName)) {
                        for (int i = 0; i < dataModel.folders.size(); i++) {
                            FolderInfo folderInfo = dataModel.folders.valueAt(i);
                            if (folderInfo.screenId == screenId && folderInfo.cellX == cellX && folderInfo.cellY == cellY) {
                                String className = getAttributeValue(parser, "className");

                                addItem(context, screenId, dataModel.folders.keyAt(i), cellX, cellY, packageName, className, rank, mUser);
                                return true;
                            }
                        }
                    }
                }

                rank++;
            }
        }

        return false;
    }

    private static void addItem(Context context, int screenId, int container, int cellX, int cellY, String packageName, String className, int rank, UserHandle user) {
        LauncherAppState app = LauncherAppState.getInstance(context);
        ArrayList<Pair<ItemInfo, Object>> installQueue = new ArrayList<>();
        List<LauncherActivityInfo> activities = context.getSystemService(LauncherApps.class).
                getActivityList(packageName, user);
        if (activities.size() > 0) {
            LauncherActivityInfo launcherActivityInfo = activities.get(0);
            WorkspaceItemInfo workspaceItemInfo = new WorkspaceItemInfo();
            workspaceItemInfo.container = container;
            workspaceItemInfo.screenId = screenId;
            workspaceItemInfo.cellX = cellX;
            workspaceItemInfo.cellY = cellY;
            workspaceItemInfo.rank = rank;
            workspaceItemInfo.user = user;
            workspaceItemInfo.bitmap = app.getIconCache().getDefaultIcon(user);
            workspaceItemInfo.title = Utilities.trim(launcherActivityInfo.getLabel());
            workspaceItemInfo.contentDescription = app.getContext().getPackageManager()
                    .getUserBadgedLabel(launcherActivityInfo.getLabel(), user);
            workspaceItemInfo.intent = new Intent(Intent.ACTION_MAIN)
                    .setClassName(packageName, className);
            workspaceItemInfo.itemType = Favorites.ITEM_TYPE_APPLICATION;
            workspaceItemInfo.status |= WorkspaceItemInfo.FLAG_AUTOINSTALL_ICON;
            installQueue.add(Pair.create(workspaceItemInfo, null));
        }
        // 添加图标到已存在的工作空间
        app.getModel().addAndBindExistingWorkspaceItems(installQueue);
    }
// @MY CUSTOMIZATION
addAndBindExistingWorkspaceItems最终会调用到定制Task的execute方法:
@Override
    public void execute(LauncherAppState app, BgDataModel dataModel, AllAppsList apps) {
        if (mItemList.isEmpty()) {
            return;
        }

        final ArrayList<ItemInfo> addedItemsFinal = new ArrayList<>();
        final IntArray addedWorkspaceScreensFinal = new IntArray();

        synchronized(dataModel) {
            List<ItemInfo> filteredItems = new ArrayList<>();
            for (Pair<ItemInfo, Object> entry : mItemList) {
                ItemInfo item = entry.first;
                if (item.itemType == LauncherSettings.Favorites.ITEM_TYPE_APPLICATION ||
                        item.itemType == LauncherSettings.Favorites.ITEM_TYPE_SHORTCUT) {
                    // Short-circuit this logic if the icon exists somewhere on the workspace
                    if (shortcutExists(dataModel, item.getIntent(), item.user)) {
                        continue;
                    }
                }

                if (item.itemType == LauncherSettings.Favorites.ITEM_TYPE_APPLICATION) {
                    if (item instanceof AppInfo) {
                        item = ((AppInfo) item).makeWorkspaceItem(app.getContext());
                    }
                }
                if (item != null) {
                    filteredItems.add(item);
                }
            }

            InstallSessionHelper packageInstaller =
                    InstallSessionHelper.INSTANCE.get(app.getContext());
            LauncherApps launcherApps = app.getContext().getSystemService(LauncherApps.class);

            for (ItemInfo item : filteredItems) {
                ItemInfo itemInfo;
                if (item instanceof WorkspaceItemInfo || item instanceof FolderInfo ||
                        item instanceof LauncherAppWidgetInfo) {
                    itemInfo = item;
                } else if (item instanceof AppInfo) {
                    itemInfo = ((AppInfo) item).makeWorkspaceItem(app.getContext());
                } else {
                    throw new RuntimeException("Unexpected info type");
                }

                // Add the shortcut to the db
                // 添加图标的核心方法
                getModelWriter().addItemToDatabase(itemInfo,
                        item.container, item.screenId,
                        item.cellX, item.cellY);

                // Save the WorkspaceItemInfo for binding in the workspace
                addedItemsFinal.add(itemInfo);
            }
        }

        if (!addedItemsFinal.isEmpty()) {
            scheduleCallbackTask(new CallbackTask() {
                @Override
                public void execute(Callbacks callbacks) {
                    final ArrayList<ItemInfo> addAnimated = new ArrayList<>();
                    final ArrayList<ItemInfo> addNotAnimated = new ArrayList<>();
                    if (!addedItemsFinal.isEmpty()) {
                        ItemInfo info = addedItemsFinal.get(addedItemsFinal.size() - 1);
                        int lastScreenId = info.screenId;
                        for (ItemInfo i : addedItemsFinal) {
                            if (i.screenId == lastScreenId) {
                                addNotAnimated.add(i);
                            } else {
                                addNotAnimated.add(i);
                            }
                        }
                    }
                    callbacks.bindAppsAdded(addedWorkspaceScreensFinal,
                            addNotAnimated, addAnimated);
                }
            });
        }
    }
图标拖拽布局
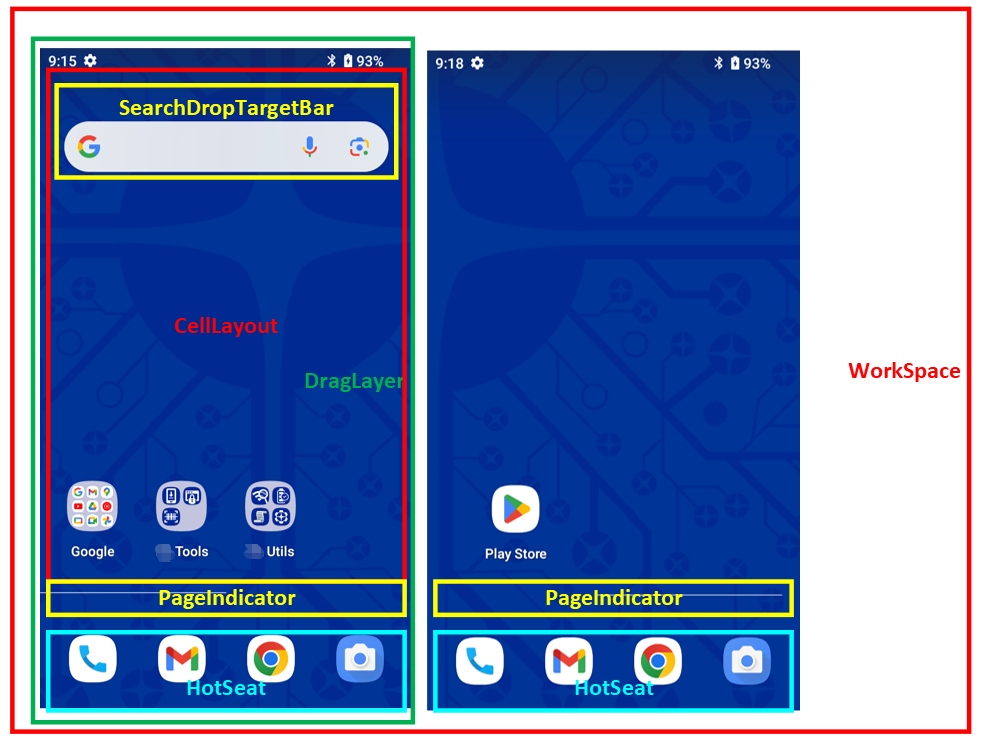
Workspace:主屏幕对应的布局,是直接添加到Launcher.xml中的布局对象CellLayout:主屏幕中的每一页,其父布局就是Workspace,左右滑动屏幕,就是每一个CellLayout的变化过程,这个类中有很多处理拖拽相关方法。ShortcutAndWidgetContainer:装载图标的容器(布局),其父布局是CellLayout。BubbleTextView:launcher中的图标对象(单击、长按图标的实际载体)
-
DragLayer:拖拽图层,最顶层的View对象,其主要功能就是处理滑动事件,以及拖拽对象的动画效果。其子View包含Workspace(主页)、PageIndicatorDots(分页指示器)、AllApp(更多应用界面、上拉弹出的抽屉页)、HotSeat(画面底部常驻图标区)…。具体大家可以查看res/layout/launcher.xml里面的内容,以及DragLayer类方法。 -
DragController:核心拖拽控制器基类,定义很多拖拽相关的公共方法,处理滑动事件等等,其子类重点关注LauncherDragController。 -
DropTarget:拖拽事件接口,在Workspace中有实现这个接口。其包含主要的拖拽事件:onDrop(拖拽结束松手的瞬间触发)、onDragEnter(进入拖拽触发)、onDragOver(拖拽过程中触发)、onDragExit(退出拖拽)。重点需要理解的就是onDragOver以及onDrop。 -
DragObject:DropTarget的内部类,顾名思义这个对象就是“拖拽对象”,其最重要的功能就是封装拖拽过程中的信息(数据结构) -
DragView:BubbTextView的平替(他们携带的信息是一样的),因为BubbTextView的父布局是ShortcutAndWidgetContainer,如果拖拽到另一个ShortcutAndWidgetContainer是不允许的。所以创造了一个DragView来代替BubbTextView,这样拖动过程其实是拽着DragView动(原始的BubbTextView会被隐藏)。 -
DraggableView:定义绘制预览、拖拽预览以及相关动画的接口,BubbleTextView中有相关的实现。 -
DragOptions:定义拖拽过程中的一些状态、行为信息(例如:是否正在拖拽,是否是键盘控制等等)。
查看Workspace:
public class Workspace<T extends View & PageIndicator> extends PagedView<T>
        implements DropTarget, DragSource, View.OnTouchListener,
        DragController.DragListener, Insettable, StateHandler<LauncherState>,
        WorkspaceLayoutManager, LauncherBindableItemsContainer {

}
Workspace实现了 DropTarget ,DragSource, View.OnTouchListener, DragController.DragListener等接口。
如上所述, DropTarget管控着拖拽结束松手一瞬间的所有拖拽事件的生命周期,事件都会分发到Workspace上,所以松手后要处理的逻辑就看这个类。
 @Override
 public void onDrop(final DragObject d, DragOptions options) {
        // ...
 	    if (d.dragSource != this || mDragInfo == null) {
            final int[] touchXY = new int[] { (int) mDragViewVisualCenter[0],
                    (int) mDragViewVisualCenter[1] };
            onDropExternal(touchXY, dropTargetLayout, d);
        }
        // ...
 }
拖动普通图标最终是走onDropExternal
/**
     * Drop an item that didn't originate on one of the workspace screens.
     * It may have come from Launcher (e.g. from all apps or customize), or it may have
     * come from another app altogether.
     *
     * NOTE: This can also be called when we are outside of a drag event, when we want
     * to add an item to one of the workspace screens.
     */
    private void onDropExternal(final int[] touchXY, final CellLayout cellLayout, DragObject d) {
        if (d.dragInfo instanceof PendingAddShortcutInfo) {
        	// ...
        	//在将项目添加到屏幕之前将其添加到数据库可确保容器和信息的其他值得到正确更新。
            // Add the item to DB before adding to screen ensures that the container and other
            // values of the info is properly updated.
            Log.d("Lucas-"+TAG, "-----onDropExternal--------");
            mLauncher.getModelWriter().addOrMoveItemInDatabase(info, container, screenId,
                    mTargetCell[0], mTargetCell[1]);

            addInScreen(view, container, screenId, mTargetCell[0], mTargetCell[1],
                    info.spanX, info.spanY);
            cellLayout.onDropChild(view);
            cellLayout.getShortcutsAndWidgets().measureChild(view);
            // ...

     }
如何更新数据库呢?
mLauncher.getModelWriter().addOrMoveItemInDatabase(info, container, screenId,
                    mTargetCell[0], mTargetCell[1]);
getModelWriter拿到的是ModelWriter, 并调用addOrMoveItemInDatabase进行处理数据库。
addOrMoveItemInDatabase总方法
    /**
     * Adds an item to the DB if it was not created previously, or move it to a new
     * <container, screen, cellX, cellY>
     */
     // 传入的数据分别为:
     // 项目数据信息ItemInfo,
     // item所在的容器ID,
     // 容器所在的页ID,
     // 所在页的坐标X / Y
    public void addOrMoveItemInDatabase(ItemInfo item,
            int container, int screenId, int cellX, int cellY) {
        Log.d(TAG, "-----addOrMoveItemInDatabase--------container="+container
        +", screenId=" +screenId
        +", cellX=" + cellX
        +", cellY=" + cellY);
        if (item.id == ItemInfo.NO_ID) {
            // From all apps
            addItemToDatabase(item, container, screenId, cellX, cellY);
        } else {
            // From somewhere else
            moveItemInDatabase(item, container, screenId, cellX, cellY);
        }
    }
-
新增图标就是调用
addOrMoveItemInDatabase -
移动图标就是调用
moveItemInDatabase
addItemToDatabase
/**
     * Add an item to the database in a specified container. Sets the container, screen, cellX and
     * cellY fields of the item. Also assigns an ID to the item.
     */
    public void addItemToDatabase(final ItemInfo item,
            int container, int screenId, int cellX, int cellY) {
        // ...
        // 使用消息METHOD_NEW_ITEM_ID用于在数据库里面创建新的id
        item.id = Settings.call(cr, Settings.METHOD_NEW_ITEM_ID).getInt(Settings.EXTRA_VALUE);
        // ...
        //使用线程池专门处理db数据
        MODEL_EXECUTOR.execute(() -> {
            // Write the item on background thread, as some properties might have been updated in
            // the background.
            // 默认数据的准备工作
            final ContentWriter writer = new ContentWriter(mContext);
            item.onAddToDatabase(writer);
            writer.put(Favorites._ID, item.id);

            // 真正插入数据到数据库的方法
            cr.insert(Favorites.CONTENT_URI, writer.getValues(mContext));

            synchronized (mBgDataModel) {
                checkItemInfoLocked(item.id, item, stackTrace);
                mBgDataModel.addItem(mContext, item, true);
                verifier.verifyModel();
            }
        });
        // ...
    }
moveItemInDatabase
    /**
     * Move an item in the DB to a new <container, screen, cellX, cellY>
     */
    public void moveItemInDatabase(final ItemInfo item,
            int container, int screenId, int cellX, int cellY) {
        updateItemInfoProps(item, container, screenId, cellX, cellY);
        notifyItemModified(item);

        // 使用enqueueDeleteRunnable线程池专门处理db数据变动
        enqueueDeleteRunnable(new UpdateItemRunnable(item, () ->
                new ContentWriter(mContext)
                        .put(Favorites.CONTAINER, item.container)
                        .put(Favorites.CELLX, item.cellX)
                        .put(Favorites.CELLY, item.cellY)
                        .put(Favorites.RANK, item.rank)
                        .put(Favorites.SCREEN, item.screenId)));
    }
最后啰嗦几句
- Launcher的布局还算是简单好理解的,核心就是MVP模式。
- Android系统源码扩展性比较好,把握完整流程,再根据定制需求扣细节即可。


 1199
1199

 被折叠的 条评论
为什么被折叠?
被折叠的 条评论
为什么被折叠?
 到【灌水乐园】发言


